
Overview of Text as an Image Mask
Text as an image mask is a powerful technique in Adobe InDesign that allows you to creatively blend text and images together. By using text as a mask, you can manipulate the appearance of an image to fit seamlessly within the contours and shapes of your text.
This technique is widely used in graphic design, advertising, and editorial layouts to add visual interest, convey messages creatively, and create unique design elements. By applying a text mask to an image, you can create stunning effects such as text filled with an image pattern, text that is made up of images, or images that seamlessly blend into text.
The process involves placing the image and text in separate layers in InDesign, and then using the “Text Wrap” feature to apply the text as a mask to the image layer. The text acts as a transparent layer that selectively reveals or hides portions of the image, creating the desired effect.
One of the great advantages of using text as an image mask is the flexibility it offers. You can easily edit the text and image independently, allowing for quick changes and experimentation. By adjusting the size, font, and position of the text, as well as the placement and size of the image, you have full control over how the text and image interact.
Whether you’re a graphic designer, a marketer, or an aspiring artist, understanding how to use text as an image mask in Adobe InDesign can greatly enhance your design skills and open up new creative possibilities.
In the following sections, we will guide you through the process of creating a new document in InDesign, inserting and formatting text, importing images, applying the text as an image mask, and adding the finishing touches to your design.
Creating a New Document in Adobe InDesign
Before you can begin using text as an image mask in Adobe InDesign, you need to create a new document to work on. Follow these steps to get started:
- Launch Adobe InDesign and select “File” from the top menu bar.
- Choose “New” and a new window will appear.
- In the “New Document” window, you can set the page size, orientation, and number of pages for your document.
- Specify the desired measurements and units for your document. You can choose from predefined sizes or enter custom dimensions.
- Decide on the number of columns and margin sizes for your layout, or you can keep the default settings.
- Select the desired settings for bleed and slug (optional).
- Choose the appropriate color mode for your document. For print projects, CMYK is generally used, while RGB is commonly used for digital projects.
- Click on the “Create” button to generate your new document.
Once you have created your new document, you will see the blank canvas where you can start designing your layout. InDesign provides a wide range of tools and features to help you arrange elements, add text and images, and apply various effects to your design.
It’s important to ensure that you set up your document with the correct specifications right from the beginning, as it can be time-consuming to make changes to the document settings later. Consider the purpose and target audience of your design project when deciding on the page size, orientation, and color mode.
Whether you are creating a brochure, magazine layout, or any other type of design project, creating a new document in Adobe InDesign is the first step in bringing your ideas to life. With a well-designed and properly set up document, you’ll have a solid foundation to unleash your creativity and effectively utilize the text as an image mask technique.
Inserting and Formatting Text in InDesign
Once you have created a new document in Adobe InDesign, you can start inserting and formatting text. Follow these steps to add text to your design:
- Select the “Type Tool” from the toolbar on the left side of the InDesign interface.
- Click and drag on the canvas to create a text frame, which will define the area where the text will appear.
- Type or paste the desired text into the text frame. You can also import text from external sources such as Word documents or text files.
- To format the text, select the text frame or individual text within the frame.
- Use the options in the “Character” and “Paragraph” panels to modify the font, size, color, alignment, spacing, and other formatting attributes of the text. Alternatively, you can use the top menu bar to access the formatting options.
- You can also apply character and paragraph styles to maintain consistency and make it easier to update the formatting across the entire document.
- Experiment with different font combinations, sizes, and styles to achieve the desired aesthetic and readability for your text.
In addition to basic text formatting, InDesign offers advanced typographic controls that allow you to fine-tune the appearance of your text. You can adjust kerning (spacing between individual characters), tracking (spacing between all characters), and leading (spacing between lines of text) to achieve ideal visual balance.
When formatting text for use as an image mask, consider the size and style of the text in relation to the image. Opt for larger, bolder fonts or unique typefaces that can create striking visual effects when applied as a mask.
Remember to pay attention to legibility and readability when formatting text in InDesign. Ensure that the chosen font and size are suitable for the intended purpose and target audience of your design.
By inserting and formatting text in Adobe InDesign, you can add informative and visually appealing text elements to your design. The flexibility and control offered by InDesign’s text tools allow you to seamlessly integrate text with other design elements, readying it for the next step in the process – applying the text as an image mask.
Importing an Image into your InDesign Document
Adding images to your design is an essential part of creating compelling visuals in Adobe InDesign. Follow these steps to import an image into your InDesign document:
- Select the “Rectangle Frame Tool” from the toolbar or press ‘F’ on your keyboard.
- Click and drag on the canvas to create a rectangular frame where you want the image to appear.
- Go to the top menu bar and select “File” > “Place” or use the shortcut ‘Ctrl+D’ (Windows) or ‘Cmd+D’ (Mac).
- Navigate to the location where your image file is stored and select it.
- Click on the “Open” button to place the image into the selected frame.
- Resize or reposition the image within the frame as needed by clicking and dragging the control handles.
- To maintain the aspect ratio of the image while resizing, hold the ‘Shift’ key.
InDesign supports a variety of image file formats, including JPEG, PNG, and TIFF. It’s important to use high-quality images to ensure sharpness and clarity in your design.
Keep in mind that the size and resolution of your image should be appropriate for the intended output. Higher resolution images are required for print projects, while lower resolution images are suitable for digital designs.
In addition to individual images, you can also use image placeholders or image links to keep your InDesign file size manageable when working with a large number of images. This allows you to import low-resolution versions of the images and replace them with high-resolution versions before final output.
Importing images into your InDesign document allows you to bring visual elements into your design and combine them with text and other design elements seamlessly. With the image in place, you are now ready to apply the text as an image mask to create engaging and integrated designs.
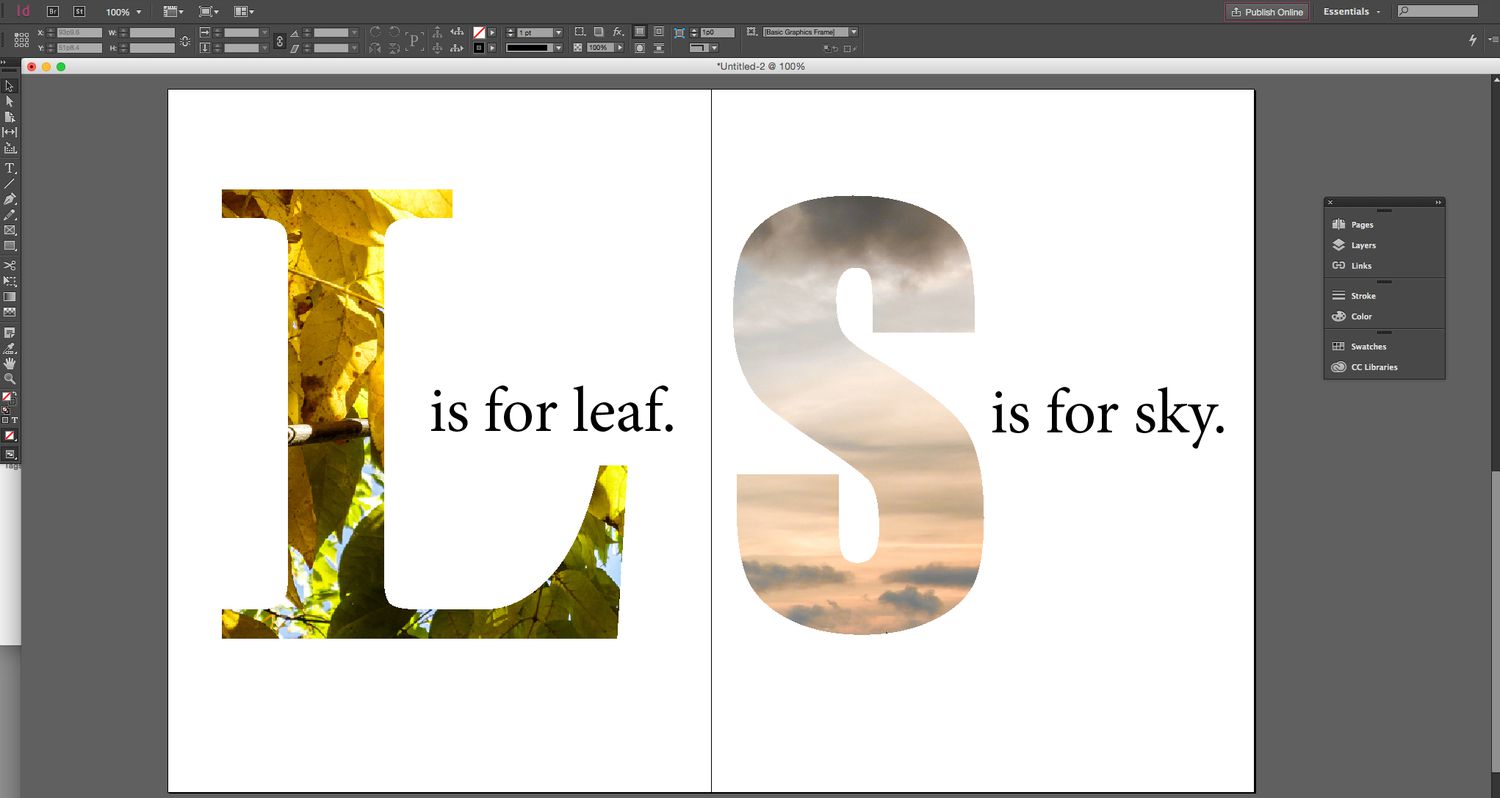
Applying the Text as an Image Mask
Now that you have inserted an image into your Adobe InDesign document, you can proceed to apply the text as an image mask. This technique allows you to creatively blend the text and image together. Follow these steps to apply the text as an image mask:
- Select the text frame that contains the text you want to use as the image mask.
- Go to the top menu bar and choose “Object” > “Text Frame Options”.
- In the “Text Frame Options” dialog box, check the “Ignore Text Wrap” option and click “OK”. This ensures that the text frame does not interfere with the image mask.
- Select the image that you want to apply the text mask to.
- Go to the top menu bar and choose “Object” > “Effects” > “Transparency”. Alternatively, you can use the shortcut ‘Ctrl+Shift+F10’ (Windows) or ‘Cmd+Shift+F10’ (Mac).
- In the “Transparency” panel, check the “Clip” option. This tells InDesign to use the text as an image mask.
- Click on the small menu icon in the top-right corner of the “Transparency” panel and choose “Isolate Blending”. This ensures that the text mask only affects the selected image.
By applying the text as an image mask, you can achieve amazing effects like images seamlessly fading into text or text filled with intricate image patterns. Experiment with different fonts, text sizes, and image placements to achieve the desired visual impact.
Remember that the text you are using as the image mask needs to be within a text frame for it to work effectively. You can resize, reposition, or edit the text and image independently of each other to fine-tune the effect.
Once you have successfully applied the text as an image mask, you can further refine the placement and appearance of the text and image to create a cohesive and visually appealing design.
Now that you have learned how to apply the text as an image mask, let’s move on to the next step, which involves adjusting the text and image placement to fine-tune your design.
Adjusting the Text and Image Placement
Once you have applied the text as an image mask in Adobe InDesign, you can start fine-tuning the placement of both the text and the image to achieve the desired visual effect. Follow these steps to adjust the text and image placement:
- Select the text frame and the image that are being used for the mask.
- Click and drag the text frame or image to reposition them within your InDesign document. You can place them anywhere on the canvas.
- Use the control handles that appear around the text frame or image to resize them if necessary.
- Experiment with different placements to find the most visually appealing arrangement. Consider factors such as the composition, balance, and overall design aesthetic.
- Make sure the text and image are effectively integrated and that the important elements of the image are not hidden by the text.
- Adjust the text size, font, or layout if needed to enhance the overall visual impact.
As you adjust the placement, keep in mind the purpose and context of your design. The placement should support the message or concept you’re trying to convey. For example, if the text is showcasing a product, ensure the image is placed in a way that highlights the product’s key features.
Remember to maintain a balance between the text and the image. Avoid overcrowding the design with excessive text or burying the image beneath heavy text elements.
In addition, make sure the text remains legible and readable, even when placed over the image. Consider using contrasting colors or adjusting the transparency of the text to ensure it stands out against the image background.
By adjusting the text and image placement, you can create a visually striking design that seamlessly combines the two elements. Take the time to experiment and iterate until you achieve the desired composition and impact.
Now that you have fine-tuned the placement of the text and image, it’s time to move on to the next step – editing the text and image mask to further enhance your design.
Editing the Text and Image Mask
After adjusting the placement of the text and image in your Adobe InDesign document, you can proceed to edit and refine both elements to enhance your design. Follow these steps to edit the text and image mask:
- Select the text frame that contains the text you want to edit. You can click inside the frame and make changes directly, such as modifying the wording, adjusting the font, or changing the color.
- To further customize the text, use the “Character” and “Paragraph” panels or the top menu bar to make adjustments. Experiment with different font sizes, styles, and formatting options until you achieve the desired look.
- If needed, you can resize the text frame or adjust the positioning to accommodate longer or shorter text.
- To edit the image mask, select the image itself and go to the “Effects” panel or use the top menu bar to access image editing options.
- You can adjust the transparency, brightness, contrast, or apply other effects to the image mask to enhance its visual appeal.
- If you want to make modifications to the shape of the text mask, select the text frame, go to the “Object” menu, and choose “Path” > “Convert to Shape”. This allows you to modify the shape of the text frame using anchor points and Bezier curves.
Editing the text and image mask provides you with the opportunity to fine-tune the overall look and feel of your design. Pay attention to details such as spacing, alignment, and balance between the text and the image.
Experiment with different typography choices and image effects to create a visually captivating design. Consider the concept and desired mood of your project and make adjustments accordingly.
Regularly review your design and seek feedback from others to ensure that the text and image mask work harmoniously together and effectively convey your intended message.
Remember to save your work regularly to avoid any accidental loss of changes. By editing the text and image mask, you can transform your design from a basic composition into a visually stunning and impactful piece of artwork.
Now that you have fine-tuned the text and image mask, it’s time to focus on formatting and styling the text to further enhance the visual impact of your design.
Formatting and Styling the Text
Once you have edited the text and image mask in your Adobe InDesign document, you can now focus on formatting and styling the text to enhance its visual impact. Use the following steps to format and style the text:
- Select the text frame or specific portions of the text you want to format.
- Access the “Character” and “Paragraph” panels or utilize the top menu bar to modify the font, size, color, alignment, and other formatting attributes of the text.
- Experiment with different font combinations to find a style that matches the overall design aesthetic and mood of your project.
- Consider using variations in font size, weight, or style to add visual interest and emphasize important elements of the text.
- Use tracking or kerning adjustments to refine the spacing between individual characters, ensuring optimal legibility and visual balance.
- Apply paragraph formatting, such as indentation or alignment, to create a visually pleasing composition.
- Implement bullet points, numbered lists, or other formatting options to organize information and enhance readability.
- Experiment with text effects, such as drop shadows or outlines, to add depth and make the text stand out against the image mask.
Keep in mind the purpose and context of your design when formatting and styling the text. Choose a style that complements the overall message and target audience of your project.
Ensure that the chosen font and formatting options are readable and legible, even when applied as an image mask. Avoid using overly decorative or complex fonts that may hinder readability or clash with the image behind the text.
Consistency is key. Use paragraph and character styles to maintain a consistent look throughout your design, making it easier to update and maintain in the future.
By formatting and styling the text, you can enhance the visual impact of your design and elevate it to a more professional and polished level. Take the time to experiment with various formatting options until you find a combination that best complements your design concept.
Now that you have formatted and styled the text, let’s explore how to add effects to the image mask to further enhance the visual appeal of your design.
Adding Effects to the Image Mask
With the text and formatting in place, you can now focus on enhancing the image mask in your Adobe InDesign document by adding various effects. Follow these steps to add effects to the image mask:
- Select the image that is being used as the mask.
- Access the “Effects” panel or use the top menu bar to apply different effects to the image.
- Experiment with adjusting the image’s transparency, brightness, contrast, or saturation to create the desired visual effect.
- Consider applying filters and artistic effects to the image, such as blurring, embossing, or adding a textured overlay.
- Add shadows or glows to give the image mask a sense of depth and dimension.
- Utilize gradient or gradient feather effects to create smooth transitions between the image and the surrounding text.
- Explore different blend modes to achieve unique and visually appealing effects when the text and image mask interact.
When adding effects to the image mask, be mindful of the overall design aesthetic and the message you want to convey. The effects should enhance the composition and complement the mood and purpose of your design project.
Consider the readability and legibility of the text when applying effects to the image mask. Ensure that the text remains clear and easy to read against the modified image background.
Remember that less can sometimes be more when it comes to adding effects. Exercise restraint and avoid overloading the design with excessive or distracting effects that may detract from the focal point or message of your composition.
Regularly preview and evaluate the design to ensure that the added effects enhance the overall visual appeal and cohesion of the image mask.
By adding effects to the image mask, you can take your design to the next level by creating captivating visuals that draw the viewer’s attention and effectively convey your intended message.
Now that you’ve learned how to add effects to the image mask, it’s time to explore the final step – exporting and saving your InDesign document.
Exporting and Saving your InDesign Document
After you have completed your design in Adobe InDesign, it’s important to properly export and save your document to ensure that it is ready for sharing, printing, or further editing. Follow these steps to export and save your InDesign document:
- Review your design and make any final adjustments or refinements as needed.
- Ensure that all fonts, images, and linked files used in your document are properly embedded or included.
- Save your InDesign document by selecting “File” > “Save” or using the shortcut ‘Ctrl+S’ (Windows) or ‘Cmd+S’ (Mac).
- Choose a suitable location on your computer or network to save the file, and provide a descriptive name for easy identification.
- To prepare your document for sharing or printing, export it as a PDF file. Select “File” > “Export” or use the shortcut ‘Ctrl+E’ (Windows) or ‘Cmd+E’ (Mac).
- In the Export dialog box, choose the destination folder and specify a name for the PDF file.
- Configure the export settings based on your requirements, such as the page range, compression quality, and security settings.
- Click “Export” to generate the PDF file of your InDesign document.
By exporting your InDesign document as a PDF, you ensure that the final output retains the formatting, images, and fonts exactly as intended, regardless of the viewing environment.
If you need to collaborate with others or further edit the document in the future, it’s important to also save a copy of your InDesign file (.indd) in addition to the exported PDF. This allows you to easily make changes or modifications to your design using Adobe InDesign.
Additionally, maintaining an organized file structure and keeping a backup of your InDesign document and associated assets can provide peace of mind and prevent any potential data loss.
Now that you have exported and saved your InDesign document, you can confidently share, print, or continue working on your design as necessary.
Congratulations on completing the process of using text as an image mask in Adobe InDesign and creating visually compelling designs. With practice and creativity, you can continue to explore and experiment with this technique to produce engaging and unique visual compositions.