
What is Storage Sense?
Storage Sense is a built-in feature in Windows operating systems that offers users an alternative to Disk Cleanup. It is designed to help you manage and free up storage space on your computer by automatically deleting unnecessary files and managing storage settings.
With the ever-increasing amount of data we accumulate on our devices, storage space can quickly become limited. Storage Sense becomes a valuable tool in optimizing disk space and ensuring your computer runs smoothly.
This feature intelligently identifies and targets the files that can safely be removed from your system based on predefined criteria. This includes temporary files, old Windows installation files, system-generated error reports, and more. By removing these unneeded files, you can reclaim valuable space on your hard drive.
Not only does Storage Sense clean up your system, but it also helps manage your storage settings. It can automatically make room for more storage when your device is running low by removing unused temporary files and emptying the recycle bin.
Storage Sense is a user-friendly and efficient way to maintain your computer’s storage space. By automating the process, you no longer have to manually search for and delete unnecessary files, saving you time and effort.
Now that you understand what Storage Sense is and its purpose, let’s dive deeper into how it works and how to configure and use it effectively.
How does Storage Sense work?
Storage Sense utilizes a combination of built-in algorithms and user-defined settings to identify and delete unnecessary files from your system. It runs in the background, periodically scanning your computer for files that can be safely deleted to free up storage space.
When you turn on Storage Sense, it starts by analyzing your device’s storage and categorizing files based on their size and usage. It then targets specific types of files that are safe to remove, such as temporary files, system-generated error logs, recycle bin contents, and files that have been in the Downloads folder for a specified period of time.
By default, Storage Sense runs on a regular basis to automatically clean up your system. However, you have the flexibility to configure when and how often it runs, allowing you to customize the cleanup process according to your needs.
The algorithm behind Storage Sense ensures that it only removes files that are safe to delete and won’t impact your system’s performance. It avoids deleting files that are currently in use or essential for the proper functioning of your operating system or installed applications.
Additionally, Storage Sense is integrated with OneDrive, Microsoft’s cloud storage service. It can help you manage your OneDrive storage by intelligently syncing files and removing local copies when storage space is limited.
Overall, Storage Sense offers a hassle-free solution for keeping your computer clutter-free and optimizing storage space. Its automated cleanup process takes the guesswork out of file management, allowing you to focus on your tasks without worrying about running out of storage.
Turning on Storage Sense
Taking advantage of the storage optimization benefits offered by Storage Sense is simple and straightforward. To turn on Storage Sense in Windows, follow these steps:
- Click on the “Start” button and open the “Settings” app. This can be done by clicking on the gear icon in the Start menu or by pressing “Windows key + I” on your keyboard.
- In the Settings app, click on “System.”
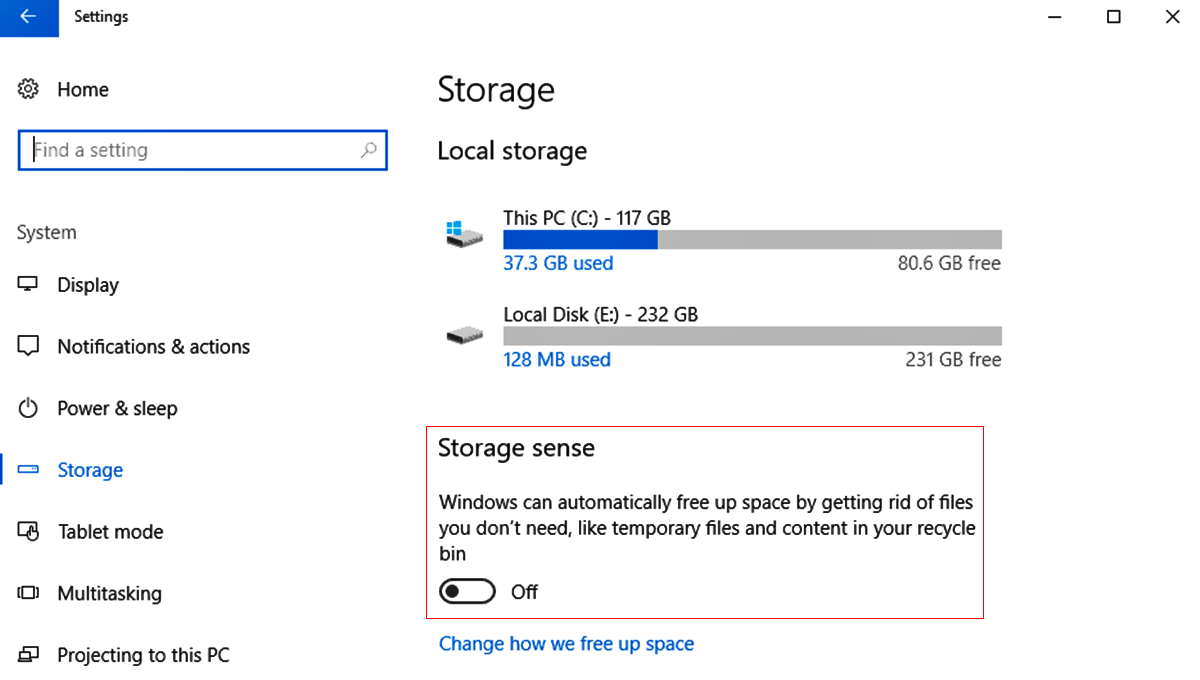
- From the left-hand menu, select “Storage.”
- On the Storage page, you will see a toggle switch labeled “Storage Sense” at the top. Click on the toggle switch to turn on Storage Sense.
- Beneath the toggle switch, you will find options to configure how Storage Sense works. We will explore these options further in the next sections.
Once you have successfully turned on Storage Sense, your computer will start automatically cleaning up unnecessary files and managing your storage settings to keep your device running smoothly and maximize available disk space.
It’s worth noting that Storage Sense will only clean up files based on the criteria you define in the settings, so it’s essential to ensure the right options are enabled to meet your needs. We will delve into the configuration options in the subsequent sections to help you customize Storage Sense according to your preferences.
Now that you have enabled Storage Sense, let’s explore how you can configure it to best suit your storage optimization requirements.
Configuring Storage Sense
Configuring Storage Sense allows you to tailor the storage cleanup process to your specific preferences. To access and modify the Storage Sense settings, follow these steps:
- Open the “Settings” app by clicking on the “Start” button and selecting the gear icon or pressing “Windows key + I”.
- In the Settings app, click on “System” followed by “Storage.”
- Scroll down to the bottom of the Storage page, and under “Storage Sense,” click on “Configure Storage Sense or run it now.”
On the Configuration page, you will find several options to customize how Storage Sense works:
- Run Storage Sense: By default, Storage Sense is scheduled to run every month. However, you can change the frequency to run it daily, weekly, or during low free disk space.
- Delete files in the Downloads folder: Toggle this option to enable or disable the automatic deletion of files that have been in the Downloads folder for a specified number of days.
- Recycle bin: Enable this option to have Storage Sense automatically empty the recycle bin when it runs.
- Temporary Files: Toggle this option to allow Storage Sense to remove temporary files that are no longer being used by applications on your computer.
- Locate and delete files in OneDrive: If you have OneDrive storage, enabling this option allows Storage Sense to automatically manage your OneDrive storage space by removing unnecessary files from your local storage.
Once you have configured the desired settings, click on the “Clean now” button to run Storage Sense immediately, applying the new configurations.
With the ability to specify when Storage Sense runs, what files it targets, and how it manages OneDrive, you can ensure that your storage is optimized precisely as you desire. Regularly reviewing and adjusting these settings will help keep your computer running efficiently and prevent unnecessary accumulation of files.
Now that you have customized Storage Sense according to your preferences, let’s explore how it can help you effectively manage your OneDrive storage.
Managing OneDrive storage with Storage Sense
If you use OneDrive, Microsoft’s cloud storage service, Storage Sense can help you efficiently manage your storage across both local and cloud-based files. Here’s how you can leverage Storage Sense to manage your OneDrive storage:
Sync Files: When Storage Sense is turned on, it can automatically sync your OneDrive files to your local storage. This ensures that you have the most up-to-date version available offline. If you are running low on disk space, Storage Sense may offload some files to the cloud, freeing up valuable storage on your device.
Manage OneDrive Storage: By enabling the “Locate and delete files in OneDrive” option in the Storage Sense settings, you allow Storage Sense to actively monitor and remove unnecessary files stored in your OneDrive folder on your computer. It identifies files that are already synced to the cloud and no longer needed locally, creating more space on your hard drive without compromising important data.
Recycle Bin: When Storage Sense cleans up your system, it also empties the recycle bin. This applies to both local and OneDrive files. It is important to note that files deleted from the recycle bin will be permanently removed and cannot be restored, so it’s wise to review your recycle bin before running Storage Sense if there are any files you wish to keep.
By utilizing Storage Sense in conjunction with OneDrive, you can optimize your storage usage, ensuring that your important files are accessible offline while freeing up space on your local storage.
Now, let’s explore how Storage Sense can help you free up additional storage space by removing temporary files from your system.
Freeing up space with Storage Sense
One of the primary benefits of using Storage Sense is its ability to automatically free up space on your computer. By removing unnecessary and temporary files, you can regain valuable storage capacity. Here are the ways in which Storage Sense helps you free up space:
Removing Temporary Files: Temporary files are created by various applications and can accumulate over time, taking up significant storage space. Storage Sense targets these files and safely deletes them from your system. This includes temporary internet files, system-generated error logs, and more. Removing these temporary files not only frees up space but can also help improve system performance.
Deleting Old Windows Installation Files: When you update your Windows operating system, older installation files are typically left behind as backups. Storage Sense identifies and removes these files, ensuring that you no longer needlessly store outdated installation files, further recovering storage space on your computer.
Cleaning Up Recycle Bin: Storage Sense can automatically empty your recycle bin, permanently deleting any files stored within it. This action helps you reclaim storage space that would otherwise be occupied by deleted files that haven’t been permanently removed.
Managing Downloads Folder: Files in your Downloads folder can quickly accumulate and take up substantial disk space. Storage Sense has the capability to automatically delete files that have been in the Downloads folder for a specific period of time. This ensures that you keep only the essential files and prevent cluttering of your disk space.
By utilizing Storage Sense to free up storage space, you can optimize your computer’s performance, ensure efficient storage utilization, and have more room for the files and applications that matter to you.
Now, let’s explore how Storage Sense can help you manage and clean up temporary files.
Viewing and managing temporary files with Storage Sense
Temporary files are created by various applications and can accumulate over time, taking up valuable storage space on your computer. Storage Sense offers a convenient way to view and manage these temporary files. Here’s how you can do it:
Viewing Temporary Files:
- Open the “Settings” app by clicking on the “Start” button and selecting the gear icon or pressing “Windows key + I”.
- In the Settings app, click on “System” followed by “Storage.”
- Scroll down to the “Temporary files” section and click on it.
You will now see a list of temporary files that are taking up space on your computer, categorized by different types such as temporary internet files, downloaded program files, and more. You can review the files and their sizes to determine which ones you want to delete.
Managing Temporary Files:
- Select the checkboxes next to the types of temporary files you want to delete.
- Click on the “Remove files” button to delete the selected temporary files.
Storage Sense will then proceed to remove the selected temporary files, freeing up storage space on your computer. It’s important to note that Storage Sense only targets files that are safe to delete and won’t impact the functionality or performance of your system or applications.
Regularly managing temporary files with Storage Sense is an efficient way to keep your computer’s storage space optimized and ensure smooth operation. It helps prevent the accumulation of unnecessary files, maintains system performance, and maximizes available disk space.
Next, let’s explore how Storage Sense can help you empty the recycle bin and recover additional storage.
Emptying the recycle bin with Storage Sense
The recycle bin is a temporary storage location on your computer where deleted files are stored before they are permanently removed. Storage Sense offers a convenient way to automatically empty the recycle bin, freeing up additional storage space. Here’s how you can do it:
Automatic Recycle Bin Emptying:
- Open the “Settings” app by clicking on the “Start” button and selecting the gear icon or pressing “Windows key + I”.
- In the Settings app, click on “System” followed by “Storage.”
- Scroll down to the “Storage Sense” section and click on it.
- Beneath the toggle switch, you will find the option “Recycle bin.” Enable this option to allow Storage Sense to automatically empty the recycle bin when it runs.
Once enabled, Storage Sense will regularly scan your recycle bin and permanently delete any files stored within it, thereby releasing the occupied storage space.
Manual Recycle Bin Emptying:
- If you prefer to manually empty the recycle bin without relying on Storage Sense’s automation, you can do so by right-clicking on the recycle bin icon on your desktop.
- From the context menu, select “Empty Recycle Bin” to delete all the files currently stored in the recycle bin.
It’s important to note that once files are permanently removed from the recycle bin, they cannot be recovered. Ensure that you have reviewed the contents of the recycle bin before emptying it manually or enabling automatic emptying with Storage Sense.
By leveraging Storage Sense to empty the recycle bin, you can maintain a clutter-free environment and make better use of your storage space. This feature ensures that deleted files are promptly removed from your system, optimizing disk space for new data and applications.
Next, let’s explore how Storage Sense can help you clean up the Downloads folder and manage the storage location for new content.
Cleaning up the Downloads folder with Storage Sense
The Downloads folder is a common location where files accumulate over time, occupying valuable storage space on your computer. Storage Sense can help you clean up this folder by automatically removing files that have been sitting there for a specified period of time. Here’s how you can use Storage Sense to clean up your Downloads folder:
Automatic Cleanup of Downloads Folder:
- Open the “Settings” app by clicking on the “Start” button and selecting the gear icon or pressing “Windows key + I”.
- In the Settings app, click on “System” followed by “Storage.”
- Scroll down to the “Storage Sense” section and click on it.
- Beneath the toggle switch, you will find the option “Delete files in the Downloads folder that haven’t changed for more than [x] days.”
- Adjust the number of days as per your preference. By default, it is set to 30 days.
Once enabled, Storage Sense will regularly scan your Downloads folder and delete files that haven’t been modified for the specified number of days. This helps keep your Downloads folder clutter-free and prevents it from becoming an unnecessary storage space hog.
Manual Cleanup of Downloads Folder:
- If you prefer to manually clean up your Downloads folder without relying on Storage Sense’s automation, you can do so by opening the File Explorer (Windows key + E) and navigating to your Downloads folder.
- Select the files that you no longer need and either press the delete key on your keyboard or right-click and select “Delete” from the context menu.
Cleaning up your Downloads folder using Storage Sense ensures that you keep your storage optimized and organized. It prevents the buildup of unnecessary files and allows you to find and access important downloads more easily.
Next, let’s explore how Storage Sense can help you change the storage location for new content.
Changing the storage location for new content with Storage Sense
Storage Sense provides the flexibility to change the default storage location for new content, such as apps, documents, pictures, and videos. This feature allows you to control where your files are saved, which can help you manage your storage more effectively. Here’s how you can change the storage location for new content:
Changing the Storage Location:
- Open the “Settings” app by clicking on the “Start” button and selecting the gear icon or pressing “Windows key + I”.
- In the Settings app, click on “System” followed by “Storage.”
- Scroll down to the “Storage Sense” section and click on it.
- Under “More storage settings,” click on the “Change where new content is saved” option.
- You will see various content types such as apps, documents, music, pictures, and videos. Click on each content type and choose the desired storage location from the drop-down menu.
- Once you have selected the preferred storage location for each content type, close the settings window.
From now on, any new content of the selected type will be automatically saved to the allocated storage location. This allows you to separate files based on your preferences, ensuring efficient storage management.
By changing the storage location for new content, you can optimize your storage space based on your specific needs. For example, you can choose to save documents on an external hard drive to free up space on your main system drive.
Now that you have learned how to change the storage location for new content, let’s explore how Storage Sense can be scheduled to run automatically.
Using Storage Sense on a schedule
Storage Sense allows you to automate the storage cleanup process by scheduling it to run at specific intervals. This eliminates the need for manual intervention and ensures that your computer remains optimized without requiring constant monitoring. Here’s how you can use Storage Sense on a schedule:
Configuring Storage Sense Schedule:
- Open the “Settings” app by clicking on the “Start” button and selecting the gear icon or pressing “Windows key + I”.
- In the Settings app, click on “System” followed by “Storage.”
- Scroll down to the “Storage Sense” section and click on it.
- Ensure that the toggle switch for Storage Sense is turned on.
- Click on the link that says “Configure Storage Sense or run it now.”
- Under the “Run Storage Sense” section, choose the frequency at which you want Storage Sense to run: daily, weekly, monthly, or during low free disk space.
- If you select the “During low free disk space” option, you can specify the threshold at which Storage Sense should be triggered to run.
Once you have configured the desired schedule, Storage Sense will automatically clean up your system according to the defined frequency. It will remove unnecessary files, empty the recycle bin, and perform other cleanup tasks to optimize your storage space.
Using Storage Sense on a schedule not only saves you time and effort but also ensures that your system remains clutter-free and performs at its best. It’s a convenient way to maintain an organized and efficient storage environment without having to remember to manually run cleanup tasks.
Next, let’s explore some common issues that you might encounter when using Storage Sense and how to troubleshoot them.
Troubleshooting common issues with Storage Sense
While Storage Sense is a useful feature for managing storage and optimizing disk space, you might encounter some common issues. Here are a few troubleshooting tips to resolve these issues:
Storage Sense not cleaning up files:
- Check if Storage Sense is enabled in the Settings app under “System” > “Storage.” Ensure that the toggle switch for Storage Sense is turned on.
- Verify that the correct settings are configured for deleting temporary files, emptying the recycle bin, and other cleanup actions.
- Manually run Storage Sense by clicking on “Configure Storage Sense or run it now” in the Storage settings to trigger an immediate cleanup.
- Restart your computer and check if Storage Sense starts functioning properly.
Storage Sense not freeing up enough space:
- Review the storage settings and ensure that you have selected the appropriate options for deleting temporary files, emptying the recycle bin, and managing other specific folders.
- Manually clean up your Downloads folder and other folders that might contain large files or unnecessary data.
- Consider adjusting the frequency of Storage Sense to run more frequently, such as daily, to ensure a more regular cleanup.
Storage Sense not syncing with OneDrive:
- Confirm that you have enabled the “Locate and delete files in OneDrive” option in the Storage Sense settings.
- Check your OneDrive settings to ensure that files are being synced properly and that any necessary permissions are granted.
- Restart OneDrive and see if it begins syncing files with Storage Sense.
If these troubleshooting tips do not resolve the issues you’re facing with Storage Sense, you may consider seeking further assistance from Microsoft support or community forums to troubleshoot and resolve the specific problem you’re encountering.
With these troubleshooting techniques, you can ensure that Storage Sense functions as intended, helping you manage storage space effectively and keep your computer running smoothly.