
Understanding Blending Modes in Photoshop
Blending modes in Photoshop are powerful tools that allow you to combine multiple layers and create unique visual effects. They define how pixels from one layer interact with the pixels on the layers below it. Understanding blending modes is essential for any graphic designer or photo editor looking to elevate their skills. In this section, we will explore the different types of blending modes and their applications.
Blending modes in Photoshop can be organized into several categories based on their primary function. These categories include Normal, Darken, Lighten, Contrast, Inversion, Component, and Custom.
The Normal blending mode is the default setting for layers in Photoshop and results in straightforward layer stacking. It maintains the full color and brightness of the pixels in the layer, without any interaction with the layers below.
The Darken blending modes, such as Multiply and Darker Color, compare the pixel values of each layer and choose the darkest pixel. This is useful for blending dark elements or shadows to create depth and richness in your images.
Conversely, the Lighten blending modes, such as Screen and Lighter Color, compare pixel values and choose the lightest pixel. These blending modes are effective for adding highlights and brightening images.
The Contrast blending modes, such as Overlay and Soft Light, enhance the contrast between pixels on different layers. They add depth, intensity, and texture to your images, making them visually appealing.
Inversion blending modes, like Difference and Exclusion, invert the color information of the layers, creating interesting and unique effects. They are commonly used for artistic or creative purposes.
Component blending modes, including Hue, Saturation, and Color, isolate and manipulate specific color properties of layers. These blending modes are frequently used in photo editing to adjust individual color channels.
Photoshop also offers Blend If sliders, which allow you to control blending based on pixel luminosity levels. This provides even more precise control over the blending effect.
Applying blending modes to layers and groups is simple. You can either choose a blending mode from the layer panel or use the keyboard shortcut “Shift+” to cycle through the different blending modes.
To customize blending modes further, you can adjust the opacity and fill values of the layer. Opacity controls the transparency of the layer, while fill determines the transparency without affecting layer styles or effects.
One advanced technique with blending modes is creating gradient maps. By applying a gradient map adjustment layer and changing the blending mode, you can quickly apply color and tonal shifts to your images.
Blending modes in Photoshop unlock endless creative possibilities. Experimenting with different blending modes and their combinations can lead to stunning effects and transformations in your designs or photos. Remember to explore and have fun with these tools to unleash your creativity.
Normal Blending Mode
The Normal blending mode is the default blending mode in Photoshop, and it simply stacks the layers on top of each other without any interaction or blending between them. In this mode, the top layer completely covers the layers below it, obscuring any content underneath.
When working with the Normal blending mode, the pixels in the top layer are completely opaque, and their color and brightness remain unchanged. This means that no blending or transparency occurs between the layers, giving you full control over the appearance of each layer.
This blending mode is useful when you want to preserve the original colors and details of the layers without any modifications. For example, if you have a text layer on top of a background layer, using the Normal blending mode will keep the text fully visible and unaffected by the background layer.
Additionally, the Normal blending mode is often used as a starting point when applying other blending modes and layer effects. By applying various blending modes to additional layers above the base layer using the Normal blending mode, you can create complex and unique visual effects.
It’s important to note that although the Normal blending mode doesn’t incorporate any blending or transparency, it can still interact with layer masks and blending options such as opacity and fill. These features allow you to partially hide or reveal portions of the layer, giving you some flexibility in controlling the visibility of specific areas.
Darken Blending Modes
The Darken blending modes in Photoshop are a group of blending modes that compare the pixel values of multiple layers and select the darkest pixel to create the final composite image. These blending modes are particularly useful when you want to blend dark elements or shadows to add depth and richness to your images.
One of the most commonly used Darken blending modes is Multiply. When you apply Multiply blending mode to a layer, the pixels in that layer are multiplied by the pixels in the layers below. This results in a darker color, as the brightness values are reduced. Multiply blending mode is often used to blend shadows or to simulate the effect of multiple light sources.
Another Darken blending mode is Darker Color. Similar to Multiply, this blending mode selects the darkest pixel from the original pixels and the underlying layers. However, Darker Color does not multiply the pixel values together, resulting in a less intense darkening effect. Darker Color is useful when you want to blend elements but maintain some of the original colors.
The Color Burn blending mode darkens the pixels in a way that emphasizes the underlying colors. It works by decreasing the brightness and increasing the contrast. This blending mode is commonly used to create dramatic and high-contrast effects.
The Linear Burn blending mode combines the darker pixel values from the layers, resulting in a blend that is even darker than Multiply. It produces a more intense darkening effect and is often used to add depth and drama to images.
The Darken blending mode also includes other modes such as Darken, Multiply, and Color Burn. Each one contributes its own unique darkening effect, allowing you to choose the best one for your specific needs.
When using Darken blending modes, it’s important to experiment and adjust the opacity of the layers to fine-tune the blending effect. Lowering the opacity can soften the darkening effect, while increasing it can intensify the blending.
Overall, the Darken blending modes in Photoshop provide valuable tools for blending and darkening elements in your images. Whether you want to add shadows, simulate multiple light sources, or create dramatic effects, these blending modes can help you achieve the desired results.
Lighten Blending Modes
The Lighten blending modes in Photoshop are a group of blending modes that compare the pixel values of multiple layers and select the lightest pixel to create the final composite image. These blending modes are particularly useful when you want to blend bright elements or add highlights to your images.
One of the commonly used Lighten blending modes is Screen. When you apply the Screen blending mode, the pixels in the top layer are screened onto the layers below. This results in a lighter color as the brightness values are increased. Screen blending mode is often used to blend highlights or to simulate the effect of light sources.
Another Lighten blending mode is Lighter Color. Similar to Screen, this blending mode selects the lightest pixel from the original pixels and the underlying layers. Lighter Color does not impact the color saturation or contrast, which makes it suitable for blending elements while preserving their original colors.
The Color Dodge blending mode brightens the pixels by decreasing the contrast and increasing the brightness. It emphasizes the underlying colors, making them more vibrant and intense. Color Dodge is often used to create glowing effects and add more light to an image.
The Linear Dodge blending mode combines the lighter pixel values from the layers, resulting in a blend that is even lighter than Screen. It produces a more intense brightening effect and is often used to add highlights and increase the overall brightness in an image.
The Lighten blending mode also includes other modes such as Lighten, Screen, and Color Dodge. Each one contributes its own unique brightening effect, allowing you to choose the best one for your specific needs.
When using Lighten blending modes, it’s important to experiment and adjust the opacity of the layers to fine-tune the blending effect. Lowering the opacity can soften the brightening effect, while increasing it can intensify the blending.
Overall, the Lighten blending modes in Photoshop provide valuable tools for blending and adding brightness to elements in your images. Whether you want to add highlights, simulate light sources, or create vibrant effects, these blending modes can help you achieve the desired results.
Contrast Blending Modes
The Contrast blending modes in Photoshop are a group of blending modes that enhance the contrast between layers, resulting in visually striking and impactful images. These blending modes are perfect for adding depth, intensity, and texture to your designs or photos.
One commonly used Contrast blending mode is Overlay. When you apply the Overlay blending mode to a layer, it combines both the Multiply and Screen blending modes. This results in an increased contrast and adds a punch to your image. Overlay is often used to enhance texture and give images a more dynamic appearance.
The Soft Light blending mode is another Contrast blending mode that provides a softer and gentler contrast effect compared to Overlay. It subtly darkens or lightens the image, depending on the layer’s contents. Soft Light is often used to add a gentle glow or to create a dreamy and romantic atmosphere in photos.
Another Contrast blending mode is Hard Light. It combines the effects of both Screen and Multiply but with a stronger contrast. Hard Light increases the contrast significantly, resulting in a more intense and dramatic effect. It is often used to add a vibrant and surreal look to images.
Difference blending mode creates a blend by subtracting the pixel values of the top layer from the pixel values of the underlying layers. This creates an inverted, high-contrast effect where areas that are similar in color become neutral or black. Difference is commonly used to create special effects, such as creating interesting patterns or emphasizing differences between layers.
The Contrast blending modes also include modes such as Linear Light, Vivid Light, Pin Light, and Hard Mix. Each mode has its own unique way of enhancing contrast and can be used to achieve different results in your designs or photos.
When using Contrast blending modes, it’s important to experiment with the opacity and fill values of the layers to control the intensity of the effect. Lowering the opacity can create a subtler contrast, while increasing it can intensify the blending.
Overall, the Contrast blending modes in Photoshop offer a range of options to enhance the contrast and add impact to your images. Whether you want to add texture, create a surreal atmosphere, or make your photos stand out, these blending modes provide powerful tools to achieve your desired results.
Inversion Blending Modes
The Inversion blending modes in Photoshop are a group of blending modes that invert the color information of layers, creating unique and interesting effects. These blending modes manipulate the way colors interact between layers and can be used to add a touch of creativity to your designs or photos.
One commonly used Inversion blending mode is Difference. When you apply the Difference blending mode to a layer, it subtracts the pixel values of the top layer from the pixel values of the underlying layers. This results in an inverted color effect where areas that are similar in color become neutral or black. The Difference blending mode is commonly used for artistic purposes or to create special effects.
Exclusion is another blending mode that inverts the colors, similar to Difference, but with a softer and less intense effect. It creates a blend where areas with similar colors become less visible, resulting in a unique and intriguing look. Exclusion blending mode can be used to add a subtle contrast and enhance the colors in your images.
Subtract blending mode subtracts the pixel values of the top layer from the pixel values of the layers below, resulting in a negative or inverted effect. This blending mode is often used for creative purposes, such as creating interesting patterns or emphasizing differences between layers.
These Inversion blending modes, along with others such as Divide and Hard Mix, provide various ways to manipulate color and create visually striking effects. It’s important to experiment with different blending modes and combine them with other adjustment layers to achieve the desired results.
When using Inversion blending modes, you can adjust the opacity and fill values of the layers to control the intensity of the effect. Lowering the opacity can soften the inversion effect, while increasing it can intensify the color inversion.
Overall, the Inversion blending modes in Photoshop offer a range of options to invert color and create unique effects. Whether you want to add a touch of creativity, create special effects, or experiment with color manipulation, these blending modes provide exciting opportunities to enhance your designs or photos.
Component Blending Modes
The Component blending modes in Photoshop are a group of blending modes that manipulate specific color properties of layers. These blending modes provide precise control over hue, saturation, and luminosity, allowing you to adjust and fine-tune the color characteristics of your designs or photos.
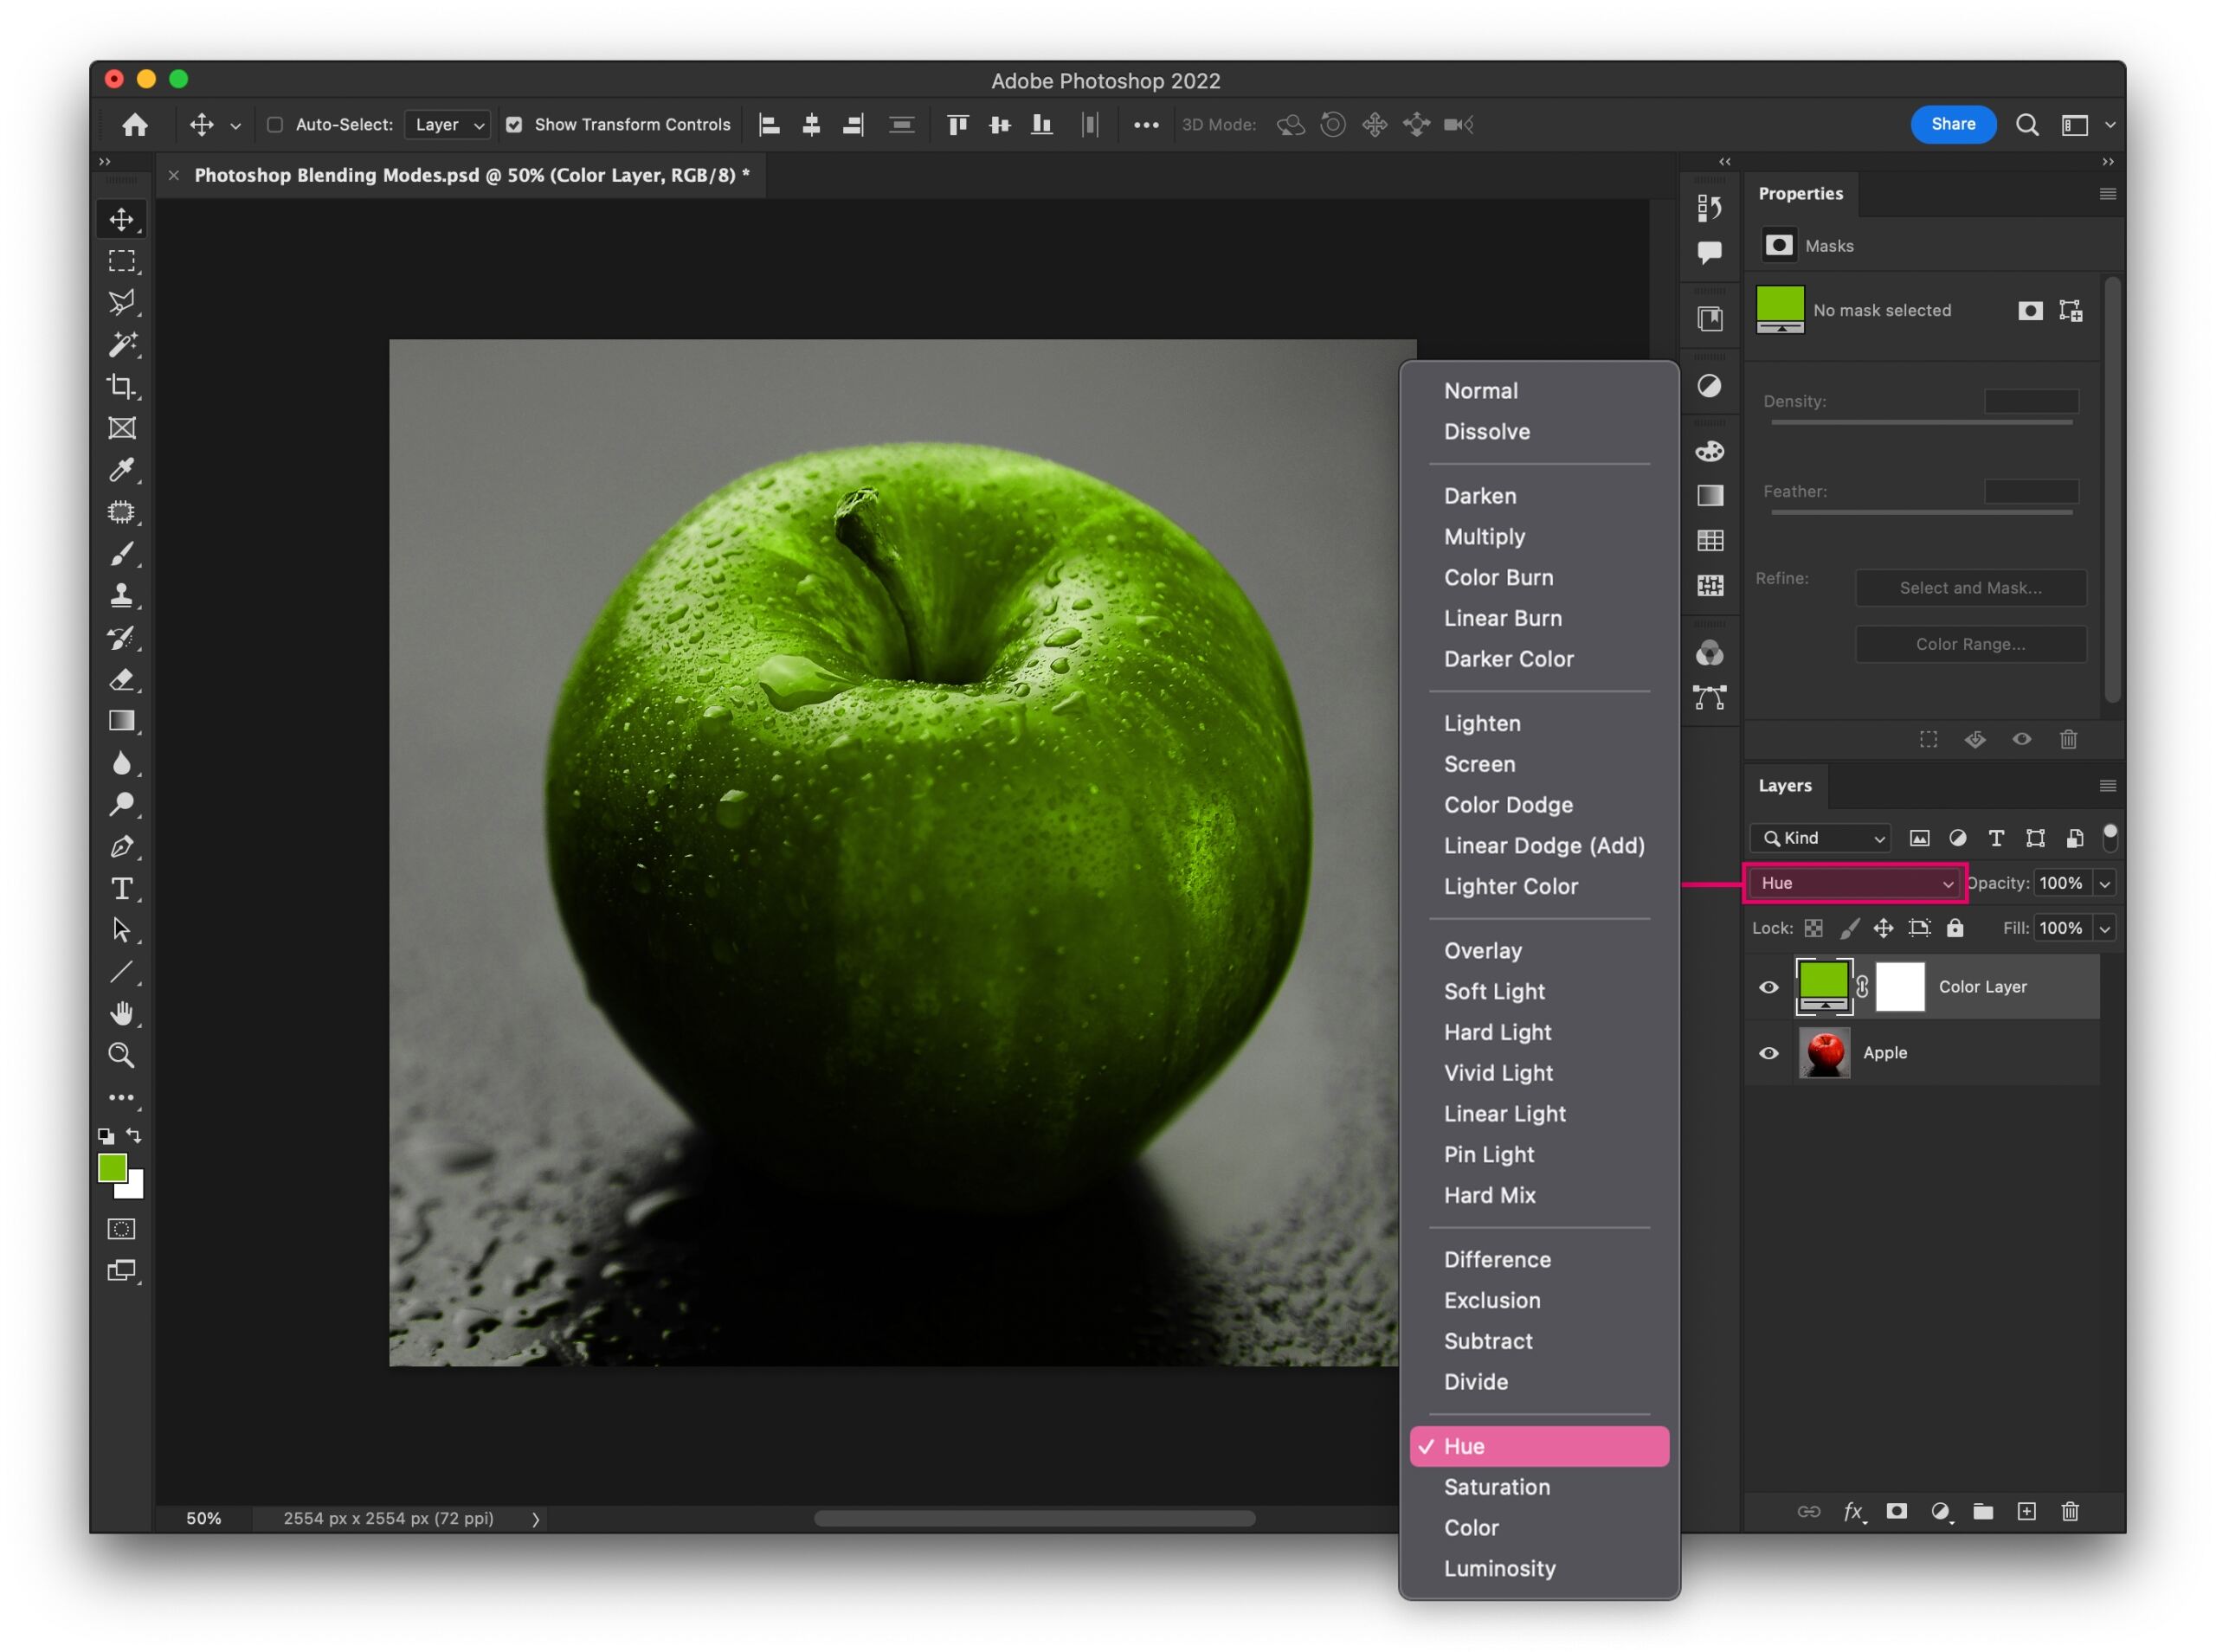
One commonly used Component blending mode is Hue. When you apply the Hue blending mode to a layer, the hue values of the top layer are preserved while adopting the luminosity and saturation values of the underlying layers. This blending mode is often used to change the overall color tone of an image without affecting its brightness or saturation.
The Saturation blending mode focuses on adjusting the saturation values of layers. It keeps the underlying luminosity and hue intact while incorporating the saturation values from the top layer. Saturation blending mode can be useful to enhance or desaturate colors, creating vibrant or muted effects.
Color blending mode combines the hue and saturation values of the top layer with the luminosity values of the underlying layers. This blending mode is commonly used to transfer the color appearance of one layer to another while maintaining the original luminosity values. It allows you to harmonize colors or create color variations without affecting the overall brightness.
Luminosity blending mode modifies the luminosity values of layers while keeping the hue and saturation values unchanged. It takes the luminosity values of the top layer and applies them to the underlying layers. Luminosity blending mode is often used to adjust the brightness or contrast of images without affecting their color integrity.
The Component blending modes provide a wide range of options to tweak and control colors in your designs or photos. By using the appropriate blending mode, you can make selective adjustments to specific color attributes and create visually appealing results.
When using Component blending modes, it’s important to experiment and fine-tune the opacity and fill values of the layers. This allows you to control the intensity of the color adjustments and achieve the desired outcome.
Overall, the Component blending modes in Photoshop are valuable tools to manipulate and fine-tune specific color properties. Whether you want to adjust the hue, saturation, luminosity, or overall color appearance, these blending modes provide precise control for creating stunning visual effects.
Blend If Sliders
Blend If sliders in Photoshop are powerful tools that allow you to control the blending of layers based on the luminosity values of pixels. These sliders provide a precise way to blend layers, giving you greater control over how and where the layers interact.
There are two sets of Blend If sliders – one for the underlying layer and one for the layer being blended. Each set consists of two sliders: one for the dark tones (shadows) and one for the light tones (highlights). By adjusting these sliders, you can determine which tones should be visible or transparent in the blending process.
When adjusting the Blend If sliders, you can split the sliders by holding the Alt/Option key. This splits the sliders into two, allowing you to create a smoother transition and avoid harsh transitions between the blended layers.
The Blend If sliders work by controlling the transparency of the pixels based on their luminosity. For example, if you want to blend a layer with the underlying layer only in the dark areas, you can drag the dark tone slider to the right. This will make the pixels in the dark areas of the top layer transparent, revealing the pixels of the underlying layer.
The Blend If sliders can be used to create various effects. For instance, you can blend a textured layer with the underlying layer using the Blend If sliders to control where the texture appears. You can also use the sliders to seamlessly blend two different skies in a photo or to blend objects into their backgrounds by making them semi-transparent.
It’s important to note that Blend If sliders are based on luminosity values, and therefore work best with grayscale images or with layers where the luminosity values are the primary concern. In images with vibrant or complex color variations, adjusting the Blend If sliders may result in unexpected or undesirable blending artifacts.
Experimenting and fine-tuning the Blend If sliders is key to achieving the desired blending effect. Be careful to avoid harsh transitions and artifacts by splitting the sliders and creating smooth transitions between the blended layers.
Overall, Blend If sliders in Photoshop are powerful tools that allow you to precisely control the blending of layers based on luminosity values. By adjusting these sliders, you can create seamless blends, control the visibility of different tones, and achieve stunning blending effects in your designs or photos.
Applying Blending Modes to Layers and Groups
Applying blending modes to layers and groups in Photoshop is a simple but effective way to create unique and visually appealing effects. Blending modes determine how the pixels of a layer or group interact with the pixels of the layers below it, allowing you to blend elements and create interesting compositions.
To apply a blending mode to a layer, select the desired layer in the Layers panel. Then, click on the blending mode dropdown menu at the top of the Layers panel and choose the desired blending mode from the list. Alternatively, you can cycle through the blending modes using the keyboard shortcut “Shift+” to preview how each blending mode affects the image.
Blending modes can also be applied to layer groups. Grouping layers together and applying a blending mode to the group allows you to blend multiple layers as a whole, creating cohesive and harmonious effects. To apply a blending mode to a layer group, select the group in the Layers panel and choose the blending mode from the blending mode dropdown menu.
It’s important to note that the order of the layers and groups in the Layers panel affects the blending result. Lower layers in the stacking order have a higher influence on the final composition. You can reorder the layers simply by dragging and dropping them within the Layers panel to experiment with different blending effects.
When applying blending modes, it’s recommended to have multiple layers or groups in your composition to see the full impact of the blending mode. You can try different combinations of blending modes on different layers within a composition to create interesting and complex effects.
Blending modes can also be combined with layer masks to control the visibility of specific areas within the layer. By adding a layer mask and using tools such as brushes or gradients, you can selectively reveal or hide portions of the layer, allowing for even more creative control over the blending effect.
Finally, adjusting the opacity and fill values of the layers or groups can further customize the blending effect. Opacity controls the overall transparency of the layer or group, while fill determines the transparency without affecting layer styles or effects. Adjusting these values can help fine-tune the blending and achieve the desired results.
Customizing Blending Modes with Opacity and Fill
When working with blending modes in Photoshop, customizing the blending effect using opacity and fill options allows for greater control and fine-tuning of the overall appearance of the layers. Opacity and fill values can be adjusted to modify the transparency and visibility of the layers, enhancing the blending effect or creating subtle variations.
Opacity is a fundamental attribute that determines the overall transparency of a layer. A layer with an opacity of 100% is fully opaque, while a layer with an opacity of 0% is completely transparent, making it invisible. Adjusting the opacity of a layer affects the entire layer, including all its contents and effects.
By decreasing the opacity of a layer, you can reduce its visibility and create a more translucent effect. This is particularly useful when blending layers and aiming for a softer or more subtle blending result. Lowering the opacity can also help blend layers together smoothly, reducing any harsh transitions or abrupt changes in the composition.
The fill option, on the other hand, modifies the transparency of the layer without affecting any layer styles or effects applied to it. It allows you to control the transparency of the layer’s contents while preserving any applied styles, such as drop shadows or strokes.
While reducing the fill of a layer, you are adjusting the transparency of its contents, making them less visible without altering the layer’s effects. This can be useful when you want to maintain the layer’s visual elements, but still have them blend more subtly with the layers below.
Experimenting with different opacity and fill values can help you achieve the desired blending effect. Finetuning these values can help you balance the visibility of layers and create a seamless integration within your composition.
Additionally, using layer masks in conjunction with opacity and fill adjustments can provide even further customization. By selectively painting on the layer mask, you can reveal or hide specific areas within the layer, allowing for precise control over the blending and visibility of elements.
It’s important to note that opacity and fill adjustments can be made on individual layers or applied to layer groups. This allows for versatile control over the blending effect of multiple layers simultaneously, creating cohesive and harmonious compositions.
Remember that finding the right balance of opacity and fill values is a matter of experimentation and personal preference. By manipulating these options, you can create unique and customized blending effects that truly bring your designs or photos to life.
Creating Gradient Maps with Blending Modes
Gradient maps, combined with blending modes, are a powerful tool in Photoshop that can transform the colors and tones of your images, allowing for creative and dramatic effects. By applying a gradient map adjustment layer and adjusting the blending mode, you can easily map the colors in your image to a gradient of your choice.
To create a gradient map, start by adding a Gradient Map adjustment layer. This adjustment layer maps the gradient onto the luminosity values of the image, creating a seamless transition of colors. The gradient range spans from the darkest to the lightest tones of the image, ensuring that the colors are properly mapped across the entire tonal range.
Once the gradient map adjustment layer is added, you can select and customize the gradient using the gradient editor. The editor allows you to choose from preset gradients, create your own custom gradients, or load gradients from external sources. By manipulating the gradient’s color stops, you can create the desired color effect or tone mapping for your image.
After defining the gradient, the blending mode option comes into play. By changing the blending mode of the gradient map adjustment layer, you can combine the mapped colors with the underlying layers, creating unique and visually appealing results.
The blending modes interact with the colors of the gradient map and the layers below in different ways. For example, using the Overlay blending mode enhances the contrast and saturation of the image, adding depth and richness. The Soft Light blending mode offers a more subtle effect, enhancing the overall tonality and creating a dreamy atmosphere.
Experimenting with different blending modes can yield various creative outcomes. The Multiply blending mode, for instance, can create a vintage or cinema-like effect by blending the gradient colors with the image using a multiplication algorithm. On the other hand, the Screen blending mode brightens the image and adds a soft glow, suitable for ethereal or high-key effects.
By adjusting the opacity and fill values of the gradient map adjustment layer, you can further fine-tune the blending effect. Lowering the opacity can tone down the intensity of the colors, while increasing it can amplify the gradient’s impact.
Creating gradient maps with blending modes opens up a world of possibilities for artistic and expressive image editing. Whether you want to create a moody atmosphere, add vibrant colors, or achieve a specific aesthetic, the combination of gradient maps and blending modes allows you to easily transform the look and feel of your images.
Advanced Techniques with Blending ModesBlending modes in Photoshop offer a wide range of creative possibilities beyond simple layer blending. Advanced techniques with blending modes allow you to push the boundaries of your designs, create intricate effects, and elevate your artwork to new levels. Here are a few advanced techniques worth exploring.
1. Double Exposure: The Multiply blending mode is commonly used in double exposure effects. By blending two or more images together, you can create unique compositions with overlapping elements and seamless integration. Experiment with different images and layer opacity levels to achieve the desired effect.
2. Light Painting: Blending modes like Screen and Add can be used to simulate light painting effects. By painting with a brush set to a low opacity and choosing a bright color, you can create light streaks or glowing elements. Experiment with different blending modes and brush settings to achieve the desired result.
3. Texturizing: Blending a texture layer with the Overlay or Soft Light blending mode can add depth and texture to your designs. Textures such as grunge, paper, or fabric can be blended with your artwork, giving it an aged or tactile appearance. Adjust the opacity and fill values to achieve the desired texture effect.
4. Color Grading: Blending modes and adjustment layers can be used for color grading to achieve a specific mood or tone. By adding adjustment layers like Curves or Color Balance and adjusting their blending modes, you can fine-tune the color palette of your image, emphasizing certain hues and creating a cohesive look.
5. Glowing Effects: The Overlay or Soft Light blending modes can be combined with Gaussian Blur to create a soft, glowing effect. Apply the blending mode to a duplicated layer, then apply a Gaussian Blur filter to the duplicated layer. Experiment with different amounts of blur and opacity to achieve the desired glow effect.
6. Selective Colorization: By using blending modes and layer masks, you can selectively colorize specific parts of your image. Convert your image to black and white, then paint with a soft brush on a new layer set to the Color blending mode. The colors will only appear on the areas you paint, creating a striking selective color effect.
7. Creative Blend If Techniques: Utilize the Blend If sliders to customize the blending effect even further. By manipulating the sliders, you can control the visibility of specific luminosity ranges, creating intricate and nuanced blending effects. Experiment with splitting the sliders and adjusting them separately to achieve more refined results.
These advanced techniques with blending modes are just the tip of the iceberg. Allow yourself to explore and experiment with different blending modes, layer combinations, and adjustment layers. The more you practice and push the boundaries, the more unique and stunning effects you can achieve in your designs.