
Overview of AirDrop on iPhone
AirDrop is a convenient feature on your iPhone that allows you to wirelessly share files, photos, and documents with nearby Apple devices. Whether you want to quickly send a picture to a friend or collaborate on a project with a colleague, AirDrop simplifies the sharing process without the need for email or messaging apps.
With AirDrop, you can easily transfer files between iPhones, iPads, and Mac computers. It utilizes a combination of Bluetooth and Wi-Fi technology to establish a secure and direct connection between devices, ensuring fast and reliable file transfers.
One of the key advantages of AirDrop is its simplicity. To use AirDrop, both the sender and recipient need to have AirDrop enabled on their devices and be within close proximity to each other. Once the connection is established, you can quickly share files with just a few taps.
Another notable feature of AirDrop is its compatibility with various file types. You can send and receive photos, videos, documents, contacts, and even entire folders. This versatility makes AirDrop a valuable tool for personal and professional use.
When it comes to security, AirDrop prioritizes your privacy. By default, AirDrop is set to “Contacts Only,” meaning you can only send and receive files from people in your iPhone’s Contacts. This helps prevent unwanted transfers from unknown sources.
However, you also have the option to set AirDrop to “Everyone” if you want to receive files from any nearby device. Keep in mind that this setting might pose some privacy risks, so it’s important to exercise caution when using AirDrop in public places.
Enabling AirDrop on your iPhone
Before you can start using AirDrop on your iPhone, you need to make sure that it is enabled. Here’s how to enable AirDrop:
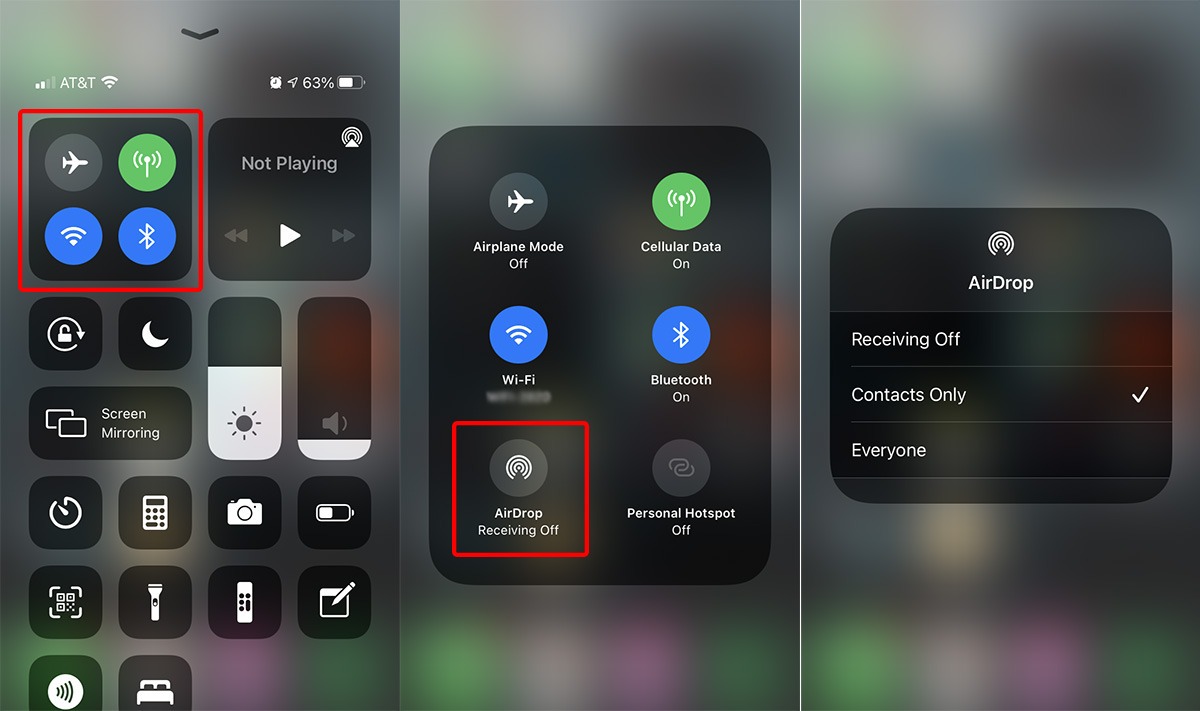
- Swipe up from the bottom of your iPhone screen to open the Control Center.
- Tap and hold the network settings card in the top-left corner of the Control Center.
- In the expanded network settings menu, you will see the AirDrop option.
- Tap on AirDrop to access the AirDrop settings.
- You will have three options: Off, Contacts Only, and Everyone.
- Select “Contacts Only” if you want to limit AirDrop to people in your iPhone’s Contacts. This is generally the recommended setting for privacy.
- If you want to receive files from any nearby device, select “Everyone.” However, keep in mind the privacy considerations associated with this option.
- Once you have chosen your AirDrop setting, you can exit the Control Center.
Now that AirDrop is enabled on your iPhone, you are ready to start sharing files with other devices. Remember that both the sender and recipient need AirDrop enabled and be in close proximity to each other for successful file transfers. Additionally, make sure that both devices have Bluetooth and Wi-Fi turned on to establish a connection.
Using AirDrop in the Control Center
The Control Center on your iPhone is where you can access various settings and features, including AirDrop. Here’s how to use AirDrop in the Control Center:
- Swipe up from the bottom of your iPhone screen to open the Control Center.
- Locate the network settings card in the top-left corner of the Control Center.
- Tap and hold the card to expand the network settings menu.
- In the expanded menu, you will see the AirDrop option.
- Tap on AirDrop to open the AirDrop settings.
- Choose your preferred AirDrop setting: “Contacts Only” or “Everyone.”
- Exit the Control Center by swiping down or tapping elsewhere on the screen.
Now that you have enabled AirDrop and set your desired preferences, you can start using AirDrop to share files. Here’s how to use AirDrop in the Control Center:
- Open the app or file that you want to share.
- Locate the Share button or icon within the app or file.
- Tapping the Share button will open the Share menu, which displays various sharing options.
- In the Share menu, you will see a list of available AirDrop recipients.
- Tap on the name of the person or device you want to send the file to via AirDrop.
- If the recipient accepts the file transfer, you will see a notification confirming the successful transfer.
- The recipient can choose to save or open the received file, depending on its type.
Note that AirDrop works best when devices are in close proximity to each other, within a reasonable range. Additionally, make sure that both devices have AirDrop enabled and are connected to the same Wi-Fi network or have Bluetooth turned on for successful file transfers.
Adjusting your AirDrop settings
While enabling AirDrop on your iPhone is the first step, you also have the flexibility to adjust your AirDrop settings according to your preferences. Here’s how to adjust your AirDrop settings:
- Go to the Settings app on your iPhone’s home screen.
- Scroll down and tap on “General.”
- In the General settings, tap on “AirDrop.”
- You will see the same AirDrop options as in the Control Center: Off, Contacts Only, and Everyone.
- Select your desired AirDrop setting.
If you choose “Off,” AirDrop will be completely disabled on your iPhone. No one will be able to send you files via AirDrop, and you won’t see any AirDrop recipients in the Share menu.
If you select “Contacts Only,” only people in your iPhone’s Contacts will be able to send you files via AirDrop. This is the recommended setting for privacy purposes, as it limits file sharing to known contacts.
By choosing “Everyone,” you allow any nearby device to send you files via AirDrop. This setting can be useful in certain situations, but it’s important to be cautious as it may lead to unwanted file transfers from unknown sources.
Once you have adjusted your AirDrop settings, they will apply to all file transfers via AirDrop on your iPhone. Remember to always review and update your settings according to your preferences and privacy requirements.
Sending files via AirDrop
Sending files with AirDrop on your iPhone is a straightforward process. Here’s how to send files via AirDrop:
- Open the file or content that you want to send.
- Look for the Share button or icon within the app or file.
- Tap on the Share button to open the Share menu.
- In the Share menu, you will see a list of available sharing options.
- Scroll through the sharing options until you find the AirDrop icon.
- Tap on the AirDrop icon to initiate the AirDrop process.
- Your iPhone will start searching for nearby AirDrop recipients.
- Once your desired recipient appears in the AirDrop section, tap on their name to send the file.
- A notification will be sent to the recipient’s device, asking them to accept or decline the file transfer.
- If the recipient accepts the transfer, a progress bar will appear on both devices.
- Once the transfer is complete, you will receive a confirmation message on your iPhone.
It’s important to note that the availability of AirDrop recipients may vary depending on their AirDrop settings. If your intended recipient is not appearing in the AirDrop section, ensure that they have AirDrop enabled and set to “Contacts Only” or “Everyone.”
You can send various file types through AirDrop, including photos, videos, documents, contacts, and more. Additionally, you can even send multiple files or entire folders at once, making AirDrop a versatile tool for file sharing.
Remember to keep both devices with AirDrop enabled and in close proximity to ensure a successful transfer. Additionally, make sure that both devices have Bluetooth and Wi-Fi turned on to establish a connection for the file transfer.
Receiving files via AirDrop
Receiving files via AirDrop on your iPhone is a seamless process that allows you to quickly access and save shared content. Here’s how to receive files via AirDrop:
- Make sure AirDrop is enabled on your iPhone and set to either “Contacts Only” or “Everyone.”
- Ensure that both Bluetooth and Wi-Fi are turned on to establish a connection with the sender.
- Wait for the sender to initiate the AirDrop process and select your device as the recipient.
- A notification will appear on your iPhone, displaying details about the incoming file or content.
- Tap “Accept” to begin the file transfer.
- A progress bar will appear, indicating the status of the file transfer.
- Once the transfer is complete, the shared file will be saved in the respective app or location on your iPhone.
Receiving files via AirDrop is a quick and efficient method to exchange content with other Apple devices. It eliminates the need for cumbersome cables or third-party apps, allowing for seamless file sharing.
When receiving files, it’s important to exercise caution and be mindful of the source of the content. While AirDrop prioritizes privacy, it’s always recommended to accept files only from trusted individuals or known contacts. This helps ensure the security of your device and personal information.
Moreover, AirDrop gives you the flexibility to preview and save the received files within the respective apps. For example, if you receive a photo, it will be saved in the Photos app, while a document will be stored in the Files app.
By utilizing AirDrop, you can easily and wirelessly receive various types of files, such as photos, videos, documents, and more. This convenient feature enhances your productivity and simplifies file sharing between Apple devices.
Troubleshooting common AirDrop issues
While AirDrop is typically a straightforward and reliable feature, you may occasionally encounter some issues with file transfers. Here are some common AirDrop issues and troubleshooting steps to resolve them:
- AirDrop not working: If AirDrop is not working on your iPhone, first ensure that both Bluetooth and Wi-Fi are enabled on your device. If the issue persists, try restarting your iPhone or toggling Airplane Mode on and off. You can also try restarting the device you’re trying to AirDrop with.
- Device not appearing: If the device you want to AirDrop to is not appearing in the AirDrop section, check if AirDrop is enabled on their device as well. They should set AirDrop to “Contacts Only” or “Everyone” and keep their device’s visibility mode turned on.
- Slow file transfer: If file transfer via AirDrop is slow, check the Wi-Fi or Bluetooth connection on both devices. Ensure that there are no network or signal interference. You can also try moving the devices closer to improve the transfer speed.
- File not receiving: If you’re not receiving files through AirDrop, make sure that AirDrop is enabled on your device and set to “Contacts Only” or “Everyone.” Alternatively, check if your device storage is sufficient to accommodate the received files.
- Error messages: If you encounter error messages during the AirDrop process, try restarting both devices and retrying the file transfer. You can also check if both devices have the latest software updates installed, as compatibility issues can sometimes cause errors.
- Privacy concerns: If you’re concerned about privacy while using AirDrop, it’s recommended to keep AirDrop set to “Contacts Only.” This limits file transfers to people in your iPhone’s Contacts, reducing the likelihood of receiving files from unknown sources.
If you continue to experience issues with AirDrop, you can visit the Apple Support website or contact Apple Support for further assistance. They can provide more specific troubleshooting steps based on your device model and software version.
Remember that AirDrop functionality may vary depending on the device model and its compatibility with AirDrop. Refer to the Apple documentation or support resources for device-specific information.
Security and privacy considerations with AirDrop
While AirDrop offers a convenient and efficient way to share files wirelessly, it’s important to be aware of the security and privacy considerations associated with using this feature on your iPhone.
First and foremost, AirDrop utilizes a combination of Bluetooth and Wi-Fi technology to establish a direct connection between devices for file transfers. This connection is encrypted, ensuring that your files are transmitted securely. However, it’s still crucial to exercise caution when sharing sensitive or confidential information via AirDrop.
To enhance your privacy, Apple provides two AirDrop settings: “Contacts Only” and “Everyone.” By default, AirDrop is set to “Contacts Only,” which allows you to receive files only from people in your iPhone’s Contacts. This setting can help prevent unwanted file transfers from unknown sources.
If you choose to set AirDrop to “Everyone,” you widen the scope of potential file transfers and increase the risk of receiving files from unfamiliar individuals. Therefore, it is important to carefully consider the setting that best suits your privacy needs and avoid accepting files from unknown senders if you have AirDrop set to “Everyone.”
It’s worth noting that even with AirDrop set to “Contacts Only,” individuals who are not in your Contacts can still send you a request to AirDrop. You have the option to decline or accept the request, which adds them as a contact. This control further ensures your privacy and allows you to manage the types of AirDrop requests you receive.
Additionally, when receiving a file via AirDrop, you have the choice to preview and save the file in the respective app or location on your iPhone. This allows you to review the content before accepting it and ensure it aligns with your privacy and security standards.
Lastly, keep in mind that AirDrop is designed for local sharing within close proximity. To protect your iPhone’s security and prevent unauthorized file transfers, it’s advisable to disable AirDrop or set it to “Receiving Off” when you are in public or unfamiliar environments.
By understanding and implementing these security and privacy considerations, you can safely and confidently utilize AirDrop for convenient file sharing while maintaining control over your personal information and digital security.