
Prepare Your MacBook Pro
Upgrading your MacBook Pro with an SSD (Solid State Drive) can give your laptop a significant performance boost. Before you dive into the installation process, it’s important to properly prepare your MacBook Pro to ensure a smooth and successful upgrade. Here are the steps to follow:
1. Back up your data: Before making any changes to your MacBook Pro, it’s crucial to back up all your important files and data. This can be done using Time Machine or any other backup solution of your choice. By doing this, you’ll have peace of mind knowing that your data is safe and can be easily restored if anything goes wrong during the upgrade process.
2. Create a bootable installer: To install the new SSD, you’ll need a bootable installer. You can create one by downloading the macOS installer from the App Store and using a USB drive or an external storage device. Make sure to follow the official Apple instructions to create a bootable installer for your specific version of macOS.
3. Gather the necessary tools: To open your MacBook Pro and install the SSD, you’ll need a few tools. These may include a small screwdriver set, a plastic spudger, and a suction cup. Ensure you have all the necessary tools on hand before proceeding with the upgrade.
4. Shut down your MacBook Pro: Before working on any internal components, it’s important to shut down your MacBook Pro and unplug it from any power source. This will ensure your safety and prevent any potential damage to the device.
5. Remove the bottom case: Use the appropriate screwdriver to remove the screws holding the bottom case of your MacBook Pro. Carefully lift the case and set it aside in a safe place. This will give you access to the internal components of your laptop.
6. Ground yourself: Before touching any internal components, it’s essential to ground yourself to prevent any static electricity discharge that could potentially damage your MacBook Pro. You can do this by touching a metal object or wearing an anti-static wristband.
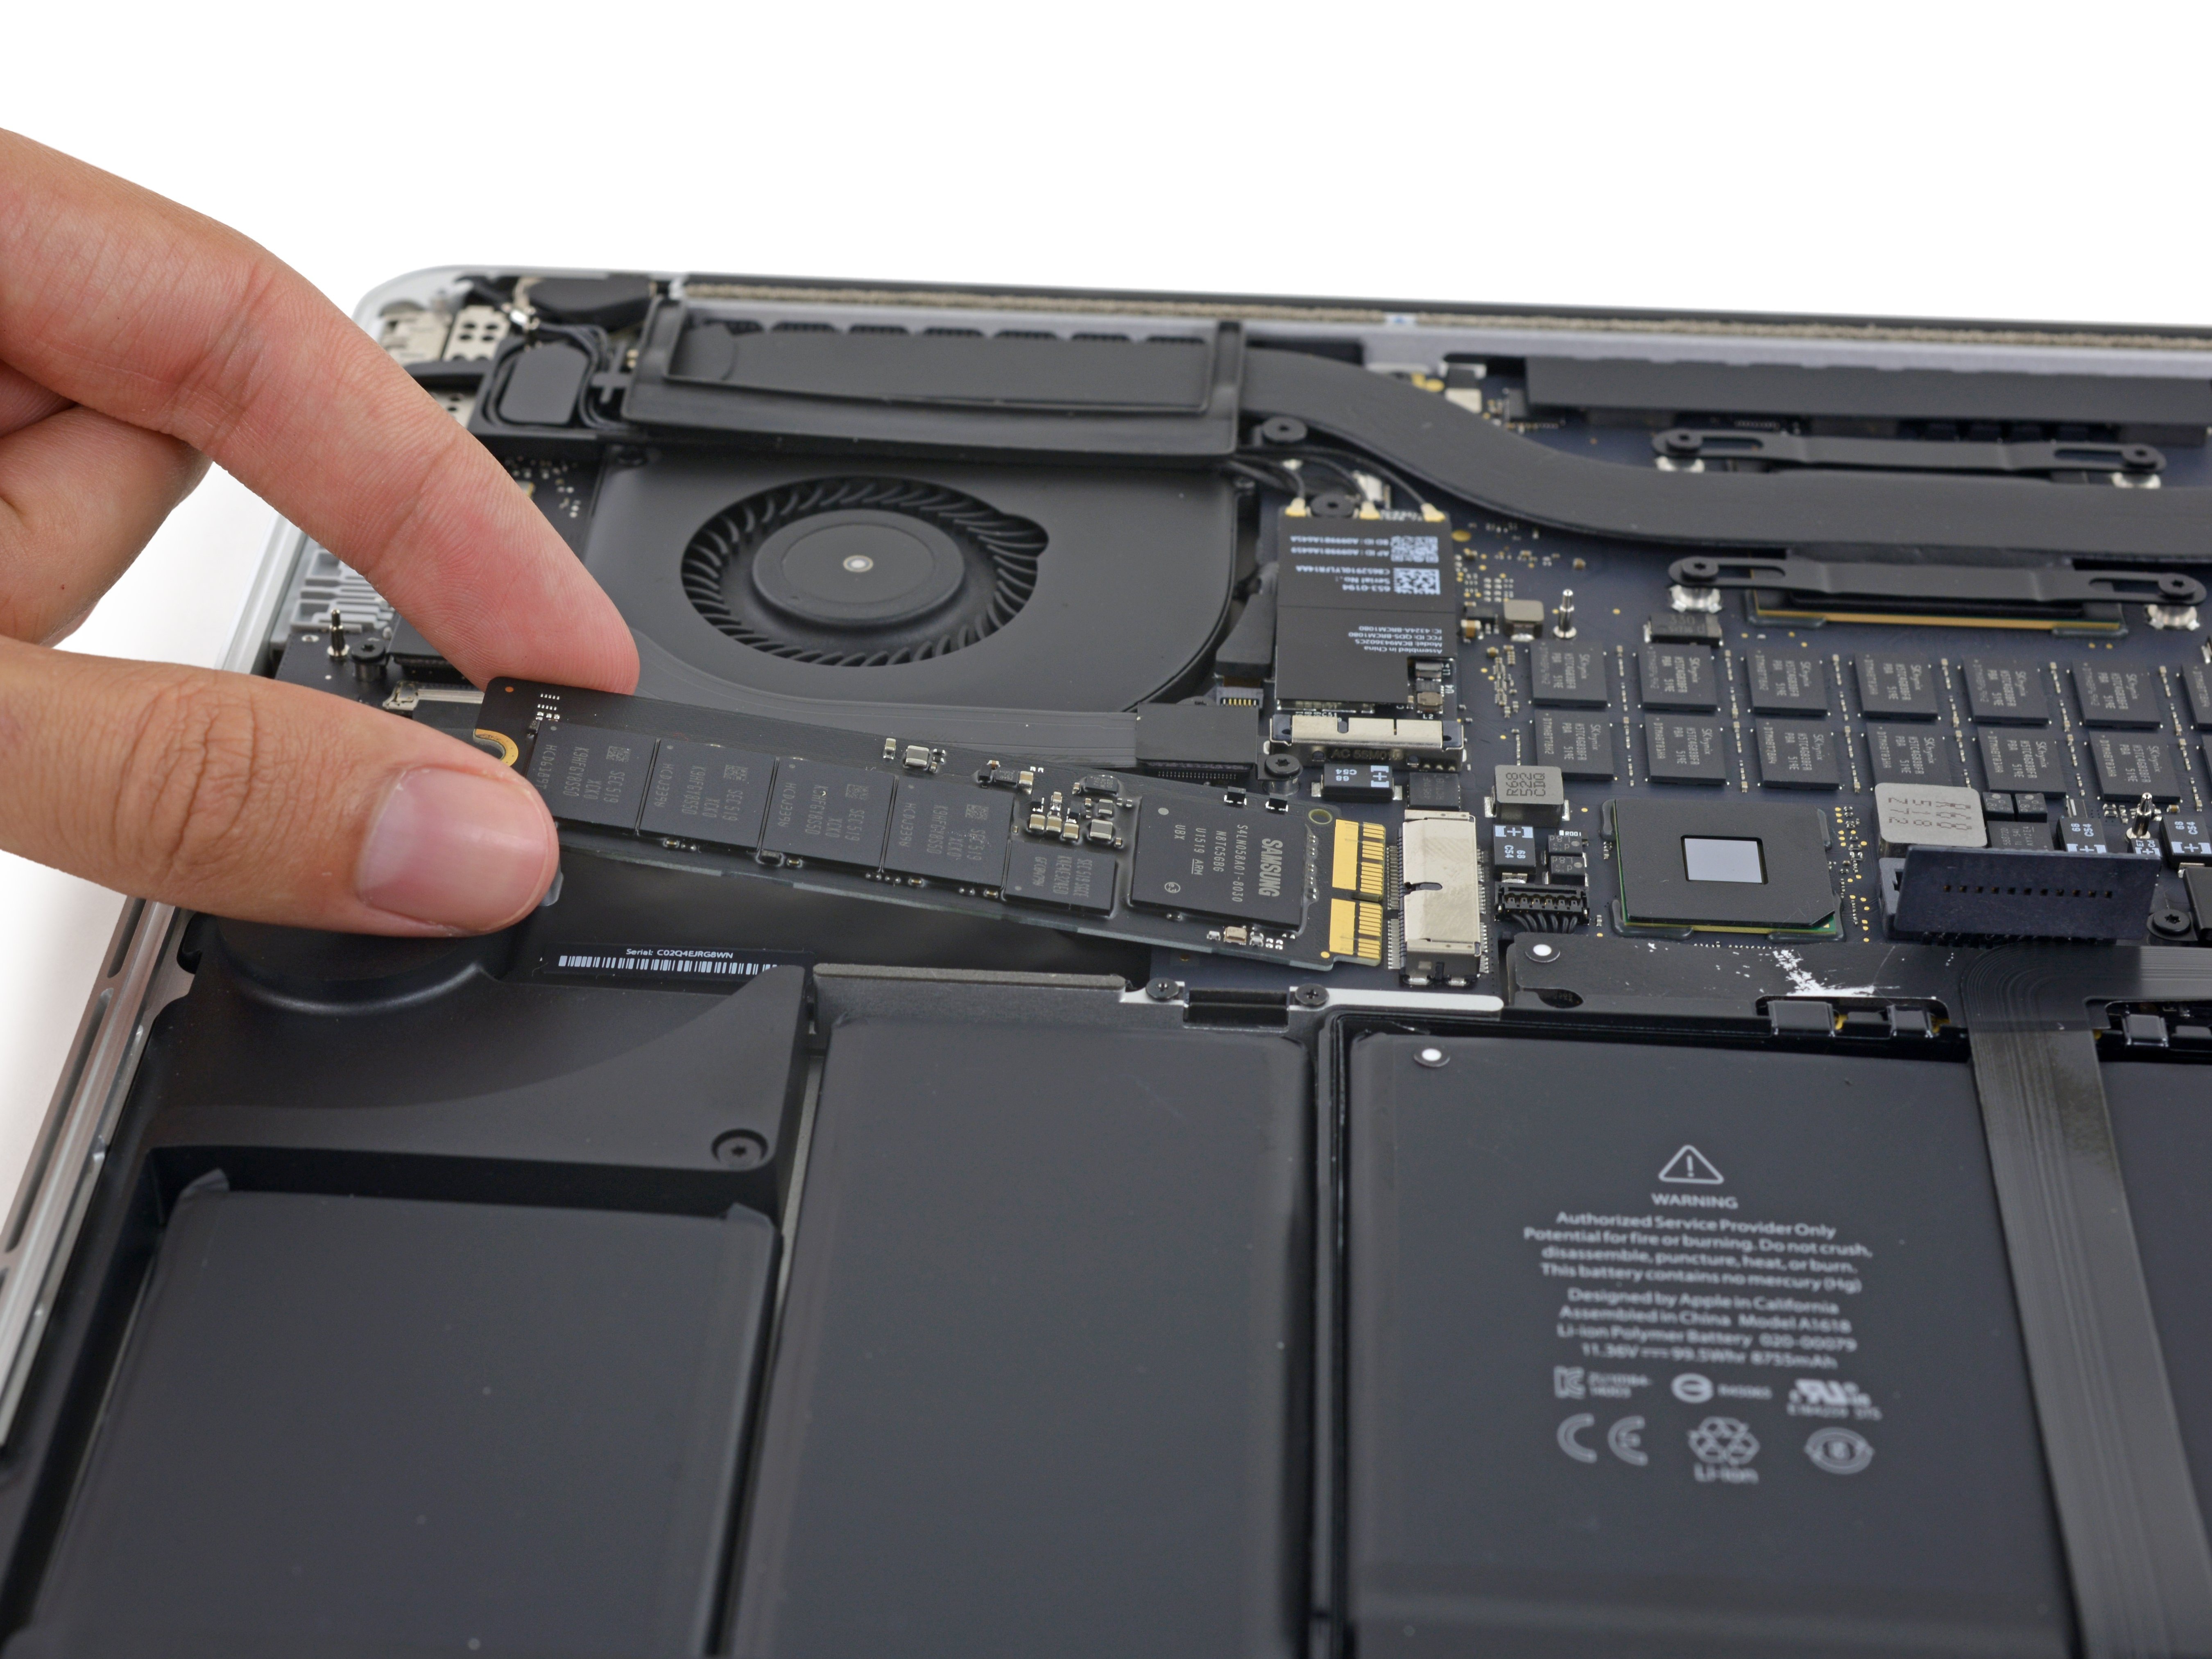
7. Locate the SSD slot: Identify the location of the existing SSD slot in your MacBook Pro. This may vary depending on the model and year of your laptop. Refer to your MacBook Pro’s user manual or consult online resources to find the correct location.
8. Carefully remove the old SSD: Gently disconnect the connector cables attached to the old SSD and carefully remove it from the slot. Take note of the orientation of the old SSD to ensure proper installation of the new one.
9. Install the new SSD: Insert the new SSD into the slot. Make sure it is properly aligned and securely connected with the connector cables. Be careful not to force it into place or damage any of the internal components.
10. Reassemble your MacBook Pro: Once the new SSD is securely in place, reattach the bottom case of your MacBook Pro and tighten the screws. Ensure all the connections are properly seated and fastened.
By following these steps, you’ll have successfully prepared your MacBook Pro for the SSD upgrade. In the next section, we’ll guide you through the process of choosing the right SSD for your MacBook Pro.
Choose the Right SSD
When it comes to upgrading the storage in your MacBook Pro, selecting the right SSD is crucial. The SSD will not only determine the overall performance of your laptop but also affect its storage capacity. Here are some factors to consider when choosing the right SSD:
1. Compatibility: Ensure that the SSD you choose is compatible with your MacBook Pro model. Check the specifications and requirements provided by the manufacturer to find an SSD that is specifically designed for your laptop.
2. Storage Capacity: Determine how much storage space you need on your MacBook Pro. SSDs are available in various capacities, ranging from 256GB to 2TB or even more. Consider your storage requirements, such as the amount of data, files, and applications you typically use, to make an informed decision.
3. Speed and Performance: Look for SSDs that offer fast data transfer speeds and read/write performance. This will ensure that your MacBook Pro operates smoothly and efficiently, with minimized loading times for applications and files.
4. Brand and Reliability: Choose SSDs from reputable brands known for their reliability and quality. Opting for a well-established brand can provide peace of mind, knowing that you are investing in a durable and dependable product.
5. Warranty: Check the warranty offered by the SSD manufacturer. A more extended warranty period indicates that the manufacturer has confidence in the product’s quality and durability. It also provides you with protection and support in case of any issues or defects.
6. Price: Consider your budget when selecting an SSD. While SSDs are generally more expensive than traditional hard drives, their performance and reliability make them a worthwhile investment. Compare prices from different brands and retailers to find an SSD that fits your budget without compromising on quality.
7. Customer Reviews: Read reviews and testimonials from other MacBook Pro users who have upgraded their SSD. This will give you insights into their experiences with different models and brands. Look for SSDs that have positive reviews regarding performance, compatibility, and reliability.
8. Future Upgradability: Consider whether you may want to upgrade your MacBook Pro’s SSD in the future. Opting for an SSD with additional capacity can allow for future expansion without the need to replace the entire drive again.
By taking these factors into account, you can choose an SSD that suits your needs and ensures optimal performance for your MacBook Pro. In the next section, we’ll discuss the importance of backing up your data before proceeding with the upgrade.
Backup Your Data
Before upgrading your MacBook Pro’s SSD, it is essential to back up all your data to ensure that no important files or documents are lost during the process. Here’s why data backup is crucial and how you can do it:
1. Prevent Data Loss: Backing up your data ensures that you have a copy of all your files, documents, and settings in case something goes wrong during the SSD upgrade. Accidental errors, hardware failures, or other unforeseen issues can potentially lead to data loss if not properly backed up.
2. Easy Data Restoration: Having a backup allows you to easily restore your data to its previous state once the SSD upgrade is complete. Instead of starting from scratch, you can simply transfer your files back to your MacBook Pro and resume your work without any hassle.
3. Choose a Backup Solution: There are several options for backing up your data, including using macOS’s built-in backup system called Time Machine. Time Machine allows you to create automated backups of your MacBook Pro’s files and settings, making it easy to restore them later. Alternatively, you can use cloud storage services like iCloud, Dropbox, or Google Drive to store your important files online.
4. Perform a Full Backup: Before starting the backup process, it is recommended to perform a full system backup. This includes backing up your documents, photos, music, applications, and any other files or data that you consider important. This ensures that you have a complete copy of everything on your MacBook Pro.
5. External Storage: Choose a reliable external storage device to store your backup. This can be an external hard drive, a USB flash drive, or a network-attached storage device. Make sure the storage device has enough capacity to hold all your data.
6. Time Machine Backup: If you choose to use Time Machine, connect your external storage device and follow the instructions to set up Time Machine. Once set up, Time Machine will automatically create incremental backups of your MacBook Pro, allowing you to restore specific files or folders as needed.
7. Cloud Storage Backup: If you prefer using cloud storage services, sign up for an account and install the corresponding software or application on your MacBook Pro. Configure the settings to synchronize your important files to the cloud, ensuring that they are safely stored online.
8. Regular Backup Schedule: To ensure that your data is continuously backed up, establish a regular backup schedule. This can be done daily, weekly, or monthly, depending on your needs and the amount of data you generate.
By backing up your data, you can safeguard your important files and documents against any unforeseen circumstances during the SSD upgrade process. In the next section, we will guide you through creating a bootable installer for your new SSD.
Create Bootable Installer
Creating a bootable installer is an essential step in upgrading your MacBook Pro’s SSD. This installer will allow you to install the operating system onto the new SSD. Here’s how you can create a bootable installer:
1. Download the macOS installer: Go to the App Store and download the macOS installer for the version of the operating system you want to install. Make sure the installer is saved in the Applications folder.
2. Connect a USB drive: Choose a USB drive with sufficient storage capacity (at least 16GB) that you can use to create the bootable installer. Connect the USB drive to your MacBook Pro.
3. Open Disk Utility: Open Disk Utility, which is located in the Utilities folder within the Applications folder. This utility will allow you to format the USB drive and create the bootable installer.
4. Select the USB drive: In Disk Utility, select the USB drive from the list of available devices on the left side of the window.
5. Erase the USB drive: Click on the “Erase” tab in Disk Utility. Choose a name for the drive and select the appropriate format (usually “Mac OS Extended (Journaled)”). Click on the “Erase” button to format the USB drive.
6. Open Terminal: Open the Terminal application, which is also located in the Utilities folder. This application will allow you to create the bootable installer using a command-line interface.
7. Create the bootable installer: In the Terminal window, type the following command: sudo /Applications/Install\ macOS\ [version name].app/Contents/Resources/createinstallmedia --volume /Volumes/[USB drive name], replacing [version name] with the name of the macOS installer you downloaded and [USB drive name] with the name of your USB drive.
8. Authenticate the command: Press Enter after entering the command, and you will be prompted to enter your administrator password. Type your password and press Enter again to proceed with the creation of the bootable installer.
9. Wait for the process to complete: The Terminal will display a progress bar indicating the creation of the bootable installer. Wait for the process to complete; this may take a few minutes.
10. Safely eject the USB drive: Once the bootable installer is created, you can safely eject the USB drive from your MacBook Pro. Right-click on the USB drive icon on your desktop and select “Eject,” or drag it to the trash bin.
By following these steps, you will have successfully created a bootable installer for your new SSD. In the next section, we’ll guide you through the process of installing the new SSD into your MacBook Pro.
Install the New SSD
Now that you have prepared your MacBook Pro and created a bootable installer, it’s time to install the new SSD. Follow these steps to ensure a successful installation:
1. Shut down your MacBook Pro: Power off your MacBook Pro and disconnect it from any power sources. This will ensure your safety while working on the internal components.
2. Remove the bottom case: Use the appropriate screwdriver to remove the screws securing the bottom case of your MacBook Pro. Carefully lift the case and set it aside in a safe place.
3. Ground yourself: Before touching any internal components, ground yourself by touching a metal object or wearing an anti-static wristband. This will help prevent any static electricity discharge that could potentially damage your MacBook Pro or the new SSD.
4. Locate the SSD slot: Identify the existing SSD slot in your MacBook Pro. The location may vary depending on the model and year of your laptop. Refer to the user manual or consult online resources to find the correct location.
5. Disconnect the old SSD: Gently disconnect the connector cables attached to the old SSD. These cables include the data cable and power cable. Take note of the orientation of the cables for the proper installation of the new SSD.
6. Remove the old SSD: Once the cables are disconnected, carefully lift the old SSD out of the slot. Handle it with care to avoid any unnecessary damage.
7. Insert the new SSD: Take the new SSD and align it with the slot. Ensure that it is properly lined up and then gently push it into place. Once inserted, connect the data and power cables securely to the new SSD.
8. Reassemble your MacBook Pro: Reattach the bottom case of your MacBook Pro and tighten the screws. Make sure all the connections are properly seated and the case is secure.
9. Connect the bootable installer: Connect the USB drive with the bootable installer you created earlier to your MacBook Pro. This will allow you to install the operating system onto the new SSD.
10. Power on your MacBook Pro: Press the power button on your MacBook Pro to turn it on. Hold down the “Option” key while the laptop is starting up to access the boot menu.
11. Choose the bootable installer: From the boot menu, select the USB drive with the bootable installer. Follow the on-screen instructions to install the macOS onto your new SSD.
By following these steps, you will have successfully installed the new SSD into your MacBook Pro. In the next section, we’ll guide you through the process of initializing the new SSD.
Initialize the New SSD
After installing the new SSD into your MacBook Pro, you need to initialize it before you can start using it. Here are the steps to initialize your new SSD:
1. Boot from the new SSD: Restart your MacBook Pro and hold down the “Option” key to access the boot menu. Select the new SSD as the boot device to start up your MacBook Pro from the newly installed drive.
2. Choose the language: Once the macOS installer loads, choose your preferred language from the available options. Click “Continue” to proceed.
3. Open Disk Utility: In the macOS installer, select “Disk Utility” from the Utilities menu. This utility will allow you to initialize and format the new SSD.
4. Select the new SSD: In Disk Utility, locate and select the new SSD from the list of available drives on the left side of the window. It should be listed by its manufacturer and size.
5. Erase the SSD: Click on the “Erase” button in Disk Utility and choose a name for your new SSD. Select the appropriate format (usually “Mac OS Extended (Journaled)”) and click “Erase” to format the SSD. This will prepare it for the macOS installation.
6. Wait for the formatting to complete: Disk Utility will display a progress bar indicating the formatting process. Wait for the formatting to complete, which may take a few minutes.
7. Close Disk Utility: Once the formatting is complete, close Disk Utility to return to the macOS installer.
8. Install macOS: In the macOS installer, click “Continue” and follow the on-screen instructions to install the macOS onto your newly initialized SSD. This will ensure that your MacBook Pro runs on the new SSD.
9. Complete the macOS installation: Once the macOS installation is complete, you will be prompted to set up your MacBook Pro, including creating a user account and configuring system preferences. Follow the on-screen instructions to complete the installation process.
10. Restore your data: If you backed up your data prior to the SSD upgrade, you can now restore your files and documents from your backup. Use the backup solution you previously employed, such as Time Machine or cloud storage, to transfer your data back onto your MacBook Pro.
By following these steps, you will have successfully initialized your new SSD and installed the macOS onto it. In the next section, we’ll explore how to restore your data onto the newly upgraded MacBook Pro.
Restore Your Data
After initializing your new SSD and installing macOS, it’s time to restore your data onto your MacBook Pro. By following these steps, you can easily transfer your files and settings back onto your newly upgraded laptop:
1. Connect your backup device: If you used an external storage device or a cloud backup solution, connect or sign in to your backup device or service. Make sure it is accessible and ready for data transfer.
2. Open Migration Assistant: Launch Migration Assistant, which is located in the Utilities folder within the Applications folder. Migration Assistant will guide you through the process of transferring your data from the backup to your MacBook Pro.
3. Select the transfer method: In Migration Assistant, choose the option to transfer data from your backup device or from a Time Machine backup. This will depend on the backup solution you used and the location of your data.
4. Follow the prompts: Migration Assistant will provide you with on-screen instructions to proceed with the data transfer. Follow the prompts and select the specific files, folders, applications, and settings you wish to restore onto your MacBook Pro.
5. Begin the data transfer: Once you have made your selections in Migration Assistant, initiate the data transfer process. Depending on the amount of data being transferred, this may take some time. Ensure that your MacBook Pro remains connected to a power source throughout the process.
6. Complete the setup: After the data transfer is complete, Migration Assistant will prompt you to complete the setup of your MacBook Pro. This may include creating a user account, setting up preferences, and other initial configurations.
7. Verify the transferred data: Once the setup is complete, take some time to verify that your transferred data, files, folders, and settings are present and intact on your MacBook Pro. Open applications and documents to ensure everything transferred successfully.
8. Organize and optimize: As you explore your restored data, take the opportunity to organize your files and folders in a way that suits your workflow. Delete any unnecessary files or duplicates to optimize your disk space.
9. Sync with cloud services: If you use cloud storage services like iCloud, Dropbox, or Google Drive, ensure that your files are syncing correctly. Install the corresponding applications and sign in to your cloud accounts to enable automatic synchronization with your MacBook Pro.
10. Create regular backups: Now that your data is restored, it is crucial to establish a regular backup routine to protect your files and settings in case of future emergencies or hardware failures. Use a reliable backup solution like Time Machine or cloud storage to ensure your data is always backed up.
By following these steps, you will have successfully restored your data onto your newly upgraded MacBook Pro. In the next section, we’ll guide you through setting up your new SSD to optimize its performance and make the most of your upgraded laptop.
Set Up Your New SSD
Now that you have installed the new SSD and restored your data, it’s time to set up your new SSD to optimize its performance and make the most of your upgraded MacBook Pro. Follow these steps to ensure a smooth and efficient setup:
1. Update macOS: Check for any available updates for macOS. Keeping your operating system up to date ensures that you have the latest features, security patches, and bug fixes. Go to the Apple menu > System Preferences > Software Update to check for updates.
2. Install essential software: Install the essential software and applications you need for your daily tasks. This may include productivity tools, creative software, web browsers, and media players. Ensure that you download and install the latest versions from official sources.
3. Customize system preferences: Take the time to tweak your system preferences to your liking. This includes customizing settings for display, keyboard, trackpad, energy saver, desktop, and screensaver. Visit the Apple menu > System Preferences to access these settings.
4. Set up security measures: Protect your MacBook Pro and its data by enabling necessary security measures. This includes setting up a strong login password, enabling FileVault to encrypt your disk, enabling Firewall, and configuring privacy settings for applications.
5. Configure iCloud: If you use iCloud, configure it to sync your important data across devices. This includes contacts, calendars, bookmarks, reminders, and files. Visit the Apple menu > System Preferences > iCloud to set up and manage your iCloud account.
6. Transfer licenses and authorization: If you have any licensed software or applications, transfer the necessary licenses or authorizations to your new SSD. This ensures that your applications are fully activated and functional on the new drive.
7. Customize your desktop and organization: Organize your desktop by creating folders, arranging icons, and setting your preferred wallpaper. Customize the dock with your frequently used applications for quick access. This will help streamline your workflow and make your desktop more personalized.
8. Set up email and messaging: Configure your email accounts and messaging services on your MacBook Pro. Use the built-in Mail app or download third-party email clients for a customized email experience. Set up messaging apps like Messages or Slack for seamless communication.
9. Configure backup solutions: Set up regular backups using Time Machine or cloud storage solutions. Ensure that your backup settings are configured correctly to protect your data and allow for easy recovery in case of emergencies or hardware failures.
10. Test and optimize: Take the time to test your MacBook Pro with the new SSD. Open applications, browse the internet, and perform various tasks to ensure that everything is running smoothly. Optimize performance by performing regular system maintenance, such as clearing caches and managing storage.
By following these steps, you will have successfully set up your new SSD and optimized your MacBook Pro for optimal performance and productivity. Enjoy the improved speed and storage capacity of your upgraded laptop!
Configure Your System Settings
Configuring your system settings is an important step in maximizing the performance and personalization of your MacBook Pro with the new SSD. Here are some key settings to adjust and customize:
1. Display: Adjust the display settings according to your preferences. This includes adjusting the screen resolution, brightness, and color temperature. You can also set up multiple displays if you use external monitors.
2. Keyboard and Trackpad: Customize your keyboard and trackpad settings to suit your typing and navigation preferences. Adjust key repeat speed, enable or disable keyboard backlights, and set up touch gestures on the trackpad.
3. Energy Saver: Optimize your MacBook Pro’s energy usage with the Energy Saver settings. Adjust the sleep and idle times, enable Power Nap for background tasks, and configure power management options to conserve battery life.
4. Dock: Customize the Dock to your liking. Add or remove applications, adjust the size and position, and enable or disable the magnification effect. You can also rearrange the icons on the Dock for easy access to your most-used apps.
5. Security & Privacy: Take steps to enhance the security of your MacBook Pro. Enable the firewall, manage app permissions, and set up FileVault to encrypt your disk. Configure privacy settings for apps like camera, microphone, and location services.
6. Sound: Adjust the sound settings to your preferences. Set the output volume, select the default audio device, and customize alert sounds for notifications and system events.
7. Siri: Enable Siri and personalize its settings. You can choose to activate Siri by voice or keyboard shortcut, customize the language and voice, and customize Siri suggestions and privacy settings.
8. Accessibility: Configure accessibility settings to make your MacBook Pro more user-friendly. Adjust options for visual, auditory, and motor impairments, such as display accommodations, auditory notifications, and keyboard accessibility.
9. Network Preferences: Set up and manage your network preferences. Configure Wi-Fi settings, manage network connections, set up a VPN for secure browsing, and customize advanced network options.
10. Time Machine: Set up and customize Time Machine backups. Configure backup destinations, exclude certain files and folders from backups, and set up automatic backup intervals for robust data protection.
11. System Updates: Keep your MacBook Pro up to date by enabling automatic system updates. Regularly check for and install software updates to ensure that you have access to the latest features, bug fixes, and security patches.
By carefully configuring these system settings, you can personalize your MacBook Pro and optimize its performance to meet your specific needs. Take the time to adjust these settings to enhance your overall user experience and make the most of your upgraded MacBook Pro with the new SSD.
Enjoy Your Upgraded MacBook Pro
Congratulations on successfully upgrading your MacBook Pro with the new SSD. With the improved performance and increased storage capacity, you are now ready to enjoy all the benefits of your upgraded laptop. Here are some things you can do to fully enjoy your upgraded MacBook Pro:
1. Experience lightning-fast speed: The SSD upgrade will greatly improve the speed and responsiveness of your MacBook Pro. You will notice faster boot times, quicker application launches, and speedy file transfers.
2. Multi-task with ease: With the increased storage capacity, you can now run multiple applications simultaneously without worrying about running out of space. Enjoy seamless multi-tasking and switch between tasks effortlessly.
3. Store more files and media: The larger storage capacity of your new SSD allows you to store more files, documents, photos, videos, and other media. Take advantage of the extra space to organize your digital life without worrying about running low on storage.
4. Enjoy smoother graphics and video playback: The improved performance of your MacBook Pro will enhance your multimedia experience. Enjoy smoother graphics rendering, lag-free video playback, and seamless video editing.
5. Work more efficiently: The speed and responsiveness of the new SSD will improve your productivity. Whether you’re working on documents, editing images or videos, or running resource-intensive applications, your MacBook Pro will keep up with your demands.
6. Back up your data regularly: Don’t forget to regularly back up your data to prevent any potential data loss. Use Time Machine or cloud storage solutions to ensure that your important files are safe and easily recoverable in case of emergencies.
7. Stay updated: Keep your MacBook Pro and its software up to date. Regularly check for system updates and install them to benefit from the latest features, improvements, and security patches offered by Apple.
8. Customize your workspace: Personalize your desktop, wallpapers, icons, and other visual elements to create a workspace that suits your style and preferences. Make your MacBook Pro truly yours with customizations that inspire and motivate you.
9. Explore new features and capabilities: Take the time to explore the various features and capabilities of your upgraded MacBook Pro. Experiment with new apps, learn new workflows, and discover shortcuts to enhance your overall experience.
10. Share your joy: If you’re thrilled with your upgraded MacBook Pro, don’t hesitate to share your experience with others. Spread the word and recommend the SSD upgrade to fellow MacBook Pro users who are looking to boost their laptop’s performance.
By following these tips, you can fully enjoy and make the most of your upgraded MacBook Pro with the new SSD. Embrace the improved performance, increased storage, and enhanced capabilities as you dive into your work, creative projects, and entertainment. Let your upgraded MacBook Pro empower you in achieving your goals and delivering exceptional results.