
Why should you update your graphics driver?
Updating your graphics driver is essential for ensuring optimal performance and compatibility with the latest software and games. Your graphics driver serves as a translator between your operating system and your graphics card, enabling the communication necessary to display images and videos on your screen. Here are a few reasons why you should regularly update your graphics driver:
- Improved Performance: Graphics driver updates often include performance enhancements and bug fixes that can significantly improve the speed and stability of your system. By updating your graphics driver, you can ensure that you are taking advantage of the latest optimizations for your graphics card.
- Compatibility with New Software: Software developers regularly release updates that incorporate new features and improvements. However, these updates may require updated graphics drivers to function properly. By keeping your graphics driver up to date, you can avoid compatibility issues and enjoy a smooth experience with the latest software releases.
- Support for New Games: If you are an avid gamer, updating your graphics driver is crucial for accessing the latest game optimizations and features. Game developers often work closely with graphics card manufacturers to ensure optimal performance and visual quality. By keeping your graphics driver updated, you can ensure that you are getting the best possible gaming experience.
- Security Fixes: Graphics driver updates also address security vulnerabilities that may be present in older versions. These vulnerabilities can potentially be exploited by malicious actors to gain unauthorized access to your system. By regularly updating your graphics driver, you can protect your system from potential security risks.
Check your current graphics driver version
Before you proceed with updating your graphics driver, it’s important to check the current version installed on your system. This will help you determine if an update is necessary and track your progress throughout the process. Here’s how you can check your current graphics driver version:
- Open Device Manager: Press the Windows key + R on your keyboard to open the Run dialog box. Type “devmgmt.msc” and press Enter to open the Device Manager.
- Expand the Display Adapters category: In the Device Manager window, locate and click the arrow next to the “Display Adapters” category to expand it. This will display the graphics card(s) installed on your system.
- Identify the graphics card: Look for the specific graphics card(s) under the Display Adapters category. The name of the card should be listed, such as “NVIDIA GeForce GTX 1080” or “AMD Radeon RX 5700 XT.”
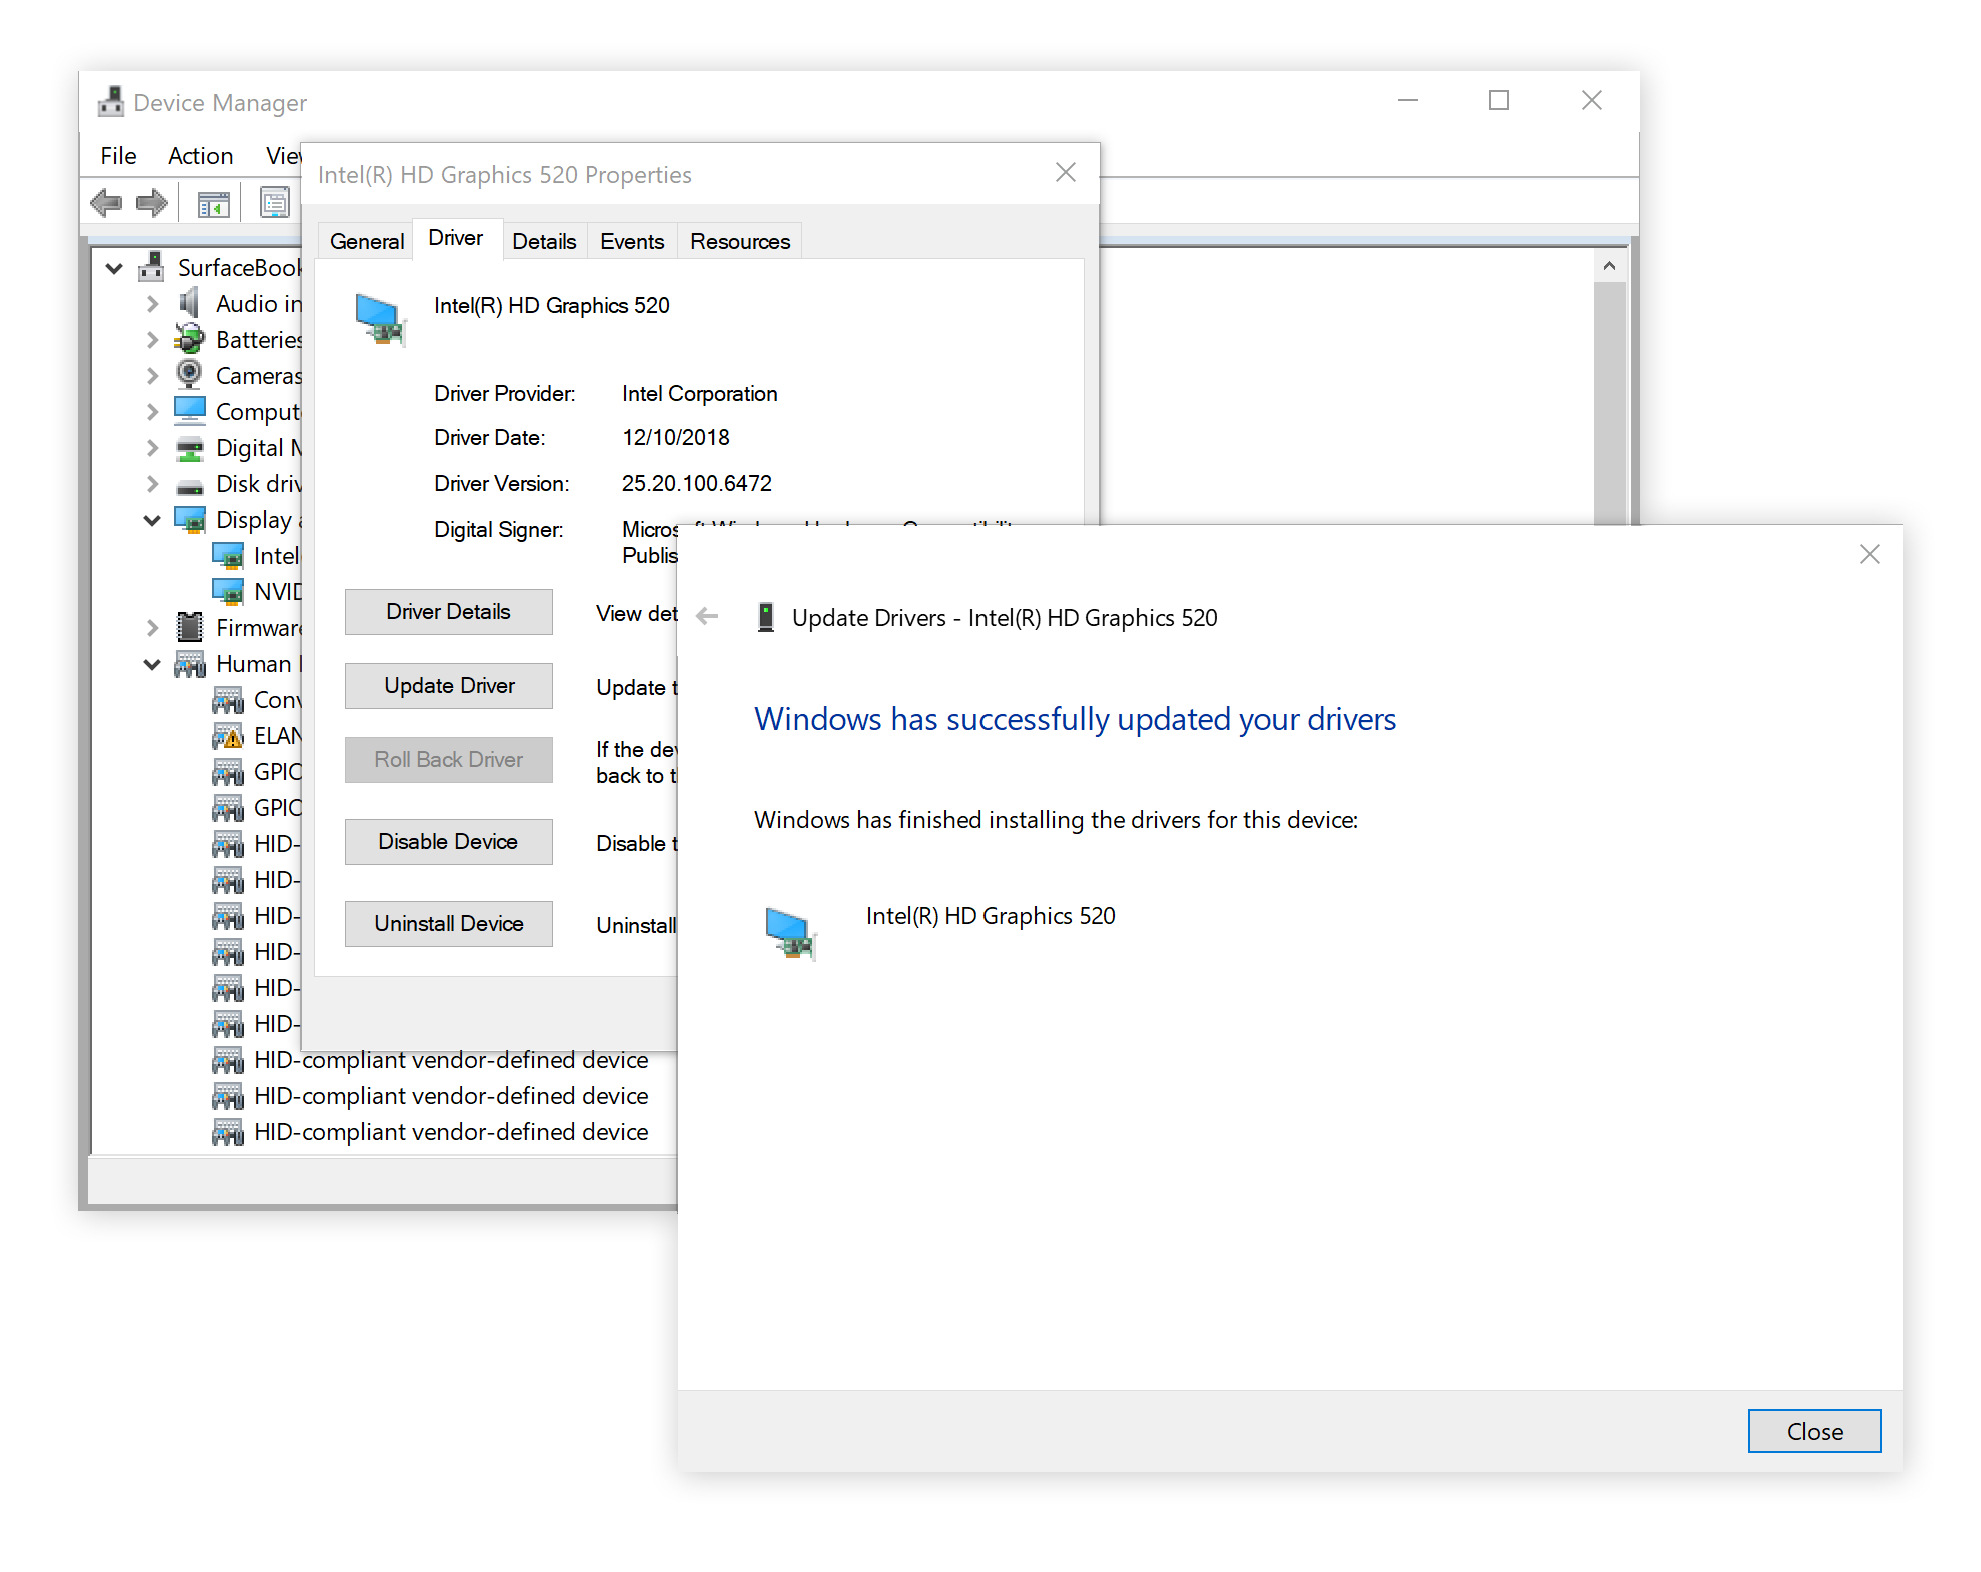
- Double-click on the graphics card: Right-click on the graphics card name and select “Properties” from the context menu. This will open the Properties window for the graphics card.
- Check the driver version: In the Properties window, navigate to the “Driver” tab. The driver version will be displayed here, such as “27.21.14.5671.” Take note of this version for reference when comparing it to the latest available driver.
By checking your current graphics driver version, you’ll have a better understanding of whether an update is needed and be able to track your progress in updating to the latest driver release. It’s important to keep in mind that different graphics cards may have different methods for checking the driver version, so the steps provided here may vary slightly depending on your specific hardware configuration.
Determine the graphics card manufacturer
Before you can update your graphics driver, it’s essential to determine the manufacturer of your graphics card. This information is crucial as different manufacturers have their own support websites and update processes. Here’s how you can determine the graphics card manufacturer:
- Open Device Manager: Press the Windows key + R on your keyboard to open the Run dialog box. Type “devmgmt.msc” and press Enter to open the Device Manager.
- Expand the Display Adapters category: In the Device Manager window, locate and click the arrow next to the “Display Adapters” category to expand it. This will display the graphics card(s) installed on your system.
- Identify the graphics card: Look for the specific graphics card(s) under the Display Adapters category. The name of the card should be listed, such as “NVIDIA GeForce GTX 1080” or “AMD Radeon RX 5700 XT.”
- Determine the manufacturer: Based on the name of the graphics card, you can determine the manufacturer. Some common manufacturers include NVIDIA, AMD, and Intel. Note down the manufacturer for reference when visiting their support website.
By determining the graphics card manufacturer, you’ll be able to find the appropriate drivers and support resources specifically tailored to your card. Each manufacturer may have their own driver update utilities or download pages, so it’s important to have this information ready when proceeding with the driver update process.
Visit the manufacturer’s website
Once you have determined the manufacturer of your graphics card, the next step in updating your graphics driver is to visit the manufacturer’s website. This is where you will find the latest driver updates and support resources for your specific graphics card. Here’s how you can visit the manufacturer’s website:
- NVIDIA: If you have an NVIDIA graphics card, go to the NVIDIA website at www.nvidia.com. Look for the “Drivers” or “Support” section of the website to access the driver download page.
- AMD: If you have an AMD graphics card, visit the AMD website at www.amd.com. Look for the “Drivers & Support” section of the website to access the driver download page.
- Intel: If you have an Intel integrated graphics card, go to the Intel website at www.intel.com. Look for the “Support” or “Downloads” section of the website to access the driver download page.
- Other Manufacturers: If you have a graphics card from a different manufacturer, such as ASUS or MSI, visit the manufacturer’s website directly. Look for the “Support” or “Drivers” section to access the appropriate driver download page.
Once you are on the manufacturer’s website, follow the instructions to navigate to the driver download page specific to your graphics card model. Different manufacturers may have different navigational paths, but typically you will need to select your graphics card model and operating system to proceed with the driver download.
It’s important to ensure that you are on the official manufacturer’s website to avoid downloading drivers from unreliable sources. Always double-check the website address to confirm its legitimacy. Visiting the manufacturer’s website is a crucial step in obtaining the correct and latest drivers for your graphics card.
Locate the correct graphics driver
Once you have arrived at the appropriate manufacturer’s website, the next step is to locate the correct graphics driver for your specific graphics card model and operating system. Here’s how you can do it:
- Select your graphics card model: Look for a drop-down menu, search bar, or list of graphics card models on the driver download page. Choose your exact graphics card model from the available options.
- Select your operating system: Most driver download pages will require you to select your operating system to ensure compatibility. Choose the operating system that matches your system, such as Windows 10, macOS, or Linux.
- Review the available driver options: After selecting your graphics card model and operating system, you will typically be presented with a list of available drivers. Pay attention to the version numbers, release dates, and any additional information provided to identify the latest and most suitable driver for your needs.
- Download the graphics driver: Once you have identified the correct driver for your graphics card and operating system, click on the “Download” or similar button to initiate the driver download. Choose a location on your computer where you can easily find the downloaded file.
It’s important to ensure that you download the correct and up-to-date driver to avoid compatibility issues and potential problems. Make sure to double-check your graphics card model and operating system before proceeding with the download.
If you are unsure about the correct driver for your graphics card, some manufacturer websites provide automatic detection tools or utilities that can identify your hardware and recommend the appropriate driver for you. These tools can simplify the process and help ensure you get the correct driver without manual searching and selection.
Download the graphics driver
Once you have located the correct graphics driver for your specific graphics card model and operating system, it’s time to download the driver. Follow these steps to download the graphics driver:
- Click on the download link: On the driver download page, click on the download link or button associated with the correct driver for your graphics card and operating system. This will initiate the driver download process.
- Choose a download location: When prompted, choose a location on your computer where you want to save the downloaded driver file. It is recommended to save it in a location that is easy to find, such as the “Downloads” folder.
- Wait for the download to complete: The download process may take some time depending on the size of the driver file and your internet connection speed. Make sure not to interrupt the download process.
- Scan the downloaded file for viruses: Before proceeding with the installation, it is a good practice to scan the downloaded driver file with your antivirus software to ensure it is safe and free from any malware or viruses.
Downloading the graphics driver is a crucial step in getting the latest updates and improvements for your graphics card. It is important to download the driver from the official manufacturer’s website to ensure its authenticity and reliability. Avoid downloading drivers from third-party websites, as they may offer outdated or modified versions that could potentially harm your system.
Once the driver download is complete and you have scanned it for viruses, you are ready to proceed with the installation process to update your graphics driver.
Install the downloaded graphics driver
After you have downloaded the graphics driver for your specific graphics card and operating system, the next step is to install the driver. Follow these steps to install the downloaded graphics driver:
- Locate the downloaded driver file: Navigate to the location where you saved the downloaded driver file. It is typically in your “Downloads” folder or the location you selected during the download process.
- Double-click on the driver file: Double-click on the driver file to start the installation. You may be prompted to confirm your intent to run the file if your system has security measures in place.
- Follow the on-screen instructions: The installation process will vary depending on the manufacturer and driver version. Follow the on-screen instructions provided by the driver installer. These instructions may include accepting license agreements, choosing installation options, and confirming the installation process.
- Wait for the installation to complete: The installation process may take a few moments to complete. Be patient and do not interrupt the installation process. Your screen may flicker or go black temporarily during the installation, which is normal.
- Restart your computer: After the driver installation is complete, it is recommended to restart your computer to ensure that the changes take effect. Save any open work and close any running programs before restarting your system.
It is important to note that during the driver installation, your screen may flicker or go black temporarily. This is normal and part of the installation process. After the installation and computer restart, your graphics driver should be updated to the latest version.
If you encounter any issues during the installation process, such as error messages or compatibility problems, consult the manufacturer’s support resources and documentation for troubleshooting steps.
Restart your computer
After successfully installing the graphics driver, it is important to restart your computer to ensure that the changes take effect and the updated driver is fully integrated into your system. Here are the steps to restart your computer:
- Save your work: Before restarting your computer, save any open documents and close any running programs. This will ensure that you don’t lose any unsaved work.
- Close all programs: Make sure to close all open programs to avoid any conflicts or issues during the restart process.
- Click on the Start menu: Click on the Start button located at the bottom left corner of your screen.
- Choose the “Restart” option: From the Start menu, select the “Restart” option. This will initiate the restart process for your computer.
- Wait for the restart: Your computer will now shut down and start the restart process. This may take a few moments. Avoid interrupting the restart process by pressing the power button or unplugging your computer.
- Log in to your computer: Once the restart is complete, your computer will boot up and you will be prompted to log in. Enter your username and password to access your system.
Restarting your computer is important to ensure that the changes made by the updated graphics driver are fully applied. This will allow your system to recognize and utilize the new driver for improved performance and compatibility.
After restarting, you can verify the successful installation of the updated graphics driver by checking the driver version or testing the graphics performance in games or applications. If you encounter any issues or notice any anomalies, you may need to troubleshoot the driver installation or seek further assistance from the manufacturer’s support resources.
Verify the graphics driver installation
After restarting your computer following the graphics driver installation, it is important to verify that the driver has been successfully installed and is functioning correctly. Here are a few steps to help you verify the graphics driver installation:
- Check the driver version: Open the Device Manager by pressing the Windows key + R on your keyboard, typing “devmgmt.msc,” and pressing Enter. Expand the “Display Adapters” category, right-click on your graphics card, and select “Properties.” In the Properties window, navigate to the “Driver” tab and confirm that the driver version matches the updated driver you installed.
- Update any remaining drivers: While you’re in the Device Manager, it’s a good idea to check for any other outdated drivers and update them as well. Look for any devices with yellow exclamation marks, indicating driver issues, and update those drivers as necessary.
- Test graphics performance: Run some graphics-intensive applications, such as games or video editing software, to assess the performance of your graphics card. If you notice smoother graphics, improved rendering, and faster load times compared to before the driver update, it indicates a successful installation.
- Check for stability: Monitor your computer for any crashes, freezes, or visual anomalies after the driver installation. A stable system without any major issues indicates that the graphics driver is functioning well.
- Visit the manufacturer’s support community: If you encounter any problems, visiting the manufacturer’s support community or forums can provide helpful insights and solutions. Other users may have experienced similar issues and can offer guidance or troubleshoot with you.
By verifying the graphics driver installation, you can ensure that the updated driver is correctly installed and functioning as intended. If you experience any difficulties or notice any issues after installation, you may need to seek further assistance from the manufacturer’s support resources or consider reinstalling the graphics driver.
Remember, keeping your graphics driver up to date is important for optimal performance, compatibility with the latest software and games, and security. Therefore, it is recommended to periodically check for new driver updates and install them to keep your system running smoothly.
Troubleshooting common issues with graphics driver updates
While updating your graphics driver is usually a smooth process, you may encounter some common issues along the way. Here are a few troubleshooting steps you can take to address these issues:
- Rollback to a previous driver: If you experience compatibility issues or encounter problems after updating your graphics driver, you can try rolling back to a previous version. Open the Device Manager, expand the “Display Adapters” category, right-click on your graphics card, select “Properties,” go to the “Driver” tab, and click on “Roll Back Driver” if available. This will revert your graphics driver to the previous version.
- Reinstall the graphics driver: If the updated driver is causing issues, you can reinstall it to ensure a clean installation. Uninstall the current driver by right-clicking on your graphics card in the Device Manager, selecting “Uninstall device,” and checking the box to delete the driver software. After uninstalling, restart your computer and reinstall the driver using the latest version from the manufacturer’s website.
- Perform a clean installation: To ensure a thorough installation, you can perform a clean installation of the graphics driver. This involves uninstalling the previous driver, rebooting your computer, and using a driver uninstaller tool (available on the manufacturer’s website) to remove any remaining driver files. Afterward, proceed with a fresh installation of the updated driver.
- Disable antivirus software: In some cases, antivirus software may interfere with the graphics driver installation process. Temporarily disable your antivirus software before installing the driver and re-enable it afterward to ensure a smooth installation.
- Update your operating system: Ensure that your operating system is up to date with the latest updates and patches. Sometimes, outdated operating systems can cause compatibility issues with new graphics driver updates. Check for updates in your system settings and install any available updates before proceeding with the driver update.
If you have tried the above troubleshooting steps and are still experiencing issues with your graphics driver update, it is recommended to seek further assistance from the manufacturer’s support resources. They can provide specific guidance and troubleshooting for your graphics card model and system configuration.
Remember, maintaining an updated graphics driver is crucial for optimal performance, compatibility, and security. Therefore, it’s worth investing time in troubleshooting and resolving any issues that may arise during the update process.