
Check Display Settings
If you find yourself with a sideways or upside-down screen on your Windows computer, the first step in fixing it is to check your display settings. This simple solution may resolve the issue without the need for any additional troubleshooting or software installations.
To access the display settings, right-click on your desktop and select “Display settings” from the drop-down menu. This will open the “Settings” window, where you can customize various aspects of your screen’s appearance and behavior.
Once in the display settings, navigate to the “Orientation” section. Here, you can select the desired orientation for your screen: landscape, portrait, landscape (flipped), or portrait (flipped). If your screen is currently sideways or upside-down, it is likely set to an incorrect orientation. Select the appropriate option that matches your desired screen orientation.
After selecting the correct orientation, click on the “Apply” button to save the changes. Your screen should now display in the correct orientation. If the issue persists, try rotating the screen to a different orientation and then back to the desired orientation to see if it helps.
It’s important to note that the steps to access display settings may vary slightly depending on your version of Windows. If you’re unable to find the display settings through the right-click menu, you can also access them by going to the Control Panel and selecting “Appearance and Personalization” followed by “Display.” From there, you can adjust the display settings just as described earlier.
If checking the display settings doesn’t resolve the issue, don’t worry. There are other methods you can try to fix a sideways or upside-down screen in Windows. It’s important to explore all options before seeking professional assistance or making major changes to your computer’s hardware.
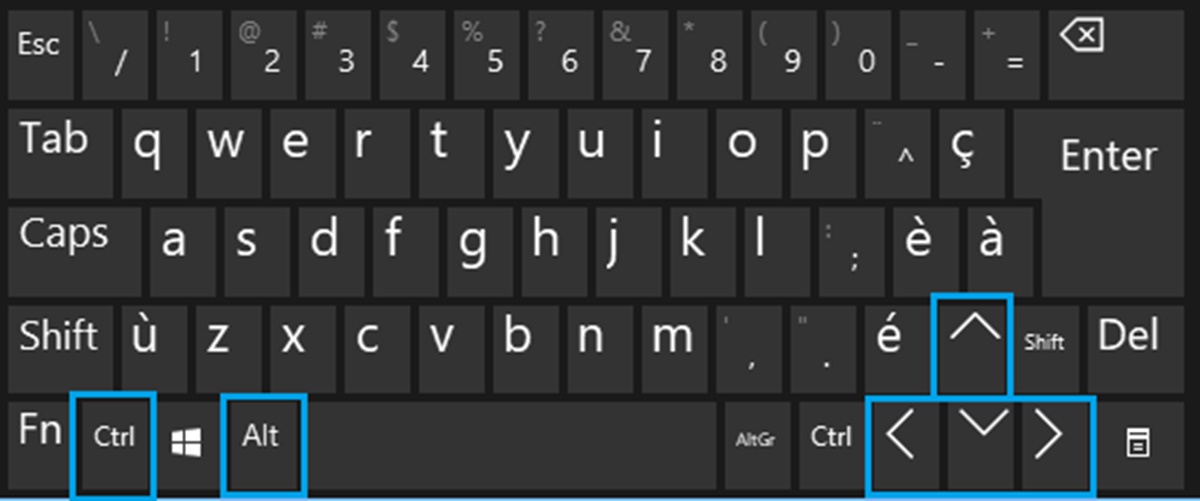
Use Keyboard Shortcuts
If your screen is sideways or upside-down and you’re unable to navigate through the display settings, using keyboard shortcuts can be an effective solution. Windows provides several keyboard shortcuts that allow you to quickly rotate the screen and bring it back to the correct orientation.
The most commonly used keyboard shortcut to rotate the screen is Ctrl + Alt + Arrow keys. Pressing these keys simultaneously allows you to rotate the screen to different orientations:
- Ctrl + Alt + Right Arrow: Rotate the screen to a 90-degree clockwise orientation.
- Ctrl + Alt + Left Arrow: Rotate the screen to a 90-degree counterclockwise orientation.
- Ctrl + Alt + Up Arrow: Restore the screen to the default landscape orientation.
By experimenting with these keyboard shortcuts, you can easily determine the correct combination to bring your screen back to the correct orientation. It’s important to note that some keyboards may have different placement or variations of these shortcut keys, so you may need to adjust accordingly.
If the keyboard shortcuts don’t work or your keyboard doesn’t have the necessary arrow keys, there’s an alternative method you can try. Press Ctrl + Alt + Delete to bring up the Windows Security screen. From there, click on “Task Manager” and then select “File” from the top menu. Choose “Run new task” and type “explorer.exe” into the field. Press Enter to execute the command, and this should refresh your desktop and potentially resolve the screen orientation issue.
Using keyboard shortcuts to fix a sideways or upside-down screen is a quick and convenient solution. It eliminates the need to navigate through complex menus or install additional software. However, keep in mind that this method may not work for all hardware configurations or Windows versions. If you’re still experiencing screen orientation problems, continue reading for alternative solutions.
Change Graphics Settings
If your screen is still displaying sideways or upside-down, adjusting the graphics settings can help resolve the issue. Windows allows you to modify the graphics settings through the graphics control panel provided by your graphics card manufacturer.
First, right-click on your desktop and look for an option that says “Graphics Options,” “Graphics Properties,” or something similar. This will vary depending on the graphics card installed on your computer. Clicking on this option will open the graphics control panel.
Once inside the graphics control panel, locate the display settings or rotation settings. The specific location of these settings may vary depending on the graphics card manufacturer and the version of the control panel software you have installed.
When you find the display settings, look for an option that allows you to change the screen rotation. The available options may include landscape, portrait, auto-rotate, or a specific degree of rotation. Select the desired rotation option that matches the correct orientation for your screen.
After adjusting the graphics settings, click on the apply or save button to save the changes. Your screen should now display in the correct orientation. If the issue persists, try rotating the screen to a different orientation and then back to the desired orientation to see if it helps.
If you’re unable to find the graphics control panel or the rotation settings, you can also try accessing them through the Windows Display Settings. Right-click on your desktop, select “Display settings,” and then click on “Advanced display settings.” From there, click on “Display adapter properties” and navigate to the “Rotation” dropdown menu to adjust the rotation settings.
Changing the graphics settings can often provide a solution for a sideways or upside-down screen. However, if this method doesn’t resolve the issue, continue reading to explore other potential solutions.
Update Graphics Drivers
In some cases, outdated or incompatible graphics drivers can cause issues with screen orientation. Updating these drivers can potentially fix the problem and restore your screen to the correct orientation. Here’s how you can update your graphics drivers:
1. To begin, right-click on the Windows Start button and select “Device Manager” from the menu that appears.
2. In the Device Manager window, locate the category labeled “Display adapters” and click on the arrow next to it to expand the list of graphics cards installed on your computer.
3. Right-click on the graphics card name and select “Update driver” from the context menu that appears.
4. Choose the option to automatically search for updated driver software. Windows will then search for the latest driver version online and install it if available. This process may take a few minutes, so ensure that you have a stable internet connection.
5. Once the driver update is complete, restart your computer to apply the changes to your system.
If Windows cannot find an updated driver automatically, you can also visit the website of your graphics card manufacturer and locate the latest driver for your specific model. Download the driver and install it manually by following the instructions provided by the manufacturer.
Updating graphics drivers not only enhances the performance and stability of your system, but it can also help resolve issues related to screen orientation. If updating the drivers doesn’t fix the problem, there may be other underlying causes that need to be addressed.
Keep in mind that graphics drivers should be updated regularly to ensure optimal performance, compatibility, and security. It is a good practice to check for driver updates periodically and install them as needed.
Reinstall Graphics Drivers
If updating the graphics drivers didn’t resolve the issue with your screen orientation, reinstalling the graphics drivers can be a next step to consider. Reinstalling the drivers can help in case there was a problem with the installation or if the current drivers are corrupted. Here’s how you can reinstall the graphics drivers:
1. Start by opening the Device Manager. Right-click on the Windows Start button, select “Device Manager” from the menu that appears.
2. In the Device Manager window, locate the category labeled “Display adapters” and click on the arrow next to it to expand the list of graphics cards installed on your computer.
3. Right-click on the graphics card name and select “Uninstall device” from the context menu that appears.
4. In the confirmation dialog, check the box that says “Delete the driver software for this device” and click on “Uninstall” to proceed with the uninstallation.
5. Once the uninstallation process is complete, restart your computer.
Upon restarting your computer, Windows will automatically reinstall the default graphics drivers. These drivers will be generic and may not have the full capabilities and features of the specific drivers provided by your graphics card manufacturer. However, they should be sufficient to restore the screen orientation to its default settings.
If the default drivers don’t resolve the issue or if you have specific drivers provided by your graphics card manufacturer that you’d like to reinstall, you can download the latest drivers from their website. Visit the manufacturer’s website, locate the correct drivers for your graphics card model and operating system, and follow their installation instructions.
Reinstalling the graphics drivers can often resolve issues that are related to the software or driver installation. However, if the issue persists, there may be other underlying causes that need to be addressed.
Adjust Screen Orientation
If you’re still facing a sideways or upside-down screen on your Windows computer, manually adjusting the screen orientation settings can help resolve the issue. Windows provides a simple option to rotate the screen to the correct orientation. Here’s how you can adjust the screen orientation:
1. Right-click on your desktop and select “Display settings” from the drop-down menu. This will open the “Settings” window.
2. In the “Settings” window, scroll down and click on the link that says “Advanced display settings.”
3. Under the “Orientation” section, you’ll find options to change the screen orientation. The available options may include Landscape, Portrait, Landscape (flipped), and Portrait (flipped). Select the orientation that matches the desired screen orientation – usually, Landscape for a regular screen setup.
4. Once you’ve selected the appropriate orientation, click on the “Apply” button to save the changes. Your screen should now display in the correct orientation. If the issue still persists, try rotating the screen to a different orientation and then back to the desired orientation.
It’s important to note that the steps and options to adjust screen orientation may slightly vary depending on your version of Windows. If you’re unable to find the display settings or advanced options, you can also try accessing them through the control panel. Just open the control panel, navigate to the “Appearance and Personalization” section, and then click on “Display” to find the screen orientation options.
Manually adjusting the screen orientation can be an effective way to fix a sideways or upside-down screen. However, if the issue continues to persist, there may be other underlying causes that require further troubleshooting.
Use Screen Rotation Software
If you’ve tried adjusting the screen orientation settings in Windows but are still facing issues with a sideways or upside-down screen, using screen rotation software can be another solution to consider. Screen rotation software allows you to manually control and adjust the screen orientation, providing more flexibility and customization options than the built-in Windows settings. Here’s how you can use screen rotation software:
1. Start by researching and selecting a reliable screen rotation software that is compatible with your Windows operating system. There are various free and paid options available online, so choose one that suits your preferences.
2. Download and install the screen rotation software onto your computer following the provided instructions. Make sure to download the software from a trusted source to avoid any potential security risks.
3. Once the software is installed, launch it and familiarize yourself with the user interface. Most screen rotation software offers intuitive controls that allow you to easily adjust the screen orientation to your desired position.
4. Experiment with the available options and controls within the software to rotate the screen to the correct orientation. These options may include selecting a specific degree of rotation, setting hotkeys for quick screen rotation, or even creating custom profiles for different display setups.
5. Once you’ve adjusted the screen orientation as desired, save the settings within the screen rotation software. This will ensure that the chosen orientation is applied consistently whenever you use your computer.
Using screen rotation software provides additional flexibility and control over your screen’s orientation compared to the standard Windows settings. It can be particularly useful for special setups such as dual monitors or if you frequently switch between different screen orientations.
However, keep in mind that screen rotation software might not be necessary for everyone, especially if your main goal is to fix a one-time issue with a sideways or upside-down screen. If the screen rotation software doesn’t resolve the problem or doesn’t meet your needs, continue exploring other potential solutions.
Perform a System Restore
If you’ve exhausted all other options and are still unable to fix the issue with your sideways or upside-down screen, performing a system restore can be a last resort solution. System restore allows you to revert your computer’s settings back to a previous point in time when the screen orientation was functioning correctly. Here’s how you can perform a system restore:
1. Press the Windows key on your keyboard and type “system restore” in the search bar. Select the “Create a restore point” option from the search results.
2. In the System Properties window, click on the “System Restore” button. This will open the System Restore wizard.
3. Click on “Next” to proceed and you will be presented with a list of available restore points. It’s recommended to choose a restore point that is dated prior to when you started experiencing the screen orientation issue.
4. Once you’ve selected the desired restore point, click on “Next” and then click on “Finish” to initiate the system restore process.
5. The system restore process may take some time to complete, as it involves rebooting your computer and restoring the system to the chosen restore point. Follow the on-screen instructions and wait for the process to finish.
Once the system restore is complete, your computer will be reverted back to the selected restore point, including all system settings and configurations. Check if the screen orientation issue has been resolved. If the problem persists, it may indicate a more deeply rooted issue that requires further investigation or professional assistance.
It’s important to note that performing a system restore will not affect your personal files, but it may remove any software installations or updates made after the chosen restore point. Therefore, it’s crucial to ensure you have a backup of any important files or data before proceeding with a system restore.
Performing a system restore can be a powerful tool to recover your computer’s functionality and resolve stubborn screen orientation issues. However, it should be used with caution and as a last resort option, as it can potentially undo recent changes made to your system.
Seek Professional Help
If you’ve tried all the troubleshooting steps and solutions mentioned above but are still unable to fix the sideways or upside-down screen issue, it may be time to seek professional help. Sometimes, the problem can be more complex and require the expertise of a computer technician or specialist. Here are a few options to consider when seeking professional assistance:
1. Contact Manufacturer Support: If your computer or graphics card is still under warranty, reaching out to the manufacturer’s support team can be a good starting point. They can provide you with guidance on how to address the screen orientation issue or may recommend sending your device in for repairs.
2. Visit a Local Repair Shop: Look for reputable computer repair shops in your area. These professionals have the knowledge and experience to diagnose and fix a variety of hardware and software issues. They can assess the problem with your screen orientation and provide the necessary repairs or recommendations.
3. Hire a Remote Technician: Remote computer technicians can assist you in resolving the screen orientation issue from the comfort of your own home. They can remotely access your computer and troubleshoot the problem, providing guidance or executing necessary steps to fix the issue.
4. Join Online Tech Support Communities: There are numerous online forums and communities where you can seek assistance from knowledgeable individuals who may have encountered similar screen orientation issues. They can offer suggestions, tips, or workaround solutions based on their own experiences.
When seeking professional help, it’s important to communicate the steps you’ve already taken to troubleshoot the problem. This can help the technician or community members better understand the situation and provide more accurate solutions.
Keep in mind that seeking professional help may come with additional costs, especially if your device is no longer covered by warranty. However, it can save you time, frustration, and potentially prevent further damage to your computer in the long run.
Remember, troubleshooting computer issues can sometimes be challenging, and seeking professional help is a valid and smart option when your efforts have been exhausted. Don’t hesitate to reach out to experts who can provide the required expertise to fix the problem with your sideways or upside-down screen.