
Backup your important files and folders
Before proceeding with the uninstallation process of Kaspersky in Safe Mode on Windows XP, it’s crucial to create a backup of your important files and folders. This step ensures that your valuable data is preserved and accessible even after the uninstallation process.
Creating a backup is a simple and necessary precaution that safeguards your files from any potential loss or corruption. Follow these steps to backup your important data:
- Identify your essential files and folders: Determine which files and folders are crucial to you. These could include personal documents, photos, videos, or any other data that you want to preserve.
- Choose a backup method: There are several ways to backup your files. You can use external storage devices like USB drives or external hard drives, or make use of cloud storage services like Google Drive or Dropbox.
- Copy your files to the chosen backup location: Once you have selected your preferred method, start copying your important files and folders to the backup location. You can follow the drag-and-drop method or use the appropriate software provided by the backup solution.
- Verify the backup: Once the backup process is complete, double-check that all your essential files and folders have been successfully transferred and are accessible in the backup location. This step ensures that the backup was created accurately.
By backing up your important files and folders, you can proceed with the uninstallation process of Kaspersky without worrying about potential data loss. In case any issues occur during the uninstallation, you can restore your files from the backup and continue using your computer smoothly.
Restart your computer in Safe Mode
In order to uninstall Kaspersky in Safe Mode on Windows XP, you need to restart your computer in Safe Mode. Safe Mode allows you to perform troubleshooting tasks and uninstall software that may be causing issues. Here’s how you can restart your computer in Safe Mode:
- Close all programs: Before restarting your computer, make sure to close all open programs and save any unsaved work.
- Click on the Start menu: Click on the “Start” button located at the bottom left corner of your screen.
- Choose Restart: From the Start menu, click on “Restart” to initiate the restart process.
- Press F8 key during restart: As your computer restarts, keep pressing the F8 key repeatedly until you see the Windows Advanced Options Menu.
- Select Safe Mode: Use the arrow keys on your keyboard to navigate to the “Safe Mode” option on the Windows Advanced Options Menu.
- Press Enter: Once “Safe Mode” is selected, press the Enter key on your keyboard to restart your computer in Safe Mode.
After following these steps, your computer will restart in Safe Mode. In Safe Mode, the operating system loads only essential drivers and services, allowing you to uninstall Kaspersky without any interference from other programs or processes. This provides a stable environment for performing the uninstallation process and helps resolve any issues that may be encountered during regular mode uninstallation.
It is important to note that while in Safe Mode, the screen resolution may be lower, and the graphics and sound drivers may not function as they do in normal mode. Additionally, certain features and functionalities may be limited. However, this temporary adjustment is necessary to ensure the successful uninstallation of Kaspersky in Safe Mode on Windows XP.
Disable or uninstall other security software
Before proceeding with the uninstallation of Kaspersky in Safe Mode on Windows XP, it is advisable to disable or uninstall any other security software that may be running on your computer. This step is essential to avoid conflicts and ensure a smooth uninstallation process. Here’s how you can disable or uninstall other security software:
- Identify other security software: Take note of any antivirus, firewall, or other security software that is currently installed on your computer.
- Disable real-time protection: Open the user interface of each security software and navigate to the settings or preferences. Look for options related to real-time protection and temporarily disable this feature. This will prevent the software from interfering with the uninstallation of Kaspersky.
- Uninstall other security software: If you have decided to replace the existing security software with Kaspersky, it is recommended to uninstall the previous software completely. Open the Control Panel, access the “Add or Remove Programs” or “Programs and Features” option, and locate the security software from the list. Select the software and click on the “Uninstall” or “Remove” button. Follow the on-screen instructions to complete the uninstallation process.
- Restart your computer: After disabling or uninstalling the other security software, restart your computer to finalize the changes.
Disabling or uninstalling other security software ensures that there are no conflicts when uninstalling Kaspersky in Safe Mode. It prevents any active protection or background processes from interfering with the uninstallation process and allows Kaspersky to be removed cleanly from your system.
Remember to re-enable or install a new security software after you have successfully uninstalled Kaspersky to keep your computer protected against potential threats.
Access the Control Panel
In order to uninstall Kaspersky in Safe Mode on Windows XP, you need to access the Control Panel. The Control Panel is a centralized location where you can manage various settings and features on your computer. Here’s how you can access the Control Panel:
- Click on the Start menu: Click on the “Start” button located at the bottom left corner of your screen.
- Open the Control Panel: From the Start menu, click on “Control Panel” to open the Control Panel window.
Alternatively, you can access the Control Panel through different methods:
- Search: Type “Control Panel” in the search bar on the Start menu and select the Control Panel option from the search results.
- Run Command: Press the Windows key + R on your keyboard to open the Run dialog box. Type “control” in the box and click “OK.” This will open the Control Panel.
- Shortcut: If you have a shortcut to the Control Panel on your desktop or taskbar, you can simply click on it to open the Control Panel window.
Once you have accessed the Control Panel, you can proceed with the next steps to uninstall Kaspersky in Safe Mode. The Control Panel provides you with the necessary tools and options to manage and modify software and settings on your Windows XP computer.
It is important to note that the steps to access the Control Panel may vary slightly depending on your specific version of Windows XP or any modifications made to your computer’s settings. However, the general method of accessing the Control Panel described above should work for most situations.
Open the Add or Remove Programs window
Once you have accessed the Control Panel, the next step in uninstalling Kaspersky in Safe Mode on Windows XP is to open the Add or Remove Programs window. This window provides a list of all the installed programs on your computer, allowing you to manage and uninstall them. Here’s how you can open the Add or Remove Programs window:
- Locate the Programs section: In the Control Panel window, look for the section or icon labeled “Programs” or “Programs and Features.” The name may vary depending on your version of Windows XP.
- Click on the Programs section: Once you’ve located the Programs section, click on it to access the Programs window.
- Find the Add or Remove Programs option: Within the Programs window, you should see an option called “Add or Remove Programs,” “Uninstall a program,” or a similar label. Click on this option to open the Add or Remove Programs window.
Alternatively, you can directly open the Add or Remove Programs window by following these steps:
- Click on the Start menu: Click on the “Start” button located at the bottom left corner of your screen.
- Open the Control Panel: From the Start menu, click on “Control Panel” to open the Control Panel window.
- Access the Add or Remove Programs window: In the Control Panel window, locate and click on the “Add or Remove Programs,” “Uninstall a program,” or similar option to open the Add or Remove Programs window.
Once you have successfully opened the Add or Remove Programs window, you can proceed with the next steps to uninstall Kaspersky in Safe Mode. This window lists all the installed programs on your computer, providing you with a convenient interface to manage and uninstall them as needed.
Note that the steps to open the Add or Remove Programs window might slightly vary depending on your specific version of Windows XP. However, the general methods described above should work for most situations.
Locate and select Kaspersky from the list
After opening the Add or Remove Programs window, the next step in uninstalling Kaspersky in Safe Mode on Windows XP is to locate and select Kaspersky from the list of installed programs. This will ensure that you can remove Kaspersky from your computer. Here’s how you can locate and select Kaspersky:
- Scroll through the list: In the Add or Remove Programs window, you will see a list of all the installed programs on your computer. Scroll through the list to find Kaspersky.
- Look for Kaspersky: Use your eyes to locate the entry for Kaspersky. The name may appear as “Kaspersky,” “Kaspersky Security,” or a similar variation depending on the specific Kaspersky product installed on your computer.
- Select Kaspersky: Once you have located Kaspersky in the list, click on it to select it.
If you have a long list of installed programs and find it difficult to locate Kaspersky manually, you can use the search feature provided in the Add or Remove Programs window. Here’s how:
- Click on the “Name” or “Program” column header: This will sort the list alphabetically by program name.
- Type “Kaspersky” in the search bar: Look for a search bar or text box within the Add or Remove Programs window. Type “Kaspersky” in the search bar to filter the list and display only the entries that match the search term.
- Select Kaspersky from the filtered list: From the filtered list of programs, locate Kaspersky and click on it to select it.
Once you have successfully located and selected Kaspersky from the list, you are ready to proceed with the next steps to uninstall Kaspersky in Safe Mode. Selecting Kaspersky ensures that the uninstallation process specifically targets this program and removes it from your Windows XP computer.
Note that the steps to locate and select Kaspersky may vary slightly depending on the version of Windows XP or the specific layout of the Add or Remove Programs window. However, the general methods described above should work for most situations.
Click Uninstall/Change
Once you have selected Kaspersky from the list of installed programs in the Add or Remove Programs window, the next step in uninstalling Kaspersky in Safe Mode on Windows XP is to click on the Uninstall/Change button. This button initiates the uninstallation process for Kaspersky. Here’s how you can proceed:
- Locate the Uninstall/Change button: In the Add or Remove Programs window, look for the button labeled “Uninstall,” “Change,” or a similar term. It is usually located near the top or bottom of the window.
- Click on the Uninstall/Change button: Once you have located the Uninstall/Change button, click on it to start the uninstallation process.
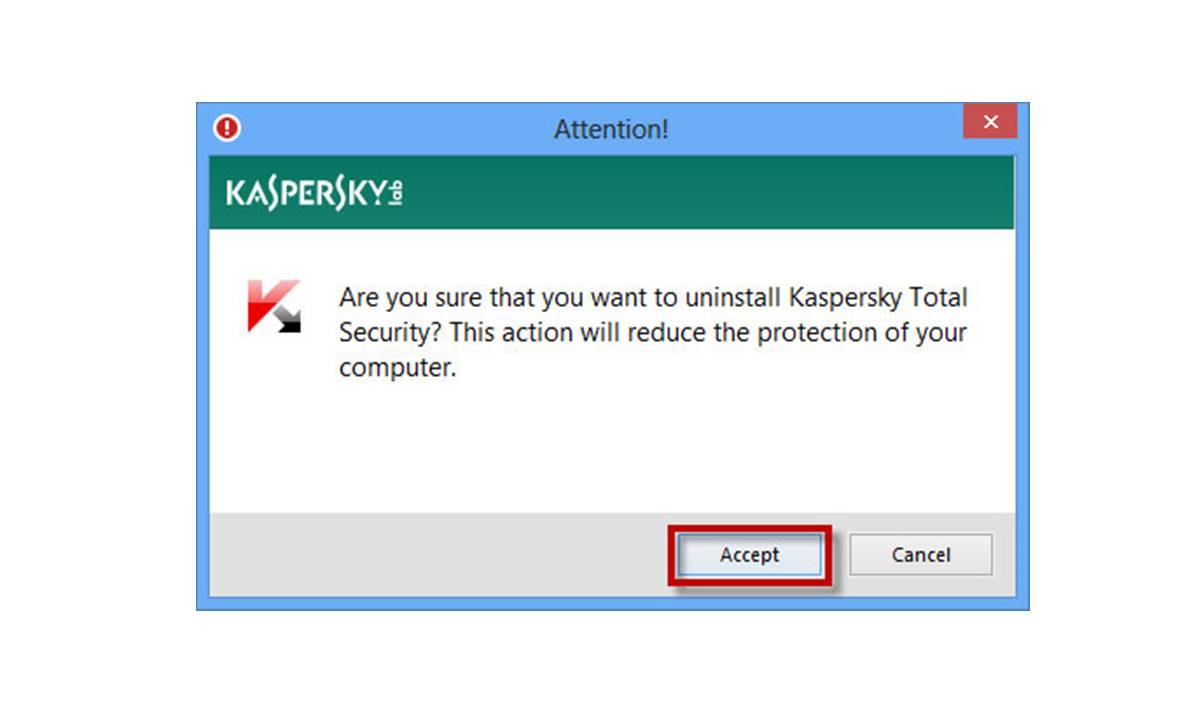
After clicking the Uninstall/Change button, a confirmation dialog or prompt from the Kaspersky uninstaller may appear. This dialog may ask you to confirm the uninstallation and prompt you with options or additional instructions. Read and follow the instructions carefully to proceed with the uninstallation process.
Depending on your specific version of Kaspersky and the settings you have selected during installation, you may have additional options such as modifying the installation or repairing the program. If you wish to uninstall Kaspersky completely, make sure to choose the appropriate option during this step.

Example of an Uninstall/Change button in the Add or Remove Programs window
Clicking the Uninstall/Change button is a crucial step in the uninstallation process of Kaspersky in Safe Mode. This action launches the necessary procedures to remove the Kaspersky software from your Windows XP computer.
Note that the appearance and location of the Uninstall/Change button may vary depending on the version of Windows XP or the specific layout of the Add or Remove Programs window. However, the general method described above should work for most situations.
Follow the on-screen instructions
After clicking the Uninstall/Change button in the Add or Remove Programs window to initiate the uninstallation process of Kaspersky in Safe Mode on Windows XP, you will need to follow the on-screen instructions provided by the Kaspersky uninstaller. These instructions guide you through the specific steps to complete the uninstallation. Here’s how you can proceed:
- Read and understand the instructions: Carefully read the on-screen instructions presented by the Kaspersky uninstaller. Make sure to understand each step before proceeding.
- Follow the step-by-step process: As instructed, follow each step outlined by the uninstaller. This may include confirming the removal, selecting additional options, or providing input when required.
- Wait for the uninstallation to complete: Depending on the size of your Kaspersky installation and the speed of your computer, the uninstallation process may take a few moments. Be patient and allow the process to complete.
- Restart your computer (if required): Once the uninstallation process is finished, you may be prompted to restart your computer. If prompted, save any ongoing work, close all programs, and allow your computer to restart.
During the uninstallation process, be mindful of any prompts or notifications that may require your response. For example, you may be asked to confirm the removal of certain files or components. It’s important to follow the instructions accurately to ensure a successful and complete uninstallation of Kaspersky.
By following the on-screen instructions provided by the Kaspersky uninstaller, you can confidently proceed through the required steps and complete the uninstallation process in Safe Mode on Windows XP. This guarantees that Kaspersky is removed from your computer efficiently and without any lingering files or settings.
Keep in mind that the exact on-screen instructions may vary depending on the specific version of Kaspersky and your installation settings. However, the general guidance outlined above should apply in most cases.
Restart your computer in normal mode
After successfully uninstalling Kaspersky in Safe Mode on Windows XP, the next step is to restart your computer in normal mode. Normal mode allows your computer to boot up with all the usual drivers and services, providing a standard operating environment for everyday use. Here’s how you can restart your computer in normal mode:
- Close all programs: Before restarting your computer, make sure to close all open programs and save any unsaved work.
- Click on the Start menu: Click on the “Start” button located at the bottom-left corner of your screen.
- Choose Restart: From the Start menu, click on “Restart” to initiate the restart process.
- Do not press any keys: Unlike when restarting in Safe Mode, you don’t need to press any specific keys during the restart process for normal mode.
- Wait for the computer to restart: Allow your computer to complete the restart process. This may take a few moments as it initializes all the drivers and services for normal mode.
Once your computer has restarted in normal mode, you can start using it as you would normally. You should now have successfully uninstalled Kaspersky and restored your computer to its regular operating state.
It’s important to note that when restarting in normal mode, your computer may take slightly longer to start up compared to Safe Mode. This is because it loads all the necessary software and drivers essential for everyday use. Additionally, ensure that your computer is connected to the internet and all your essential programs are working properly after the restart.
If you encounter any issues or notice any abnormalities after restarting your computer in normal mode, double-check that Kaspersky is completely uninstalled and consider contacting technical support for further assistance.
By following these steps to restart your computer in normal mode, you can resume your usual activities and enjoy the full functionality of your Windows XP system.
Perform a final cleanup and system scan
After uninstalling Kaspersky in Safe Mode on Windows XP and restarting your computer in normal mode, it is recommended to perform a final cleanup and system scan to ensure your computer is running optimally and free from any remaining traces of the uninstalled software. Here’s how you can proceed:
- Clear temporary files: Use a disk cleanup utility or the built-in Disk Cleanup tool in Windows XP to remove unnecessary temporary files that may be taking up disk space. This will help improve system performance and free up storage capacity.
- Run a system scan: Use a reliable antivirus or antimalware software to perform a full system scan. This scan will help detect and remove any remaining malware or potentially unwanted software that may have been missed during the uninstallation process.
- Update your security software: Ensure that your antivirus or antimalware software is up to date with the latest virus definitions. This will provide your computer with the best possible protection against new threats.
- Scan for registry errors: Use a reputable registry cleaner tool to scan and fix any errors or invalid entries in the Windows registry. This can help improve system stability and performance.
- Restart your computer: After completing the cleanup and system scan, it’s recommended to restart your computer once again to finalize the changes and ensure that your system is running smoothly.
Performing a final cleanup and system scan helps ensure that any remnants of Kaspersky or other potential threats are thoroughly removed from your Windows XP computer. By regularly maintaining and scanning your system, you can keep it in optimal condition and protect it from any potential security risks.
Remember to keep your security software updated and perform regular system maintenance to maintain a healthy and secure computing environment.
Note that the specific steps for cleanup and system scanning may vary depending on the software and tools you use. Consult the documentation or online resources for your specific tools to ensure you follow the most suitable instructions for your system.