
Enable AirDrop on Mac
If you are a Mac user, you might have heard about AirDrop, a convenient feature that allows you to easily share files wirelessly with other nearby Apple devices. Whether you want to send photos, documents, or videos, AirDrop makes the process quick and seamless. In this guide, we will walk you through the steps to enable AirDrop on your Mac.
Before diving into the instructions, it’s important to make sure your Mac is compatible with AirDrop. AirDrop requires a Mac with macOS X Lion (10.7) or later, a supported Wi-Fi card, and Bluetooth. You can check your Mac’s compatibility by clicking on the Apple menu in the top left corner of your screen, selecting “About This Mac,” and then clicking on “System Report.” Under the “Network” section, you should see “Bluetooth” and “Wi-Fi” listed.
To enable AirDrop, you first need to access the Finder on your Mac. You can do this by clicking on the Finder icon in your dock or by pressing Command + Space and typing “Finder” in the Spotlight search.
Once you have the Finder open, click on “Go” in the menu bar at the top of the screen and select “AirDrop” from the dropdown menu. Alternatively, you can press Command + Shift + R on your keyboard to directly access AirDrop.
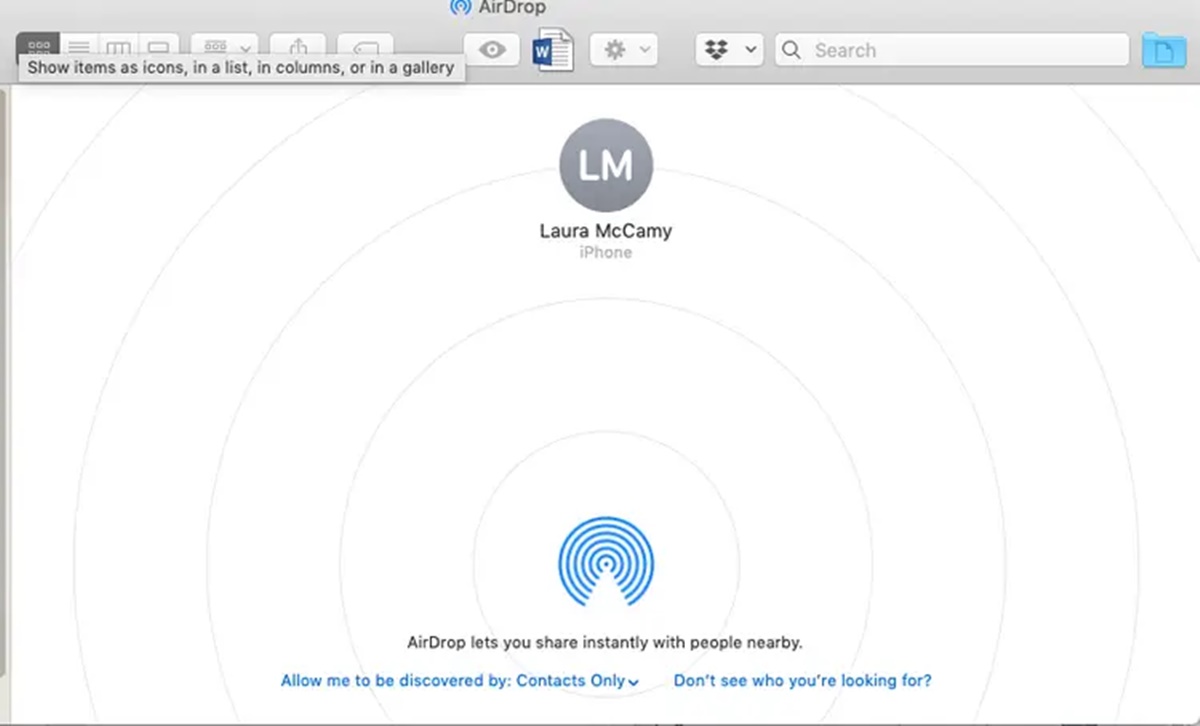
Next, you’ll see the AirDrop window, which displays nearby devices that are also using AirDrop. By default, AirDrop is set to “Contacts Only,” which means you can only share files with people in your contacts. If you want to change the visibility settings, click on “Allow me to be discovered by” at the bottom of the window. You can choose either “Contacts Only” or “Everyone,” depending on your preference.
Now that AirDrop is enabled and the visibility settings are adjusted, you can start sending files to other devices. To send a file via AirDrop, simply locate the file on your Mac, right-click on it, and select “Share” from the dropdown menu. Then, select the device you want to send the file to from the AirDrop window. If the recipient accepts the file, it will be transferred wirelessly to their device.
On the other hand, if someone wants to send a file to you via AirDrop, you will receive a notification. To accept the file, Click on “Accept” when prompted. The file will be saved in the Downloads folder on your Mac by default, but you can choose a different location if needed.
If you encounter any issues with AirDrop, make sure that both Wi-Fi and Bluetooth are turned on and that the devices you are trying to connect to are within range. Additionally, check if AirDrop is supported on the device you are trying to share files with. Restarting your Mac and the other device can often resolve connectivity problems.
With AirDrop enabled on your Mac, you can easily share files with others without the need for cables or complicated setup. It’s a convenient feature that enhances your productivity and makes file sharing a breeze. So go ahead, follow the steps above, and start enjoying the benefits of AirDrop on your Mac.
Check Compatibility
Before you can start using AirDrop on your Mac, it is important to check if your device meets the necessary requirements. AirDrop requires macOS X Lion (10.7) or later, a supported Wi-Fi card, and Bluetooth. Checking compatibility is a quick and easy process.
To check the compatibility of your Mac, begin by clicking on the Apple menu in the top left corner of your screen. From the dropdown menu, select “About This Mac.” A window will appear displaying information about your Mac, including the version of macOS you are running.
If your macOS version is X Lion (10.7) or later, then your device is compatible with AirDrop. However, it is essential to ensure that your Mac has a supported Wi-Fi card and Bluetooth functionality.
To verify these requirements, stay in the “About This Mac” window and navigate to the “System Report” option. This will open a new window displaying detailed information about your Mac’s hardware and software.
In the left sidebar of the System Report window, scroll down and select “Network.” The right panel will then display information about your Mac’s network connections, including Wi-Fi and Bluetooth.
Ensure that both Wi-Fi and Bluetooth are listed and indicated as “On.” If either one is missing or turned off, you may need to troubleshoot the respective feature before using AirDrop.
If you are unsure whether your Wi-Fi card or Bluetooth is supported, you can visit the Apple website or consult your Mac’s documentation to find the specifications of your specific model. Compare this information with the requirements for AirDrop to confirm compatibility.
It is worth noting that older Mac models may not be compatible with AirDrop due to hardware limitations. In such cases, you may need to explore alternative methods for transferring files, such as using external storage devices or email.
By performing a quick check of your Mac’s compatibility, you can ensure that you meet all the necessary requirements to use AirDrop. This will save you time and frustration by avoiding any compatibility issues that may arise during the file-sharing process.
Accessing the Finder
The Finder is a crucial component of your Mac operating system, and it is where you can access various files, folders, and applications. When it comes to enabling AirDrop on your Mac, you will need to access the Finder to navigate to the AirDrop feature. Here are the steps to access the Finder on your Mac:
To open the Finder, simply look for the Finder icon, which resembles a blue smiling face, in your dock. You can click on this icon, and the Finder window will appear on your screen.
If you don’t have the Finder icon on your dock, no need to worry! You can also access the Finder by pressing Command + Space on your keyboard to activate the Spotlight search. Type in “Finder” and press Enter. The Finder window will then open on your screen.
Alternatively, you can also locate the Finder in your Applications folder. Click on the “Go” tab in the menu bar at the top of your screen, then select “Applications” from the dropdown menu. Look for the “Finder” folder within the Applications folder and double click on it to open it.
Another quick way to access the Finder is by using a keyboard shortcut. Press Command + N on your keyboard, and the Finder will open a new Finder window for you to navigate.
Once you have successfully accessed the Finder, you are ready to proceed with enabling AirDrop on your Mac. Simply follow the instructions mentioned earlier in this guide, or continue reading to learn more about navigating through the AirDrop feature.
It’s important to note that the Finder is not only used for enabling AirDrop but also for managing and organizing your files and folders. It provides a user-friendly interface to help you locate and access your important documents quickly and efficiently.
By becoming familiar with the Finder and its various features, you can streamline your file management process, making your Mac experience more organized and productive.
Now that you know how to access the Finder, let’s move on to the next section to learn how to enable AirDrop visibility.
Using the Menu Bar
The menu bar on your Mac is a convenient and accessible location for accessing various features and functions, including AirDrop. By utilizing the menu bar, you can easily enable AirDrop and manage its settings. Here’s how to use the menu bar to enable AirDrop on your Mac:
To begin, look at the top of your screen. You will see the menu bar, which contains different menus and options. The menu bar is visible in all applications and provides quick access to essential functions.
To enable AirDrop, start by clicking on the “Go” menu in the menu bar. A dropdown menu will appear with several options.
Scroll down and locate the “AirDrop” option. Click on it to open the AirDrop window, where you can enable and customize AirDrop settings.
Alternatively, you can use a keyboard shortcut to access the AirDrop window directly. Press Command + Shift + R simultaneously, and the AirDrop window will open on your screen.
Once the AirDrop window is open, you will see a list of nearby devices that are using AirDrop. This list includes other Mac computers, iPhones, iPads, and iPod touches, depending on their proximity to your Mac.
By default, the AirDrop visibility setting is set to “Contacts Only.” This means that you can only share files with people who are listed in your Contacts app. However, you can modify this setting according to your preferences.
To adjust the AirDrop visibility setting, click on “Allow me to be discovered by” at the bottom of the AirDrop window. A dropdown menu will appear, giving you two options: “Contacts Only” and “Everyone.”
If you select “Contacts Only,” only people in your contacts will be able to see your Mac and send files to you via AirDrop. If you choose “Everyone,” any nearby devices using AirDrop will be able to see your Mac and send files to you.
Once you have selected your desired visibility setting, you can start using AirDrop to send and receive files with other devices. Simply drag and drop files onto the name or icon of the desired recipient in the AirDrop window, and the transfer will begin.
Using the menu bar to access AirDrop provides a quick and straightforward way to enable the feature and adjust its settings. It ensures that AirDrop is easily accessible from any application on your Mac, allowing you to seamlessly share files with other devices.
Now that you know how to use the menu bar to enable AirDrop, let’s move on to the next section to learn how to set the visibility of AirDrop.
Set AirDrop Visibility
When using AirDrop on your Mac, you have the option to control the visibility of your device. This means you can choose who can see your Mac and send files to you via AirDrop. Setting the AirDrop visibility is a simple process, and here’s how you can do it:
Once you have opened the AirDrop window, either through the Finder or the menu bar, you will see the list of nearby devices using AirDrop.
At the bottom of the AirDrop window, you will find the visibility setting labeled “Allow me to be discovered by.” By default, it is set to “Contacts Only.”
If you click on the visibility setting, a dropdown menu will appear with two options: “Contacts Only” and “Everyone.”
– Contacts Only: This option limits file sharing to only people in your contacts. It ensures that only devices belonging to your known contacts can see your Mac and send files to you via AirDrop.
– Everyone: Selecting this option allows any nearby devices using AirDrop to see your Mac and send files to you. It removes the restriction of sharing files only with your contacts, opening up the possibility of receiving files from any AirDrop-supported device.
Choose the visibility setting that suits your preference and requirements.
It is worth noting that adjusting your AirDrop visibility may impact your privacy. If you select “Everyone,” any AirDrop-enabled device within range can discover and attempt to send files to your Mac. Thus, it is crucial to exercise caution and only accept files from sources you trust.
Once you have selected the desired visibility setting, it will be saved for future AirDrop sessions. You can easily switch between “Contacts Only” and “Everyone” as needed.
By setting the visibility of AirDrop on your Mac, you can customize your file-sharing experience. Whether you prefer to restrict file sharing to known contacts or open it up to anyone nearby, adjusting the AirDrop visibility ensures that you retain control over who can send files to your Mac.
Now that you know how to set the AirDrop visibility, it’s time to learn how to send files via AirDrop.
Sending Files via AirDrop
Sending files via AirDrop on your Mac is a seamless and hassle-free process. With just a few clicks, you can share your documents, photos, videos, and more with other nearby Apple devices. Here’s how you can send files via AirDrop:
1. Begin by locating the file you want to send on your Mac. This can be a document, photo, video, or any other type of file that you want to share.
2. Once you’ve found the file, right-click on it to open the context menu. From the menu, select “Share.”
3. In the Share menu, you will see several options for sharing the file. Look for the AirDrop icon, which resembles concentric blue circles. Click on it.
4. After clicking on the AirDrop icon, a list of available devices will appear in a new window. These devices represent other Apple devices that are within range and have AirDrop enabled.
5. Locate the device you want to send the file to and click on its name or icon in the AirDrop window. This will select the device as the recipient of the file.
6. Once you have selected the recipient device, click on the “Send” button. This will initiate the transfer of the file via AirDrop.
7. Keep in mind that the recipient device must accept the file transfer in order to complete the process. They will receive a notification on their device asking them to accept or decline the file. Once they accept the file, it will be downloaded and saved on their device.
8. Depending on the size of the file and the speed of the Wi-Fi connection, the transfer may take a few seconds or several minutes. Larger files may take longer to transfer, so be patient during the process.
9. Once the file transfer is complete, you will receive a confirmation on your Mac, indicating that the file was successfully sent via AirDrop.
Sending files via AirDrop offers a quick and efficient way to share content with other Apple devices. Whether you need to send important documents to a colleague or share vacation photos with friends, AirDrop simplifies the process and allows for wireless file sharing.
Now that you know how to send files via AirDrop, let’s move on to the next section to learn how to receive files using AirDrop.
Receiving Files via AirDrop
Receiving files via AirDrop on your Mac is just as easy as sending them. When someone sends a file to your device, you will receive a notification and can quickly accept or decline the transfer. Here’s how you can receive files via AirDrop:
1. When someone wants to send you a file via AirDrop, you will receive a notification on your Mac. The notification will contain the name and icon of the sender’s device, as well as the name of the file being sent.
2. To accept the file, click on the “Accept” button in the AirDrop notification. If you want to decline the file, simply click on the “Decline” button.
3. Once you click “Accept,” the file transfer will begin. You may see a progress bar indicating the status of the transfer.
4. Once the file is successfully transferred, it will be saved in your Downloads folder by default. You can locate the file by opening the Finder and navigating to the Downloads folder, or you can access it directly from the Downloads stack on your dock.
5. If you prefer to save the received file in a different location, you can choose to do so by specifying a different folder during the file transfer process. In the AirDrop notification, click on the “Options” button and select the desired location before accepting the file.
6. It is important to note that you have the option to accept or decline each file sent to you via AirDrop. This allows you to maintain control over the files you receive and ensures that you only accept files from sources you trust.
Receiving files via AirDrop is a convenient way to quickly and wirelessly transfer files between compatible Apple devices. It eliminates the need for physical connections or online file transfers, making it ideal for sharing documents, photos, videos, and more.
Now that you know how to receive files via AirDrop, let’s move on to the next section to learn how to troubleshoot common AirDrop issues.
Troubleshoot AirDrop Issues
While AirDrop is a convenient feature for wireless file sharing between Apple devices, you may occasionally encounter some issues. If you’re experiencing problems with AirDrop, here are some troubleshooting steps you can take to resolve common AirDrop issues:
1. Check Wi-Fi and Bluetooth: Ensure that both Wi-Fi and Bluetooth are turned on and functioning properly on your Mac. AirDrop requires both of these features to be enabled for successful file transfers.
2. Ensure Compatibility: Double-check that your Mac and the device you are attempting to connect to via AirDrop meet the necessary compatibility requirements. Refer to the earlier section on “Check Compatibility” to verify compatibility.
3. Range and Proximity: Make sure the devices you want to connect to via AirDrop are within close proximity to each other. AirDrop has a limited range, so ensure that the devices are close enough to establish a connection.
4. Restart Devices: Try restarting both your Mac and the other device to refresh their settings and network connections. Restarting can often resolve any temporary connectivity issues.
5. Reset Network Settings: If AirDrop issues persist, try resetting your Mac’s network settings. Go to “System Preferences,” select “Network,” and click on the “Advanced” button. From there, click on “Reset Wi-Fi” or “Reset Bluetooth” to reset the corresponding network settings.
6. Disable Firewall or Security Software: In some cases, firewall or security software on your Mac may interfere with AirDrop connections. Temporarily disable any firewall or security software and attempt to use AirDrop again to see if the issue is resolved.
7. Update macOS: Ensure that your Mac is running the latest version of macOS. Updates often contain fixes for known issues and improve compatibility with AirDrop and other features.
8. Try Different File Type: If you are experiencing issues with a specific file type, try sending or receiving a different file type via AirDrop to see if the issue persists. This can help determine if the problem is related to a specific file or a broader AirDrop issue.
9. Contact Apple Support: If none of the above troubleshooting steps resolve the issue, it may be helpful to contact Apple Support for further assistance. They can provide dedicated support and guidance to troubleshoot and resolve AirDrop issues specific to your Mac and devices.
By following these troubleshooting steps, you can identify and resolve common AirDrop issues, allowing you to enjoy seamless and uninterrupted file sharing between your Apple devices.
Now that you have a range of troubleshooting techniques at your disposal, you can confidently troubleshoot any AirDrop issues that may arise.