
Why Turn off Notifications on iPhone
Notifications on your iPhone can be incredibly useful, keeping you informed about important updates, messages, and reminders. However, they can also be overwhelming and distracting, constantly disrupting your focus and draining your battery. That’s why it’s important to know how to turn off notifications on your iPhone when you need some uninterrupted time or simply want to reduce digital distractions.
Here are a few reasons why you might want to consider turning off notifications on your iPhone:
- Improved Focus: Notifications can be constant interruptions, pulling your attention away from the task at hand. By temporarily turning off notifications, you can regain control of your attention and stay focused on your work or important projects.
- Better Productivity: With fewer distractions from notifications, you’ll have more time and mental energy to accomplish tasks efficiently. By eliminating interruptions, you can increase your productivity and achieve more in less time.
- Reduced Stress: Constant notifications can lead to information overload and contribute to feelings of stress and anxiety. By turning off unnecessary notifications, you can create a calmer and more peaceful digital environment.
- Extended Battery Life: Notifications require your device to constantly check for updates, which can drain your iPhone’s battery quickly. Disabling notifications can help conserve battery power, ensuring that it lasts longer throughout the day.
Keep in mind that turning off notifications doesn’t mean you’ll miss out on important information. You can still manually check for updates in your apps, messages, and emails whenever you’re ready to engage with them.
Now that you understand the benefits of turning off notifications, let’s explore how to access and customize your notification settings on your iPhone.
How to Access Notification Settings
Accessing the notification settings on your iPhone is simple and allows you to control how and when you receive notifications from various apps and services. Here’s how to access the notification settings:
- Open the Settings app on your iPhone. It’s the gray icon with gears typically found on your home screen.
- Scroll down and tap on “Notifications.”
- You’ll see a list of all the installed apps on your iPhone. Tap on the app for which you want to modify the notification settings.
- You can now configure the specific notification settings for that app, including enabling or disabling notifications, changing the alert style, controlling sound and vibration settings, and more.
- Repeat these steps for each app you want to customize notifications for.
By accessing the notification settings, you can have complete control over how each app notifies you. You can choose to receive banner notifications, enable or disable lock screen notifications, and customize the notification sounds.
Keep in mind that the actual steps may vary slightly depending on the iOS version you’re using, but the overall process should remain similar.
Now that you know how to access the notification settings, let’s delve into how to turn off notifications for specific apps on your iPhone.
How to Turn off Notifications for Specific Apps
While notifications can be helpful, some apps can be overly active and bombard you with constant alerts. If you want to minimize distractions from specific apps, here’s how to turn off notifications for them on your iPhone:
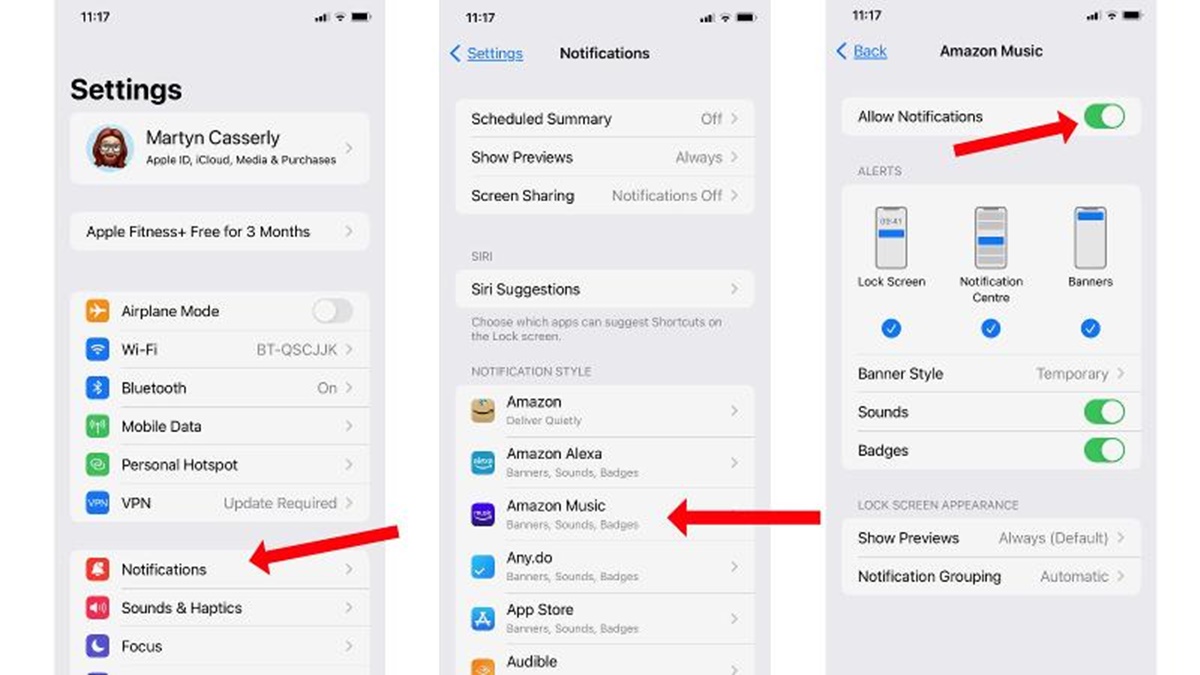
- Open the Settings app on your iPhone and tap on “Notifications.”
- Scroll through the list of apps and select the app you want to modify the notification settings for.
- Toggle the switch next to “Allow Notifications” to turn off notifications for that particular app.
By disabling notifications for specific apps, you won’t receive any alerts or banners from those apps. However, keep in mind that this setting may vary depending on the app’s individual notification preferences.
If you want to further customize the notification settings for a specific app, you can tap on the app’s name in the notification settings menu. From there, you can control the alert style, sound, badges, and other notification options.
Turning off notifications for specific apps gives you the freedom to focus on the most important ones while minimizing distractions from others. It allows you to tailor your notification experience based on your preferences and needs.
Now that you know how to turn off notifications for specific apps, let’s explore how to turn off notifications for groups and threads in the Messages app.
How to Turn off Notifications for Groups and Threads in Messages
Group chats and active message threads can generate a high volume of notifications, causing your iPhone to constantly buzz with updates. If you find yourself overwhelmed by numerous notifications from groups and threads in the Messages app, here’s how to turn them off:
- Open the Messages app on your iPhone.
- Select the group chat or message thread that you want to modify the notification settings for.
- Tap on the name or contact picture at the top of the screen to open the details page for the conversation.
- Scroll down and tap on “Hide Alerts.”
Enabling the “Hide Alerts” function for a group chat or message thread will prevent any new messages in that conversation from triggering notifications on your iPhone. You will still receive the messages, but your device will remain silent and without any visual distractions.
If you want to re-enable notifications for a specific chat or thread, follow the same steps and disable the “Hide Alerts” option.
By turning off notifications for specific groups and threads in the Messages app, you can reduce interruptions and maintain a clearer notification experience on your iPhone.
Now that you know how to turn off notifications for groups and threads in Messages, let’s move on to turning off notifications for phone calls and messages.
How to Turn off Notifications for Phone Calls and Messages
Phone calls and text messages are crucial forms of communication, but the constant notifications can be disruptive and intrusive. If you want to limit notifications for phone calls and messages on your iPhone, here’s how to do it:
- Open the Settings app on your iPhone.
- Scroll down and tap on “Notifications.”
- Locate “Phone” and tap on it.
- You’ll see options to customize the notification settings for phone calls, including allowing notifications on the Lock Screen and enabling sounds and vibration.
- Tap on “Messages” in the Notifications menu and configure the notification settings for text messages, such as enabling or disabling notifications, changing alert styles, and managing sound and vibration settings.
By customizing the notification settings for phone calls and messages, you can choose how and when you receive alerts. For example, you can disable sounds and vibrations for incoming calls, ensuring a quieter notification experience.
In addition to these general settings, you can also customize notifications for specific contacts by using the “Do Not Disturb” feature or assigning different text message tones.
Remember that turning off notifications for calls and messages doesn’t mean you will miss important communications. You can still check your missed calls or unread messages manually at your convenience.
Now that you know how to turn off notifications for phone calls and messages, let’s explore how to disable notification previews to enhance privacy.
How to Disable Notification Previews
Notification previews can potentially expose personal or sensitive information when your iPhone is locked. If you value your privacy and want to prevent notification content from appearing on your lock screen, here’s how to disable notification previews:
- Open the Settings app on your iPhone.
- Scroll down and tap on “Notifications.”
- Tap on “Show Previews.”
- You’ll see three options: “Always,” “When Unlocked,” and “Never.”
- To disable notification previews entirely, tap on “Never.” This will hide the content of notifications even when your iPhone is unlocked.
By selecting “Never,” you protect your sensitive information from prying eyes, especially when your iPhone is locked. However, keep in mind that this also means you won’t be able to see notification content without unlocking your device.
If you still want to see the notification content but only when your iPhone is unlocked, choose the “When Unlocked” option instead.
Disabling notification previews adds an extra layer of privacy to your iPhone. It ensures that only you can view the contents of your notifications, enhancing confidentiality and security.
Now that you know how to disable notification previews, let’s explore how to mute notifications using the Do Not Disturb mode.
How to Mute Notifications using Do Not Disturb Mode
Do Not Disturb mode is a useful feature that allows you to silence notifications and minimize interruptions during certain periods or when you need some focused time. Here’s how to mute notifications using Do Not Disturb mode on your iPhone:
- Open the Control Center on your iPhone by swiping down from the top-right corner on iPhones with Face ID or swiping up from the bottom on iPhones with a Home button.
- Locate the crescent moon icon, which represents Do Not Disturb mode.
- Tap on the crescent moon icon to enable Do Not Disturb mode. You will see a crescent moon icon in the status bar, indicating that notifications are now muted.
You can also access more advanced scheduling options for Do Not Disturb mode by following these steps:
- Open the Settings app on your iPhone.
- Tap on “Do Not Disturb.”
- Here, you can enable scheduled Do Not Disturb mode, set a specific time frame when notifications will be muted automatically. You can even allow calls from certain contacts or repeated calls to come through even when Do Not Disturb mode is enabled.
Do Not Disturb mode is a convenient way to temporarily mute notifications while still allowing important calls or messages to come through if desired. It can be especially useful during meetings, sleep hours, or any time you need uninterrupted focus.
Now that you know how to mute notifications using Do Not Disturb mode, let’s explore how to enable and disable banner notifications.
How to Enable and Disable Banner Notifications
Banner notifications are a common way to receive alerts on your iPhone without interrupting your current activity. They appear briefly at the top of your screen and then disappear, allowing you to view the notification without fully taking over your screen. Here’s how to enable and disable banner notifications on your iPhone:
- Open the Settings app on your iPhone.
- Scroll down and tap on “Notifications.”
- Choose the app for which you want to enable or disable banner notifications.
- Toggle the switch next to “Allow Notifications” to enable or disable notifications for that app.
- If notifications are enabled, scroll down and find the “Alert Style” option.
- Select the “Banner” option to enable banner notifications or choose “None” to disable them completely.
Enabling banner notifications ensures that you receive alerts without being interrupted by a full-screen notification. However, if you find banner notifications too distracting, you have the option to disable them and rely on other forms of notifications, such as badges or sounds.
Keep in mind that enabling or disabling banner notifications can be customized on an app-by-app basis, allowing you to tailor your notification preferences according to your needs and preferences.
Now that you know how to enable and disable banner notifications, let’s explore how to turn off lock screen notifications for increased privacy.
How to Turn off Lock Screen Notifications
Lock screen notifications can display sensitive information to anyone who glances at your iPhone when it’s locked. If privacy is a concern and you want to prevent notification content from appearing on the lock screen, here’s how to turn off lock screen notifications:
- Open the Settings app on your iPhone.
- Scroll down and tap on “Notifications.”
- Find the app for which you want to disable lock screen notifications and tap on it.
- Toggle the switch next to “Show on Lock Screen” to turn off lock screen notifications for that app.
By disabling lock screen notifications for specific apps, you ensure that no one can see the content of your notifications without unlocking your iPhone.
Alternatively, you can choose to hide sensitive information by selecting the “When Unlocked” option for the “Show Previews” setting, which allows notifications to appear on the lock screen but hides the content until the device is unlocked.
Remember that turning off lock screen notifications doesn’t mean you won’t receive the notifications; they will still be accessible when you unlock your device and view the Notification Center.
Now that you know how to turn off lock screen notifications, let’s explore how to customize notification center widgets to suit your preferences.
How to Customize Notification Center Widgets
The Notification Center on your iPhone provides quick access to important information and widgets that display useful content from various apps. If you want to personalize your Notification Center and customize the widgets that appear, here’s how you can do it:
- Swipe down from the top of your iPhone’s screen to open the Notification Center.
- Tap on the “Edit” button at the bottom of the screen.
- You’ll now see a list of available widgets that you can add or remove from the Notification Center.
- To add a widget, tap on the green “+” button next to its name. This will include the widget in your Notification Center.
- To remove a widget, tap on the red “-” button next to its name and confirm the deletion.
- You can also rearrange the order of the widgets by tapping and holding the “≡” icon next to a widget and dragging it up or down the list.
Customizing the widgets in Notification Center allows you to prioritize the information that is most relevant to you. You can add widgets for weather updates, news headlines, calendar events, stocks, and more.
Keep in mind that the available widgets may vary depending on the apps you have installed on your iPhone. Some apps may offer their own specialized widgets.
Now that you know how to customize Notification Center widgets, let’s explore how to control notification sounds and vibrations.
How to Control Notification Sounds and Vibrations
Notification sounds and vibrations help you promptly identify incoming alerts and messages on your iPhone. If you want to customize your notification experience by adjusting the sounds and vibrations, here’s how you can do it:
- Open the Settings app on your iPhone.
- Scroll down and tap on “Sounds & Haptics.”
- In the “Sounds and Vibration Patterns” section, you’ll see various categories such as Ringtone, Text Tone, and more.
- To change the default sound for notifications, tap on “Text Tone” or the corresponding category.
- Select a sound from the list or tap on “Classic” to choose from classic tones.
- To customize vibration patterns, tap on “Vibration” or the corresponding category.
- You can choose from pre-defined vibration patterns or create your own by tapping on “Create New Vibration.”
- Follow the prompts to create a custom vibration pattern by tapping and holding on the screen.
- Once you’ve chosen your sound and vibration preferences, exit the settings, and your changes will take effect immediately.
By customizing notification sounds and vibrations, you can personalize the way your iPhone alerts you to incoming notifications. Whether you prefer subtle vibrations, distinct sounds, or a combination of both, you have the flexibility to tailor your notification experience.
Keep in mind that some apps may have their own notification sound and vibration settings, allowing you to further customize alerts for specific apps.
Now that you know how to control notification sounds and vibrations, let’s explore how to temporarily disable notifications using the Bedtime mode.
How to Temporarily Disable Notifications with Bedtime Mode
Bedtime Mode is a feature on your iPhone that allows you to create a disturbance-free sleeping environment by temporarily disabling notifications. If you want to enjoy uninterrupted sleep without being disturbed by alerts and notifications, here’s how to enable Bedtime Mode:
- Open the Clock app on your iPhone.
- Tap on the “Bedtime” tab at the bottom of the screen.
- Set your desired sleep schedule by adjusting the “Wake Up” and “Bedtime” times.
- Toggle on the “Bedtime Mode” switch to enable it.
When Bedtime Mode is active, your iPhone will automatically mute all notifications and dim the lock screen, preventing any interruptions during your designated sleep hours.
Furthermore, Bedtime Mode can integrate with the Do Not Disturb feature, ensuring that calls and alerts will only come through if they are from designated contacts or repeated calls.
To adjust the settings for Bedtime Mode or customize the sleep schedule, you can go back to the Clock app and make the necessary changes.
Bedtime Mode provides a peaceful and uninterrupted sleep environment by temporarily disabling notifications on your iPhone. You can wake up feeling refreshed and undisturbed by the usual barrage of alerts.
Now that you know how to temporarily disable notifications with Bedtime Mode, let’s explore how to manage notifications for Apple Watch.
How to Manage Notifications for Apple Watch
If you own an Apple Watch, you have the convenience of receiving notifications directly on your wrist. However, managing these notifications and customizing the settings can enhance your Apple Watch experience. Here’s how to manage notifications for your Apple Watch:
- Open the Watch app on your paired iPhone.
- Scroll down and tap on “Notifications.”
- From here, you can choose how your Apple Watch mirrors your iPhone’s settings.
- To manage which apps send notifications to your Apple Watch, tap on “Notifications Indicator” or “Notifications Off” and customize your preferences.
- If you prefer to receive notifications silently on your Apple Watch, enable “Silent Mode.” This will prevent your watch from making sounds or vibrating for incoming notifications.
- Furthermore, you can customize the behavior of individual apps by selecting them from the list and adjusting their notification settings.
- You can choose to have notifications delivered quietly, with or without a sound, or have them delivered prominently, making your watch alert you with a sound or haptic feedback.
Managing notifications for your Apple Watch lets you control which alerts are important enough to appear on your wrist. It helps prevent unnecessary distractions and allows you to stay focused on the most essential notifications.
Keep in mind that managing notifications on your Apple Watch will mirror the settings you’ve configured in the Watch app on your iPhone. Adjusting the notification settings for individual apps can help fine-tune your Apple Watch experience and prioritize the alerts you receive.
Now that you know how to manage notifications for your Apple Watch, you can personalize your watch to suit your preferences and stay updated on the notifications that matter most to you.