
Turn Off All Notifications on the iPhone
The constant barrage of notifications on your iPhone can be overwhelming and disruptive at times. Whether it’s buzzes, beeps, or vibrations, these notifications can steal your attention and hinder your productivity. Thankfully, iPhone offers a simple solution to help you regain control over your device’s notifications by allowing you to turn them off completely.
To disable all notifications on your iPhone, follow these steps:
- Open the Settings app on your iPhone’s home screen.
- Scroll down and tap on “Notifications”.
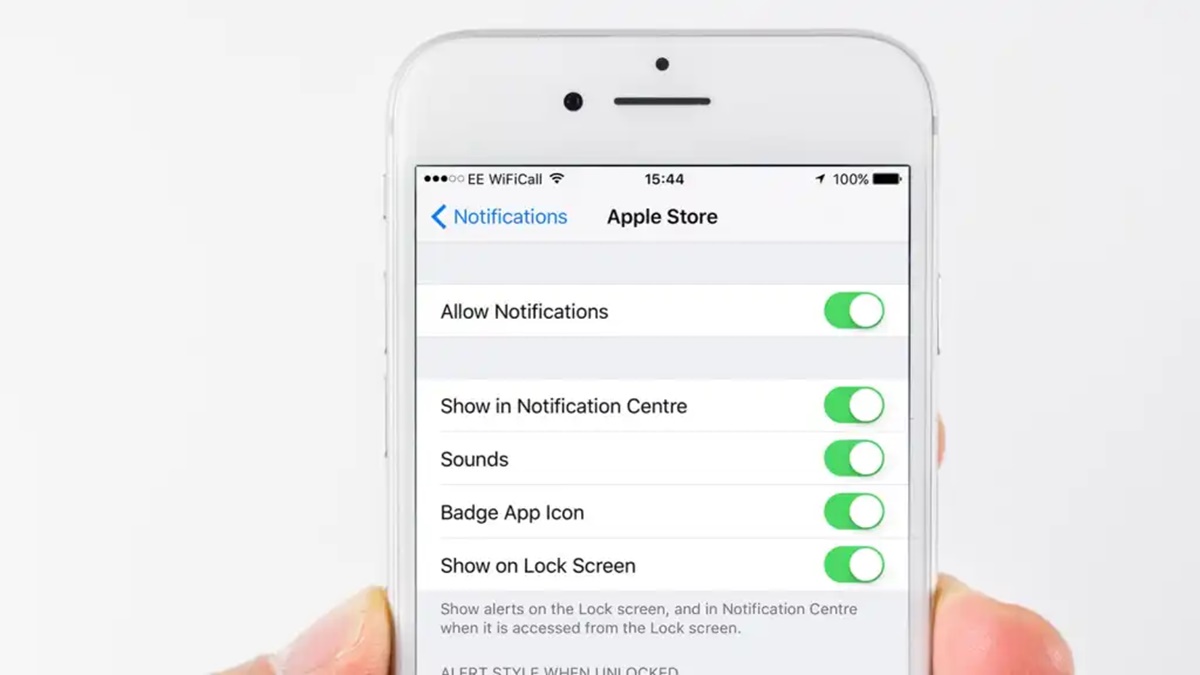
- At the top of the screen, you will find the “Allow Notifications” toggle. Turn this toggle off by sliding it to the left.
Once you have turned off all notifications, your iPhone will no longer display any alerts, banners, or sounds for incoming calls, messages, or app notifications. This can be especially useful in situations where you need uninterrupted focus, such as during important meetings, studying, or simply when you want some peace and quiet.
However, keep in mind that turning off all notifications may mean that you miss important updates, messages, or reminders. If you wish to only disable notifications for specific apps or customize them further, continue reading to find out how to do so.
Turn On Do Not Disturb
Have you ever wanted to temporarily silence your iPhone’s notifications without completely turning them off? That’s where the “Do Not Disturb” feature comes in handy. When enabled, Do Not Disturb allows you to silence incoming calls, messages, and notifications while still allowing important alerts to come through.
To turn on Do Not Disturb on your iPhone, follow these steps:
- Open the Control Center by swiping down from the upper-right corner of your iPhone’s screen (or up from the bottom on older models).
- Tap on the crescent moon icon to enable Do Not Disturb mode.
You can also access and customize Do Not Disturb settings in the Settings app:
- Open the Settings app on your iPhone.
- Scroll down and tap on “Do Not Disturb”.
From here, you can schedule Do Not Disturb to automatically turn on during certain hours, allow calls from specific contacts or repeated calls to come through, or even customize the behavior of the feature.
When Do Not Disturb is enabled, incoming calls and notifications will be silenced, and your iPhone’s screen won’t light up when receiving them. However, any missed calls or notifications will be available in the Notification Center for you to review later.
Whether you’re in a meeting, enjoying some quality time with loved ones, or simply want some peace and quiet, Do Not Disturb is your go-to feature to temporarily mute the notifications while keeping important alerts accessible. Take advantage of this feature to maintain your focus and reduce distractions without missing out on any urgent messages or calls.
Set Individual App Notifications
While turning off all notifications or enabling Do Not Disturb can provide a temporary respite from the constant stream of alerts, you may still want to receive notifications from certain apps that are important to you. Thankfully, iPhone allows you to customize notifications on an individual app basis, giving you more control over which apps can send you alerts.
To set individual app notifications on your iPhone, follow these steps:
- Open the Settings app on your iPhone.
- Scroll down and tap on “Notifications”.
- You will see a list of apps installed on your iPhone. Tap on the app for which you want to customize notifications.
- On the app’s notification settings page, you can adjust various options such as allowing or disallowing notifications, choosing the notification style (such as banners or alerts), and enabling or disabling sounds and badges.
- Customize the notification settings according to your preference for each app. You can also rearrange the order of the app notifications on the main “Notifications” page.
By setting individual app notifications, you can prioritize the apps that matter most to you and filter out the ones that are less important. For example, you may want to receive instant notifications from messaging or productivity apps, while opting for less intrusive alerts from social media or news apps.
Moreover, you can choose different notification styles for different apps to help you quickly identify the type of notification without even unlocking your iPhone. For instance, you might prefer banners for text messages and alerts for calendar events.
Don’t forget to regularly review and update your app notification settings to ensure they align with your current needs and preferences. With individual app notifications, you can strike the perfect balance between staying informed and minimizing distractions on your iPhone.
Customize Notification Settings for Messages
Messages are a crucial part of our daily communication, and it’s important to stay on top of new text messages without being overwhelmed by constant notifications. Fortunately, iPhone provides several options to customize notification settings specifically for messages, enabling you to receive alerts in a way that suits your preferences.
To customize notification settings for messages on your iPhone, follow these steps:
- Open the Settings app on your iPhone.
- Scroll down and tap on “Notifications”.
- Find and tap on “Messages” in the list of apps.
- On the Messages notification settings page, you can adjust various options such as allowing or disallowing notifications, choosing the notification style (such as banners or alerts), and enabling or disabling sounds and badges.
- One notable feature is the “Show Previews” option, which allows you to control how message notifications display on your lock screen. You can choose to show previews of the message content, or simply display the sender’s name without revealing the message content until you unlock your iPhone.
- Customize the notification settings according to your preference.
With customized message notification settings, you can ensure that important messages are promptly brought to your attention, while still maintaining your privacy and minimizing distractions. For example, you might opt for banner notifications that briefly appear at the top of your screen for less intrusive alerts, or choose sound and badge notifications for a more noticeable indication of new messages.
By toggling the “Show Previews” option, you can decide how much information is displayed in notifications, which can be particularly useful when you’re in public or shared spaces and want to maintain confidentiality.
Remember, adjusting these settings allows you to tailor your iPhone experience to your personal preferences. Take the time to explore and experiment with different notification options for messages so you can strike the right balance between staying updated and avoiding distractions.
Manage Notification Grouping
If you receive a high volume of notifications from different apps, your iPhone’s lock screen and Notification Center can quickly become cluttered and overwhelming. Fortunately, iPhone offers a feature called “Notification Grouping” that allows you to manage and organize your notifications, making it easier to navigate and prioritize them.
To manage notification grouping on your iPhone, follow these steps:
- Open the Settings app on your iPhone.
- Scroll down and tap on “Notifications”.
- Find and tap on the app whose notifications you want to manage.
- On the app’s notification settings page, you will find the “Notification Grouping” option. Tap on it.
- You will be presented with three options for grouping notifications: “Automatic”, “By App”, and “Off”.
-
– “Automatic” groups notifications intelligently based on the app and relevance.
– “By App” groups notifications strictly by the app they belong to.
– “Off” disables notification grouping, showing each notification individually. - Choose the grouping option that suits your preference.
Notification grouping can help you visually organize and manage your notifications. For example, if you choose the “By App” grouping option, all notifications from a specific app will be stacked together under its name, making it easier to find and interact with them.
By employing notification grouping, you can quickly scan through notifications and identify the relevant ones without having to scroll through a long list. This can be especially helpful if you receive multiple notifications from various apps throughout the day.
Remember, managing notification grouping gives you more control over how your notifications are displayed, allowing you to streamline your notification experience and save time by focusing on the notifications that matter most to you.
Schedule Notifications
Having your iPhone notify you at the right time can be incredibly helpful, especially when it comes to reminders, meetings, and important events. With the ability to schedule notifications, you can ensure that you never miss a deadline or forget an important task again. Let’s explore how you can schedule notifications on your iPhone.
To schedule notifications on your iPhone, follow these steps:
- Open the Clock app on your iPhone.
- Tap on the “Alarm” tab at the bottom of the screen.
- Create a new alarm by tapping on the “+” button in the upper right corner.
- Set the desired time for your alarm by scrolling through the hours and minutes.
- Once you have set the time, tap on the “Repeat” option to choose the days of the week you want the alarm to go off.
- Under the alarm options, you will find the “Label” field. Tap on it to assign a name or description for your alarm.
- Finally, tap on the “Save” button to schedule the alarm.
By scheduling notifications through the Clock app, you can receive timely reminders about important tasks or events, even when your iPhone is locked or in Do Not Disturb mode. This feature is particularly useful for setting wake-up alarms, medication reminders, or any other time-sensitive notifications you need.
Additionally, you can take advantage of the “Bedtime” feature available in the Clock app to establish a consistent sleep schedule. This feature not only helps you maintain a healthy sleep routine but also prompts you with gentle notifications to wind down before bed.
Now, with your notifications scheduled, you can stay organized and ensure that you never miss an important deadline or forget to complete a crucial task. Take advantage of this handy feature to make the most out of your iPhone’s notification capabilities.
Organize Notifications with Notification Center Widgets
The Notification Center on your iPhone is not only a place where all your incoming notifications are stored but also a customizable space that allows you to access important information and perform quick actions. With Notification Center widgets, you can organize and personalize your notifications to suit your needs and preferences.
To organize notifications with Notification Center widgets on your iPhone, follow these steps:
- Swipe down from the top of your iPhone’s screen to open the Notification Center.
- Scroll to the bottom and tap on “Edit”.
- You will see a list of available widgets that you can add or remove from your Notification Center.
- Tap the “+” button next to the widget you want to add.
- Use the drag handles next to each widget to rearrange their order and prioritize the information you want to see.
- Tap “Done” when you have finished customizing your widgets.
By adding widgets to your Notification Center, you can have quick access to relevant information and perform actions without even unlocking your iPhone. For example, you can add a weather widget to see the current conditions or a calendar widget to view your upcoming events at a glance.
Furthermore, some apps offer widgets for enhanced functionality. For instance, a to-do list app might provide a widget that displays your tasks or allows you to mark them as complete directly from the Notification Center.
Customizing your Notification Center widgets empowers you to have a tailored notification experience, ensuring that you see the most important information that matters to you. With just a swipe, you can access key information without navigating through multiple apps, saving you time and effort throughout the day.
Take advantage of the versatility and convenience of Notification Center widgets to streamline your notification management and optimize your iPhone’s usability.
Manage Notification Previews
When you receive a notification on your iPhone, it may often display a preview of the content, allowing you to quickly glance at the message or information without unlocking your device. However, there are situations where you may want to keep your notifications private, especially if you’re in a public setting or have sensitive information coming through. Luckily, iPhone provides options to manage and control notification previews to maintain your privacy.
To manage notification previews on your iPhone, follow these steps:
- Open the Settings app on your iPhone.
- Scroll down and tap on “Notifications”.
- Choose the app for which you want to manage notification previews.
- On the app’s notification settings page, you will find the “Show Previews” option.
- Tap on “Show Previews” to reveal the available options:
- – “Always”: This option displays the full notification content even when your iPhone is locked.
- – “When Unlocked”: This option shows the full notification content only when your iPhone is unlocked.
- – “Never”: This option hides the notification content entirely, showing only the sender’s name or app name.
- Select the option that suits your preferences for each app.
By managing notification previews, you have the flexibility to decide how much information is revealed when notifications come in. This allows you to maintain your privacy and prevent others from seeing potentially sensitive content.
If you’re concerned about privacy, selecting the “Never” option ensures that the content of your notifications remains concealed, even when your iPhone is locked. This way, you can have peace of mind knowing that only you have access to the details of your messages, emails, or other notifications.
On the other hand, if privacy is less of a concern, you can choose the “Always” option to view the full content of notifications without having to unlock your iPhone.
Managing notification previews provides you with control over the level of information visible on your iPhone’s lock screen, making it an essential feature to maintain your privacy and security.
Adjust Notification Sounds and Vibrations
Notification sounds and vibrations on your iPhone play a vital role in alerting you to incoming messages, calls, and app notifications. Customizing these settings allows you to personalize your device and ensure that you’re aware of important alerts while avoiding unnecessary distractions. Let’s explore how you can adjust notification sounds and vibrations on your iPhone.
To adjust notification sounds and vibrations on your iPhone, follow these steps:
- Open the Settings app on your iPhone.
- Scroll down and tap on “Sounds & Haptics” (or “Sounds” on older iOS versions).
- Under the “Sounds and Vibration Patterns” section, you can customize various sound and vibration settings.
Here are some options you can modify:
- – Ringtone: Choose the default ringtone for incoming calls.
- – Text Tone: Select the sound you want for incoming text messages.
- – New Mail: Set the sound for new email notifications.
- – Calendar Alerts: Choose the alert tone for calendar events.
- – Vibration: Tap on “Vibration” to select different vibration patterns or create custom vibrations for specific contacts or apps.
By customizing these settings, you can not only choose sounds and vibrations that resonate with you but also differentiate between different types of notifications. For instance, you might prefer a soothing melody for text messages and a more attention-grabbing sound for incoming calls.
If you want to take it a step further, you can even create custom vibrations for specific contacts. This feature allows you to identify who is calling or messaging based on the unique vibration pattern, without needing to look at your device.
Keep in mind that adjusting notification sounds and vibrations can help you personalize your iPhone and make it reflect your preferences and style. Additionally, it enables you to distinguish between different alerts in crowded or noisy environments without needing to rely solely on visual cues.
Take some time to experiment with different sounds and vibrations to find the combination that works best for you and enhances your notification experience on the iPhone.
Prioritize and Sort Notifications
With the multitude of apps installed on our iPhones, it can be challenging to keep track of all the incoming notifications. However, iPhone offers features that allow you to prioritize and sort your notifications, ensuring that you never miss the most important ones. Let’s explore how you can effectively manage your notifications on your iPhone.
To prioritize and sort notifications on your iPhone, follow these steps:
- Open the Settings app on your iPhone.
- Scroll down and tap on “Notifications”.
- You will see a list of apps that send notifications. Tap on the app you want to prioritize.
- On the app’s notification settings page, you will find options like “Notification Grouping,” “Lock Screen”, and “Banner Style.”
- Adjust these settings to prioritize the app’s notifications.
- On the main “Notifications” page, you can also rearrange the order of the apps to determine their priority in the Notification Center.
- For more granular control, you can use the “Critical Alerts” feature introduced in iOS 12 to allow certain apps to bypass Do Not Disturb mode and deliver critical notifications.
By customizing notification settings and arranging app order, you can prioritize the notifications that matter most to you. For instance, you might want to receive instant alerts from messaging or work-related apps while relegating less important notifications to a later time.
Furthermore, by enabling the “Critical Alerts” feature for specific apps, you can ensure that important notifications, like emergency alerts or medical reminders, always reach you, even when Do Not Disturb is enabled.
By organizing and prioritizing your notifications, you can stay on top of important updates and messages without feeling overwhelmed by the constant stream of alerts. It enables you to focus on what matters most while minimizing distractions from less relevant notifications.
Take the time to review and adjust your notification settings periodically to align them with your current needs and priorities. With these customization options, you can streamline your notification management and make the most out of your iPhone’s capabilities.