Disabling Siri’s message reading feature on iPhone
Siri, the personal voice assistant on iPhones, can be incredibly helpful in many aspects of our daily lives. However, if you find Siri reading out your incoming messages aloud, it may invade your privacy or cause interruptions in certain situations. Fortunately, there are multiple ways to disable Siri’s message reading feature on your iPhone. In this section, we will explore five methods that can help you regain control over your messages.
Method 1: Turning off Apple CarPlay
If you use Apple CarPlay in your vehicle, Siri’s message reading may be enabled through this feature. To disable it, simply disconnect your iPhone from CarPlay or disable CarPlay altogether if you don’t use it frequently.
Method 2: Adjusting Siri settings on iPhone
To begin, open the Settings app on your iPhone and navigate to “Siri & Search.” From here, you can take the following steps:
- Disable “Listen for Hey Siri” and “Press Home/Side Button for Siri” to prevent accidental triggerings of Siri’s message reading.
- Make sure “Allow Siri When Locked” is turned off to ensure Siri doesn’t read messages when your iPhone is locked.
- Disable Siri Suggestions on the Lock Screen to prevent Siri from reading out notifications or displaying message previews.
Method 3: Disabling Allow Notifications from Messages
If you don’t want messages to trigger Siri’s message reading, you can turn off notifications specifically for the Messages app. Follow these steps:
- Open the Settings app, go to “Notifications,” and select “Messages.”
- Disable the “Allow Notifications” option to prevent incoming messages from being announced by Siri.
Method 4: Using Do Not Disturb mode
The Do Not Disturb mode allows you to temporarily silence notifications and prevent Siri from reading messages. Here’s how you can utilize this feature:
- Open the Control Center by swiping down from the top-right corner of your iPhone’s display.
- Tap on the Do Not Disturb button to activate it.
- You can also enable “Bedtime Mode” to silence notifications during your sleep hours.
- If you want to schedule Do Not Disturb mode for specific times, go to Settings, then “Do Not Disturb,” and set up a customized schedule.
Method 5: Disabling Read Receipts in Messages
When “Read Receipts” is enabled, Siri may read incoming messages to provide read status information. If you wish to prevent this, follow these steps:
- Open the Settings app on your iPhone and select “Messages.”
- Disable the “Send Read Receipts” option to prevent Siri from announcing your message read statuses.
By utilizing these methods, you can regain control over Siri’s message reading feature on your iPhone. Whether you value your privacy or simply want to avoid interruptions, these steps will help you customize Siri’s behavior according to your preferences.
Method 1: Turning off Apple CarPlay
If you frequently use Apple CarPlay in your vehicle, you may have noticed that Siri’s message reading feature can be enabled through this integration. This means that whenever you receive a new message, Siri will read it out loud. However, if you prefer to disable this feature, you can do so by following a few simple steps.
The first step is to disconnect your iPhone from CarPlay. If your iPhone is connected to your vehicle via USB or Bluetooth, simply unplug the cable or disconnect the device. By doing so, you will deactivate the CarPlay feature and prevent Siri from reading messages through it.
If you don’t use CarPlay frequently or prefer to disable it permanently, you can do so by going into the Settings app on your iPhone. From there, scroll down until you find “CarPlay” and tap on it. You will see a list of available CarPlay-enabled vehicles or devices. To disable CarPlay altogether, simply toggle off the “Connect to This Car Automatically” option.
Disabling CarPlay will not only prevent Siri from reading messages, but it will also stop other CarPlay-related features from functioning. Keep in mind that if you want to use CarPlay again in the future, you can easily re-enable it by following the same steps and toggling the option back on.
By turning off Apple CarPlay, you regain control over Siri’s message reading feature while using your iPhone in your vehicle. This can be particularly useful if you prefer to keep your messages private or if you find the frequent message reading interruptions to be distracting.
Method 2: Adjusting Siri settings on iPhone
If you want to disable Siri’s message reading feature on your iPhone, you can achieve this by adjusting the Siri settings. By following a few simple steps, you can customize Siri’s behavior and ensure that it no longer reads your incoming messages. Here’s how:
- Open Settings on iPhone: Begin by unlocking your iPhone and tapping on the Settings app icon. This will open the Settings menu where you can access various options and configurations.
- Tap on Siri & Search: Scroll through the Settings menu until you find “Siri & Search.” This section allows you to manage Siri’s settings and interactions with your iPhone.
- Disable “Listen for Hey Siri” and “Press Home/Side Button for Siri”: By default, your iPhone listens for the “Hey Siri” command or when you press the home button (or the side button on devices without a home button). To prevent accidental activation of Siri’s message reading, toggle off both the “Listen for Hey Siri” and “Press Home/Side Button for Siri” options. This ensures that Siri will not automatically activate when you receive a new message.
- Make sure “Allow Siri When Locked” is turned off: If you want to prevent Siri from reading messages when your iPhone is locked, double-check that the “Allow Siri When Locked” toggle is switched off. This ensures that Siri requires authentication to access your messages.
- Disable Siri Suggestions on Lock Screen: Scroll down further in the Siri & Search settings menu and locate the “Siri Suggestions” section. Within this section, you will find an option called “Suggestions on Lock Screen.” By disabling this option, Siri will no longer read out your incoming message notifications or display message previews on the lock screen.
By adjusting these Siri settings on your iPhone, you can effectively disable Siri’s message reading feature. Whether you want to maintain your privacy or avoid interruptions, customizing Siri’s behavior according to your preferences is a simple and effective solution.
Step 1: Open Settings on iPhone
To begin adjusting the Siri settings on your iPhone and disable the message reading feature, you need to open the Settings app. The Settings app is a central hub for customizing various functions and configurations on your iPhone. Here’s how you can easily access the Settings app:
1. Unlock your iPhone: If your iPhone is locked, press the home button (or the side button on devices without a home button) or use Face ID or Touch ID to unlock it. You will be directed to the home screen.
2. Locate and tap on the Settings app: Look for the Settings app icon on your screen. The icon resembles a gear or a set of mechanical cogs. It is typically found on the main home screen, but you can also swipe down and use the search feature to locate it quickly if it’s not readily visible.
3. Tap on the Settings app icon: Once you have located the Settings app, tap on it to open the app. This will launch the Settings menu on your iPhone.
By successfully opening the Settings app on your iPhone, you gain access to a wide range of options for customizing your device’s settings. This is the first step in adjusting the Siri settings to disable the message reading feature and regain control over your incoming messages.
Step 2: Tap on Siri & Search
Once you have successfully opened the Settings app on your iPhone, the next step in disabling Siri’s message reading feature is to tap on the “Siri & Search” option. This section allows you to fine-tune Siri’s settings and personalize its behavior according to your preferences. Here’s how you can access it:
1. Navigate to the Siri & Search option: Scroll through the Settings menu until you find the “Siri & Search” option. It is usually located near the top of the menu, below the search bar. Tap on it to enter the Siri options.
2. Enter the Siri settings: Tapping on the “Siri & Search” option will open a new menu containing various settings related to Siri’s functionality. Here, you can configure different aspects of Siri’s behavior, including its interaction with messages and notifications.
3. Customize Siri’s message reading settings: Within the Siri settings menu, you can find options to control Siri’s behavior when it comes to reading messages. These options include “Listen for Hey Siri,” which allows Siri to be activated by voice command, and “Press Home/Side Button for Siri,” which enables Siri when you press the home button or side button. By adjusting these settings, you can prevent Siri from automatically reading your incoming messages.
By tapping on the “Siri & Search” option in the Settings app, you gain access to the specific settings that allow you to customize Siri’s behavior. This step is crucial in the process of disabling Siri’s message reading feature and regaining control over your notifications and privacy.
Step 3: Disable “Listen for Hey Siri” and “Press Home/Side Button for Siri”
To further disable Siri’s message reading feature on your iPhone, you need to turn off the “Listen for Hey Siri” and “Press Home/Side Button for Siri” options. Adjusting these settings will prevent Siri from automatically activating when a new message arrives, ensuring that your messages remain private. Here’s how you can disable these options:
1. Inside the Siri & Search settings: Open the Settings app and navigate to the Siri & Search section by following the previous steps outlined in the previous section. This is where you can customize different Siri settings.
2. Locate the desired options: Within the Siri settings menu, scroll down until you find the “Listen for Hey Siri” and “Press Home/Side Button for Siri” options. These options control how Siri is activated on your device.
3. Disable the options: To prevent Siri from automatically activating when a new message arrives, toggle off both the “Listen for Hey Siri” and “Press Home/Side Button for Siri” options. This ensures that Siri will not accidentally trigger the message reading feature.
By disabling these options, you regain control over when Siri is activated and prevent unwanted interruptions when receiving messages. Your iPhone will no longer automatically read out incoming messages, preserving your privacy and allowing you to manage your notifications more effectively.
Step 4: Make sure “Allow Siri When Locked” is turned off
Ensuring that the “Allow Siri When Locked” option is turned off is essential in disabling Siri’s message reading feature on your iPhone. By doing so, you can prevent Siri from accessing your messages when your device is locked, adding an extra layer of privacy and control. Let’s explore how you can disable this option:
1. Open Siri settings: Access the Siri settings by going to the Settings app and navigating to the Siri & Search section as described in the previous steps.
2. Find “Allow Siri When Locked”: Within the Siri settings, scroll down until you locate the “Allow Siri When Locked” option. This option determines whether Siri can be used when your iPhone is locked.
3. Turn off the option: To prevent Siri from accessing your messages when your iPhone is locked, make sure the “Allow Siri When Locked” toggle is switched off.
Disabling this option ensures that Siri cannot read your messages or perform any actions related to them without authentication. It adds an extra layer of security, especially if you value your privacy or want to keep sensitive message content private.
By turning off the “Allow Siri When Locked” option, you have full control over when Siri can access your messages. This allows you to manage your notifications and maintain the privacy of your conversations, even when your iPhone is locked.
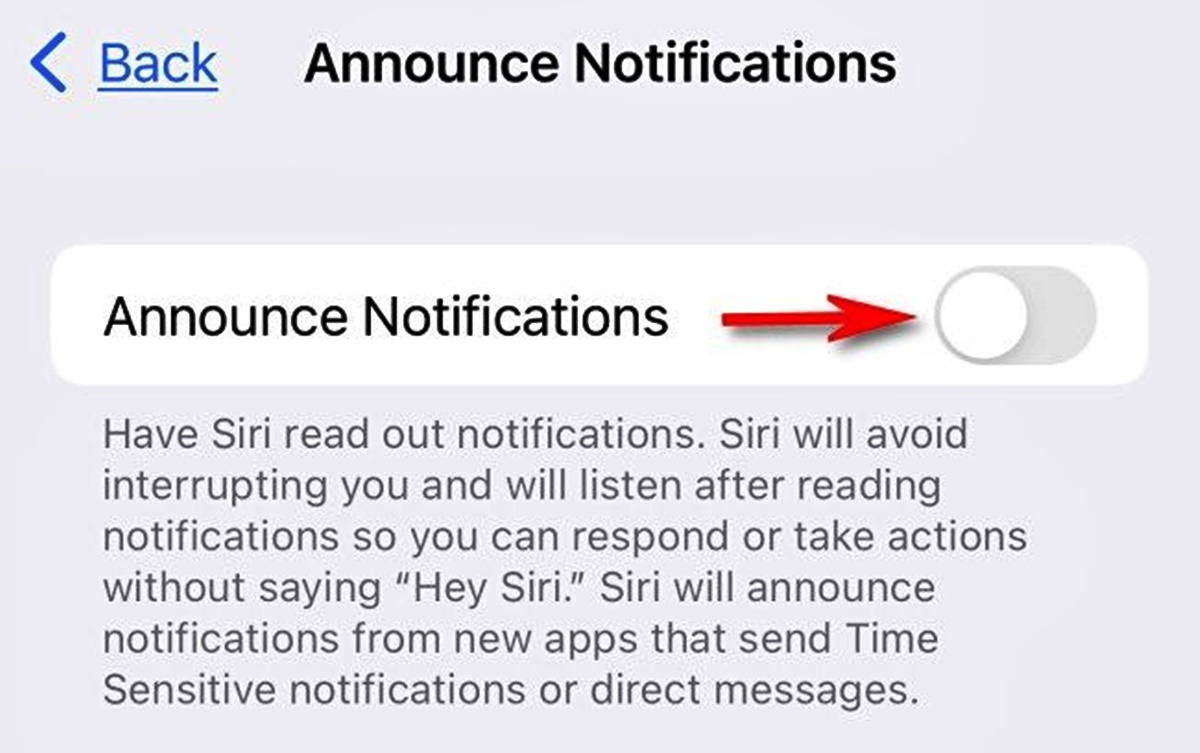
Step 5: Disable Siri Suggestions on Lock Screen
To ensure that Siri doesn’t read out your incoming message notifications or display message previews on the lock screen, it’s important to disable the “Siri Suggestions” feature. By doing so, you can maintain your privacy and prevent any potential interruptions caused by Siri’s message reading on the lock screen. Here’s how you can disable Siri Suggestions:
1. Within the Siri & Search settings: Open the Settings app on your iPhone and navigate to the Siri & Search section, following the steps outlined before.
2. Locate Siri Suggestions: Scroll down within the Siri settings until you find the “Siri Suggestions” section. This is where you can control how Siri interacts with your lock screen and displays suggestions.
3. Disable “Suggestions on Lock Screen”: Within the Siri Suggestions section, you will find an option called “Suggestions on Lock Screen.” Toggle this option off to prevent Siri from displaying message previews or reading out notifications on the lock screen.
Disabling Siri Suggestions on the lock screen ensures that your incoming messages remain private, and Siri won’t announce or display them without your consent. This helps to avoid any potential privacy concerns or distractions that may arise from Siri’s message reading feature on the lock screen.
By following these steps and disabling Siri Suggestions on the lock screen, you take control of your lock screen notifications and prevent any unwanted message reading by Siri. This allows you to manage your notifications discreetly and maintain a higher level of privacy on your iPhone.
Method 3: Disabling Allow Notifications from Messages
If you want to prevent Siri from reading your messages, one effective method is to disable notifications specifically for the Messages app. By doing so, you can ensure that incoming messages do not trigger Siri’s message reading feature. Follow these steps to disable message notifications:
1. Open the Settings app on your iPhone: Locate the Settings app icon on your home screen and tap on it to open the app.
2. Tap on Notifications: Scroll down in the Settings menu until you find the “Notifications” option. Tap on it to access the notification settings for various apps on your iPhone.
3. Select Messages: Within the Notifications settings, locate and tap on the “Messages” option. This will take you to the notification settings specifically for the Messages app.
4. Disable “Allow Notifications”: Once you’re in the Messages notification settings, you will see an option called “Allow Notifications.” Toggle this option off to prevent incoming messages from generating notifications, which would trigger Siri’s message reading feature.
By disabling message notifications, you can effectively prevent Siri from reading your incoming messages. This allows you to have more control over when and how you interact with your messages, without any interruptions or privacy concerns caused by Siri’s automatic message reading.
It’s worth noting that disabling notifications from the Messages app means you won’t receive any alerts or banners for new messages. However, you can still manually check your inbox and read your messages at your convenience without Siri’s intervention.
By utilizing this method and disabling notifications from the Messages app, you can reclaim control over your messages and ensure that Siri doesn’t read them aloud, maintaining your privacy and allowing you to manage your messages on your own terms.
Step 1: Open Settings on iPhone
To begin the process of disabling message notifications from the Messages app, the first step is to open the Settings app on your iPhone. The Settings app is where you can customize various aspects of your device’s configurations and preferences. Here’s how you can open the Settings app:
1. Navigate to the home screen: Press the home button (or the side button on devices without a home button) to return to the home screen of your iPhone. This is the main screen that displays all your installed apps.
2. Locate the Settings app: Look for the Settings app icon on your home screen. It is represented by a grey icon with gears. You can typically find it either on the front page of the home screen or in a folder labeled “Utilities.”
3. Tap on the Settings app icon: Once you have located the Settings app, tap on the icon to launch the app. This will open the Settings menu on your iPhone.
By successfully opening the Settings app on your iPhone, you gain access to a wide range of options for customizing your device. This is the first step in disabling message notifications from the Messages app and regaining control over your incoming message alerts.
Keep in mind that the exact location of the Settings app may vary depending on your iPhone model and iOS version. However, it is typically easy to find and access from the home screen. Once you’re in the Settings menu, you can proceed with further steps to disable message notifications from the Messages app.
Step 2: Tap on Notifications
After opening the Settings app on your iPhone, the next step in disabling message notifications from the Messages app is to navigate to the Notifications settings. This is where you can manage and customize the notification preferences for various apps on your device. Follow these steps to access the Notifications settings:
1. Locate the Notifications option: Within the Settings menu, scroll down until you find the option labeled “Notifications.” It is typically listed alphabetically along with other system preferences.
2. Tap on Notifications: Once you have located the Notifications option, tap on it to enter the Notifications settings. This is where you can fine-tune the notification settings for individual apps on your iPhone.
3. Find and select the Messages app: Within the Notifications settings, you will see a list of installed apps on your iPhone. Scroll through the list until you find the “Messages” app and tap on it. This will take you to the notification settings specifically for the Messages app.
By tapping on the Notifications option in the Settings app, you gain access to the settings that govern how notifications are displayed on your iPhone. This includes controlling the behavior of message notifications from the Messages app.
Keep in mind that the exact location of the Notifications option may vary slightly depending on your iOS version. However, it is typically easy to find within the Settings menu. Once you’re in the Notifications settings, you can proceed with the next steps to customize the notification preferences for the Messages app.
Step 3: Select Messages
Once you have accessed the Notifications settings in the Settings app on your iPhone, the next step in disabling message notifications is to locate and select the Messages app. This will allow you to customize the notification settings specifically for the Messages app. Follow these steps to select the Messages app within the Notifications settings:
1. Within the Notifications settings: Open the Settings app and navigate to the Notifications section by following the steps outlined in the previous sections.
2. Locate the Messages app: Scroll through the list of installed apps within the Notifications settings until you find the “Messages” app. This is the app that handles all your text messaging and iMessage conversations.
3. Tap on the Messages app: Once you have located the Messages app, tap on it to enter the notification settings specifically for the Messages app.
By selecting the Messages app within the Notifications settings, you can now customize the way notifications are displayed for incoming messages. This will allow you to tailor the notification settings to your preferences and effectively manage incoming message alerts.
Within the Messages notification settings, you’ll find various options to configure how notifications appear, including banners, sounds, badges, and more. By adjusting these settings, you can modify how the Messages app notifies you about new messages and prevent Siri from reading them aloud.
Keep in mind that disabling notifications from the Messages app means you won’t receive any alerts or banners for new messages. However, you can still manually open the app and read your messages at your convenience, without triggering Siri’s message reading feature.
By successfully selecting the Messages app within the Notifications settings, you are now ready to customize the notification preferences for the Messages app and disable unwanted message notifications.
Step 4: Disable “Allow Notifications”
After selecting the Messages app within the Notifications settings on your iPhone, the next step in disabling message notifications is to turn off the “Allow Notifications” option. By disabling this option, you can ensure that incoming messages won’t generate notifications, preventing Siri’s message reading feature. Follow these steps to disable “Allow Notifications” for the Messages app:
1. Within the Messages notification settings: Open the Settings app and navigate to the Notifications section as described in the previous sections. Tap on the “Messages” app to access the notification settings specifically for Messages.
2. Locate the “Allow Notifications” toggle: Within the Messages notification settings, you will find an option called “Allow Notifications.” This toggle determines whether you receive notifications for incoming messages.
3. Disable “Allow Notifications”: To prevent Siri from reading out your incoming messages, toggle off the “Allow Notifications” option for the Messages app. This ensures that message notifications won’t be displayed, thereby avoiding any potential interruptions or privacy concerns.
By disabling the “Allow Notifications” option, you gain control over how and when you receive message alerts. Siri won’t read out your messages or display message notifications, providing you with a quieter and more private messaging experience.
It’s worth noting that disabling message notifications doesn’t prevent you from accessing your messages entirely. You can still open the Messages app and view your conversations at any time. However, you won’t receive any notifications or prompts when new messages arrive.
By successfully disabling the “Allow Notifications” option for the Messages app, you have effectively disabled the message notifications that trigger Siri’s message reading feature. This allows you to manage your messages on your own terms, without any interference from Siri.
Method 4: Using Do Not Disturb mode
If you want to silence notifications and prevent Siri from reading your messages, using the Do Not Disturb mode on your iPhone is an effective method. By enabling this mode, you can temporarily disable message alerts and ensure uninterrupted privacy. Here’s how you can utilize the Do Not Disturb mode:
1. Open Control Center on your iPhone: From the home screen or any app screen, swipe up from the bottom (or from the top-right corner on newer models without a Home button) to access the Control Center.
2. Tap on the Do Not Disturb button: In the Control Center, look for the crescent moon icon or the Do Not Disturb button and tap on it. This action immediately activates the Do Not Disturb mode.
3. Enable “Bedtime Mode” (optional): If you want to prevent disruptions even during your sleep hours, you can enable “Bedtime Mode” within the Control Center. This will ensure that notifications and calls are silenced during your designated sleep time.
4. Set a specific schedule for Do Not Disturb mode (optional): To use the Do Not Disturb mode consistently during specific hours, you can set up a customized schedule in the Settings app. Open the Settings app, go to “Do Not Disturb,” and tap on “Scheduled.” From there, you can specify the start and end time for the Do Not Disturb mode.
By utilizing the Do Not Disturb mode, you can enjoy uninterrupted periods without message alerts or Siri’s message reading. It’s particularly useful during meetings, important events, or when you simply need some focused time without distractions.
Keep in mind that calls and notifications will be silenced while Do Not Disturb mode is active, so make sure to adjust the settings if you don’t want to miss any urgent calls or messages. Additionally, certain enabled contacts or repeated calls can be set to bypass the Do Not Disturb mode in case of emergencies.
By following these steps and utilizing the Do Not Disturb mode, you can regain control over your notifications and prevent Siri from reading your messages when enabled. It’s a powerful feature that allows you to create a distraction-free zone whenever needed.
Step 1: Open Control Center on iPhone
To access and enable the Do Not Disturb mode on your iPhone, the first step is to open the Control Center. The Control Center is a convenient shortcut menu that allows you to quickly access various settings and functionalities of your device. Here’s how you can open the Control Center:
1. Unlock your iPhone: If your iPhone is locked, press the home button (or the side button on devices without a home button) or use Face ID or Touch ID to unlock it. You will be directed to the home screen.
2. Swipe up from the bottom: From the bottom of your iPhone screen, swipe upward with your finger. This gesture will reveal the Control Center. If you own a newer model without a home button, swipe down from the top-right corner of the screen to access the Control Center.
3. Access the Do Not Disturb button: Within the Control Center, look for the crescent moon icon or the Do Not Disturb button. Tap on it to activate the Do Not Disturb mode.
By successfully opening the Control Center on your iPhone, you can quickly enable the Do Not Disturb mode and temporarily silence notifications, including Siri’s message reading feature. This allows you to focus on tasks, meetings, or simply enjoy uninterrupted time without the disturbance of incoming messages or notifications.
It’s worth noting that the appearance and arrangement of icons in the Control Center may slightly vary depending on your iPhone model and iOS version. However, the general concept and functionality remain consistent, allowing you to easily access the Do Not Disturb mode and other essential settings with just a swipe and a tap.
Now that you have opened the Control Center, you’re ready to proceed with enabling the Do Not Disturb mode and enjoying uninterrupted, distraction-free time on your iPhone.
Step 2: Tap on the Do Not Disturb button
After accessing the Control Center on your iPhone, the next step in enabling the Do Not Disturb mode is to tap on the corresponding button. By activating this feature, you can effectively silence notifications, including Siri’s message reading, and enjoy uninterrupted time on your device. Here’s how you can tap on the Do Not Disturb button:
1. Locate the Do Not Disturb button: Once you have opened the Control Center, look for the crescent moon icon or the Do Not Disturb button. This button is designed to represent the Do Not Disturb mode.
2. Tap on the Do Not Disturb button: When you find the Do Not Disturb button in the Control Center, simply tap on it to enable the mode. Once enabled, the crescent moon icon or the button will appear highlighted or show a subtle indicator to indicate that the Do Not Disturb mode is active.
By tapping on the Do Not Disturb button, you activate the mode and ensure that your iPhone remains quiet and undisturbed by incoming notifications. This includes silencing message alerts and preventing Siri from reading your messages aloud.
While the Do Not Disturb mode is active, calls and notifications will be silenced, preventing them from interrupting your activities or causing distractions. However, you can still manually check your messages and notifications by unlocking your iPhone or opening the relevant apps.
It’s important to note that by default, the Do Not Disturb mode is set to manually enable and disable. This means that it will remain active until you manually turn it off by tapping on the Do Not Disturb button again in the Control Center.
By successfully tapping on the Do Not Disturb button in the Control Center, you have activated the mode on your iPhone, ensuring a peaceful and undisturbed experience without interruptions from message notifications or Siri’s message reading.
Step 3: Enable “Bedtime Mode”
In addition to the basic Do Not Disturb functionality, iPhone users have the option to enable “Bedtime Mode” to further enhance their uninterrupted sleep or designated quiet hours. By enabling this feature, you can ensure that notifications and alerts, including Siri’s message reading, are silenced during specific hours. Here’s how you can enable “Bedtime Mode” within the Do Not Disturb settings:
1. Open the Control Center: Access the Control Center on your iPhone by swiping up from the bottom of the screen or swiping down from the top-right corner, depending on your iPhone model.
2. Tap on the Do Not Disturb button: Look for the crescent moon icon or the Do Not Disturb button in the Control Center, and tap on it to activate the mode.
3. Enable “Bedtime Mode”: Once the Do Not Disturb mode is active, tap and hold the crescent moon icon or the Do Not Disturb button to reveal additional options. Among the options, you will find “Bedtime Mode.” Tap on it to enable this mode.
4. Set the schedule for “Bedtime Mode”: After enabling “Bedtime Mode,” you will be prompted to set a schedule for the mode to automatically activate and deactivate. Adjust the “From” and “To” time settings to specify the hours during which you want “Bedtime Mode” to be active.
By enabling “Bedtime Mode” within the Do Not Disturb settings, you ensure that notifications, including message alerts and Siri’s message reading, are silenced during your designated sleep or quiet hours. This allows you to have uninterrupted rest or focused time without any disruptions from your iPhone.
It’s important to note that “Bedtime Mode” is designed to work in conjunction with the Do Not Disturb mode. When “Bedtime Mode” is active, both scheduled and manual notifications will be silenced, and your device will display a dimmed lock screen with no intrusive notifications visible.
By following these steps and enabling “Bedtime Mode” within the Do Not Disturb settings, you can create a peaceful and uninterrupted environment during your designated sleep or quiet hours, safeguarding your rest and reducing any distractions caused by message notifications or Siri’s message reading feature.
Step 4: Set a specific schedule for Do Not Disturb mode
To further customize the Do Not Disturb mode on your iPhone, you can set a specific schedule for when it should be activated and deactivated. This allows you to automatically enable and disable the mode during your preferred hours, ensuring uninterrupted focus or quiet time. Follow these steps to set a specific schedule for Do Not Disturb mode:
1. Open the Settings app: Locate the Settings app icon on your iPhone’s home screen and tap on it to open the app.
2. Navigate to the Do Not Disturb settings: Scroll through the Settings menu and find “Do Not Disturb” (usually represented by a crescent moon icon). Tap on it to enter the Do Not Disturb settings.
3. Tap on “Scheduled”: Within the Do Not Disturb settings, you will find a section labeled “Scheduled.” Tap on it to access the scheduling options.
4. Set the start and end time: Once you’re in the “Scheduled” section, you will see the “From” and “To” time options. Tap on each of them to select the desired start and end time for the Do Not Disturb mode. Adjust the hours and minutes according to your preference.
5. Customize additional options (optional): If desired, you can customize additional options within the Do Not Disturb settings. This includes allowing calls from specific contacts, repeated calls, and more. Explore these options and adjust them according to your preferences.
By setting a specific schedule for the Do Not Disturb mode, you can automate the activation and deactivation of this feature during your preferred hours. This allows you to establish dedicated time for focused work, relaxing, or uninterrupted sleep.
Keep in mind that the scheduled Do Not Disturb mode overrides any manual activation of the mode through the Control Center. This ensures that you don’t have to remember to enable or disable it manually each time.
By following these steps and setting a specific schedule for the Do Not Disturb mode, you can take control of your iPhone’s notifications and ensure uninterrupted periods of focus or relaxation without any interruptions from message alerts or Siri’s message reading.
Method 5: Disabling Read Receipts in Messages
If you want to prevent Siri from reading messages aloud, one effective method is to disable read receipts in the Messages app. By turning off this feature, you can prevent the sender from knowing when you have read their message, eliminating the need for Siri to announce the read status. Here’s how you can disable read receipts:
Step 1: Open Settings on your iPhone: Locate the Settings app icon on your home screen and tap on it to open the app.
Step 2: Tap on Messages: Scroll through the Settings menu and find “Messages,” represented by a green speech bubble icon. Tap on it to access the settings for the Messages app.
Step 3: Disable “Send Read Receipts”: Within the Messages settings, locate the “Send Read Receipts” option. Toggle the switch to turn it off. This will prevent the sender from receiving read receipts when you read their messages.
By disabling read receipts, you can maintain your privacy and prevent Siri from announcing the read status of your messages. You will be able to read messages at your own convenience without worrying about triggering Siri’s message reading feature.
It’s worth noting that when you disable read receipts, you will also stop receiving read receipts from others. Additionally, keep in mind that this change applies to the Messages app only and does not affect other messaging platforms or apps on your iPhone.
By successfully disabling read receipts in the Messages app on your iPhone, you can enjoy a more private messaging experience without the need for Siri to interact with your messages. This method gives you full control over when and how you respond to messages, allowing you to maintain your communication preferences while preventing Siri from reading messages aloud.
Step 1: Open Settings on iPhone
To begin the process of disabling read receipts in the Messages app on your iPhone, the first step is to open the Settings app. The Settings app is where you can access and modify various settings and preferences for your device. Here’s how you can open the Settings app:
1. Locate the Settings app: Find the Settings app icon on your iPhone’s home screen. It appears as a grey gear or mechanical cogs icon. The icon is typically found on the first page of the home screen or within a folder labeled “Utilities.”
2. Tap on the Settings app: Once you have located the Settings app icon, tap on it to open the app. This will launch the Settings menu on your iPhone.
By successfully opening the Settings app on your iPhone, you gain access to a wide range of options for customizing and adjusting your device’s settings. This is the first step in disabling read receipts in the Messages app and maintaining your privacy when interacting with messages.
Keep in mind that the Settings app icon and its location may differ slightly depending on your iPhone model and iOS version. However, it is generally easily recognizable and accessible from the home screen. Once you’re in the Settings menu, you can proceed with the next steps to disable read receipts in the Messages app.
Step 2: Tap on Messages
After opening the Settings app on your iPhone, the next step in disabling read receipts in the Messages app is to locate and tap on the “Messages” option. This allows you to access the settings specifically for the Messages app and make the necessary changes. Follow these steps to access the Messages settings:
1. Within the Settings app: From the main screen of the Settings app, scroll down until you find the option labeled “Messages.” Tap on it to enter the settings for the Messages app.
2. Tap on Messages: Once you locate the “Messages” option, tap on it to access the settings for the Messages app. This is where you can customize various features and preferences related to your messaging experience.
By tapping on the “Messages” option within the Settings app, you gain access to the settings menu specifically for the Messages app. This allows you to make adjustments to various aspects of your messaging experience, including the read receipts feature.
It’s worth noting that these settings are specific to the Messages app and do not affect other messaging platforms or apps on your iPhone. Any changes made within the Messages settings will only apply to your interactions within the Messages app itself.
By successfully tapping on the “Messages” option within the Settings app, you are now ready to proceed with the next steps to disable read receipts and customize your messaging preferences.
Step 3: Disable “Send Read Receipts”
To disable read receipts in the Messages app on your iPhone, the next step is to locate and disable the “Send Read Receipts” option. By turning off this feature, you will prevent others from receiving a notification when you have read their messages. Follow these steps to disable “Send Read Receipts”:
1. Within the Messages settings: Open the Settings app on your iPhone and tap on the “Messages” option, as described in the previous section. This will take you to the settings menu for the Messages app.
2. Locate “Send Read Receipts”: Scroll down within the Messages settings until you find the “Send Read Receipts” option. It is usually located near the middle of the settings menu.
3. Disable “Send Read Receipts”: To turn off read receipts, simply toggle the switch next to “Send Read Receipts” to the off position. When the switch is grey or moved to the left, it means the feature is disabled.
By disabling “Send Read Receipts” in the Messages settings, you prevent the sender from being notified when you have read their messages. This eliminates the need for Siri to announce the read status of your messages, further enhancing your privacy.
It’s important to note that when you disable read receipts, you will also be unable to see whether others have read your messages. The read receipts feature works reciprocally, so if you choose to disable it, you won’t receive read receipts from others either.
By successfully disabling the “Send Read Receipts” option in the Messages settings, you have effectively disabled read receipts for your messages. This allows you to read messages privately and without triggering Siri’s message reading feature.