
Why You Should Enable Find My iPad
Whether you use your iPad for work or play, keeping it safe and secure is paramount. One of the best ways to ensure the safety of your iPad and the data it contains is by enabling the Find My iPad feature. With Find My iPad, you can track the location of your device in case it gets lost or stolen, remotely lock and erase your device to protect your personal information, and even play a sound to help locate it in a nearby area.
Here are three key reasons why you should enable Find My iPad:
- Locate Your Lost or Stolen iPad: Losing your iPad can be a nightmare, but with Find My iPad, you have a better chance of finding it. By enabling this feature, you can view the real-time location of your device on a map, allowing you to track it down or provide authorities with its precise coordinates.
- Protect Your Personal Data: Your iPad likely contains valuable personal information, such as emails, contacts, photos, and more. Enabling Find My iPad ensures that even if your device falls into the wrong hands, you have the ability to remotely lock it or erase its contents. This protects your sensitive data and gives you peace of mind.
- Potential Recovery: In case your iPad does go missing, enabling Find My iPad greatly increases the chances of its recovery. By activating this feature, you can enable the “Lost Mode” option, which allows you to display a custom message on the lock screen, providing your contact information or any specific instructions for someone who may find your device.
By enabling Find My iPad, you can safeguard your device and data, as well as improve your chances of locating it if it goes missing. The peace of mind that comes with knowing your iPad is protected is invaluable, making it a wise decision to enable this feature.
How to Check if Find My iPad is Already Enabled
Before you proceed with any actions related to Find My iPad, it’s important to check whether the feature is already enabled on your device. Here’s how you can quickly verify if Find My iPad is already enabled:
- On your iPad, go to the “Settings” app. It’s typically represented by a gear icon.
- Scroll down and tap on your Apple ID, located at the top of the settings menu.
- In the Apple ID menu, tap on “iCloud.”
- Scroll down to the “Apps Using iCloud” section and look for “Find My iPad.” If it’s listed here, it means that Find My iPad is already enabled.
If you see “Find My iPad” listed in the “Apps Using iCloud” section, it means that the feature is enabled on your device. You can proceed with other Find My iPad actions such as locating your device, remotely locking it, or erasing its contents if necessary.
On the other hand, if “Find My iPad” is not listed in the “Apps Using iCloud” section, it means that the feature is not enabled on your device. In this case, you should proceed with enabling Find My iPad to ensure the safety of your iPad and its data.
Checking whether Find My iPad is already enabled is a simple process and can help you determine the next steps to take. By verifying the status of this feature on your iPad, you can effectively protect your device and increase the chances of recovering it if it ever gets lost or stolen.
How to Turn On Find My iPad Using Settings
Enabling Find My iPad is a crucial step in securing your device and its data. By following these simple steps, you can easily turn on Find My iPad using the Settings app:
- On your iPad, open the “Settings” app. You can find the app icon on your home screen.
- Scroll down and tap on your Apple ID, located at the top of the settings menu.
- In the Apple ID menu, tap on “iCloud.”
- Scroll down to the “Apps Using iCloud” section and locate “Find My iPad.” Toggle the switch next to it to the On position.
- If prompted, enter your Apple ID password to confirm the action.
Once you have completed these steps, Find My iPad will be enabled on your device. You can now take advantage of its features such as locating your device, locking it remotely, or erasing its contents in case of theft or loss.
It’s essential to note that enabling Find My iPad requires a stable internet connection and an active iCloud account linked to your iPad. Additionally, make sure you remember your Apple ID and password as they are needed for managing Find My iPad settings in the future.
By turning on Find My iPad using the Settings app, you can enhance the security and protection of your iPad. This feature provides you with valuable tools to locate and safeguard your device, giving you peace of mind in any situation.
How to Turn On Find My iPad Using iCloud
If you prefer to enable Find My iPad using the iCloud website, follow these simple steps:
- Open a web browser on your computer and visit the iCloud website (www.icloud.com).
- Sign in to your iCloud account using your Apple ID and password.
- Once you are logged in, you will see a grid of icons. Click on the “Find iPhone” icon.
- At the top of the screen, click on the drop-down menu next to
“All Devices” and select your iPad from the list. - If Find My iPad is not already enabled, a prompt will appear, asking if you would like to enable it. Click on “Allow” to turn on Find My iPad.
- You may be prompted to enter your Apple ID password again for security purposes.
After completing these steps, Find My iPad will be enabled on your device. You can now use the features of Find My iPad, such as locating your device, remotely locking it, and erasing its contents if necessary.
It’s important to note that turning on Find My iPad using iCloud requires an active iCloud account linked to your device and a stable internet connection. Additionally, make sure you remember your Apple ID and password as they are needed to access your iCloud account.
By utilizing iCloud to turn on Find My iPad, you can easily enable this powerful feature from any computer with an internet connection. This provides you with peace of mind knowing that you have a reliable way to locate and protect your device in case it gets lost or stolen.
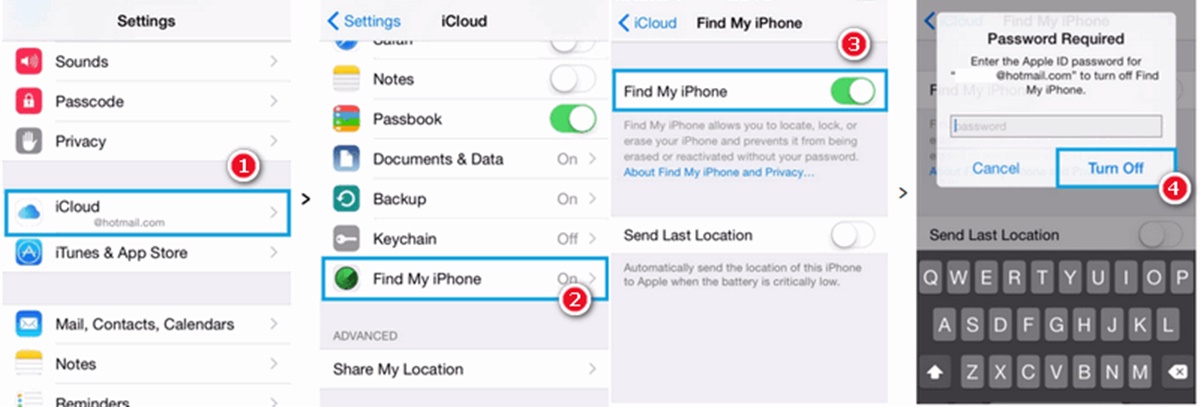
How to Turn Off Find My iPad Using Settings
If you no longer wish to use the Find My iPad feature or need to disable it for any reason, you can easily turn it off using the Settings app on your iPad. Here’s how:
- Open the “Settings” app on your iPad.
- Scroll down and tap on your Apple ID, located at the top of the settings menu.
- In the Apple ID menu, tap on “iCloud.”
- Scroll down and locate “Find My iPad” in the list of apps using iCloud.
- Toggle the switch next to “Find My iPad” to the Off position.
- If prompted, enter your Apple ID password to confirm the action.
Once you follow these steps and turn off Find My iPad, the feature will be disabled on your device. However, it’s important to note that disabling Find My iPad also removes the ability to locate your device, remotely lock it, or erase its contents in case of loss or theft.
Keep in mind that disabling Find My iPad may also impact other services that rely on this feature, such as Activation Lock, which prevents unauthorized access to your iPad. Before turning off Find My iPad, consider the implications and ensure you have alternative security measures in place.
If you plan to sell or give away your iPad, it is recommended to leave Find My iPad enabled until after the device has been transferred to the new owner. This ensures that the next person can fully utilize the device and prevents any potential issues with iCloud activation.
By following these steps, you can easily turn off Find My iPad using the Settings app. Make sure to carefully consider the consequences of disabling this feature and assess your security needs before making the decision.
How to Turn Off Find My iPad Using iCloud
If you need to disable the Find My iPad feature and prefer to do it using the iCloud website, here’s how you can turn it off:
- Open a web browser on your computer and visit the iCloud website (www.icloud.com).
- Sign in to your iCloud account using your Apple ID and password.
- Once you are logged in, click on the “Find iPhone” icon to access the Find My iPhone feature.
- In the top-center of the screen, click on the drop-down menu next to “All Devices” and select your iPad from the list.
- Click on the “Erase iPad” option.
- A confirmation prompt will appear. Review the information and click on “Erase” to proceed with disabling Find My iPad and erasing all data from your device.
- Enter your Apple ID password to confirm the action.
After completing these steps, Find My iPad will be turned off on your device, and all data will be erased. It’s worth noting that this action is irreversible, and you will no longer be able to locate or manage your device using Find My iPad.
If you no longer have access to your iPad or cannot use the iCloud website, you can also turn off Find My iPad remotely by signing in to iCloud on another iOS device or using the Find My app on another Apple device.
Remember that disabling Find My iPad removes the ability to track your device’s location or remotely lock and erase it. If you plan to sell or give away your iPad, ensure that Find My iPad is turned off to prevent any activation or ownership issues for the new user.
By following these steps, you can effectively turn off Find My iPad using iCloud. Take caution and consider the implications of disabling this feature before proceeding, especially if your device contains sensitive data or if you are still using it on a daily basis.
Troubleshooting Common Issues with Find My iPad
While Find My iPad is a powerful feature that enhances the security of your device, you may encounter some common issues along the way. Here are a few troubleshooting tips to help resolve any problems you might encounter:
- No Location or Incorrect Location: If Find My iPad is unable to accurately track the location of your device or shows an incorrect location, ensure that your iPad is connected to the internet and has a strong GPS signal. Additionally, check if you have granted the necessary location permissions to the Find My iPad app in your device settings.
- Lost Mode Not Working: If you have enabled Lost Mode to display a custom message on your device’s lock screen, but it is not working, ensure that you have entered the correct passcode or password associated with your Apple ID. Also, check if your device has an active internet connection, as Lost Mode requires an internet connection to function properly.
- Unable to Sign In: If you are having trouble signing in to your iCloud account to access Find My iPad, verify that you have entered the correct Apple ID and password. If you still can’t sign in, double-check your internet connection and try resetting your password through the Apple ID account recovery process.
- Activation Lock: If you receive a message stating that your iPad is linked to an Apple ID and Activation Lock is enabled, it means that the previous owner did not remove their iCloud account from the device. In this case, you should contact the previous owner or Apple support for assistance in removing the Activation Lock.
- Find My iPad Not Available: If Find My iPad is not available on your device or in your iCloud settings, ensure that you are using a compatible iOS version. Some older iPad models may not support this feature. Additionally, make sure that you are signed in to your iPad with an iCloud account and have enabled iCloud services on your device.
If you continue to experience issues with Find My iPad, it’s recommended to update your device to the latest iOS version and ensure that you have a stable internet connection. If the issue persists, contacting Apple Support for further assistance may be necessary.
By following these troubleshooting tips, you can overcome common issues that may arise when using Find My iPad. Remember to always keep your device updated and maintain a strong internet connection for optimal functionality.