
Enable iCloud Messages
One of the easiest ways to transfer messages from iPhone to iPhone is by enabling iCloud Messages. This feature allows you to sync your iMessages across multiple devices, including iPhones, iPads, and Macs. By enabling iCloud Messages, your messages will be stored in the cloud, making them accessible on any device with the same Apple ID.
To enable iCloud Messages on your old iPhone, follow these steps:
- Connect your iPhone to a Wi-Fi network.
- Go to Settings and tap on your Apple ID at the top of the screen.
- Select “iCloud” from the list of options.
- Look for “Messages” and toggle the switch next to it to turn on iCloud Messages. An option to “Merge” or “Disable & Delete” may appear. Choose “Merge” to ensure your messages are synced across devices.
- You may be prompted to enter your Apple ID password. Enter it to confirm your selection.
Once iCloud Messages is enabled, your messages will start syncing to your iCloud account. It may take some time, especially if you have a large message history. Make sure to keep your iPhone connected to a power source and connected to Wi-Fi until the syncing process is complete.
Please note that iCloud Messages uses your iCloud storage space. If you have a limited amount of storage available, you may need to manage your storage or upgrade to a higher iCloud storage plan. This will ensure that all your messages can be stored in the cloud and accessed on your new iPhone.
Now that iCloud Messages is enabled on your old iPhone, you are ready to backup your device and prepare for transferring messages to your new iPhone.
Backup Your iPhone
Before you transfer your messages to a new iPhone, it is crucial to create a backup of your current iPhone. This will ensure that all your data, including your messages, are safely stored and can be restored to your new device. There are two main ways to back up your iPhone: using iCloud or iTunes.
To back up your iPhone to iCloud, follow these steps:
- Connect your iPhone to a Wi-Fi network.
- Go to Settings and tap on your Apple ID at the top of the screen.
- Select “iCloud” from the list of options.
- Scroll down and tap on “iCloud Backup”.
- Toggle the switch next to “iCloud Backup” to turn it on.
- Tap on “Back Up Now” to start the backup process. Make sure you have enough iCloud storage available to accommodate the backup.
- Keep your iPhone connected to Wi-Fi and a power source until the backup is complete. You can check the progress by going to Settings > [Your Name] > iCloud > iCloud Backup.
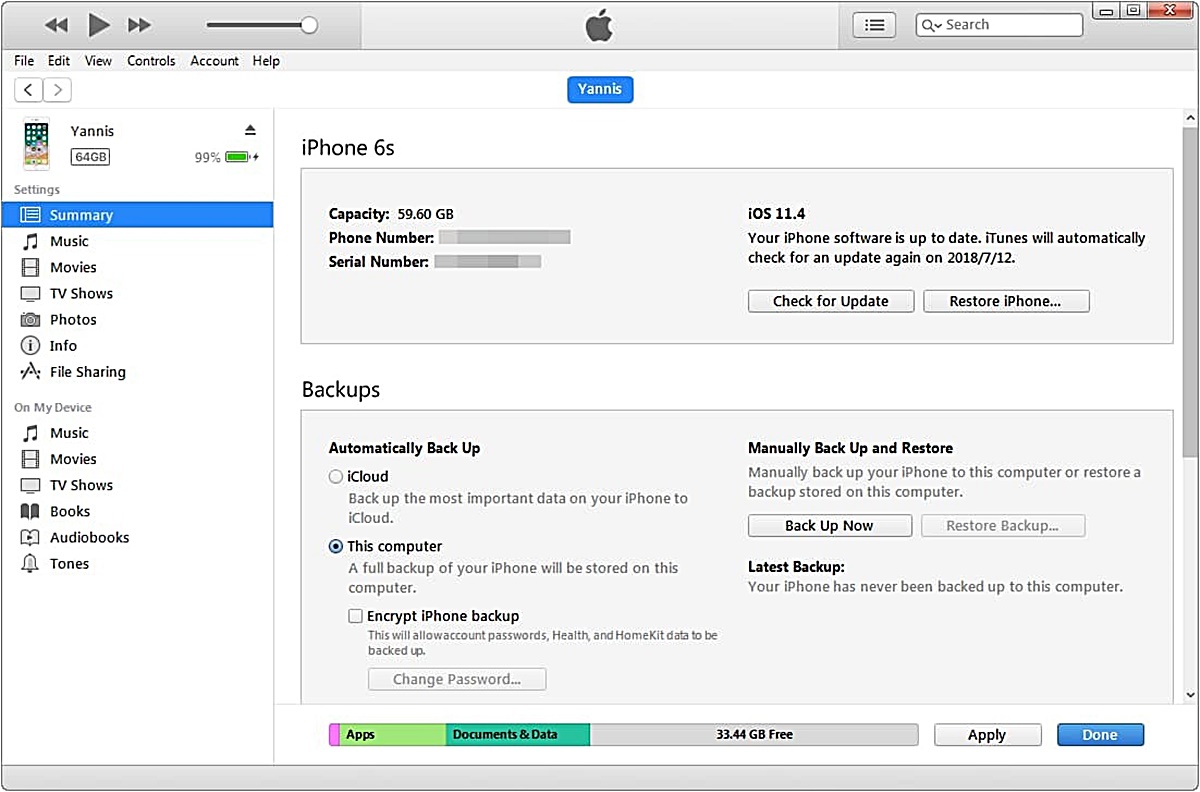
To back up your iPhone using iTunes, follow these steps:
- Connect your iPhone to your computer using a USB cable.
- Open iTunes (or Finder in macOS Catalina or later).
- Select your iPhone when it appears in iTunes.
- In the “Summary” tab, click on “Back Up Now”.
- Wait for the backup to complete. You can monitor the progress in the top status bar of iTunes.
Remember to check that the backup is successful before proceeding with the transfer. You can do this by going to Settings > [Your Name] > iCloud > iCloud Backup (for iCloud backup) or by checking the “Last Backup” time in iTunes (for iTunes backup).
By backing up your iPhone, you ensure that all your messages, along with other important data, are securely stored. This way, you can confidently move on to the next steps of transferring your messages to your new iPhone.
Disable iMessage on the Old iPhone
Before setting up your new iPhone, it is important to disable iMessage on your old iPhone to ensure that your messages are properly transferred to the new device. By disabling iMessage, you prevent any potential issues with message syncing or delivery between the two devices.
To disable iMessage on your old iPhone, follow these steps:
- Go to Settings on your old iPhone.
- Scroll down and tap on “Messages”.
- Toggle the switch next to “iMessage” to turn it off. The switch should no longer be green.
Disabling iMessage will ensure that all future messages are sent as regular SMS or MMS instead of being routed through the iMessage service. This step is crucial in preventing any potential interruptions or complications when transferring your messages to your new iPhone.
Additionally, it is important to note that disabling iMessage on your old iPhone will not delete or remove any of your existing messages. They will remain on your device until you complete the transfer process to your new iPhone.
Now that iMessage is disabled on your old iPhone, you can proceed to set up your new iPhone and restore your messages from the backup.
Set Up the New iPhone
Now that you have your new iPhone in hand, it’s time to set it up and prepare it for the transfer of your messages. Follow these steps to get started:
- Power on your new iPhone by pressing and holding the side or top button until the Apple logo appears.
- Welcome to the “Hello” screen. Swipe up from the bottom or press the Home button (if applicable) to begin the setup process.
- Select your preferred language and region.
- Connect to a Wi-Fi network. This is necessary for accessing the internet and restoring your messages from iCloud.
- On the “Data & Privacy” screen, choose whether to transfer data from another iPhone, set up as a new iPhone, or transfer from an Android device. Select the option that applies to you.
- If prompted, sign in with your Apple ID or create a new one. This will allow you to access your iCloud backup and sync your messages.
- Follow the on-screen instructions to complete the initial setup process, including setting up Face ID or Touch ID, creating a passcode, and agreeing to the terms and conditions.
- On the “Apps & Data” screen, select “Restore from iCloud Backup”.
- Sign in to your iCloud account using the same Apple ID you used to back up your old iPhone.
- Choose the most recent backup that contains your messages and other data. The list of backups will show the date and size of each backup to help you select the right one.
- Allow your new iPhone to restore from the selected iCloud backup. This may take some time depending on the size of the backup and your internet connection speed.
- Once the restore is complete, your new iPhone will reboot, and all your messages, along with other data and settings, will be transferred from your old iPhone.
Setting up your new iPhone and restoring from an iCloud backup ensures that your messages are seamlessly transferred to the new device, allowing you to pick up where you left off.
Once the restoration process is finished, proceed to the next step of signing in to iMessage on your new iPhone to complete the transfer of your messages.
Restore from iCloud Backup
After setting up your new iPhone, the next step is to restore your messages from an iCloud backup. By restoring from an iCloud backup, you can transfer not only your messages but also your apps, settings, and other data to your new device. Follow these steps to restore from iCloud backup:
- On the Apps & Data screen, choose “Restore from iCloud Backup”.
- Sign in to your iCloud account using your Apple ID and password.
- Select the most recent backup that contains your messages. Consider the date and size of the backups listed to help you choose the right one.
- Tap on “Restore” and wait for the restore process to begin. This may take some time depending on the size of the backup and your internet connection speed.
- Make sure your iPhone is connected to Wi-Fi and plugged into a power source until the restore process is complete.
- During the restore process, your iPhone will reboot and begin downloading apps, along with restoring your messages and other data.
- Once the restore is complete, your new iPhone will restart, and you can now access all your messages on the device.
It’s important to note that the time it takes to restore from an iCloud backup will vary depending on the size of the backup and the speed of your internet connection. Patience is key during this process to ensure a successful restore of your messages and other data.
Restoring from an iCloud backup allows you to seamlessly transfer your messages from your old iPhone to your new iPhone. Ensure that you have a stable internet connection and enough iCloud storage space available to complete the restore process smoothly.
Now that you have successfully restored your messages from your iCloud backup, the next step is to sign in to iMessage on your new iPhone to sync your messages.
Sign in to iMessage on the New iPhone
Once you have restored your messages on your new iPhone, the next step is to sign in to iMessage. By signing in to iMessage with your Apple ID, you can sync your messages across your devices and continue conversations seamlessly. Follow these steps to sign in to iMessage:
- Go to Settings on your new iPhone.
- Scroll down and tap on “Messages”.
- Tap on “Send & Receive”.
- Tap on “Use your Apple ID for iMessage”.
- Enter your Apple ID and password when prompted.
- Tap on “Sign In”.
- You may be prompted to verify your identity through two-factor authentication. Follow the on-screen instructions to complete the verification process.
- Once signed in, you can choose the email addresses and phone numbers associated with your Apple ID to use for iMessage.
- Toggle on the phone numbers and email addresses you want to use for iMessage.
- Tap on “Next” to complete the setup process.
Signing in to iMessage with your Apple ID allows you to sync your messages and conversations across multiple devices, ensuring that you can access them no matter which Apple device you are using.
After signing in to iMessage, you may need to wait for your messages to sync with your new iPhone. The time it takes for messages to sync will depend on the size of your message history and the speed of your internet connection.
Now that you have successfully signed in to iMessage on your new iPhone, you can start sending and receiving messages as well as continuing conversations from where you left off on your old iPhone.
Wait for Messages to Sync
After signing in to iMessage on your new iPhone, it may take some time for your messages to sync with the device. The duration of the sync process depends on various factors, including the size of your message history and the speed of your internet connection. It is important to be patient and allow sufficient time for the sync to complete successfully.
While waiting for your messages to sync, it’s a good idea to keep your new iPhone connected to a stable Wi-Fi network and ensure that it remains powered on. By staying connected to Wi-Fi, your iPhone can efficiently download and sync the necessary data for your messages.
During the sync process, you may notice that only recent messages appear initially, and older conversations take longer to appear. This is normal, as the synchronization prioritizes more recent messages to ensure a quicker availability of recent conversations.
If you have a large message history with multimedia attachments, it may take longer for the sync to complete. In such cases, it is advisable to allow your iPhone ample time to download and process the messages and attachments.
As the sync progresses, you can continue using your iPhone for other tasks, such as setting up your apps and customizing settings. However, it is essential to avoid disrupting or interrupting the sync process, as this may cause delays or errors in retrieving your messages.
Once the sync is complete, you can access all your messages on your new iPhone. Your conversations, including attachments, should now be fully synced and available for you to read, reply, and manage.
By waiting for the messages to sync, you ensure that all your important conversations and shared media are transferred properly to your new device. This way, you can seamlessly continue your conversations and stay connected with your contacts.
Finally, it’s worth noting that if you encounter any issues during the sync process or if some messages fail to appear, you can try restarting your iPhone or signing out and signing back into iMessage to trigger a fresh sync. If problems persist, it may be necessary to reach out to Apple Support for further assistance.