
Preparing for the Transfer
Before you begin transferring data from your old Mac to your new Mac using the Migration Assistant, there are a few important steps you should take to ensure a smooth and successful transfer process. Follow these steps to prepare your Macs for the data transfer:
- Back up your data: It’s always a good practice to back up your data before making any major changes. Connect an external hard drive or use a cloud-based backup service to create a backup of all your important files and folders. This will ensure that your data is safe in case of any unexpected issues during the transfer.
- Update your software: Make sure both your old Mac and new Mac are running the latest version of macOS. Check for any available updates by going to the Apple menu and selecting “Software Update.” Install any updates that are available to ensure compatibility and improved performance during the transfer.
- Connect your Macs: You will need a reliable and fast connection between your old Mac and new Mac to transfer the data. Connect them using an Ethernet cable, Thunderbolt cable, or connect them to the same Wi-Fi network. A wired connection is generally faster and more stable, so it’s recommended if possible.
- Ensure enough storage space: Check the available storage space on your new Mac to ensure that it has enough capacity to accommodate the data you will be transferring from the old Mac. Delete unnecessary files or transfer them to an external storage device if necessary to free up space.
- Disable FileVault: If you have enabled FileVault encryption on your old Mac, it’s recommended to disable it temporarily before starting the transfer. Open “System Preferences” on your old Mac, go to “Security & Privacy,” and navigate to the “FileVault” tab. Click the lock icon and enter your administrator password, then click “Turn Off FileVault.”
By following these preparation steps, you will ensure that your data is safely backed up, your software is up to date, and your Macs are ready for the transfer process. Taking these measures will minimize the potential for any complications and make the data transfer a seamless experience.
Connecting the Macs
Once you have prepared your old and new Macs for the data transfer, you will need to establish a connection between them. The method you choose will depend on the available ports and the type of connection you prefer. Here are the different options for connecting the Macs:
- Ethernet cable: If both of your Macs have Ethernet ports, you can use an Ethernet cable to connect them directly. Simply connect one end of the cable to the Ethernet port on each Mac. This method provides a fast and reliable connection, making it an ideal choice for transferring large amounts of data.
- Thunderbolt cable: If your Macs have Thunderbolt ports, you can use a Thunderbolt cable to connect them. This method allows for high-speed data transfer between the devices. Connect one end of the Thunderbolt cable to the Thunderbolt port on each Mac.
- Wi-Fi: If you prefer a wireless connection, you can connect both of your Macs to the same Wi-Fi network. Ensure that the Wi-Fi network is stable and reliable to avoid interruptions during the data transfer process. To connect to the Wi-Fi network, click on the Wi-Fi icon in the menu bar, select the network you want to join, and enter the password if prompted.
Choose the connection method that best suits your needs and available hardware. If you have a fast Ethernet or Thunderbolt connection, it is generally recommended for faster data transfer speeds. However, if you prefer the convenience of a wireless connection, Wi-Fi can also be used.
Once you have established a connection between the Macs, you are ready to proceed with the data transfer using the Migration Assistant utility.
Opening the Migration Assistant
After connecting your old and new Macs, the next step is to open the Migration Assistant tool. The Migration Assistant is a built-in utility that simplifies the process of transferring data from one Mac to another. Here’s how to open it:
- On your new Mac: Power on your new Mac if it is not already on. Once it has finished booting up, you will reach the desktop. Open the Applications folder, either by clicking on the Applications icon in the Dock or by navigating to it in Finder.
- Launch Migration Assistant: Within the Applications folder, locate the Utilities folder and open it. Inside the Utilities folder, you will find the Migration Assistant application. Double-click on it to launch the Migration Assistant.
- Authorization: A window will appear asking for your authorization. Enter your administrator username and password for your new Mac and click “Continue.” This step is necessary to grant Migration Assistant the required permissions for accessing and transferring data.
Once you have successfully launched the Migration Assistant on your new Mac, you are ready to proceed with the next steps in transferring your data:
- Select the transfer method: In the Migration Assistant window, you will be prompted to select the transfer method. Choose the option to transfer data from your old Mac and click “Continue.”
- Choose the source Mac: The Migration Assistant will search for available sources. Select your old Mac from the list of Macs displayed and click “Continue.”
- Confirmation code: Depending on the transfer method chosen, a code may be displayed on the screen of your old Mac. Check that the code on your new Mac matches the code shown on the old Mac, then click “Continue.”
By following these steps, you can easily open the Migration Assistant on your new Mac and prepare it for the data transfer process. The Migration Assistant will guide you through the subsequent steps to ensure a successful transfer of your data from the old Mac to the new one.
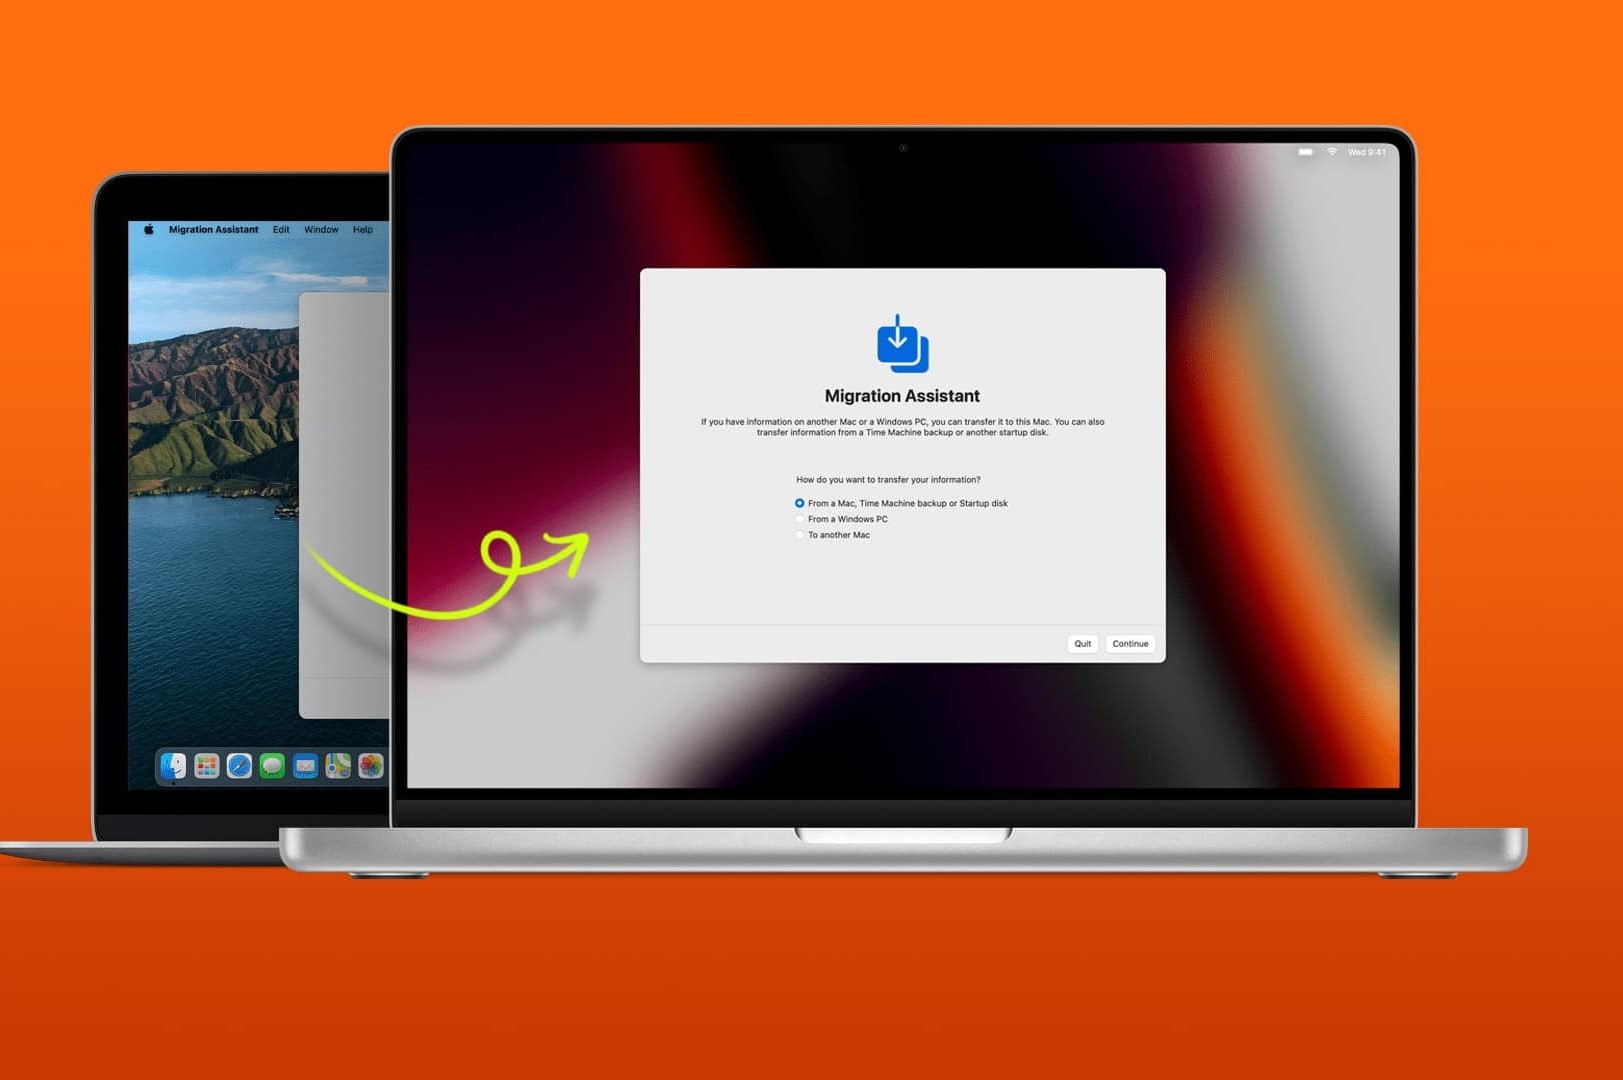
Selecting the Transfer Method
Once you have opened the Migration Assistant on your new Mac, the next step is to select the transfer method that suits your specific needs. The transfer method determines how the data will be transferred from your old Mac to the new one. Here are the available options:
- From a Mac, Time Machine backup, or startup disk: This option allows you to transfer data directly from your old Mac, a Time Machine backup, or a startup disk. It is the most common and straightforward method for transferring data. Ensure that your old Mac is connected to your new Mac or that the Time Machine backup or startup disk is accessible.
- From a Time Machine backup or startup disk: If you have already created a Time Machine backup or have a startup disk from your old Mac, you can choose this option. It is useful when you want to transfer data from a specific backup or a startup disk other than the primary one.
- From a Windows PC: If you are switching from a Windows PC to a Mac, this option allows you to transfer data directly from your Windows PC. The Migration Assistant provides step-by-step instructions on how to prepare your Windows PC for the transfer and initiate the process.
Choose the transfer method that best fits your scenario. If you are transferring from an old Mac, selecting the first option is usually the most straightforward. For Time Machine backups or startup disks, select the second option. If you are migrating from a Windows PC, choose the third option and follow the provided instructions.
No matter which transfer method you choose, the Migration Assistant will guide you through the subsequent steps to ensure a successful transfer of your data. Make sure to follow the on-screen instructions and prompts provided by the Migration Assistant for a seamless data transfer experience.
Choosing the Data to Transfer
After selecting the transfer method in the Migration Assistant, the next step is to choose the specific data that you want to transfer from your old Mac to the new one. This step allows you to customize the data transfer according to your preferences and storage capacity. Here’s how to choose the data to transfer:
- Selecting the user accounts: The Migration Assistant will display a list of user accounts present on your old Mac. Choose the user accounts whose data you want to transfer to the new Mac. You can select one or multiple user accounts depending on your requirements.
- Transferring applications and settings: In addition to user accounts, the Migration Assistant also provides options to transfer applications, files, and settings. You can choose to transfer all applications, a specific selection of applications, or no applications at all. Similarly, you can choose to transfer files and settings or opt not to transfer them. Consider your preferences and available storage space when making these selections.
- Reviewing the data size: As you make your selections, the Migration Assistant will display an estimate of the data size that will be transferred. Take note of this information to ensure that you have enough storage space available on your new Mac for the selected data.
By carefully choosing the data to transfer, you can streamline the migration process and avoid transferring unnecessary files or applications. Take some time to review your selections and ensure that you have selected the user accounts, applications, files, and settings that are essential for you on the new Mac.
It’s important to note that some applications or settings may not be compatible with the new Mac or the current version of macOS. In such cases, the Migration Assistant will display a warning message, and you may need to find alternative solutions or manually install the incompatible applications on your new Mac.
Once you are satisfied with your selections, proceed to the next step in the Migration Assistant to initiate the transfer of the chosen data from your old Mac to the new Mac.
Starting the Transfer
With the data selections made in the previous step, you are now ready to initiate the transfer process using the Migration Assistant. Starting the transfer will begin the seamless migration of your chosen data from your old Mac to the new one. Here’s how to start the transfer:
- Confirm the transfer: The Migration Assistant will display a summary of the selected data and prompt you to review it before proceeding. Take a moment to double-check the data selections to ensure they are accurate. If everything looks correct, click “Continue” to confirm and proceed with the transfer.
- Waiting for the transfer to begin: The Migration Assistant will prepare the data for transfer and establish a connection between your old Mac and new Mac. This may take some time, depending on the amount of data selected and the speed of your connection. Be patient as the Migration Assistant prepares for the transfer.
- Starting the transfer: Once the preparation is complete, the Migration Assistant will initiate the actual transfer of data. This process may take a while, again depending on the size of the selected data. During this time, it is important to keep both Macs powered on and connected to ensure an uninterrupted transfer.
It’s worth noting that the Migration Assistant will transfer your data in the most efficient way possible, optimizing the speed and reliability of the transfer process. You can monitor the progress of the transfer, which brings us to the next section.
Once you have started the transfer, sit back and allow the Migration Assistant to handle the data migration. The time it takes to complete the transfer will depend on factors such as the amount of data selected, the speed of your connection, and the performance of your Macs. It is important to avoid interrupting the transfer process and keep the Macs connected until the transfer is complete.
Monitoring the Transfer Progress
As the data transfer is in progress, it is important to monitor the progress to ensure that everything is proceeding smoothly. The Migration Assistant provides a way to track the transfer and keep you informed of its status. Here’s how to monitor the transfer progress:
- In the Migration Assistant window: The Migration Assistant will display a progress bar that indicates the overall progress of the data transfer. This progress bar provides a visual representation of how much data has been transferred and how much is remaining. You can keep an eye on this progress bar to get an idea of how much longer the transfer might take.
- On the old Mac: If you want to see more detailed information about the transfer, you can check the screen of your old Mac. It may display a status message or a progress indicator that shows the current file or data being transferred. This can give you a better sense of which specific files or folders are currently being transferred.
- Keep the Macs connected: It is crucial to ensure that both your old Mac and new Mac remain connected during the entire transfer process. Any interruption in the connection may result in an incomplete or corrupted transfer. Avoid turning off or disconnecting either Mac until the transfer is complete.
While monitoring the transfer progress, it’s important to exercise patience. The transfer time can vary depending on the size of the selected data and the speed of your connection. Large transfers may take several hours, so allow the Migration Assistant to complete the data transfer at its own pace.
If you encounter any issues or if the transfer appears to be taking longer than expected, refer to the troubleshooting section or contact Apple Support for further assistance.
Once the transfer is complete, you can proceed with the final steps to finalize the data transfer and start using your new Mac with all the transferred data.
Completing the Transfer
Once the data transfer is finished, you are almost ready to start using your new Mac with all the transferred data from your old Mac. However, there are a few important steps to complete the transfer process and ensure that everything is properly set up. Here’s what you need to do:
- Review the transferred data: Take a few moments to review the transferred data on your new Mac. Open applications, documents, and files to ensure that everything transferred successfully and is accessible. If you notice any missing or corrupted files, refer to the troubleshooting section to address the issue.
- Set up additional accounts: If you have multiple user accounts or additional accounts that were not transferred from your old Mac, set them up on your new Mac. Go to “System Preferences” and navigate to the “Users & Groups” section to add new accounts. Ensure that each user account has the necessary permissions and settings.
- Configure settings and preferences: Adjust the settings and preferences according to your preferences on your new Mac. This may include display settings, keyboard and trackpad preferences, energy-saving settings, and more. Take your time to customize your new Mac to your liking.
- Reinstall incompatible applications: If any of your transferred applications were not compatible with your new Mac or the current version of macOS, you may need to reinstall them. Visit the developer’s website or the Mac App Store to download the latest compatible version of the application and reinstall it on your new Mac.
- Delete data from the old Mac: Once you have verified that all your data has been successfully transferred to your new Mac, you can safely delete the data from your old Mac. Follow the necessary steps to securely erase the data or reformat the old Mac’s hard drive to ensure that no sensitive information remains.
By completing these steps, you will finalize the data transfer from your old Mac to your new Mac and ensure that everything is properly set up and ready for use. Enjoy the seamless transition and take advantage of your new Mac with all your transferred data and settings.
Troubleshooting the Transfer Process
While the data transfer process using the Migration Assistant is designed to be smooth and seamless, there may be instances where you encounter issues or face challenges. Here are some troubleshooting steps to help address common problems during the transfer process:
- Check the connection: Ensure that the connection between your old Mac and new Mac is stable and secure. If you’re using a wired connection, make sure the cables are properly connected. For a wireless connection, ensure that both Macs are connected to the same Wi-Fi network.
- Restart the Macs: If the transfer seems to be stalled or not progressing, try restarting both your old Mac and new Mac. This can sometimes resolve temporary glitches or issues that may be affecting the transfer process.
- Update software: Ensure that both your old Mac and new Mac are running the latest version of macOS. If there are any available software updates, install them on both Macs. Updated software can often address compatibility issues and improve the transfer process.
- Disconnect unnecessary devices: If you have any external devices connected to your Macs during the transfer, such as printers, scanners, or USB drives, try disconnecting them temporarily. Sometimes, conflicts with these devices can interfere with the migration process.
- Ensure sufficient free space: Check the available storage space on your new Mac to ensure that it has enough capacity to accommodate the data being transferred. If your new Mac is running low on storage, consider freeing up space or using an external storage device to continue the transfer.
- Reset the Migration Assistant: If you continue to experience issues, you can reset the Migration Assistant on both Macs. On your new Mac, quit the Migration Assistant and reopen it. On your old Mac, close any other applications and reboot it. Then, relaunch the Migration Assistant on both Macs and attempt the transfer again.
If the troubleshooting steps mentioned above do not resolve your issue, you may need to seek further assistance from Apple Support or consult the online support documentation for more in-depth troubleshooting steps. They can provide specific solutions tailored to your situation and help you overcome any challenges you encounter during the transfer process.
Remember to remain patient and thorough in your troubleshooting efforts. By addressing any obstacles you encounter, you can ensure a successful data transfer from your old Mac to your new Mac using the Migration Assistant.
Tips for a Successful Data Transfer
To ensure a smooth and successful data transfer from your old Mac to your new Mac using the Migration Assistant, consider the following tips:
- Plan ahead: Before starting the transfer, take the time to plan and organize your data. Determine which files, folders, and applications are essential to transfer to your new Mac and make note of any specific settings or preferences you want to carry over.
- Perform a backup: Before initiating the data transfer, make sure to create a backup of your old Mac’s data. This is crucial as an added precaution in case any issues arise during the transfer process. Use Time Machine or a reliable external storage solution to create a complete backup.
- Ensure a stable connection: For the best transfer speed and reliability, opt for a wired connection using Ethernet or Thunderbolt cables. If using Wi-Fi, ensure that both Macs are connected to a stable and fast network. A strong and consistent connection will greatly enhance the data transfer process.
- Allow sufficient time: Data transfers can take some time, especially if you are transferring a large amount of data. Set aside adequate time for the transfer process and avoid interrupting or pausing it once started. Patience is key to ensuring a successful and complete data transfer.
- Organize your transferred data: Once the transfer is complete, take some time to organize and tidy up your transferred data on the new Mac. This includes arranging files and folders in a logical structure and ensuring that applications are properly installed and updated.
- Double-check the transferred data: After the data transfer, thoroughly review your data on the new Mac. Open files, check application settings, and ensure that everything looks and functions as expected. Address any missing or corrupted data promptly to avoid any long-term issues.
- Make note of license keys and passwords: If you have any software license keys or application passwords saved on your old Mac, make sure to have them readily accessible before starting the data transfer. This will allow you to reinstall and activate any necessary applications on your new Mac smoothly.
By following these tips, you can increase the chances of a successful and hassle-free data transfer between your old Mac and new Mac. Taking the time to prepare, backup, and ensure a stable connection will help minimize any potential issues during the transfer process and ensure that your data is safely and accurately transferred to your new Mac.