
Disable Apple ID on Mac
There may come a time when you need to sign out of your Apple ID on your Mac. Whether you’re selling your Mac, transitioning to a new Apple ID, or simply want to secure your personal information, disabling your Apple ID is a straightforward process. Here are the steps to follow:
1. Open the Apple menu in the top-left corner of your screen and select “System Preferences”.
2. Within System Preferences, click on “Apple ID”.
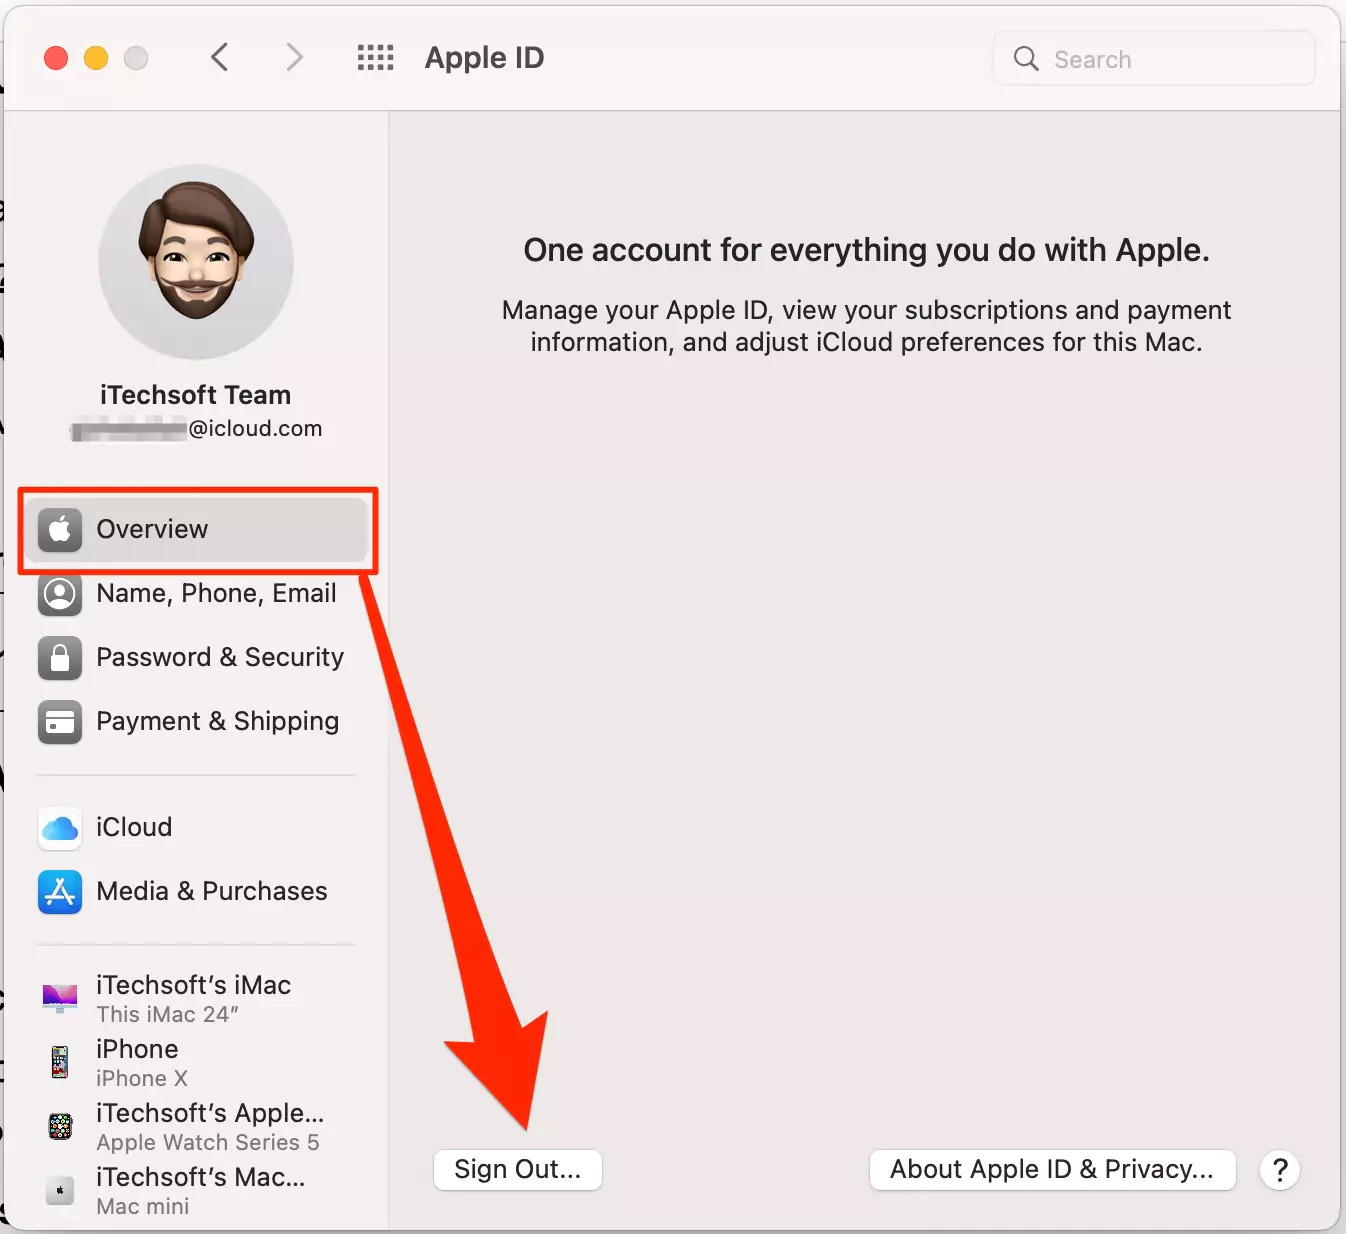
3. In the left sidebar, you will see your Apple ID listed. Click on it.
4. A window will appear with various options associated with your Apple ID. At the bottom of the window, click on “Overview”.
5. Next, click on the “Sign Out” button located on the right side of the Overview section.
6. A confirmation window will appear, asking if you want to keep a copy of your iCloud data on this Mac. You can choose to keep a copy or remove it. Keep in mind that removing the data will make it inaccessible from this Mac.
7. After making your selection, click on “Sign Out” to confirm.
8. You will be prompted to enter the password for your Apple ID. Enter your password to complete the sign-out process.
9. Once signed out, your Apple ID will be disabled on your Mac, and you will no longer have access to iCloud services, App Store, and other Apple services associated with your Apple ID.
Disabling your Apple ID on your Mac ensures that your personal information remains secure and prevents unauthorized access to your accounts. Remember, if you want to sign back in later, you can simply go back to the “Apple ID” section in System Preferences and log in with your Apple ID credentials.
Sign Out of Apple ID in System Preferences
If you want to sign out of your Apple ID on your Mac, you can do so through the System Preferences. Follow these steps:
1. Open the Apple menu in the top-left corner of your screen and select “System Preferences”.
2. Within System Preferences, click on “Apple ID”.
3. In the left sidebar, you will see your Apple ID listed. Click on it.
4. A window will appear with various options associated with your Apple ID. At the bottom of the window, click on “Overview”.
5. Next, click on the “Sign Out” button located on the right side of the Overview section.
6. A confirmation window will appear, asking if you want to keep a copy of your iCloud data on this Mac. You can choose to keep a copy or remove it. Keep in mind that removing the data will make it inaccessible from this Mac.
7. After making your selection, click on “Sign Out” to confirm.
8. You will be prompted to enter the password for your Apple ID. Enter your password to complete the sign-out process.
9. Once signed out, your Apple ID will be disabled on your Mac, and you will no longer have access to iCloud services, App Store, and other Apple services associated with your Apple ID.
Signing out of your Apple ID in System Preferences ensures that your personal information remains secure and prevents unauthorized access to your accounts. It is worth noting that signing out of your Apple ID only affects the specific Mac you are using, and your Apple ID will still be active on other devices unless you sign out from those separately.
If you ever wish to sign back in with the same Apple ID, you can easily do so by going back to the “Apple ID” section in System Preferences and entering your Apple ID credentials. Make sure to carefully manage your Apple ID sign-ins to maintain control over your account and data.
Sign Out of Apple ID in iCloud Settings
To sign out of your Apple ID in the iCloud settings on your Mac, follow these steps:
1. Open the Apple menu in the top-left corner of your screen and select “System Preferences”.
2. Within System Preferences, click on “Apple ID”.
3. In the left sidebar, you will see your Apple ID listed. Click on it.
4. A window will appear with various options associated with your Apple ID. At the bottom of the window, click on “iCloud”.
5. On the right side of the window, you will see a list of iCloud services that are currently enabled. Scroll down to the bottom and click on “Sign Out”.
6. A confirmation window will appear, informing you that a copy of your iCloud data will be removed from this Mac. You can choose to keep a copy or remove it. Be aware that removing the data will make it inaccessible from this Mac.
7. After making your selection, click on “Continue” to proceed.
8. You will be prompted to enter the password for your Apple ID. Enter your password to confirm the sign-out process.
9. Once signed out, your Apple ID will be disconnected from iCloud services on your Mac. You will no longer be able to sync your data, access iCloud Drive, or use other iCloud-related features associated with your Apple ID.
Signing out of your Apple ID in iCloud settings is useful when you want to dissociate your Apple ID from your Mac’s iCloud services. It helps protect your privacy and prevents any unauthorized access to your data. Remember, signing out of iCloud on your Mac does not affect your Apple ID on other devices unless you sign out from those separately.
If you want to sign back in with the same Apple ID, you can do so by going back to the “Apple ID” section in System Preferences and entering your Apple ID credentials under the iCloud settings. Be sure to manage your iCloud sign-ins appropriately to maintain control over your Apple ID account and data.
Remove Apple ID from App Store, iTunes, and iBooks
If you no longer want your Apple ID associated with the App Store, iTunes, and iBooks on your Mac, you can remove it by following these steps:
1. Open the App Store on your Mac.
2. In the menu bar at the top of the screen, click on “Store”. From the dropdown menu, select “Sign Out”.
3. Next, open iTunes. If you’re running macOS Catalina or later, open the Music app instead.
4. In the menu bar at the top of the screen, click on “Account”. From the dropdown menu, select “Sign Out”.
5. To remove your Apple ID from iBooks, open the Books app on your Mac.
6. In the menu bar at the top of the screen, click on “Store”. From the dropdown menu, select “Sign Out”.
By signing out of your Apple ID in the App Store, iTunes, and iBooks, you will no longer be able to make purchases or download content using your Apple ID. This ensures that your account and personal information remain secure.
Remember, removing your Apple ID from these services on your Mac only affects this specific device. Your Apple ID will still be active on other devices unless you sign out from them separately.
If you ever wish to sign back in with the same Apple ID, you can easily do so by opening the respective applications (App Store, iTunes, or iBooks) and signing in with your Apple ID credentials. Keep in mind that managing your Apple ID sign-ins helps maintain control over your account and protects your personal information.
Sign Out of Apple ID in Messages
If you’re using Messages on your Mac with your Apple ID and want to sign out, follow these simple steps:
1. Open the Messages app on your Mac.
2. In the menu bar at the top of the screen, click on “Messages” and then select “Preferences” from the dropdown menu.
3. In the Preferences window, click on the “Accounts” tab.
4. Select your Apple ID from the left sidebar.
5. At the bottom-right corner of the window, click on the “-” (minus) button to remove your Apple ID from Messages.
6. A confirmation dialog will appear, asking if you want to disable iMessage for your Apple ID. Select “Disable” if you no longer want to use iMessage with this Apple ID on your Mac.
7. Once you’ve disabled iMessage, click on the “Sign Out” button to complete the sign-out process.
Signing out of your Apple ID in Messages will disconnect your Apple ID from the messaging service on your Mac. This means that you won’t be able to send or receive iMessages using your Apple ID on this device. However, keep in mind that signing out of Messages only affects your Mac, and your Apple ID will still be connected to iMessage on other devices unless you sign out from them individually.
If you ever need to sign back in with the same Apple ID in Messages, follow the steps above and click on the “+” (plus) button in the Preferences window to add your Apple ID and enable iMessage for Messages on your Mac.
Managing your Apple ID sign-ins in Messages helps you control your messaging preferences and ensure the security of your personal information. It’s useful if you want to switch to a different Apple ID, share your Mac with someone else, or simply keep your messages private.
Sign Out of Apple ID in FaceTime
If you’re using FaceTime on your Mac with your Apple ID and want to sign out, follow these steps:
1. Open the FaceTime app on your Mac.
2. In the menu bar at the top of the screen, click on “FaceTime” and then select “Preferences” from the dropdown menu.
3. In the Preferences window, click on the “Settings” tab.
4. Next to your Apple ID, click on the “Sign Out” button.
5. A confirmation dialog will appear, asking if you want to disable FaceTime for your Apple ID. Select “Disable” if you no longer want to use FaceTime with this Apple ID on your Mac.
6. Once you’ve disabled FaceTime, click on the “Sign Out” button to complete the sign-out process.
Signing out of your Apple ID in FaceTime will disconnect your Apple ID from the FaceTime service on your Mac. This means that you won’t be able to make or receive FaceTime calls using your Apple ID on this device. However, it’s worth noting that signing out of FaceTime only affects your Mac, and your Apple ID will still be connected to FaceTime on other devices unless you sign out from them individually.
If you ever need to sign back in with the same Apple ID in FaceTime, follow the steps above and click on the “Sign In” button next to your Apple ID in the FaceTime Preferences window.
Managing your Apple ID sign-ins in FaceTime gives you control over your video and audio calling preferences and ensures the privacy and security of your personal information. It’s useful if you want to switch to a different Apple ID, share your Mac with someone else, or simply maintain the privacy of your FaceTime calls.
Sign Out of Apple ID in iTunes
If you’re using iTunes on your Mac with your Apple ID and want to sign out, here’s how you can do it:
1. Open iTunes on your Mac.
2. In the menu bar at the top of the screen, click on “Account”.
3. From the dropdown menu, select “Sign Out”.
By signing out of your Apple ID in iTunes, you will no longer be able to make purchases or access content associated with your Apple ID. This helps protect your account and personal information from unauthorized access.
Remember, signing out of iTunes on your Mac only affects this particular device. Your Apple ID will still be active on other devices unless you sign out from them separately.
If you wish to sign back in with the same Apple ID, you can do so by opening iTunes and clicking on “Account” in the menu bar. From there, select “Sign In” and enter your Apple ID credentials.
Managing your Apple ID sign-ins in iTunes allows you to control your music, movies, and other media preferences while safeguarding your personal information. It’s useful if you want to switch to a different Apple ID, share your Mac with someone else, or keep your iTunes activities separate.
Deauthorize Your Computer
If you want to deauthorize your Mac computer from accessing your Apple ID, follow these steps:
1. Open iTunes on your Mac.
2. In the menu bar at the top of the screen, click on “Account”.
3. From the dropdown menu, select “Authorizations”.
4. In the sub-menu, click on “Deauthorize This Computer”.
A window will appear asking for your Apple ID and password. Enter your credentials to confirm the deauthorization process.
Deauthorizing your computer from your Apple ID is essential if you no longer want that particular device to have access to your account and associated content. Deauthorizing is especially important if you plan to sell your Mac or give it to someone else.
It’s worth noting that deauthorizing your computer only affects the specific device you are deauthorizing. Your Apple ID will remain authorized on other devices unless you deauthorize them separately.
If you want to reauthorize your computer with your Apple ID in the future, you can easily do so by opening iTunes, going to the “Account” menu, and selecting “Authorizations” and then “Authorize This Computer”.
Managing your authorized devices helps maintain control over your Apple ID account and ensures the security and privacy of your personal information and purchased content.
Remove Apple ID from Keychain Access
If you want to remove your Apple ID from Keychain Access on your Mac, you can do so by following these steps:
1. Open the “Utilities” folder on your Mac. You can find it in the “Applications” folder.
2. Look for and open “Keychain Access”.
3. In the Keychain Access window, click on “Login” under the “Keychains” section on the left-hand side.
4. Next, click on the “Passwords” category in the upper-right section of the window.
5. Scroll through the list of passwords until you find the one associated with your Apple ID. It should be named something like “com.apple.idms.appleid.prd” or similar.
6. Once you’ve found the entry, right-click on it and select “Delete” from the dropdown menu.
7. A pop-up window will appear, asking if you’re sure you want to delete the item. Click on “Delete” to confirm the removal of your Apple ID from Keychain Access.
By removing your Apple ID from Keychain Access, you are deleting the saved credentials associated with your Apple ID on your Mac. This action ensures that your Apple ID information is no longer stored in the Keychain and provides an extra layer of privacy and security for your account.
Remember, removing your Apple ID from Keychain Access only affects your Mac. Your Apple ID may still be stored in Keychain Access on other devices if you use the same Apple ID with them.
If you ever need to add your Apple ID back to Keychain Access, the credentials will be saved again the next time you sign in with your Apple ID on your Mac.
Managing your Keychain Access entries helps you control the stored passwords and secure information on your Mac. By removing unwanted Apple ID entries, you can keep your Keychain organized and maintain the privacy and security of your digital identity.
Sign Out of Apple ID in Safari
If you’re using Safari on your Mac and want to sign out of your Apple ID, you can do so by following these steps:
1. Open Safari on your Mac.
2. In the menu bar at the top of the screen, click on “Safari”.
3. From the dropdown menu, select “Preferences”.
4. In the Preferences window, click on the “Passwords” tab.
5. At the bottom of the window, click on the “Remove All Website Data” button.
6. A confirmation dialog will appear, asking if you want to remove all website data stored in Safari, including cookies, cache, and preferences. Click on “Remove Now” to proceed.
7. After removing the website data, your Apple ID will be signed out of Safari on your Mac. Any saved passwords and website preferences associated with your Apple ID will be deleted.
Signing out of your Apple ID in Safari ensures that your browsing history and saved authentication information are not accessible to others who may use your Mac.
Remember, signing out of Safari only affects your Mac, and your Apple ID will still be associated with other devices unless you sign out from them separately.
If you want to sign back in with the same Apple ID in Safari, you can do so by visiting the Apple website or any other website that prompts you to sign in with your Apple ID. Safari will prompt you to enter your Apple ID credentials, and once entered, your Apple ID will be signed back in for Safari on your Mac.
By managing your Apple ID sign-ins in Safari, you can control your browsing preferences, privacy settings, and stored passwords. It’s beneficial if you want to switch to a different Apple ID, share your Mac with others, or ensure the privacy and security of your browsing activity.
Remove Apple ID from iCloud Drive, Photos, and Find My Mac
If you want to remove your Apple ID from iCloud Drive, Photos, and Find My Mac on your Mac, follow these steps:
1. Open the Apple menu in the top-left corner of your screen and select “System Preferences”.
2. Within System Preferences, click on “Apple ID”.
3. In the left sidebar, you will see your Apple ID listed. Click on it.
4. A window will appear with various options associated with your Apple ID. Scroll down to find the “iCloud” section.
5. To remove your Apple ID from iCloud Drive, uncheck the box next to “iCloud Drive” in the list of apps and services that use your Apple ID.
6. Similarly, to remove your Apple ID from Photos and Find My Mac, uncheck the respective boxes next to each service.
7. After unchecking the boxes, you will be prompted to confirm that you want to stop using iCloud for these services. Click on “Stop Using” to proceed.
By removing your Apple ID from iCloud Drive, Photos, and Find My Mac, you are disconnecting your Apple ID from these services on your Mac. This means that your iCloud Drive files, Photos library, and Find My Mac tracking will no longer be associated with your Apple ID on this device.
Keep in mind that removing your Apple ID from these services only affects your Mac. Your Apple ID may still be associated with iCloud Drive, Photos, and Find My Mac on other devices unless you remove it separately.
If you want to use these services with a different Apple ID, you can sign in with the new Apple ID by going back to the “Apple ID” section in System Preferences and selecting the checkboxes next to iCloud Drive, Photos, and Find My Mac for the new Apple ID.
Managing your Apple ID settings in iCloud Drive, Photos, and Find My Mac allows you to control how your data is stored, accessed, and tracked. It helps maintain the security and privacy of your personal information and provides flexibility if you want to use different Apple IDs for various services or devices.
Sign Out of Apple ID in iMessage and FaceTime Messages
If you’re using iMessage and FaceTime with your Apple ID on your Mac and want to sign out, follow these steps:
1. Open the Messages app on your Mac.
2. In the menu bar at the top of the screen, click on “Messages” and then select “Preferences” from the dropdown menu.
3. In the Preferences window, click on the “Accounts” tab.
4. From the left sidebar, select your Apple ID.
5. At the bottom-right corner of the window, click on the “-” (minus) button to remove your Apple ID from iMessage.
6. A confirmation dialog will appear, asking if you want to disable iMessage for your Apple ID. Select “Disable” if you no longer want to use iMessage with this Apple ID on your Mac.
7. Once you’ve disabled iMessage, click on the “Sign Out” button to complete the sign-out process.
Signing out of your Apple ID in iMessage and FaceTime messages will disconnect your Apple ID from these messaging services on your Mac. This means that you won’t be able to send or receive iMessages and FaceTime calls using your Apple ID on this device.
Remember, signing out of iMessage and FaceTime messages only affects your Mac, and your Apple ID will still be associated with these services on other devices unless you sign out from them individually.
If you want to sign back in with the same Apple ID in iMessage and FaceTime messages, follow the steps above and click on the “+” (plus) button in the Preferences window to add your Apple ID and enable iMessage and FaceTime for Messages on your Mac.
By managing your Apple ID sign-ins in iMessage and FaceTime messages, you can control your messaging preferences, privacy settings, and maintain the security of your personal information. It’s beneficial if you want to switch to a different Apple ID, share your Mac with others, or simply keep your messages private.
Remove Apple ID from Contacts, Calendars, and Reminders
If you want to remove your Apple ID from Contacts, Calendars, and Reminders on your Mac, follow these steps:
1. Open the Apple menu in the top-left corner of your screen and select “System Preferences”.
2. Within System Preferences, click on “Apple ID”.
3. In the left sidebar, you will see your Apple ID listed. Click on it.
4. A window will appear with various options associated with your Apple ID. Scroll down to find the “Contacts, Calendars & Reminders” section.
5. To remove your Apple ID from Contacts, uncheck the box next to “Contacts” in the list of apps and services that use your Apple ID.
6. Similarly, to remove your Apple ID from Calendars and Reminders, uncheck the respective boxes next to each service.
7. After unchecking the boxes, you will be prompted to confirm that you want to stop using iCloud for these services. Click on “Stop Using” to proceed.
By removing your Apple ID from Contacts, Calendars, and Reminders, you are disconnecting your Apple ID from these services on your Mac. This means that your contacts, events, and reminders will no longer be synchronized with your Apple ID on this device.
Keep in mind that removing your Apple ID from these services only affects your Mac. Your Apple ID may still be associated with Contacts, Calendars, and Reminders on other devices unless you remove it separately.
If you want to use these services with a different Apple ID, you can sign in with the new Apple ID by going back to the “Apple ID” section in System Preferences and selecting the checkboxes next to Contacts, Calendars, and Reminders for the new Apple ID.
Managing your Apple ID settings in Contacts, Calendars, and Reminders allows you to control how your personal information is stored, synced, and accessed. It provides flexibility and privacy if you want to use different Apple IDs for various services or devices.
Sign Out of Apple ID in Mail
If you’re using the Mail app on your Mac with your Apple ID and want to sign out, follow these steps:
1. Open the Mail app on your Mac.
2. In the menu bar at the top of the screen, click on “Mail”.
3. From the dropdown menu, select “Preferences”.
4. In the Preferences window, click on the “Accounts” tab.
5. From the left sidebar, select your Apple ID email account.
6. At the bottom-left corner of the window, click on the “-” (minus) button to remove your Apple ID email account from Mail.
7. A confirmation dialog will appear, asking if you want to delete the account. Click on “Delete from My Mac” to proceed.
Signing out of your Apple ID in Mail will disconnect your Apple ID email account from the Mail app on your Mac. This means that you won’t be able to send or receive emails using your Apple ID email address on this device.
Remember, signing out of Mail only affects your Mac, and your Apple ID email account will still be associated with Mail on other devices unless you sign out from them separately.
If you want to sign back in with the same Apple ID in Mail, follow the steps above and click on the “+” (plus) button in the Preferences window to add your Apple ID email account back to Mail on your Mac.
By managing your Apple ID sign-ins in Mail, you can control your email preferences, privacy settings, and maintain the security of your personal information. It’s beneficial if you want to switch to a different Apple ID, share your Mac with others, or separate your email accounts based on different Apple IDs.
Disable Apple ID on iCloud.com
If you want to disable your Apple ID on iCloud.com, you can do so by following these steps:
1. Open a web browser on your Mac and go to icloud.com.
2. Sign in to iCloud.com using your Apple ID and password.
3. Once you’re logged in, click on your name or profile picture in the top-right corner of the screen.
4. From the dropdown menu, select “Account Settings”.
5. In the Account Settings page, scroll down until you find the section labeled “Apple ID”.
6. Click on the “Disable Apple ID” button.
7. A confirmation dialog will appear, informing you that disabling your Apple ID will prevent you from accessing certain features and services, including iCloud, Find My, and more. Read the information carefully, and if you still wish to proceed, click on “Disable Account”.
8. You will be asked to confirm your choice by entering your Apple ID password. Once you’ve entered your password, click on “Continue” to disable your Apple ID.
By disabling your Apple ID on iCloud.com, you are effectively rendering it inactive for use with iCloud services and features. This means you won’t be able to access your iCloud email, notes, photos, and other data through iCloud.com using this particular Apple ID.
Keep in mind that disabling your Apple ID on iCloud.com only affects the iCloud.com web interface. Your Apple ID may still be active and functional on other devices unless you disable it separately.
If you ever wish to enable your Apple ID on iCloud.com again, you can do so by following the same steps and selecting the option to enable your account instead.
Managing your Apple ID settings on iCloud.com provides control over your account and data access, allowing you to make choices that align with your privacy and security preferences.
Unpair Devices from Apple ID
If you want to unpair devices from your Apple ID, you can do so by following these steps:
1. Open the Apple menu in the top-left corner of your Mac’s screen and select “System Preferences”.
2. Within System Preferences, click on “Apple ID”.
3. In the left sidebar, you will see a list of devices associated with your Apple ID. Select the device that you want to unpair.
4. A window will appear with details about the device. In the bottom-left corner, click on the “Remove from Account” button.
5. A confirmation dialog will appear, asking if you’re sure you want to remove the device from your account. Click on “Remove” to proceed.
By unpairing devices from your Apple ID, you are removing their association with your account. This means that the device will no longer have access to your Apple ID services, such as iCloud, iTunes, and the App Store.
Remember, unpairing a device from your Apple ID only affects that particular device. Your Apple ID will still be associated with other devices unless you unpair them separately.
If you want to pair the same device or another device with your Apple ID again, you can do so by signing in to your Apple ID on the device and authorizing it to use your account’s services.
Managing your paired devices allows you to control which devices have access to your Apple ID and associated services. It’s useful if you no longer use a device, want to maintain your privacy, or want to limit the number of authorized devices connected to your Apple ID.
Sign Out of Apple ID in System Preferences (Option 2)
If you prefer an alternative method to sign out of your Apple ID in System Preferences on your Mac, you can follow these steps:
1. Open the Apple menu in the top-left corner of your screen and select “System Preferences”.
2. Within System Preferences, click on “Users & Groups”.
3. In the Users & Groups window, select your user account from the left sidebar.
4. Click on the “Login Options” button located at the bottom-left corner of the window.
5. At the bottom-right corner of the Login Options window, click on the lock icon and enter your administrator password to make changes.
6. Once unlocked, click on the “Edit” button next to “Network Account Server” or “Join”.
7. Another window will appear with a list of network accounts. Select your Apple ID account.
8. At the bottom-left corner of the window, click on the “-” (minus) button.
9. A confirmation dialog will appear, asking if you want to remove the network account. Click on “Remove from This Mac”.
By signing out of your Apple ID in System Preferences using this alternative method, you are effectively disconnecting your Apple ID from your user account on your Mac. This means you won’t have access to iCloud, iTunes, App Store, and other Apple services associated with your Apple ID on this device.
Remember, signing out of your Apple ID in System Preferences using this method only affects your Mac. Your Apple ID will still be associated with other devices unless you sign out from them separately.
If you want to sign back in with the same Apple ID or a different Apple ID using this method, you can do so by following the same steps and adding the respective network account again.
Using this option to sign out of your Apple ID in System Preferences provides an alternative approach to managing your Apple ID account access and ensuring the security and privacy of your personal information on your Mac.
Troubleshooting FAQs
Here are some frequently asked questions and troubleshooting solutions related to signing out of your Apple ID on your Mac:
1. I’m unable to sign out of my Apple ID. What should I do?
If you encounter issues signing out of your Apple ID, ensure that you have a stable internet connection. Additionally, check if any Apple services or apps are currently using your Apple ID, as this can prevent the sign-out process. Quitting these apps or services may resolve the issue.
2. Will signing out of my Apple ID delete my data from my Mac?
Signing out of your Apple ID on your Mac will not delete your data. However, it’s important to note that disabling services like iCloud can remove certain data from your device. It’s recommended to back up your important files before signing out to avoid any data loss.
3. Can I sign out of Apple ID on one device and still remain signed in on others?
Yes, signing out of your Apple ID on one device will not affect your sign-in status on other devices. Each device is managed individually, allowing you to have different sign-in statuses across your Apple devices.
4. Will signing out of my Apple ID deactivate my iPhone or iPad?
No, signing out of your Apple ID on your Mac will not deactivate your iPhone or iPad. Your Apple ID is tied to each individual device, so signing out of your Apple ID on one device will not impact the functionality or activation of your other devices.
5. Will signing out of my Apple ID remove my purchases and app subscriptions?
No, signing out of your Apple ID will not remove purchases or app subscriptions associated with that Apple ID. Your purchases and app subscriptions are tied to your Apple ID account and will remain accessible even after signing out. You will need to sign back in with the same Apple ID to access your previous purchases and continue using any active app subscriptions.
If you encounter any other issues or have specific concerns, it’s recommended to reach out to Apple Support for further assistance or visit the Apple Support website for troubleshooting resources related to your specific situation.
Remember, it’s always important to back up your important data and exercise caution when signing out of your Apple ID to ensure a smooth transition and avoid any unexpected data loss.