
Why do you need to authorize computers in Apple Music or iTunes?
When using Apple Music or iTunes, you may come across the need to authorize your computer. But why is this necessary? Let’s delve into the importance of authorizing computers in Apple Music or iTunes.
1. Accessing your purchased content: By authorizing your computer, you can access all the music, movies, TV shows, books, or apps you have purchased from the iTunes Store. This allows you to enjoy your content seamlessly across multiple devices.
2. Using Apple Music’s features: If you’re a subscriber to Apple Music, authorizing your computer is vital to fully utilize its features. This includes streaming and downloading millions of songs, creating playlists, and accessing curated content. Authorization ensures you can enjoy all the benefits of your Apple Music subscription.
3. Syncing your devices: By authorizing your computer, you can sync your iPhone, iPad, or iPod touch with iTunes. This enables you to transfer media files, such as music, videos, and photos, between your computer and iOS devices.
4. Home Sharing: Authorizing your computer in iTunes allows you to enable Home Sharing, which lets you stream and share media libraries between devices connected to the same Wi-Fi network. This is particularly useful for families or individuals with multiple Apple devices.
5. Preventing unauthorized access: Authorizing your computer adds a layer of security to your iTunes or Apple Music account. It ensures that only authorized devices can access your purchased content or utilize Apple Music features, minimizing the risk of unauthorized downloads or usage.
6. Multiple user accounts: If you have multiple user accounts on your computer, authorizing each account individually allows all users to access and enjoy the same purchased content or Apple Music subscription across their respective profiles.
Remember that Apple limits the number of authorized computers (up to five) and deauthorizing your computer when necessary can help manage your authorized devices effectively.
How to authorize your computer in Apple Music or iTunes?
Authorizing your computer in Apple Music or iTunes is a simple process that allows you to access your purchased content and make the most of your Apple Music subscription. Here are the steps to authorize your computer:
Method 1: Authorizing your computer in Apple Music or iTunes on Mac
- Open the Music app or iTunes on your Mac.
- Sign in using your Apple ID by clicking on Account in the menu bar and selecting Sign In.
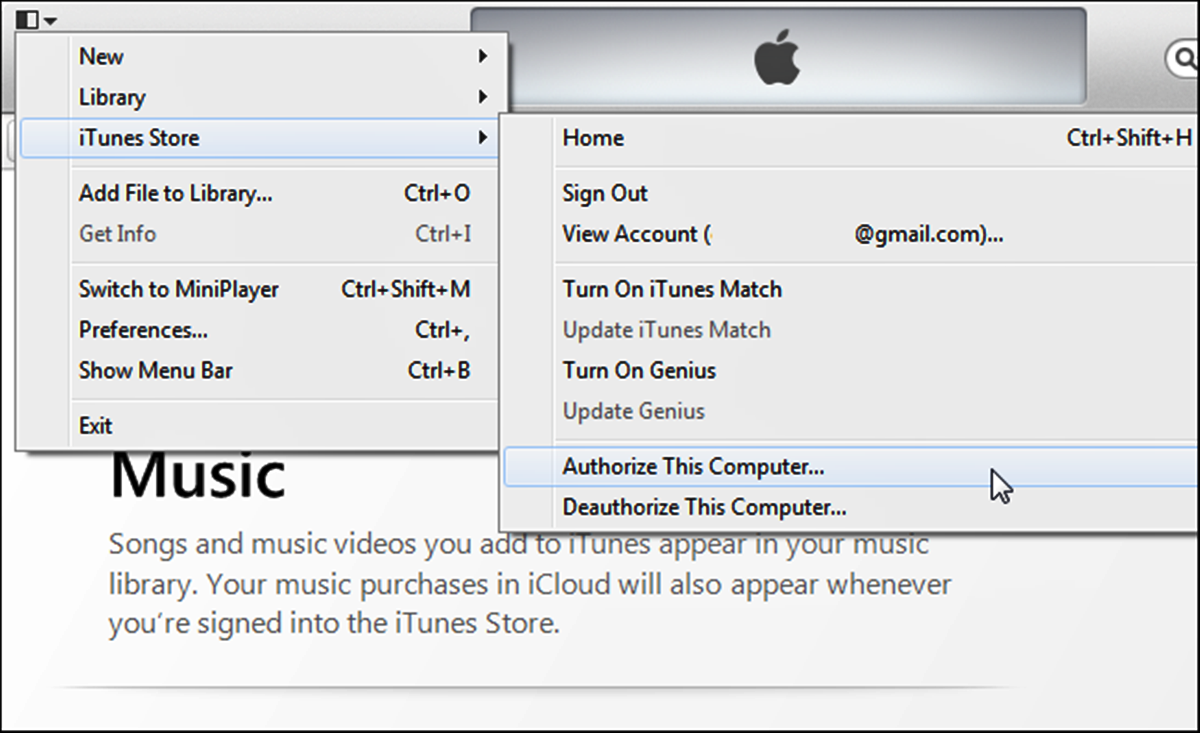
- Once signed in, go to the Account menu again and click on Authorizations.
- Choose the option “Authorize This Computer” and enter your Apple ID password if prompted.
- Your computer is now authorized, and you can access your purchased content and Apple Music features.
Method 2: Authorizing your computer in Apple Music or iTunes on Windows
- Open iTunes on your Windows computer.
- Go to the Account menu at the top of the screen and click on Sign In.
- Enter your Apple ID and password to sign in.
- Click on Account again, and then select Authorizations.
- Choose “Authorize This Computer” and enter your Apple ID password if requested.
- Your computer is now authorized, and you can access your purchased content and Apple Music features.
Method 3: Authorizing your computer in Apple Music or iTunes on iPhone or iPad
- Open the Settings app on your iPhone or iPad.
- Tap on your name at the top of the screen to access your Apple ID settings.
- Select iTunes & App Store.
- Sign in with your Apple ID if you’re not already signed in.
- Tap on your Apple ID at the top of the screen and choose View Apple ID.
- Scroll down and tap on Authorize This Computer.
- Enter your Apple ID password if prompted.
- Your device is now authorized, and you can access your purchased content and Apple Music features.
Remember, you can authorize up to five computers with your Apple ID. If you exceed this limit, you may need to deauthorize a computer to authorize a new one. Keep your authorized devices up to date to ensure seamless access to your content and Apple Music on all your devices.
Method 1: Authorizing your computer in Apple Music or iTunes on Mac
If you’re using a Mac computer, you can easily authorize it to access your purchased content and Apple Music features in Apple Music or iTunes. Follow these steps:
- Open the Music app or iTunes on your Mac. You can find it in the Applications folder or by searching with Spotlight.
- Once the app is open, click on the Account option in the menu bar at the top of the screen.
- In the drop-down menu, click on Sign In. If you’re already signed in with another Apple ID, choose the option to Sign Out first and then Sign In.
- A window will appear asking you to enter your Apple ID and password. Fill in the required information and click on the Sign In button.
- After signing in with your Apple ID, go back to the Account menu and select Authorizations.
- In the Authorizations menu, click on the option “Authorize This Computer”.
- If prompted, enter your Apple ID password and click on the Authorize button.
- That’s it! Your Mac is now authorized to access your purchased content and Apple Music features.
By authorizing your Mac in Apple Music or iTunes, you can enjoy your music, movies, TV shows, books, and apps purchased from the iTunes Store, as well as utilize the full range of features available in Apple Music. Remember, you can authorize up to five computers with your Apple ID, so make sure to manage your authorized devices accordingly.
Method 2: Authorizing your computer in Apple Music or iTunes on Windows
If you’re using a Windows computer, you can easily authorize it to access your purchased content and Apple Music features in Apple Music or iTunes. Follow these steps:
- Open the iTunes application on your Windows computer. You can find it in the Start menu or by searching for it.
- In the iTunes menu at the top of the window, click on the Account option.
- In the drop-down menu, click on Sign In. If you’re already signed in with another Apple ID, choose the option to Sign Out first and then Sign In.
- A window will appear asking you to enter your Apple ID and password. Fill in the required information and click on the Sign In button.
- Once signed in, go back to the Account menu and select Authorizations.
- In the Authorizations menu, click on the option “Authorize This Computer”.
- If prompted, enter your Apple ID password and click on the Authorize button.
- That’s it! Your Windows computer is now authorized to access your purchased content and Apple Music features.
By authorizing your Windows computer in Apple Music or iTunes, you can enjoy your music, movies, TV shows, books, and apps purchased from the iTunes Store, as well as utilize the full range of features available in Apple Music. Remember, you can authorize up to five computers with your Apple ID, so make sure to manage your authorized devices accordingly.
Method 3: Authorizing your computer in Apple Music or iTunes on iPhone or iPad
If you want to authorize your iPhone or iPad to access your purchased content and Apple Music features in Apple Music or iTunes, follow these simple steps:
- Open the Settings app on your iPhone or iPad. It is represented by a gear icon and can usually be found on your device’s home screen.
- Scroll down and tap on your name at the top of the screen. This will take you to your Apple ID settings.
- In the Apple ID settings menu, tap on the “iTunes & App Store” option.
- If you’re not already signed in, you will see a “Sign In” button. Tap on it and enter your Apple ID and password to sign in.
- Once signed in, tap on your Apple ID at the top of the screen and choose the “View Apple ID” option from the pop-up menu.
- Scroll down and tap on “Authorize This Computer”.
- If prompted, enter your Apple ID password.
- That’s it! Your iPhone or iPad is now authorized to access your purchased content and Apple Music features.
By authorizing your iPhone or iPad in Apple Music or iTunes, you can enjoy your purchased content from the iTunes Store and make the most of your Apple Music subscription. Keep in mind that you can authorize up to five computers with your Apple ID, so make sure to manage your authorized devices accordingly.
Method 4: Deauthorizing your computer in Apple Music or iTunes
If you no longer want to authorize a specific computer to access your purchased content and Apple Music features in Apple Music or iTunes, you can easily deauthorize it. Follow these steps:
- Open the Music app or iTunes on the computer that you want to deauthorize. If you’re using a Mac, click on the Account option in the menu bar at the top of the screen. If you’re using Windows, click on the Edit option.
- In the drop-down menu, click on Authorizations.
- From the Authorizations menu, choose the option “Deauthorize This Computer”.
- A pop-up window will appear, asking for confirmation. Click on the Deauthorize button to proceed.
- If prompted, enter your Apple ID and password to confirm the deauthorization.
By deauthorizing a computer, you are revoking its access to your purchased content and Apple Music features. This can be helpful if you have reached the limit of authorized devices (up to five) or if you no longer want a specific computer to have access to your content.
Remember, it’s important to manage your authorized devices and deauthorize any computers that you no longer use or want to have access to your content. This ensures that you have control over which devices can access your purchased content and Apple Music subscription.
Troubleshooting common issues with authorizing computers in Apple Music or iTunes
While authorizing computers in Apple Music or iTunes is generally a smooth process, you may encounter some common issues. Here are some troubleshooting steps to help resolve these problems:
1. Incorrect Apple ID: Double-check that you are signing in with the correct Apple ID. Make sure it is the same Apple ID used for purchasing content or subscribing to Apple Music.
2. Authorization limit reached: Apple limits the number of computers that can be authorized with a single Apple ID to five. If you have reached this limit, you may need to deauthorize a computer before authorizing a new one.
3. Network connectivity issues: Ensure that your computer or device is connected to the internet. Poor internet connectivity can sometimes affect the authorization process. Try restarting your router or connecting to a different network to see if the issue persists.
4. Outdated software: Make sure you have the latest version of iTunes or Music app installed on your computer or device. Outdated software can sometimes cause authorization issues. Update your software and try authorizing again.
5. Time and date settings: Check that the time and date settings on your computer or device are correctly configured. Incorrect time and date settings can cause authorization problems. Set the correct time and date, then try authorizing again.
6. Disable security software/firewall: Sometimes, security software or firewalls can interfere with the authorization process. Temporarily disable any security software or firewall on your computer and try authorizing again. Remember to enable them afterwards for continued protection.
7. Contact Apple support: If none of the above troubleshooting steps resolve your issues, it’s recommended to reach out to Apple Support for further assistance. They can provide personalized guidance and help resolve complex authorization problems.
It’s important to ensure that your authorized devices are up to date and properly configured to avoid any issues with accessing your purchased content or utilizing Apple Music features. Hopefully, these troubleshooting tips will help you overcome any authorization problems you may encounter.