
Prerequisites for Share Screen on Skype
To share your screen on Skype and have a successful screen sharing session, there are a few prerequisites that you need to ensure. Follow these steps to ensure a seamless screen sharing experience:
- Have the latest version of Skype installed on your device: Before you begin, make sure you have the latest version of Skype installed on your computer or mobile device. Upgrading to the latest version ensures that you have access to all the latest features and improvements, including screen sharing.
- Ensure a stable internet connection: To avoid any interruptions during your screen sharing session, it is crucial to have a stable internet connection. A high-speed and reliable internet connection will ensure that the screen sharing visuals are transmitted smoothly and without delay.
- Use a compatible device: Screen sharing is available on Windows, Mac, and Web versions of Skype. Ensure that you are using a device with a compatible operating system to access the screen sharing feature.
- Prepare the content you want to share: Before starting a screen sharing session, ensure that you have the content you want to share readily available. Whether it’s a presentation, document, or website, have it open and ready to display on your screen.
- Inform participants about the screen sharing session: If you are hosting a group call or conference, make sure to inform the participants in advance about the screen sharing session. This will allow them to prepare and focus on the shared content during the call.
By meeting these prerequisites, you will be ready to dive into the world of screen sharing on Skype. Whether it’s for work meetings, presentations, or collaborating with remote team members, screen sharing can greatly enhance your communication and productivity.
How to Start a Screen Sharing Session on Skype
Screen sharing on Skype allows you to share your screen with other participants during a call or meeting. Follow these steps to start a screen sharing session:
- Initiate a call or join a meeting: Start a video or audio call with the person or group you want to share your screen with. Alternatively, join an ongoing meeting by clicking on the provided meeting link.
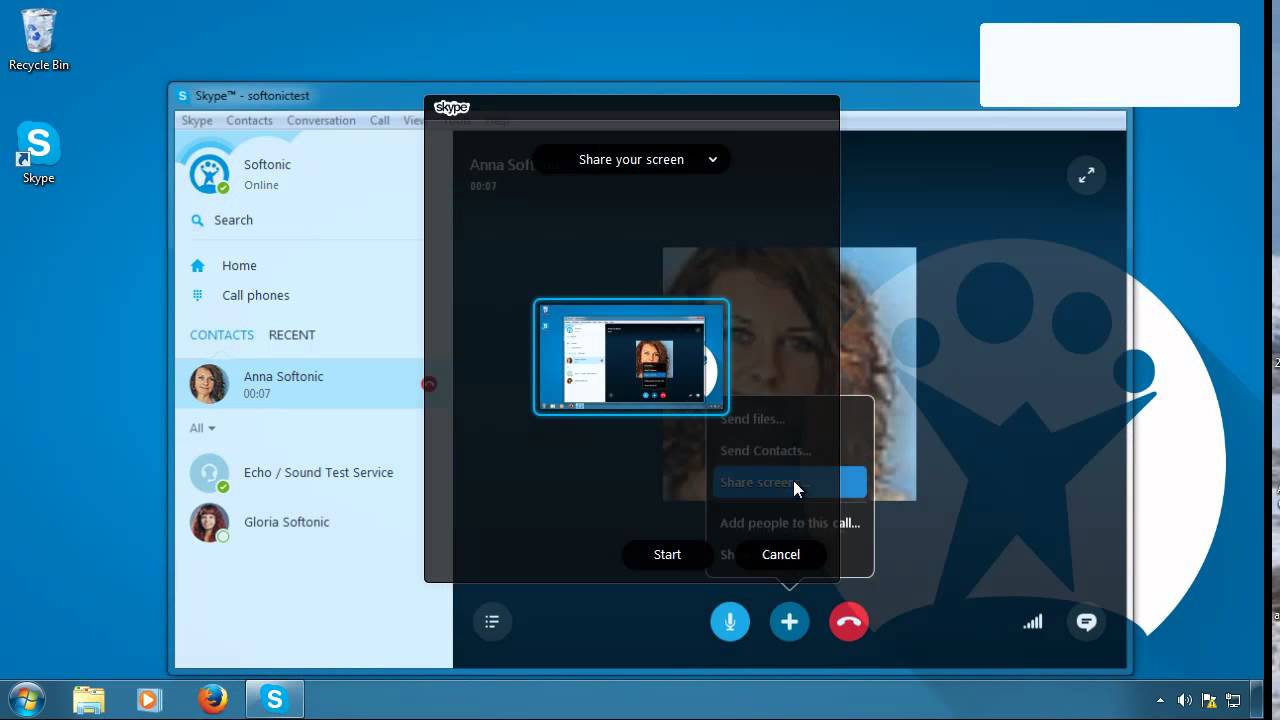
- Access the screen sharing option: Once the call or meeting has started, locate the toolbar at the bottom of the screen. Look for the “Share Screen” button, which might be represented by a monitor or a screen icon.
- Select the screen you want to share: Click on the “Share Screen” button to open a menu that displays all the screens connected to your device. If you have multiple displays, choose the specific screen you want to share. You can also choose to share a specific application window instead of your entire screen if desired.
- Start screen sharing: After selecting the screen or application window, click on the “Start” or “Share” button. Skype will inform you that your screen is being shared with the other participants in the call or meeting.
- Control the screen sharing session: While sharing your screen, you have several options to control the screen sharing session. You can pause, resume, or stop sharing your screen by clicking on the corresponding options in the toolbar. You can also choose to share computer audio during the screen sharing session.
- End the screen sharing session: When you are ready to stop sharing your screen, click on the “Stop Sharing” button in the toolbar. This will end the screen sharing session and return to the regular call or meeting view.
Screen sharing on Skype is a valuable feature that facilitates collaboration and enhances communication. Whether you need to present a document, demonstrate a software feature, or provide visual support, screen sharing can make your conversations more interactive and engaging.
Share Screen on Skype for Windows
If you are using Skype on a Windows device, here is a step-by-step guide on how to share your screen:
- Start a call or join a meeting: Initiate a video or audio call with the person or group you want to share your screen with. Alternatively, join an ongoing meeting by clicking on the provided meeting link.
- Access the screen sharing option: Once the call or meeting has started, look for the toolbar at the bottom of the screen. Locate the “Share Screen” button, which may be represented by a monitor or a screen icon. Click on it to open the screen sharing options.
- Select the screen or application window to share: In the screen sharing options menu, you will see a list of screens and application windows connected to your device. Choose the screen you want to share by clicking on it. You can also select a specific application window to share instead of your entire screen.
- Start sharing your screen: After selecting the desired screen or application window, click on the “Start” or “Share” button to begin sharing your screen. Skype will notify you that your screen is now being shared with the other participants in the call or meeting.
- Manage the screen sharing session: While sharing your screen, you have several controls available to you. Use the toolbar to pause, resume, or stop sharing your screen. You can also choose to share your computer audio during the screen sharing session for enhanced communication.
- End the screen sharing session: When you are ready to stop sharing your screen, click on the “Stop Sharing” button in the toolbar. This action will conclude the screen sharing session, and you will return to the regular call or meeting view.
Sharing your screen on Skype for Windows is a powerful feature that allows you to collaborate, present, and engage with others effortlessly. Whether you are delivering a presentation, demonstrating a process, or seeking technical assistance, screen sharing on Skype for Windows is a valuable tool for effective communication.
Share Screen on Skype for Mac
If you are using Skype on a Mac, here is a step-by-step guide on how to share your screen:
- Initiate a call or join a meeting: Start a video or audio call with the person or group you want to share your screen with. You can also join an ongoing meeting by clicking on the provided meeting link.
- Access the screen sharing option: Once the call or meeting is active, locate the toolbar at the bottom of the screen. Look for the “Share Screen” button, which might be represented by a monitor or a screen icon. Click on it to access the screen sharing options.
- Select the screen or application window to share: In the screen sharing options menu, you will see a list of screens and application windows connected to your Mac. Choose the screen you want to share by clicking on it. Alternatively, select a specific application window to share instead of your entire screen.
- Begin sharing your screen: After selecting the desired screen or application window, click on the “Start” or “Share” button to start sharing your screen. Skype will inform you that your screen is now being shared with the other participants in the call or meeting.
- Control the screen sharing session: While sharing your screen, you have several controls at your disposal. Utilize the toolbar to pause, resume, or stop sharing your screen. You can also opt to share your computer’s audio during the screen sharing session to enhance communication.
- Stop sharing your screen: When you want to end the screen sharing session, click on the “Stop Sharing” button in the toolbar. This action will conclude the screen sharing session, and you will revert to the regular call or meeting view.
Screen sharing on Skype for Mac empowers you to collaborate, present, and interact seamlessly with others. Whether you need to showcase a slideshow, demonstrate software functionality, or provide remote assistance, screen sharing on Skype for Mac enables effective communication and collaboration.
Share Screen on Skype for Web
If you are using Skype on the web version, you can also enjoy the screen sharing feature. Here’s how:
- Start a call or join a meeting: Initiate a video or audio call with the person or group you want to share your screen with. Alternatively, join an ongoing meeting by clicking on the provided meeting link.
- Access the screen sharing option: Once the call or meeting has started, locate the toolbar at the bottom of the screen. Look for the “Share Screen” button, represented by a monitor or a screen icon. Click on it to open the screen sharing options.
- Select the screen or application window to share: In the screen sharing menu, you will see a list of screens and application windows available for sharing. Choose the screen you want to share by clicking on it. Alternatively, select a specific application window to share instead of your entire screen.
- Share your screen: After selecting the desired screen or application window, click on the “Start” or “Share” button to start sharing your screen. Skype will notify you that your screen is now being shared with the other participants in the call or meeting.
- Control the screen sharing session: While sharing your screen, you have several controls at your disposal. You can use the toolbar to pause, resume, or stop sharing your screen. Additionally, you can choose to share your computer audio during the screen sharing session for enhanced communication.
- End the screen sharing session: When you want to stop sharing your screen, click on the “Stop Sharing” button in the toolbar. This will end the screen sharing session, and you will return to the regular call or meeting view.
Screen sharing on Skype for Web provides a convenient way to collaborate and engage with others. Whether you need to share a document, demonstrate a software feature, or provide visual support, screen sharing on Skype for Web enables seamless communication and effective teamwork.
Tips for a Successful Screen Sharing Session on Skype
To ensure a smooth and productive screen sharing session on Skype, consider the following tips:
- Prepare your content in advance: Before starting the screen sharing session, have your content ready and organized. Whether it’s a presentation, document, or website, make sure it is easily accessible to save time during the call.
- Double-check your screen sharing settings: Before sharing your screen, make sure you’ve selected the correct screen or application window. Verify that you are sharing the intended content to avoid any accidental disclosures of unrelated or sensitive information.
- Give clear instructions: If you are sharing your screen to demonstrate a process or showcase specific elements, provide clear instructions to guide participants through the shared content. This will ensure that everyone understands what is being presented and can follow along easily.
- Communicate effectively: While sharing your screen, it’s essential to communicate with the other participants verbally. Use Skype’s audio or video call features to explain your ideas, answer questions, and facilitate discussion during the screen sharing session.
- Optimize your screen resolution: Ensure that your screen resolution is optimized for the participants to have a clear view of your shared content. Adjust the resolution settings if needed to provide a better viewing experience for all participants.
- Minimize distractions: Close any unnecessary applications, notifications, or browser tabs that are not relevant to the screen sharing session. This will help keep the focus on the shared content and prevent distractions from diverting participants’ attention.
- Be mindful of bandwidth limitations: Screen sharing can require significant bandwidth, so consider closing other bandwidth-intensive applications or activities to ensure a stable and smooth screen sharing experience. This will prevent lag or delays in the visuals for both you and the participants.
- Test beforehand: If you are new to screen sharing on Skype or using a different device, it’s advisable to do a test run before the actual call or meeting. This will allow you to familiarize yourself with the screen sharing process and identify any potential issues in advance.
- Solicit feedback: After the screen sharing session, ask for feedback from the participants to understand their experience and if there are any areas for improvement. This feedback will help you enhance your future screen sharing sessions on Skype.
By following these tips, you can ensure a successful and engaging screen sharing session on Skype. Effective communication, preparedness, and attention to details will contribute to a seamless experience for both you and the participants, enhancing collaboration and productivity.
Troubleshooting Screen Sharing Issues on Skype
While screen sharing on Skype is generally straightforward, you may encounter occasional issues. Here are some troubleshooting tips to help resolve common screen sharing problems:
- Update Skype: Ensure that you have the latest version of Skype installed on your device. Updates often include bug fixes and improvements that can resolve screen sharing issues.
- Check system requirements: Verify that your device meets the system requirements for screen sharing on Skype. Insufficient hardware or outdated operating systems may hinder the screen sharing feature.
- Restart Skype: Sometimes, a simple restart can resolve temporary glitches. Close Skype completely and relaunch the application to see if the screen sharing problem persists.
- Check internet connection: A stable internet connection is crucial for successful screen sharing. Ensure that your internet connection is strong and free from disruptions. Switching to a wired connection if possible may help stabilize the screen sharing session.
- Adjust screen sharing settings: Double-check your screen sharing settings in Skype. Make sure you have selected the correct screen or application window to share and that the audio sharing option is enabled if needed.
- Disable unnecessary applications: Close any unnecessary applications running in the background, as they may use system resources and interfere with screen sharing performance.
- Resolve audio issues: If participants are unable to hear audio during the screen sharing session, check your audio settings and ensure that your microphone is not muted. Also, verify that the correct audio output device is selected.
- Try different screen sharing options: If you encounter issues with sharing your entire screen, try sharing a specific application window instead. This can bypass any compatibility issues that may be present with screen sharing.
- Test with another device: If possible, try screen sharing using a different device to isolate the problem. If the issue persists on another device, it may indicate a problem with the Skype application or the network.
- Contact Skype support: If none of the troubleshooting steps resolve the screen sharing issue, reach out to Skype support for further assistance. They can provide personalized guidance and help resolve any underlying technical problems.
By following these troubleshooting tips, you can overcome common screen sharing issues on Skype and ensure a smooth and uninterrupted screen sharing experience. Remember to be patient and persistent, as technical issues can sometimes be resolved with a little perseverance.