
Overview of Google Meet
Google Meet is a powerful video conferencing platform that enables individuals and teams to connect and collaborate remotely. With its user-friendly interface and robust features, Google Meet has become a popular choice for both personal and professional use. Whether you’re conducting team meetings, hosting webinars, or giving presentations, Google Meet provides a seamless and reliable video communication experience.
One of the standout features of Google Meet is its ability to facilitate real-time face-to-face interactions, no matter where you are located. Thanks to high-definition video and crystal-clear audio, participants can engage in productive discussions and feel as if they are in the same room. This makes it an ideal solution for remote teams, freelancers, and individuals seeking a remote communication tool.
Another advantage of Google Meet is its compatibility across different devices and operating systems. Whether you’re using a desktop computer, laptop, tablet, or even a mobile phone, you can easily join or host a meeting on Google Meet. This flexibility allows users to connect from any location, making it a convenient choice for remote workers, travelers, and individuals on the go.
In addition, Google Meet offers a range of collaborative features designed to enhance productivity during meetings. These features include screen sharing, which allows participants to share their screens with the rest of the group. This is especially useful for presentations, demonstrations, and sharing important documents or files.
Furthermore, Google Meet provides the option to record meetings, making it easy to refer back to discussions or share them with individuals who were unable to attend. This feature is particularly beneficial for training sessions, webinars, or important announcements that may need to be accessed at a later time.
Overall, Google Meet is a versatile and user-friendly video conferencing tool that enables seamless remote collaboration. With its high-quality video and audio, cross-platform compatibility, and collaborative features, it has become an essential tool for individuals and organizations working remotely or conducting meetings with participants across different locations.
Setting Up a Google Meet Session
Setting up a Google Meet session is quick and easy. Here are the steps to get started:
- Open your web browser and navigate to meet.google.com.
- Sign in to your Google account if you haven’t already done so. If you don’t have a Google account, you can create one for free.
- Once you’re signed in, click on the “New meeting” button. This will generate a unique meeting link that you can share with participants.
- You can choose to add a title and a brief description to your meeting, which can help participants understand the purpose or agenda of the session.
- By default, Google Meet generates a meeting code that participants can use to join the session. However, you can also choose to disable the meeting code and only allow participants to join via the generated link.
- If you want to schedule the meeting for a specific date and time, you can click on the “Add Google Calendar event” option. This will open Google Calendar, where you can set the date, time, and other details for the meeting.
- Once you have made all the necessary selections and configurations, click on the “Save” or “Done” button to finalize your meeting setup.
- You can now share the meeting link or code with participants via email, chat, or any other preferred communication method.
It’s worth noting that Google Meet also integrates seamlessly with other Google Workspace (formerly G Suite) applications, such as Google Calendar and Gmail. This integration allows you to easily schedule meetings, send meeting invitations, and access meeting links directly from your Google Workspace account.
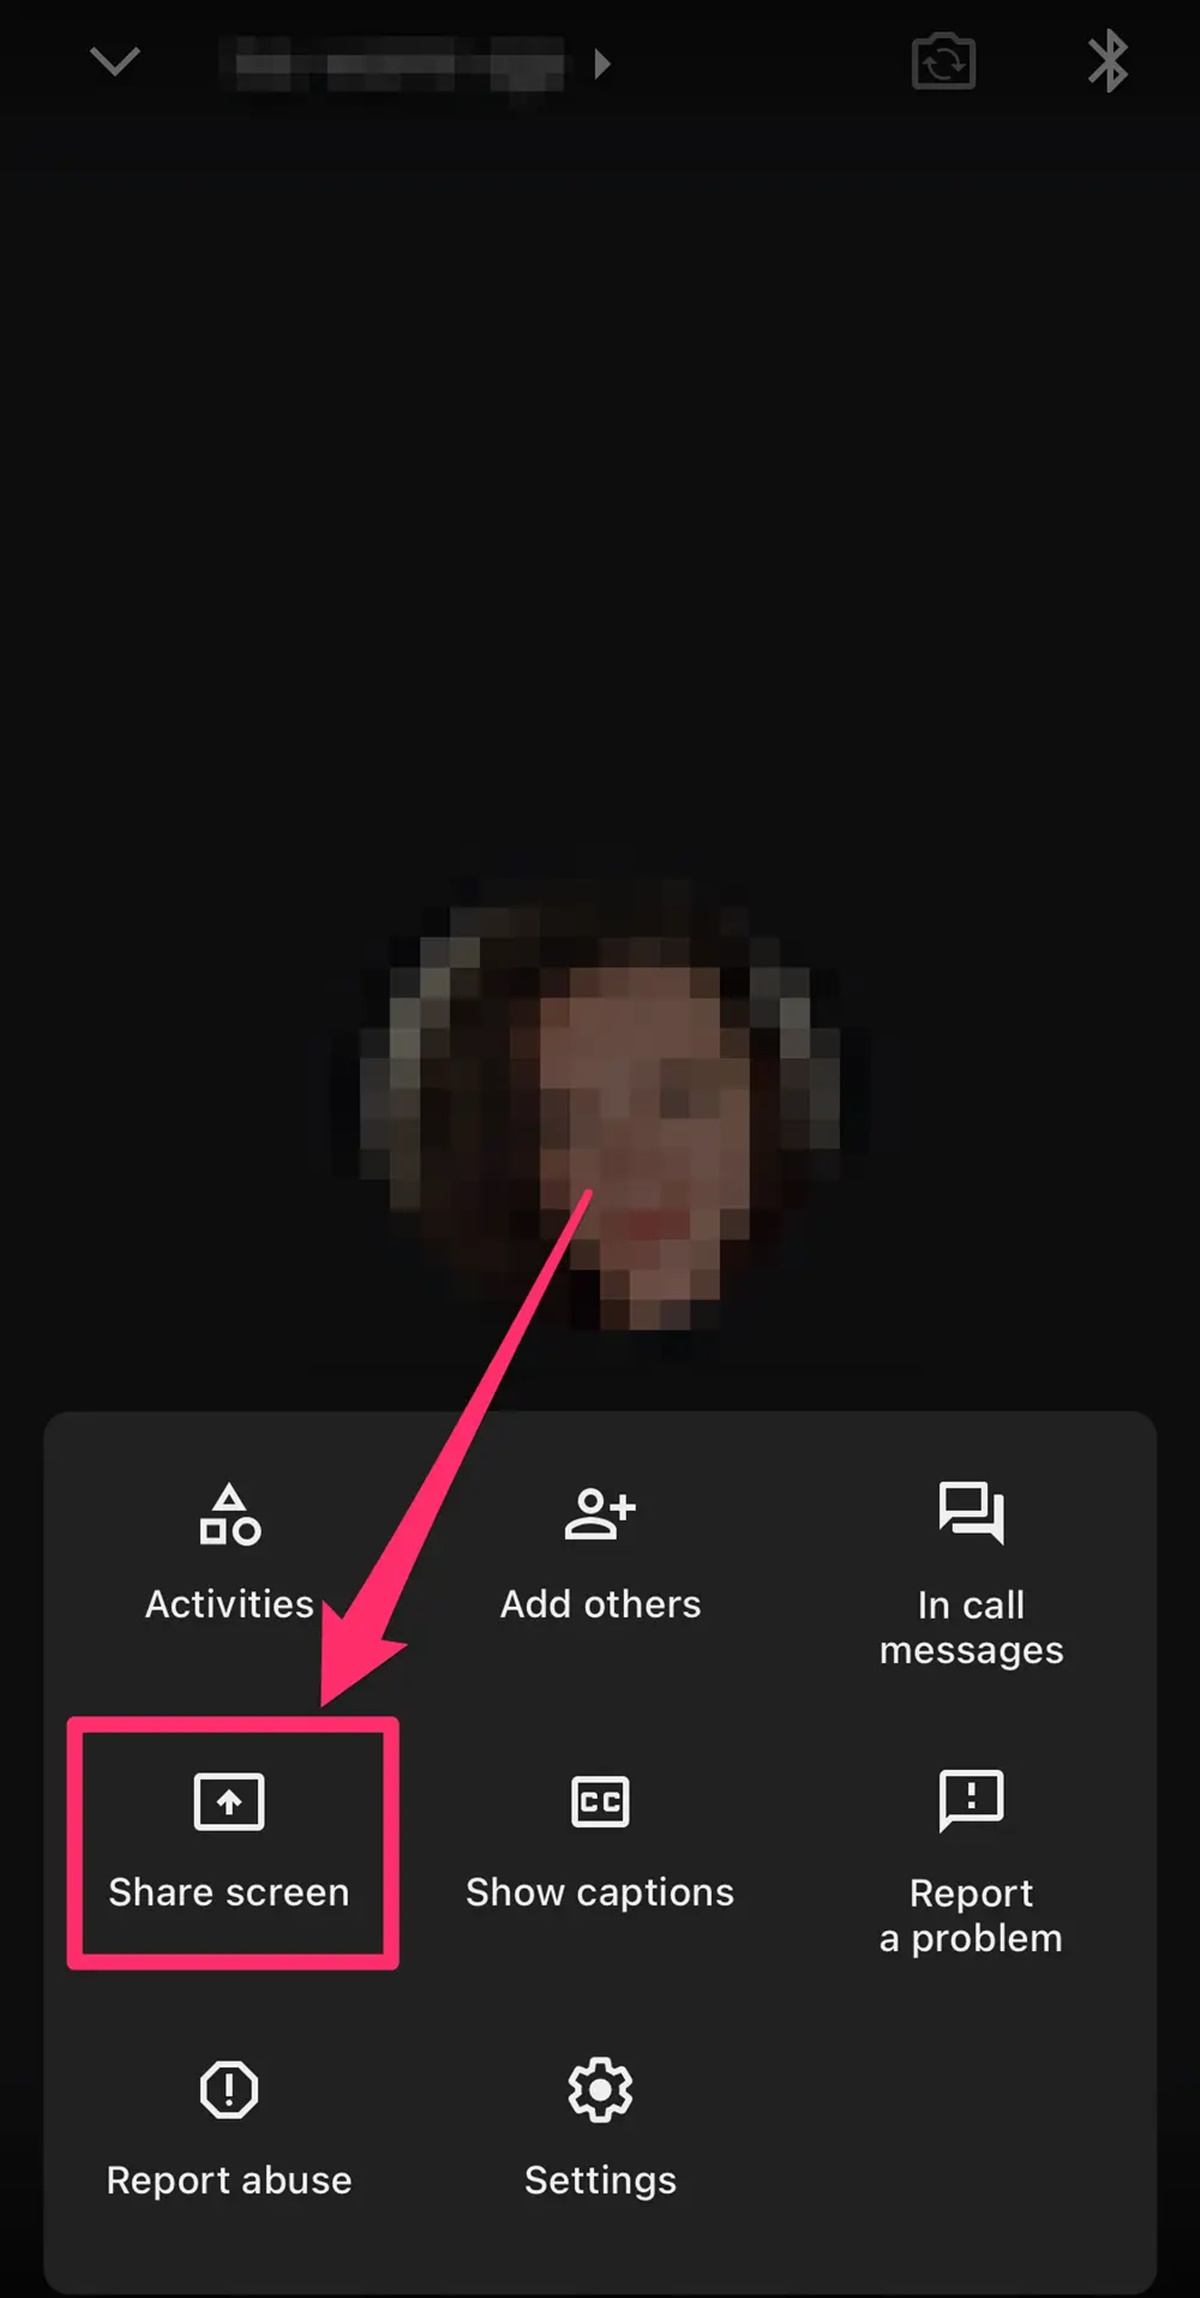
Additionally, if you’re using the Google Meet mobile app on your smartphone or tablet, the setup process is essentially the same. Simply open the app, sign in to your Google account, and follow the prompts to create a new meeting.
Setting up a Google Meet session is a straightforward process that can be done in just a few minutes. By following these steps, you’ll be able to host effective and efficient virtual meetings with ease.
Starting a Screen Share
Screen sharing is a valuable feature offered by Google Meet that allows you to share your screen with other meeting participants. This is particularly useful for presentations, demonstrations, or collaborating on documents together. Here’s how you can start a screen share in Google Meet:
- Join or start a Google Meet session by following the instructions provided in the previous section.
- Once you’re in the meeting, look for the toolbar at the bottom of the screen. You should see various icons, including the “Present now” button.
- Click on the “Present now” button, and a menu will appear with different screen sharing options.
- If you want to share your entire screen, select the “Your entire screen” option. This will display everything that is currently visible on your desktop.
- If you prefer to share a specific window, choose the “A window” option. You’ll then be able to select the specific application or window that you want to share.
- Alternatively, if you only want to share a specific Chrome tab, select the “A tab” option. This is useful if you’re presenting something from a web browser.
- Once you’ve made your selection, click on the “Share” button.
- Google Meet will now start sharing your screen with the other meeting participants. They will be able to see everything you have selected to share.
During a screen share, you can still access the Google Meet toolbar at the bottom of the screen. This allows you to use additional features like turning your camera on or off, muting or unmuting your microphone, and accessing the chat function.
It’s important to note that when you’re sharing your screen, others will not be able to see your video feed. However, they will still be able to hear your audio and see your cursor as you navigate through your shared content.
To stop screen sharing, simply click on the “Stop sharing” button in the toolbar. This will return the meeting to its normal video conferencing view with all participants’ video feeds visible.
Starting a screen share in Google Meet is a straightforward process that empowers collaboration and enhances the virtual meeting experience. By utilizing this feature effectively, you can effectively present and share information with fellow participants.
Sharing Your Entire Screen
Sharing your entire screen in Google Meet allows you to showcase everything that is currently visible on your desktop to the other meeting participants. This is particularly useful for presentations, demonstrations, or any scenario where you want to share multiple applications or documents simultaneously. Here’s how you can share your entire screen in Google Meet:
- Join or start a Google Meet session as outlined in the previous sections.
- Once in the meeting, locate the toolbar at the bottom of the screen.
- Look for the “Present now” button, which resembles a small screen with an arrow pointing out of it, and click on it.
- A menu will appear with different screen sharing options. Select the “Your entire screen” option.
- Next, a prompt will appear asking you to confirm the selection of your entire screen. Click on the blue “Share” button to proceed.
- Google Meet will now start sharing your entire screen with the other meeting participants.
Once your screen is being shared, everything on your desktop will be visible to the other participants, including any open applications, files, and even web browsers. They will be able to see any changes or activities you make on your screen in real-time.
While your screen is being shared, you’ll still have access to the Google Meet toolbar at the bottom of the screen. You can use this toolbar to manage your audio and video settings, access the chat feature, or perform other functions as needed.
To stop sharing your entire screen, go back to the Google Meet toolbar and locate the “Stop sharing” button. This will cease screen sharing and return the meeting to its normal video conferencing view.
Sharing your entire screen in Google Meet is a versatile feature that allows you to effectively communicate and collaborate with other participants. It enables seamless sharing of information, making it ideal for presentations, demonstrations, training sessions, or any scenario where visual content needs to be shared with others.
Sharing a Specific Window
In Google Meet, you have the option to share a specific window, allowing you to showcase a particular application or document to the other meeting participants. This feature is particularly useful when you want to focus on a single window or application without sharing your entire screen. Here’s how you can share a specific window in Google Meet:
- Join or start a Google Meet session as outlined in the previous sections.
- Once in the meeting, locate the toolbar at the bottom of the screen.
- Find the “Present now” button, which resembles a small screen with an arrow pointing out of it, and click on it.
- A menu will appear with different screen sharing options. Select the “A window” option.
- A pop-up will appear, displaying all the open windows and applications on your desktop.
- Choose the specific window or application that you want to share by clicking on it once.
- After selecting the window or application, click on the blue “Share” button.
- Google Meet will now start sharing the chosen window or application with the other meeting participants.
While sharing a specific window, only that window or application will be visible to the other participants. They will not see any other open applications or activities happening on your desktop. This allows you to maintain privacy and focus the attention of the participants on the specific content you want to share.
During the window sharing, you can still access the Google Meet toolbar at the bottom of the screen. This allows you to manage your audio and video settings, use the chat feature, or perform other functions as needed.
To stop sharing the specific window, simply return to the Google Meet toolbar and locate the “Stop sharing” button. This will cease the sharing and return the meeting to its regular video conferencing view.
Sharing a specific window in Google Meet provides a convenient way to present and collaborate on a single application or document. By utilizing this feature, you can focus the attention of the meeting participants on the specific content you want to discuss, allowing for effective communication and enhanced collaboration.
Sharing a Chrome Tab
Google Meet offers the option to share a specific Chrome tab, enabling you to present web content or online resources directly to the other meeting participants. This feature is particularly useful when you want to focus on a specific webpage or online document without sharing your entire screen. Here’s how you can share a Chrome tab in Google Meet:
- Join or start a Google Meet session as outlined in the previous sections.
- Once in the meeting, locate the toolbar at the bottom of the screen.
- Click on the “Present now” button, which looks like a small screen with an arrow pointing out of it.
- A menu will appear with different screen sharing options. Select the “A tab” option.
- A list of open Chrome tabs will appear, showing all the web pages you have open in your browser.
- Choose the specific tab you want to share with the other participants by clicking on it once.
- After selecting the tab, click on the blue “Share” button.
- Google Meet will now start sharing the chosen Chrome tab with the other meeting participants.
While sharing a Chrome tab, only that tab’s content will be visible to the other participants. They will not see any other open tabs or activities happening in your browser. This allows you to focus their attention on the specific web content you want to share without any distractions.
During the tab sharing, you can still access the Google Meet toolbar at the bottom of the screen. This allows you to manage your audio and video settings, utilize the chat feature, or perform other functions as needed.
To stop sharing the Chrome tab, simply return to the Google Meet toolbar and locate the “Stop sharing” button. Clicking on it will cease the sharing and bring the meeting back to its regular video conferencing view.
Sharing a Chrome tab in Google Meet enables you to present web-based information, online documents, or interactive content directly to the participants. This feature enhances collaboration and allows for real-time discussion and interaction around specific web resources.
Granting Control to Participants
In Google Meet, you have the ability to grant control to participants, allowing them to interact with and make changes to the shared screen. This feature is beneficial for collaborative sessions, where participants may need to annotate, edit, or navigate through the content being shared. Here’s how you can grant control to participants in Google Meet:
- Start sharing your screen or a specific window/tab as discussed in the previous sections.
- In the Google Meet toolbar at the bottom of the screen, locate the “More options” icon (three vertical dots) and click on it.
- A dropdown menu will appear. From this menu, select the “Give control” option.
- You’ll see a list of participants’ names or email addresses. Choose the participant to whom you want to grant control by clicking on their name.
- A notification will be sent to the participant, informing them that you have granted them control of the shared screen.
- The participant can now interact with the shared screen, such as scrolling, clicking, typing, or making annotations, depending on the permissions that you’ve granted.
- If you want to regain control of the shared screen, simply click on the “More options” icon again and select the “Take control” option.
It’s important to note that only one participant can have control of the shared screen at a time. If you grant control to another participant, the previous participant will lose control and be unable to make any further changes.
Granting control to participants is an effective way to foster collaboration and engagement during Google Meet sessions. It allows participants to actively contribute, provide input, and make real-time changes to the shared content, boosting productivity and encouraging active participation.
It’s worth mentioning that the ability to grant control to participants may be limited or disabled depending on various factors, such as the Google Meet administrator’s settings or specific security protocols in place.
Overall, granting control to participants in Google Meet empowers collaboration and encourages active participation, enhancing the overall meeting experience and facilitating meaningful contributions from all attendees.
Switching Shared Screens
In Google Meet, switching shared screens allows the host or presenters to alternate between different participants’ shared screens during a meeting. This feature is useful in scenarios where multiple participants need to showcase their screens or present their own content. Here’s how you can switch shared screens in Google Meet:
- While in a Google Meet session, locate the thumbnail views of the participants’ screens.
- Identify the participant whose screen you want to switch to.
- Click on the participant’s screen thumbnail to select it.
- Google Meet will now switch to displaying that participant’s shared screen as the main screen.
- The other participants will see the new shared screen in their own view.
- If you want to switch to another participant’s shared screen, simply repeat the process by selecting their screen thumbnail.
When you switch to a different participant’s shared screen, that screen becomes the main focus and is displayed prominently for all participants to see. This allows for seamless transitions between presentations or different content being shared by participants.
During a screen switch, you can still access the Google Meet toolbar at the bottom of the screen. This allows you to manage your audio and video settings, use the chat feature, or perform other functions as needed.
To return to the default view where your own screen is being shared, click on your own screen thumbnail. This will switch the main screen back to your shared content.
It’s important to note that switching shared screens requires the participation and consent of the screen-sharing participants. If a participant is not actively sharing their screen, their screen thumbnail will not be available for selection.
The ability to switch shared screens is a valuable feature in Google Meet that allows for a dynamic and interactive meeting experience. It enables participants to easily showcase their content and facilitates smooth transitions between shared screens, enhancing collaboration and engagement during virtual meetings.
Tips for a Smooth Screen Share
Screen sharing is a powerful feature in Google Meet that allows participants to present their screens and collaborate effectively. To ensure a smooth screen sharing experience, consider the following tips:
- Prepare your screen: Before starting a screen share, close any unnecessary applications, tabs, or documents. This helps reduce distractions and ensures that only the relevant content is visible to participants.
- Test the screen share: Prior to the meeting, conduct a test run to ensure that your screen sharing settings and devices are functioning properly. This helps you identify and address any potential technical issues in advance.
- Share high-quality content: If you’re sharing visual content such as presentations or images, make sure they are of high quality and easily readable for participants. Consider optimizing your content beforehand to enhance clarity and legibility.
- Provide context: When sharing your screen, provide a brief introduction or overview of the content you’ll be presenting. This helps participants understand the context and purpose of the shared information.
- Be mindful of sensitive information: Double-check your screen before sharing to ensure that no sensitive or confidential information is visible. Take measures to either hide or close any personal, private, or sensitive content that is not relevant to the meeting.
- Communicate effectively: During a screen share, communicate clearly with participants about what you’re showing and any actions they need to take. Use verbal cues, annotations, or chat features to guide participants and facilitate understanding.
- Consider bandwidth limitations: If you or your participants have limited bandwidth, minimize the use of bandwidth-intensive applications or features. Close unused applications and pause large file downloads to ensure a smooth and uninterrupted screen sharing experience.
- Optimize screen resolution: Adjust your screen resolution settings to strike a balance between clarity and performance. Higher resolutions may provide better visual quality but can also impact screen sharing performance and increase bandwidth usage.
- Practice moderation: If you’re sharing control or allowing participants to annotate on your shared screen, ensure that it is done in moderation. Too many simultaneous edits or changes can cause confusion and disrupt the flow of the presentation.
- Monitor participant engagement: Keep an eye on participant reactions and engagement during the screen share. Encourage participants to ask questions or provide feedback to ensure they are actively following the presentation.
By following these tips, you can ensure that your screen sharing sessions in Google Meet run smoothly and effectively. A seamless screen sharing experience helps enhance collaboration, engagement, and overall meeting productivity.
Troubleshooting Screen Share Issues
While screen sharing in Google Meet is generally a seamless process, you may encounter occasional issues that can disrupt the experience. Here are some common screen share issues and troubleshooting tips to help resolve them:
- Screen not appearing: If your shared screen is not appearing for participants, check that you have selected the correct screen or window to share. Additionally, ensure that you have not accidentally minimized or hidden the shared screen on your end.
- Poor video quality: If the quality of the shared screen appears blurry or pixelated, it may be due to a slow internet connection or limited bandwidth. Consider reducing the screen resolution or closing bandwidth-intensive applications to improve the video quality.
- No audio during screen share: If participants are unable to hear any audio from your shared screen, make sure that your audio settings are properly configured and that the volume is not muted. Additionally, check that you have selected the correct audio source in the screen sharing settings.
- Screen sharing freezing or lagging: If the shared screen freezes or lags during the session, it could be caused by a weak internet connection or high CPU usage. Try closing other applications or devices that may be using significant bandwidth or processing power to improve performance.
- Screen sharing not working on mobile devices: If you’re experiencing issues with screen sharing on a mobile device, ensure that you have the latest version of the Google Meet app installed. Additionally, check that the app has the necessary permissions to access your screen.
- Screen sharing compatibility: Ensure that the content you’re trying to share is compatible with the screen sharing feature. Some applications or content may have specific restrictions or limitations on screen sharing. Verify that the content is visible and accessible before starting the screen share.
- Unsupported screen sharing: If you’re using a web browser that is not supported by Google Meet, screen sharing may not work as expected. Check the list of supported browsers for Google Meet and switch to a compatible browser if necessary.
- Clear cache and cookies: Clearing your browser’s cache and cookies can resolve issues related to stored data or outdated information that may interfere with screen sharing. Try clearing the cache and cookies and then attempt the screen share again.
- Restart the meeting: If you continue to experience persistent screen share issues, consider restarting the Google Meet session. This can refresh the connection and resolve any temporary glitches or inconsistencies.
If you encounter persistent screen share issues that cannot be resolved through troubleshooting, consider reaching out to Google Meet support for further assistance. They can provide specific guidance based on your situation and help you troubleshoot any technical difficulties you may be facing.
By following these troubleshooting tips, you can overcome common screen share issues and ensure a smooth and uninterrupted screen sharing experience in Google Meet.