
What is a Hardware Wallet?
A hardware wallet is a physical device designed to securely store cryptocurrency private keys offline. It is considered to be one of the safest methods for protecting your digital assets from hacking attempts and online theft. Unlike software wallets that are connected to the internet, hardware wallets provide an additional layer of security by keeping your private keys offline and away from prying eyes.
Hardware wallets typically resemble USB flash drives and are equipped with a built-in screen and buttons to facilitate user interaction. They are designed to be easy to use and offer a user-friendly interface, even for individuals with limited technical knowledge. When you want to make a transaction or access your cryptocurrency holdings, you simply connect your hardware wallet to a computer or mobile device.
The key advantage of using a hardware wallet is that your private keys never leave the device, which significantly reduces the risk of being exposed to potential security vulnerabilities. Additionally, hardware wallets employ advanced encryption algorithms to protect your funds and ensure the integrity of transactions.
Hardware wallets support various cryptocurrencies, including Bitcoin, Ethereum, and many others. They are compatible with multiple operating systems and can be used with different wallet software applications depending on your preferences and needs.
Overall, a hardware wallet provides a secure and convenient solution for managing your cryptocurrencies while minimizing the risk of unauthorized access. It is an essential tool for individuals who value the security of their digital assets and want to have complete control over their funds.
Why Use a Hardware Wallet?
With the increasing popularity of cryptocurrencies, it is crucial to prioritize the security of your digital assets. A hardware wallet offers several compelling reasons why it is the preferred choice for safeguarding your cryptocurrency holdings:
1. Enhanced Security
One of the primary reasons to use a hardware wallet is the high level of security it provides. The private keys, which are essential for accessing and managing your cryptocurrencies, are stored securely on the hardware device. Since the keys are kept offline and only accessed when needed, the risk of them being compromised by hackers or malware is significantly reduced.
2. Protection against Hacks and Theft
Software wallets are vulnerable to hacking attacks, especially if they are connected to the internet. In contrast, hardware wallets are immune to online threats as they remain disconnected from the web when not in use. This allows you to securely store and transact your cryptocurrencies without worrying about potential hacking attempts or online theft.
3. User-Friendly Interface
Despite their advanced security features, hardware wallets are designed to be user-friendly. They typically have built-in screens and intuitive interfaces, making it easy for individuals of all technical levels to navigate and operate the device. This user-friendly aspect makes hardware wallets a popular choice for both beginners and experienced cryptocurrency users alike.
4. Support for Multiple Cryptocurrencies
Hardware wallets are compatible with a wide range of cryptocurrencies, including popular options like Bitcoin, Ethereum, Litecoin, and more. This flexibility allows you to manage all your digital assets in one secure location, eliminating the need for multiple wallets or accounts.
5. Peace of Mind
Using a hardware wallet offers peace of mind, knowing that your cryptocurrencies are safely stored and protected. With the increase in cyber threats and hacking attempts targeting cryptocurrencies, having a hardware wallet is an essential precautionary measure to ensure the long-term safety of your investment.
Step 1: Choose the Right Hardware Wallet for You
With a wide variety of hardware wallets available on the market, it is essential to select the one that best suits your needs and preferences. Consider the following factors when choosing a hardware wallet:
1. Security Features
Check the security features offered by the hardware wallet. Look for features such as PIN code protection, passphrase encryption, and two-factor authentication (2FA). The more robust the security measures, the better protected your cryptocurrencies will be.
2. Supported Cryptocurrencies
Review the list of supported cryptocurrencies to ensure that the hardware wallet you choose supports the digital assets you intend to store. Different wallets have varying levels of compatibility, so it”s important to choose one that aligns with your cryptocurrency portfolio.
3. User Interface
Consider the user interface and ease of use. Look for a hardware wallet with an intuitive display and navigation system. A user-friendly interface will make it easier for you to manage your cryptocurrencies and perform transactions with confidence.
4. Reputation and Reviews
Research the reputation and customer reviews of the hardware wallet manufacturer. Look for brands that have a strong track record of security and reliability. Reading feedback from other users can give you valuable insights into the strengths and weaknesses of different hardware wallets.
5. Price
Compare the prices of different hardware wallets. While it is important to consider your budget, remember that a hardware wallet is an investment in the security of your cryptocurrencies. It’s worth investing a bit more for a reputable and trustworthy device that offers the necessary security features.
6. Support and Customer Service
Consider the level of support and customer service provided by the hardware wallet manufacturer. Look for a company that offers responsive customer support and regular firmware updates to ensure your wallet remains secure and up-to-date.
By carefully evaluating these factors, you can choose a hardware wallet that aligns with your security needs, usability preferences, and budget. Remember that the choice of hardware wallet is a crucial step in securing your digital assets, so take the time to make an informed decision.
Step 2: Set Up Your Hardware Wallet
Once you have chosen the right hardware wallet for your needs, it’s time to set it up and get it ready for use. Follow these steps to successfully set up your hardware wallet:
1. Unbox the Hardware Wallet
Open the packaging and take out the hardware wallet device. Ensure that all the necessary components, such as the USB cable and any additional accessories, are present.
2. Connect the Hardware Wallet
Connect the hardware wallet to your computer or mobile device using the provided USB cable. Ensure that the device is securely connected.
3. Power On the Hardware Wallet
Power on the hardware wallet by pressing the designated button or following the manufacturer’s instructions. The screen should light up, indicating that the wallet is ready for setup.
4. Initialization Process
Follow the on-screen prompts to begin the initialization process. This typically involves selecting your preferred language, setting a PIN code, and confirming your choice.
5. Write Down the Recovery Seed
During the setup process, you will be provided with a recovery seed, which consists of a series of words. Write down these words in the order provided and keep them in a safe and secure location. This recovery seed is crucial for recovering your wallet if it gets lost or damaged.
6. Confirm the Recovery Seed
After writing down the recovery seed, the hardware wallet will ask you to confirm it by entering the words in the correct order. This step ensures that you have accurately recorded the seed for future use.
7. Finalize the Setup
Once you have confirmed the recovery seed, the hardware wallet will finalize the setup process and may prompt you to create a name or label for your wallet. Follow the instructions on the screen to complete the setup.
8. Update Firmware (if necessary)
After setting up the hardware wallet, check if there are any firmware updates available. It is important to keep your wallet’s firmware up-to-date to ensure the latest security enhancements and bug fixes are applied. Follow the manufacturer’s instructions to update the firmware if needed.
By following these steps, you can easily set up your hardware wallet and ensure it is ready to securely store and manage your cryptocurrencies. Remember to keep your recovery seed safe and double-check that you have correctly recorded it, as it is essential for accessing your wallet in case of emergencies or device loss.
Step 3: Install the Necessary Software
To fully utilize your hardware wallet, you will need to install the necessary software on your computer or mobile device. Follow these steps to install the software and establish a connection with your hardware wallet:
1. Visit the Manufacturer’s Website
Go to the official website of the hardware wallet manufacturer. Look for the section or page dedicated to software downloads and support.
2. Choose the Correct Software Version
Ensure that you select the appropriate software version for your operating system. Most hardware wallets provide software for Windows, macOS, Linux, and mobile platforms like Android and iOS.
3. Download and Install the Software
Click on the download link provided for your respective operating system and follow the on-screen instructions to download and install the software. Make sure to read any relevant release notes or documentation provided by the manufacturer.
4. Launch the Software
Once the installation is complete, launch the software on your computer or mobile device. The software will guide you through the process of setting up a connection with your hardware wallet.
5. Connect Your Hardware Wallet
Using the provided USB cable, connect your hardware wallet to the computer or mobile device. Ensure a secure connection is established.
6. Follow the On-Screen Instructions
The software will prompt you to follow a series of on-screen instructions to establish a connection with your hardware wallet. This may involve confirming the device’s PIN code or inputting a verification code displayed on the hardware wallet’s screen.
7. Verify Connection
After completing the connection process, the software should display a confirmation that the hardware wallet is successfully connected. You should now be able to manage and access your cryptocurrency holdings through the software interface.
8. Explore Software Features
Take some time to familiarize yourself with the features and functions offered by the software. This may include viewing your cryptocurrency balances, generating new wallet addresses, and performing transactions. Consult the software’s documentation or user guide for more information on its specific capabilities.
By installing the necessary software, you can unlock the full potential of your hardware wallet and seamlessly manage your cryptocurrencies. Ensure that you regularly check for software updates from the manufacturer to stay up-to-date with the latest security enhancements and improvements.
Step 4: Create a New Wallet
Now that you have set up your hardware wallet and installed the required software, it’s time to create a new wallet. Here are the steps to follow:
1. Open the Wallet Software
Launch the wallet software on your computer or mobile device. Make sure your hardware wallet is connected and recognized by the software.
2. Navigate to the Wallet Creation Section
Within the wallet software, look for the option to create a new wallet. This might be labeled as “Create New Wallet,” “New Account,” or something similar.
3. Follow the On-Screen Prompts
Follow the on-screen prompts to create your new wallet. This typically involves choosing a name or label for the wallet and selecting a password or passphrase to encrypt and protect your wallet data.
4. Write Down the Wallet Recovery Seed
During the wallet creation process, you will be provided with a recovery seed. Write down the recovery seed in the order specified and keep it in a safe and secure place. This recovery seed is crucial for restoring access to your wallet in case of loss or damage to your hardware device.
5. Confirm the Recovery Seed
After writing down the recovery seed, the wallet software will prompt you to confirm it by entering the words in the correct order. This step ensures that you have accurately recorded the seed for future use.
6. Set Up Additional Security Measures
Depending on the wallet software, you may have the option to set up additional security measures such as two-factor authentication (2FA) or a PIN code. Enable any desired security features to further protect your wallet and funds.
7. Complete the Wallet Creation
Once you have confirmed the recovery seed and set up any additional security measures, the wallet software will finalize the wallet creation process. You should now have a newly created wallet ready for use.
8. Explore Wallet Features
Take some time to explore the features and functionalities offered by the wallet software. Familiarize yourself with tasks like checking your cryptocurrency balance, generating wallet addresses, and initiating transactions. Refer to the wallet software’s documentation or user guide for more information on its specific capabilities.
By creating a new wallet, you establish a secure and dedicated storage space for your cryptocurrencies. Remember to always keep backups of your recovery seed and regularly update your wallet software for the latest security enhancements.
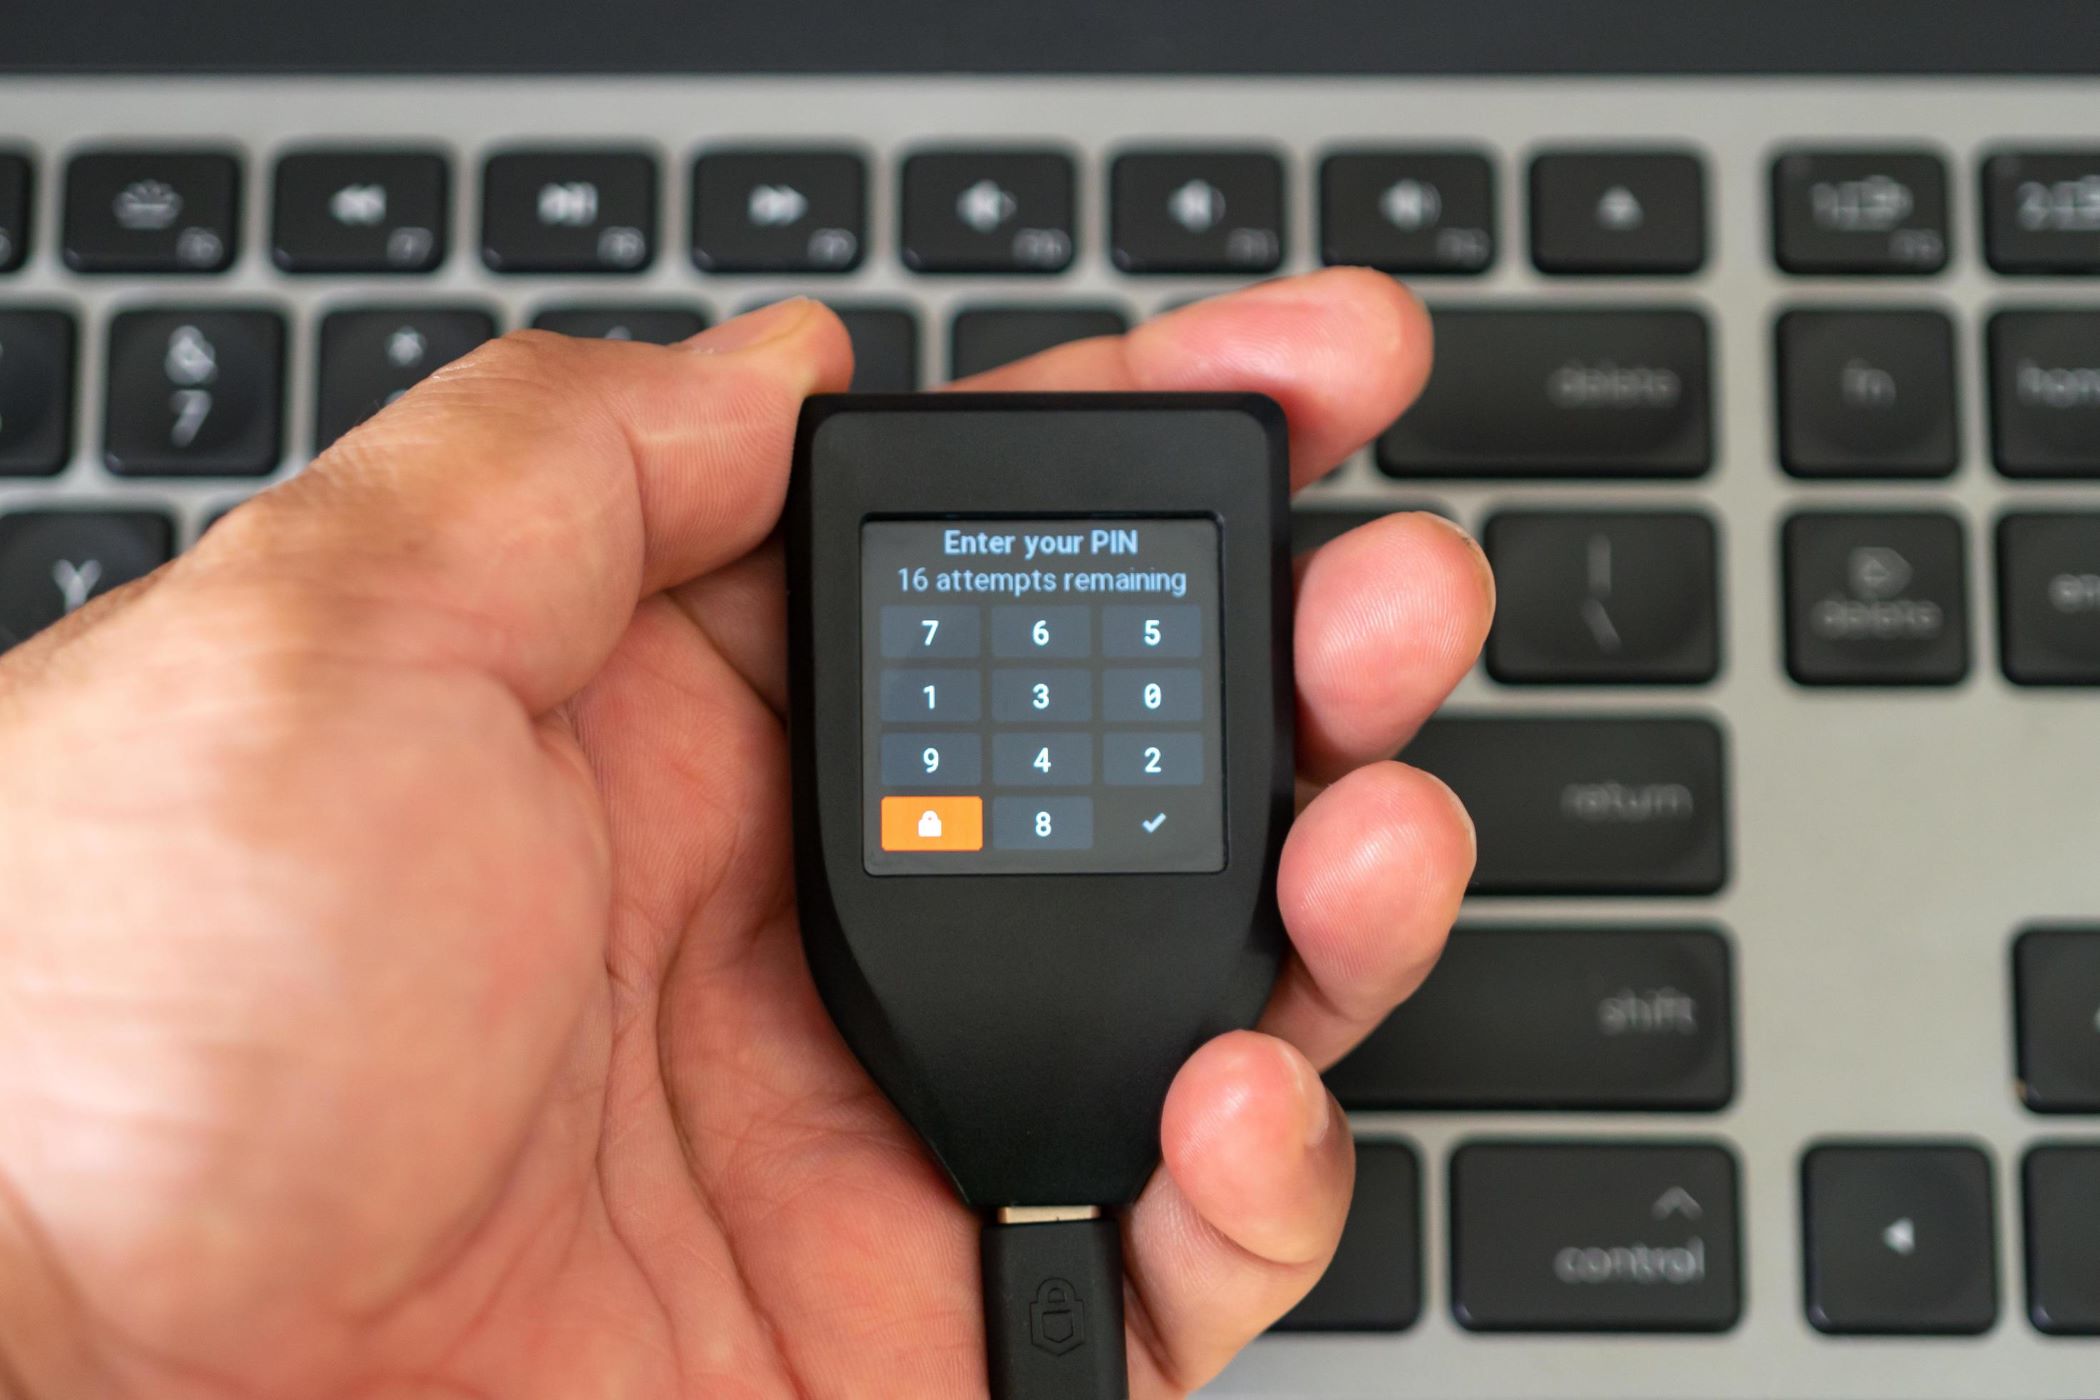
Step 5: Set a Secure PIN
Setting a secure PIN is an important step in securing your hardware wallet and protecting your cryptocurrencies. Follow these steps to set a strong and unique PIN:
1. Access the Security Settings
Open the wallet software on your computer or mobile device and navigate to the security settings section. This may be labeled as “Security,” “PIN,” or something similar.
2. Choose a Strong PIN
Select a PIN that is unique and difficult for others to guess. Avoid using common sequences (e.g., 1234) or personal information like birthdays. A strong PIN should be a combination of numbers, letters, and symbols.
3. Consider PIN Length
Choose a PIN length that is appropriate for your hardware wallet. Some wallets may support PINs of 4 digits, while others allow for longer PINs. Generally, the longer the PIN, the more secure it is.
4. Use Alphanumeric Characters (if available)
If your hardware wallet supports the use of alphanumeric characters in the PIN, consider adding letters or symbols to increase the complexity. This adds an extra layer of security to your PIN.
5. Avoid Common Sequences
Avoid using simple or common sequences such as consecutive numbers or repeating digits (e.g., 1111). These can be easily guessed or deduced, compromising the security of your hardware wallet.
6. Memorize Your PIN
Once you have set a secure PIN, make sure to memorize it. Avoid writing it down or storing it in easily accessible locations, as this can increase the risk of someone else discovering your PIN.
7. Set PIN Timeout (if available)
Some hardware wallets offer a PIN timeout feature, where the device locks itself after a certain period of inactivity. Enable this feature if available to provide an additional layer of protection against unauthorized access.
8. Test Your PIN
After setting your PIN, it’s a good practice to test it to ensure it works correctly. Enter your PIN on the hardware wallet or software interface and make sure it provides access to your cryptocurrency holdings.
By setting a secure PIN, you add an extra layer of protection to your hardware wallet and safeguard your cryptocurrencies from unauthorized access. Remember to keep your PIN confidential and avoid sharing it with anyone.
Step 6: Write Down Your Recovery Seed
Writing down your recovery seed is a critical step in securing your hardware wallet and ensuring you can recover your funds in case of loss or damage to the device. Follow these steps to properly record your recovery seed:
1. Prepare the Materials
Gather a pen and a piece of paper or a designated recovery seed card that is included with your hardware wallet. Ensure that you have a clean and secure writing surface.
2. Access the Recovery Seed
Open the wallet software on your computer or mobile device and navigate to the recovery seed section. This may be labeled as “Backup” or “Recovery Seed.”
3. Write Down the Seed
Write down the recovery seed on the paper or recovery seed card provided. Be sure to write each word in the correct order as displayed on the screen. Take your time to make sure each word is copied accurately.
4. Use a Pen (Not a Pencil)
When writing down the recovery seed, use a pen rather than a pencil. This ensures that the seeds cannot be easily erased or tampered with, providing an extra layer of protection.
5. Write Neatly and Legibly
Write each word of the recovery seed neatly and legibly. This will make it easier for you to read and recover your wallet if necessary. Avoid smudging or overlapping words to ensure clarity.
6. Do Not Take a Photo or Make a Digital Copy
Avoid taking a photo or making a digital copy of your recovery seed. By keeping it offline and in physical form, you reduce the risk of it being compromised by hackers or cyber attacks.
7. Store the Recovery Seed Securely
Keep the written recovery seed in a secure location, such as a safe deposit box, a lockbox, or a hidden and fireproof safe at home. Ensure it is protected from potential damage, theft, or unauthorized access.
8. Avoid Storing Digitally or Online
Avoid storing a digital copy of your recovery seed on your computer, mobile device, or in any online storage. Digital storage can be vulnerable to hacking, malware, or unauthorized access, compromising the security of your recovery seed.
By taking the time to write down and securely store your recovery seed, you can ensure that you have a backup plan in place to recover your wallet and access your funds if your hardware wallet is lost, stolen, or damaged.
Step 7: Confirm Your Recovery Seed
Confirming your recovery seed is a crucial step in ensuring the accuracy and validity of your backup. Follow these steps to properly verify your recovery seed:
1. Find a Secure and Quiet Location
Choose a secure and quiet location where you can concentrate without distractions. This will allow you to focus and accurately confirm your recovery seed.
2. Gather the Materials
Gather the paper or recovery seed card where you recorded your recovery seed and keep it ready for the verification process. Ensure that you have a pen or marker available for marking the confirmed words.
3. Open the Wallet Software
Launch the wallet software on your computer or mobile device. Make sure your hardware wallet is connected and recognized by the software.
4. Navigate to the Recovery Seed Confirmation Section
Within the wallet software, locate the section or option that allows you to confirm your recovery seed. This is usually labelled as “Verify Recovery Seed” or something similar.
5. Enter the Words in the Correct Order
On the wallet software, you will be prompted to enter the words of your recovery seed in the correct order. Start from the first word and continue until you have entered all the words of your recovery seed.
6. Verify Each Word Carefully
Carefully compare each word you enter with the original recovery seed you recorded. Pay close attention to the spelling and the order of the words. Ensure that there are no typos or errors when entering the seed.
7. Mark the Confirmed Words
As you confirm each word, mark it on the paper or recovery seed card to keep track of your progress. This helps prevent any confusion or repetition during the verification process.
8. Double-Check Your Confirmation
After entering all the words, review your confirmation to ensure that every word matches the recorded recovery seed. Double-check for any mistakes or discrepancies.
9. Store the Confirmation Securely
Keep the confirmation of your recovery seed in a secure location, together with the recorded recovery seed. Ensure that both are protected from potential damage, theft, or unauthorized access.
By carefully confirming your recovery seed, you can ensure that your backup is accurate and reliable. This verification process adds an extra layer of security and ensures that you can successfully restore your wallet in the event of loss or damage to your hardware device.
Step 8: Customize Your Wallet Settings
Customizing your wallet settings allows you to personalize your cryptocurrency management experience and tailor it to your specific preferences. Follow these steps to customize your wallet settings:
1. Open the Wallet Software
Launch the wallet software on your computer or mobile device. Ensure that your hardware wallet is connected and recognized by the software.
2. Navigate to the Settings Section
Within the wallet software, look for the settings section or menu. This is usually indicated by a gear or cogwheel icon.
3. Explore General Settings
Review the general settings options available to you. This may include options to change display preferences, currency units, language settings, and other general configuration options.
4. Set Transaction Preferences
Adjust the transaction preferences to fit your needs. This may involve choosing the desired transaction fee level, enabling or disabling certain features or protocols, and setting default transaction confirmation settings.
5. Enable Security Features
Activate any additional security features available in the wallet software. This could include activating two-factor authentication (2FA), biometric authentication (such as fingerprint or facial recognition), or setting up additional password protection.
6. Review Privacy Settings
Consider the privacy settings available and adjust them to your desired level of privacy. This may include options to enable or disable address reuse, manage privacy-enhancing features, or control the visibility of transaction history.
7. Explore Notification Settings
Check the notification settings to determine how you would like to be notified about wallet activities and transactions. You may have options to adjust email notifications, push notifications on mobile devices, or alerts within the software interface.
8. Set Automatic Backup and Updates
Enable automatic backups and software updates. This ensures that your wallet and its functionalities are always up to date and that your data is backed up regularly in case of hardware or software failures.
9. Save and Apply Changes
Once you have customized the desired settings, save your changes and apply them. Some changes may require you to restart the wallet software for the modifications to take effect.
10. Regularly Review and Update Settings
As you continue to use your wallet, make it a habit to review and update your settings periodically. This allows you to fine-tune your preferences and adapt to any changes in security or feature enhancements.
By customizing your wallet settings, you can create a personalized and tailored cryptocurrency management experience. Take advantage of the available options to enhance security, privacy, and usability in a way that aligns with your specific requirements and preferences.
Step 9: Fund Your Hardware Wallet
Once you have set up and customized your hardware wallet, it’s time to fund it with your chosen cryptocurrencies. Follow these steps to safely and securely fund your hardware wallet:
1. Choose Your Funding Method
Decide on the method you will use to transfer funds to your hardware wallet. This may involve purchasing cryptocurrencies from an exchange, receiving them from another wallet, or participating in a token sale or airdrop.
2. Select the Cryptocurrencies to Transfer
Determine which cryptocurrencies you want to transfer to your hardware wallet. Check if your chosen wallet supports those specific cryptocurrencies.
3. Generate a Receiving Address
In your hardware wallet’s software interface, look for the option to generate a receiving address for the cryptocurrency you wish to transfer. This address will be used to receive the funds.
4. Copy the Receiving Address
Copy the generated receiving address, either by clicking on it or using the provided copy feature. Ensure that you have copied the address correctly and completely.
5. Initiate the Transfer
Access the platform or wallet from where you want to send the funds. Fill in the recipient address field with the receiving address copied from your hardware wallet software.
6. Enter the Transfer Amount
Specify the amount of cryptocurrency you want to transfer to your hardware wallet. Double-check that the amount is accurate before proceeding.
7. Verify Transaction Details
Review the transaction details, including the recipient address and transfer amount, to ensure they are correct. Take note of any network fees or confirmation requirements.
8. Confirm the Transfer
Follow the instructions on the platform or wallet to confirm and authorize the transfer. This may involve providing additional security credentials or confirming the transaction through your hardware wallet’s interface.
9. Monitor the Transfer Progress
Monitor the progress of the transfer to ensure it is successfully processed. Depending on the network congestion and confirmation times, it may take some time for the funds to be reflected in your hardware wallet.
10. Verify the Funds in Your Wallet
Once the transfer is complete, check your hardware wallet’s software interface to verify that the funds have arrived. You should see the updated balance reflecting the transferred amount.
By following these steps, you can securely transfer funds to your hardware wallet, ensuring that your cryptocurrencies are stored safely and under your control. Remember to always double-check the recipient address and transfer details to avoid any errors or lost funds.
Step 10: Test Your Hardware Wallet
Testing your hardware wallet is an important final step to ensure that it is functioning properly and that you have set it up correctly. Follow these steps to effectively test your hardware wallet:
1. Ensure a Secure Testing Environment
Choose a secure and private environment to conduct the testing. Make sure you are using a trusted computer or mobile device that is free from malware or other security threats.
2. Connect Your Hardware Wallet
Connect your hardware wallet to the computer or mobile device using the provided USB cable. Ensure the connection is secure and that the wallet is recognized by the wallet software.
3. Access the Wallet Software
Open the wallet software on your computer or mobile device and navigate to the section where you can view your cryptocurrency balances or wallet details.
4. Verify Wallet Balance
Check if the wallet software displays the correct balance for your cryptocurrencies. Ensure that the balance matches your expectation and the amount you transferred to your hardware wallet.
5. Create a Test Transaction
Initiate a test transaction from your hardware wallet. This may involve sending a small amount of cryptocurrency to another wallet or performing a test purchase on a supported platform.
6. Confirm the Transaction Details
Review the transaction details, including the recipient address, the transfer amount, and any network fees. Make sure all the information is accurate and matches your intention.
7. Confirm the Transaction on Your Hardware Wallet
Follow the instructions displayed on your hardware wallet’s screen to confirm and authorize the test transaction. This may involve pressing buttons or verifying details directly on the device itself.
8. Complete the Test Transaction
Once you have confirmed the test transaction on your hardware wallet, wait for the transaction to be processed and confirmed on the blockchain network. Monitor the progress and ensure that it is successfully completed.
9. Verify Receipt of Test Transaction
Check the receiving wallet or platform to confirm that the test transaction has been received. Ensure that the correct amount and the intended recipient address are reflected in the receiving wallet.
10. Repeat the Process (optional)
If desired, repeat the testing process with different cryptocurrencies or on different platforms to ensure consistent and reliable performance of your hardware wallet.
By thoroughly testing your hardware wallet, you can have confidence in its functionality and security. Testing allows you to verify that your wallet is correctly set up and that your transactions are being executed accurately. Remember to always practice caution and vigilance when testing and using your hardware wallet.
Step 11: Keep Your Hardware Wallet Secure
Keeping your hardware wallet secure is crucial to safeguarding your cryptocurrencies and protecting your investment. Follow these steps to ensure the security of your hardware wallet:
1. Store Your Hardware Wallet Safely
When not in use, store your hardware wallet in a secure place, such as a locked drawer, a safe, or a safety deposit box. Keep it away from potential theft or damage.
2. Use a Strong Password or PIN
Set a strong and unique password or PIN for your hardware wallet. Avoid using easily guessable combinations and ensure that only you know the password or PIN.
3. Enable Additional Security Features
Take advantage of any additional security features offered by your hardware wallet, such as two-factor authentication (2FA) or biometric authentication. These extra layers of security help protect your funds from unauthorized access.
4. Protect Your Recovery Seed
Keep your recovery seed in a secure and private location. Store it separately from your hardware wallet, ideally in a fireproof and waterproof safe or a bank safety deposit box.
5. Be Cautious with Public Wi-Fi
Avoid connecting your hardware wallet to public Wi-Fi networks, as they can pose security risks. Stick to trusted and secure internet connections when accessing your wallet and performing transactions.
6. Beware of Phishing Attempts
Be vigilant for phishing attempts that may try to trick you into revealing your wallet information. Always verify the authenticity of the website or communication before entering any sensitive information.
7. Regularly Update Firmware and Software
Ensure that your hardware wallet’s firmware and wallet software are up to date. Manufacturers often release important security patches and updates to enhance the overall security of the device.
8. Use Dedicated Devices
Avoid using your hardware wallet on shared or public devices. Dedicate a specific computer or mobile device for interacting with your wallet to reduce the risk of malware or keylogging.
9. Keep Backup Options in Mind
Always have a plan for restoring your wallet in case of loss or damage to your hardware wallet. Maintain multiple backups of your recovery seed and ensure they are securely stored.
10. Stay Informed and Educated
Stay updated with the latest developments in cryptocurrency security and best practices. Regularly educate yourself on new threats and ways to enhance the security of your hardware wallet.
By following these steps, you can significantly reduce the risk of unauthorized access and keep your cryptocurrencies safe. Remember that the security of your investments relies heavily on your own vigilance and proactive measures.
Step 12: Back Up Your Wallet Regularly
Regularly backing up your wallet is essential to ensure that you can recover your funds in the event of loss, theft, or damage to your hardware wallet. Follow these steps to create regular backups of your wallet:
1. Understand the Importance of Backups
Recognize the critical role that backups play in protecting your cryptocurrencies. Backups serve as a fail-safe measure to restore access to your funds if your hardware wallet is lost, stolen, or compromised.
2. Identify the Backup Method
Determine the backup method supported by your hardware wallet. Most wallets provide different options, including writing down your recovery seed, creating encrypted backups, or using specialized backup software.
3. Follow Recovery Seed Best Practices
Ensure that you have securely stored your recovery seed in a safe and private location. Consider making multiple copies and storing them in separate secure places to guard against loss or damage.
4. Regularly Verify Your Recovery Seed
Periodically verify that your recovery seed is still accurate and accessible. Retrieve your recovery seed, check the order and spelling of the words, and make any necessary updates or corrections if needed.
5. Create Encrypted Backups (if available)
If your hardware wallet supports creating encrypted backups, take advantage of this feature. Encrypting your backup adds an extra layer of security, ensuring that your funds remain protected even if the backup falls into the wrong hands.
6. Use Backup Software (if available)
If your wallet offers backup software, consider using it to facilitate the backup process. Follow the instructions provided by the manufacturer, ensuring that you securely store the backup files in a safe location.
7. Set a Backup Schedule
Establish a regular backup schedule to ensure that your wallet is consistently and adequately backed up. Determine a frequency that works for you, whether it is daily, weekly, or monthly.
8. Test the Backup Restoration Process
Periodically test the backup restoration process to verify that your backups are working correctly. This ensures that you can successfully restore your wallet and access your funds if the need arises.
9. Keep Backups Offsite
Consider keeping an offsite backup of your wallet, such as storing it in a trusted cloud storage service or a secure offline location. This provides an additional layer of protection in case of physical loss or damage to your primary backups.
10. Update Backups After Significant Changes
Remember to update your backups whenever you make significant changes to your wallet, such as adding new cryptocurrencies or generating new addresses. Keeping your backups up to date ensures that you can always recover the most recent state of your wallet.
By regularly backing up your wallet, you can mitigate the risk of permanent loss of your funds. It is vital to stay proactive and diligent with your backups to maintain the security and accessibility of your cryptocurrencies.
Step 13: Update Your Wallet Firmware
Regularly updating your wallet firmware is crucial for maintaining the security and functionality of your hardware wallet. Firmware updates often include bug fixes, security enhancements, and new features. Follow these steps to update your wallet firmware:
1. Check for Firmware Updates
Visit the official website or check the wallet software for any available firmware updates. Look for the section or page dedicated to firmware updates and release notes.
2. Read the Release Notes
Review the release notes or changelog for the updated firmware version. Pay attention to any security fixes or feature enhancements that might be relevant to your wallet.
3. Follow the Manufacturer’s Instructions
Follow the instructions provided by the manufacturer to update the firmware of your hardware wallet. This may involve connecting your device to the computer, downloading and installing firmware update software, or following a step-by-step process.
4. Safely Disconnect and Reconnect Your Wallet
After completing the firmware update, safely disconnect your hardware wallet from the computer or mobile device. Power on the device and reconnect it to the wallet software to ensure a successful connection.
5. Verify Firmware Update
Access the wallet software and verify that the updated firmware version is correctly displayed. Some wallets may provide a “Firmware Version” or “Device Information” section where you can confirm the successful firmware update.
6. Review Settings and New Features
Take the time to review and update your wallet settings if needed. Check if there are any new features or options available with the updated firmware version and adjust your settings accordingly.
7. Familiarize Yourself with Changes
If there are substantial changes in the updated firmware, familiarize yourself with these modifications. Read the manufacturer’s documentation or support resources to understand any new functionalities or security considerations.
8. Stay Up to Date with Future Updates
Regularly check for future firmware updates. Manufacturers continuously improve and enhance their products, and regularly updating your firmware ensures that your wallet remains secure and optimized for the latest technologies.
9. Stay Secure with the Latest Patches
Updating your wallet firmware is vital for staying secure. Firmware updates often include patches for potential vulnerabilities identified by the manufacturer or the wider cryptocurrency community.
10. Contact Support if Issues Arise
If you encounter any issues during the firmware update process or experience problems after the update, contact the manufacturer’s support team. They can provide guidance and assistance to help resolve any difficulties.
By actively updating your wallet firmware, you ensure that your hardware wallet remains secure and up to date in an ever-evolving cryptocurrency landscape. Regular updates help protect your funds and provide you with access to the latest features and improvements offered by the wallet manufacturer.
Step 14: Use Your Hardware Wallet for Transactions
Using your hardware wallet for transactions allows you to securely send and receive cryptocurrencies while maintaining control over your private keys. Follow these steps to effectively use your hardware wallet for transactions:
1. Connect Your Hardware Wallet
Connect your hardware wallet to your computer or mobile device using the provided USB cable. Ensure that the connection is secure and that the wallet is recognized by the wallet software.
2. Open the Wallet Software
Launch the wallet software on your computer or mobile device. Make sure the hardware wallet is powered on and ready to use.
3. Navigate to the Transactions Section
Within the wallet software, find the section or option that allows you to initiate transactions. It may be labeled as “Send,” “Transfer,” or something similar.
4. Choose the Cryptocurrency to Send
Select the cryptocurrency you want to send from your available wallet balances. Make sure you have sufficient funds and confirm the transaction fees associated with the specific cryptocurrency network.
5. Enter the Recipient’s Address
Enter the recipient’s wallet address carefully. Double-check that the address is accurate and matches the intended recipient to avoid sending funds to the wrong destination.
6. Specify the Amount to Send
Specify the amount of cryptocurrency you want to send to the recipient. Ensure that the entered amount matches your intention, taking into account any applicable network fees.
7. Verify the Transaction Details
Review the transaction details shown on your hardware wallet’s screen and the wallet software interface. Ensure that the recipient address, transaction amount, and any fees are correct before proceeding.
8. Confirm the Transaction on Your Hardware Wallet
Follow the instructions displayed on your hardware wallet’s screen to confirm and authorize the transaction. This may involve pressing buttons or verifying details directly on the device itself.
9. Monitor the Transaction Progress
Once the transaction is confirmed, monitor its progress on the blockchain network. You can typically track the transaction’s status using blockchain explorers or within the wallet software itself.
10. Keep Your Hardware Wallet Secure
Disconnect your hardware wallet from the computer or mobile device after completing the transaction. Store it safely in a secure location to prevent unauthorized access.
By utilizing your hardware wallet for transactions, you ensure the secure transfer of your cryptocurrencies. Always double-check transaction details, pay attention to network fees, and stay vigilant to protect your funds and maintain control over your digital assets.
Step 15: Troubleshooting Common Issues
Even with the best preparations, you may encounter common issues when using a hardware wallet. Understanding how to troubleshoot these problems can help you quickly resolve them and ensure a smooth experience. Here are some common issues and troubleshooting steps:
1. Connection Issues
If your hardware wallet is not connecting to the wallet software, try the following troubleshooting steps:
– Ensure that your device is properly connected via a USB cable and the connection is secure.
– Restart both your computer or mobile device and your hardware wallet.
– Try using a different USB cable or a different USB port on your computer.
– Verify that you have the latest version of the wallet software installed.
– Check if there are any firmware updates available for your hardware wallet.
2. Screen Unresponsiveness
If the screen of your hardware wallet becomes unresponsive or freezes, follow these steps:
– Disconnect and reconnect your hardware wallet.
– Restart the device and try again.
– Ensure that the battery level of your hardware wallet is sufficient.
– Update the firmware of your hardware wallet if a newer version is available.
– Contact customer support if the issue persists or if there are any underlying hardware problems.
3. Incorrect Balance Display
If your hardware wallet is displaying an incorrect balance, consider the following steps:
– Confirm that you are using the latest version of the wallet software.
– Verify that you have the correct account selected within the wallet software.
– Check the transaction history on the blockchain explorer to ensure that your funds are still intact.
– Update the wallet software or firmware if there are any available updates.
– If the issue persists, reach out to the wallet manufacturer’s support team for assistance.
4. Forgotten PIN or Password
If you have forgotten your PIN or password, follow these recommendations:
– Consult the wallet manufacturer’s documentation or support resources for instructions on recovering or resetting your PIN or password.
– Some hardware wallets have built-in procedures for recovering access using the recovery seed.
– Be cautious of potential scams or unauthorized methods claiming to help recover your PIN or password. Stick to official resources and established procedures recommended by the manufacturer.
5. Missing or Invalid Recovery Seed
If you have lost or misplaced your recovery seed or are encountering issues with an invalid seed, consider the following suggestions:
– Safeguard your recovery seed and ensure it is stored securely in multiple locations.
– If your recovery seed is missing, consult the wallet manufacturer’s support for guidance on recovering access.
– Be aware that if you lose your recovery seed and access to your hardware wallet, it may be difficult or impossible to recover your funds.
For any persistent issues or concerns, it is advisable to contact the wallet manufacturer’s customer support. They have the expertise and knowledge to provide tailored assistance and ensure your hardware wallet is functioning correctly.