
How to Transfer Bitcoin to a Hardware Wallet
Transferring your Bitcoin to a hardware wallet is an essential step in ensuring the security of your cryptocurrency holdings. By storing your Bitcoin on a hardware wallet, you eliminate the risk of online hacks and theft. Here’s a step-by-step guide on how to transfer Bitcoin to a hardware wallet:
- Choose the Right Hardware Wallet: There are various hardware wallets available in the market, such as Ledger Nano S, Trezor, and KeepKey. Research and select the wallet that best suits your needs in terms of security features, compatibility, and ease of use.
- Create a Bitcoin Wallet on Your Hardware Wallet: Once you’ve obtained your hardware wallet, follow the instructions provided by the manufacturer to set it up. This typically involves connecting the device to your computer or mobile device and installing the required software.
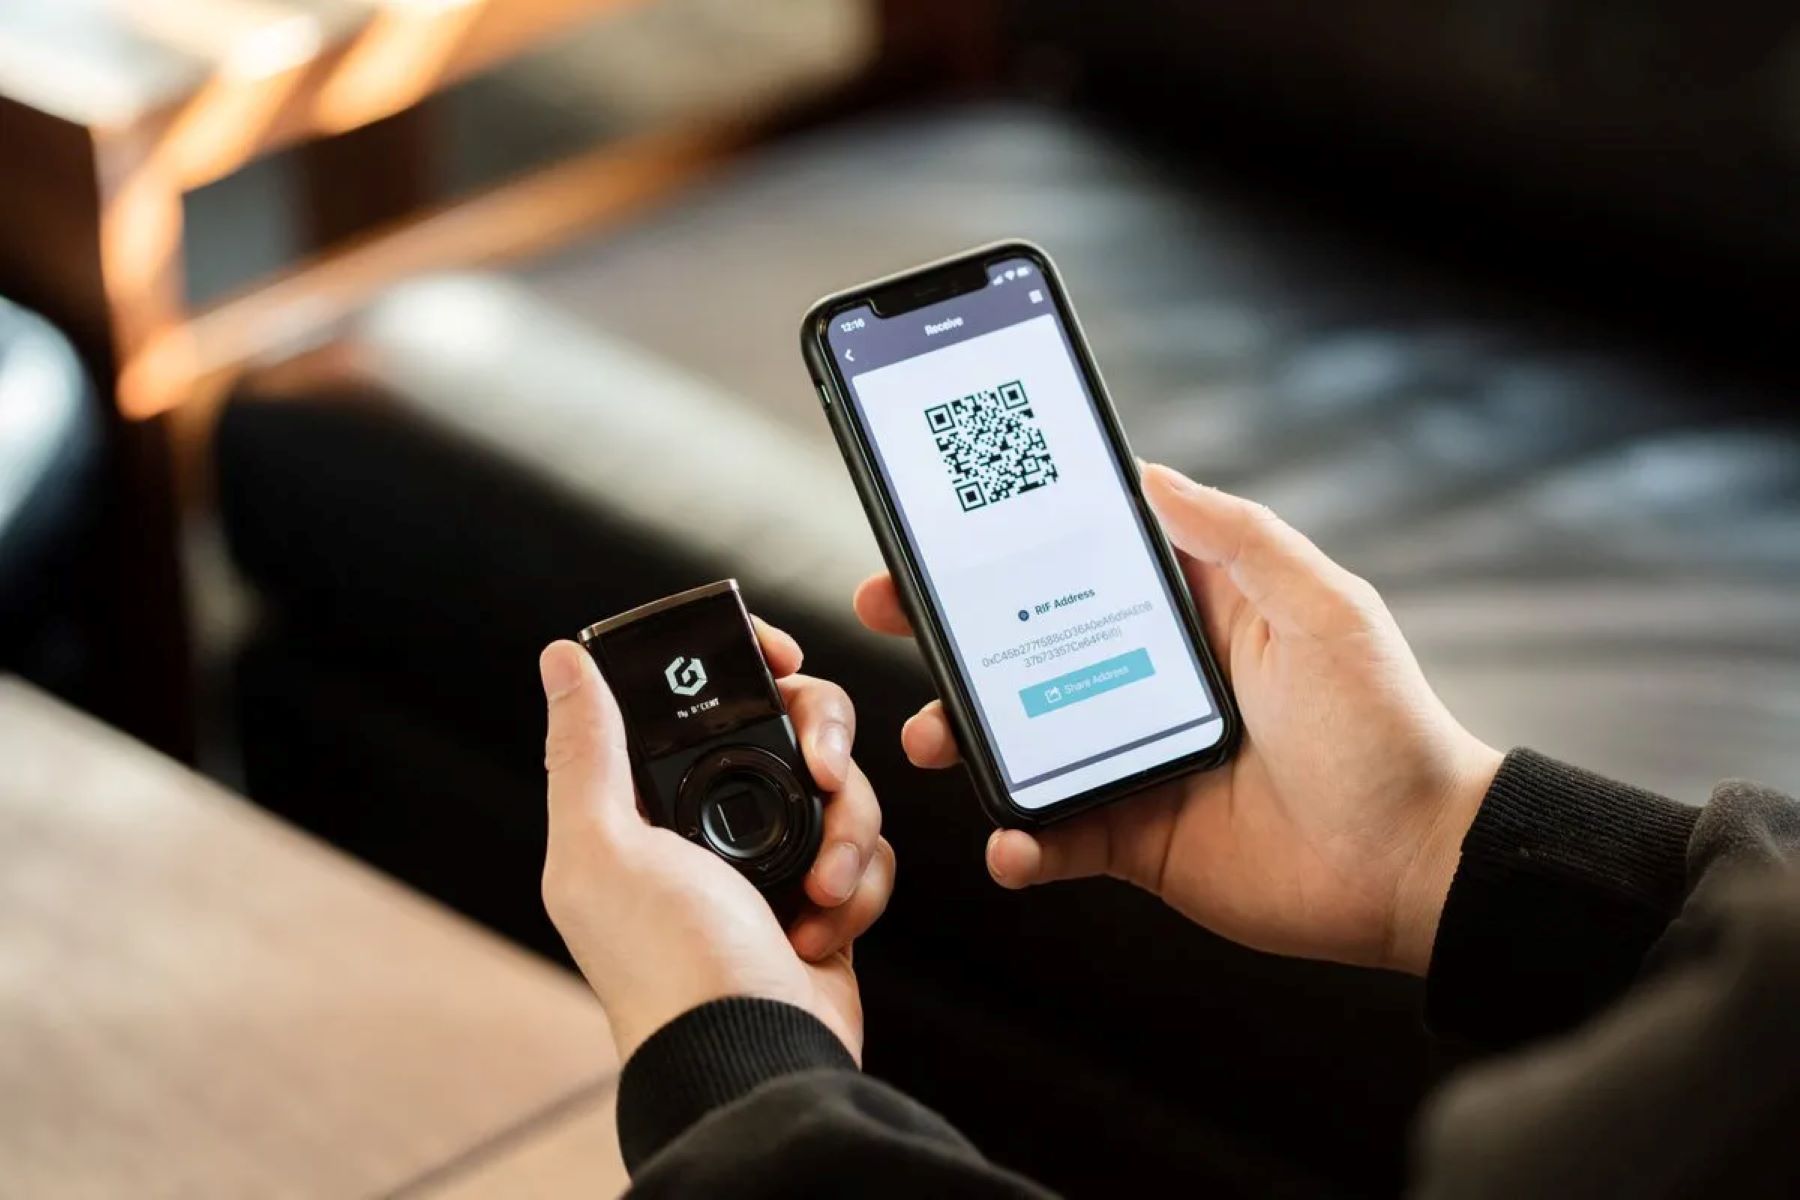
- Access Your Bitcoin Wallet on Your Hardware Wallet: After setting up your hardware wallet, you’ll be provided with a unique wallet address. This address acts as your personal identifier for receiving Bitcoin. Make sure to securely store this address as you’ll need it to initiate the transfer.
- Initiate the Transfer from Your Exchange Wallet: Log in to your cryptocurrency exchange account where your Bitcoin is currently held. Locate the “Withdraw” or “Send” option and enter the wallet address from your hardware wallet as the destination for the transfer. Double-check the address to ensure its accuracy and confirm the transaction.
- Confirm the Transaction on Your Hardware Wallet: Once you’ve initiated the transfer, your hardware wallet will display the details of the transaction. Verify the recipient address, the amount of Bitcoin being transferred, and any applicable fees. To complete the transaction, confirm it directly on your hardware wallet.
- Verify the Bitcoin Transfer on the Blockchain: After confirming the transaction on your hardware wallet, it will be broadcasted to the Bitcoin network. You can track the progress of the transfer by searching for the transaction ID on a blockchain explorer. Wait for the transaction to be confirmed, which usually takes a few minutes to an hour.
- Store Your Hardware Wallet Securely: Once the transfer is confirmed, ensure the safety of your hardware wallet by storing it in a secure location. Consider using a safe or a safety deposit box to protect it from theft, loss, or damage. Remember to also keep your backup seed phrase in a separate location.
By following these steps, you can transfer your Bitcoin to a hardware wallet with ease and ensure the long-term security of your digital assets. Enjoy the peace of mind that comes with knowing your Bitcoin is safely stored offline and under your control.
Choosing the Right Hardware Wallet
When it comes to securing your Bitcoin, choosing the right hardware wallet is crucial. With the increasing popularity of cryptocurrencies, the market is flooded with various hardware wallet options. Here are some factors to consider when selecting the right hardware wallet for your needs:
- Security Features: The primary purpose of a hardware wallet is to provide a secure storage solution for your Bitcoin. Look for wallets that utilize advanced security features, such as secure elements and PIN/password protection. Additionally, consider wallets that offer features like multi-signature support and passphrase encryption for added layers of security.
- Compatibility: Ensure that the hardware wallet you choose is compatible with your operating system and the cryptocurrencies you intend to store. Most wallet manufacturers provide software for Windows, macOS, Linux, iOS, and Android. It’s essential to confirm compatibility to avoid any compatibility issues during set up or usage.
- User-Friendliness: Look for a hardware wallet that offers a user-friendly interface and straightforward setup process. The wallet should be intuitive, making it easy for both beginners and experienced users to navigate through the features. An intuitive interface can minimize the chances of making costly mistakes during the transfer or management of your Bitcoin.
- Reputation and Reviews: Research the reputation of the hardware wallet manufacturer before making a purchase. Consider reading reviews and feedback from other users to gauge the reliability and customer satisfaction associated with the wallet. Look for well-established companies with a track record of providing quality hardware wallets and excellent customer support.
- Price: Hardware wallets come with varying price points. While cost shouldn’t be the sole deciding factor, it’s important to find a balance between affordability and quality. Consider the features, security level, and customer support offered by the wallet manufacturer when evaluating the price of the hardware wallet.
- Backup and Recovery Options: Accidental loss or damage to your hardware wallet can result in the loss of your Bitcoin. Look for wallets that offer robust backup and recovery options, such as the ability to generate a recovery seed phrase. This seed phrase can be used to restore access to your wallet in case of loss or theft of the hardware device.
By carefully considering these factors, you can choose a hardware wallet that aligns with your security needs, usability preferences, and budget. Remember that the ultimate goal is to protect your Bitcoin from potential threats and ensure peace of mind when it comes to the security of your digital assets.
Step-by-Step Guide to Transferring Bitcoin to a Hardware Wallet
Transferring your Bitcoin to a hardware wallet is a straightforward process that requires a few simple steps. Here is a step-by-step guide to help you transfer your Bitcoin securely:
- Choose the Right Hardware Wallet: Research and select a hardware wallet that meets your security needs and is compatible with your operating system.
- Create a Bitcoin Wallet on Your Hardware Wallet: Set up your hardware wallet by following the manufacturer’s instructions. Generate a new Bitcoin wallet address to receive your transferred Bitcoin.
- Access Your Bitcoin Wallet on Your Hardware Wallet: Connect your hardware wallet to your computer or mobile device and access the wallet interface. Take note of your Bitcoin wallet address, as you will need it to initiate the transfer.
- Initiate the Transfer from Your Exchange Wallet: Log in to your cryptocurrency exchange account and navigate to the withdrawal or send Bitcoin section. Enter your hardware wallet’s Bitcoin address as the recipient.
- Confirm the Transaction Details: Verify the transaction details, including the amount of Bitcoin you want to transfer and any applicable fees. Double-check the accuracy of the recipient address.
- Confirm the Transfer on Your Hardware Wallet: Once you initiate the transfer from your exchange wallet, your hardware wallet will display the transaction details. Confirm the transaction directly on your hardware wallet to proceed.
- Monitor the Transaction: After confirming the transfer, the transaction will be broadcasted to the Bitcoin network. Use a blockchain explorer to track the progress of the transaction confirmations.
- Securely Store Your Hardware Wallet: Once the transfer is confirmed, safely store your hardware wallet in a secure location. Consider using a safe or safety deposit box to protect it from theft or damage.
By following these steps, you can transfer your Bitcoin to a hardware wallet with confidence. Remember to double-check all transaction details and securely store your hardware wallet to ensure the safety of your Bitcoin holdings.
Creating a Bitcoin Wallet on your Hardware Wallet
Creating a Bitcoin wallet on your hardware wallet is an essential step in securing your cryptocurrency holdings. Here’s a step-by-step guide to help you create a Bitcoin wallet on your hardware wallet:
- Choose the Right Hardware Wallet: Select a hardware wallet that supports Bitcoin and is compatible with your device’s operating system. Popular options include Ledger Nano S, Trezor, and KeepKey.
- Set Up Your Hardware Wallet: Follow the manufacturer’s instructions to set up your hardware wallet. Connect the device to your computer or mobile device and install the required software.
- Initialize the Wallet: On your hardware wallet, select the option to initialize or set up a new wallet. Set a strong PIN or password to protect your wallet from unauthorized access.
- Create a Recovery Seed: Your hardware wallet will generate a recovery seed, which is a series of 24 words. Write down the seed on a piece of paper and store it securely. This seed can be used to restore access to your wallet if your device is lost or damaged.
- Backup and Verify: After noting down the recovery seed, your hardware wallet will ask you to enter a selection of the words in a specific order to verify your backup. Follow the instructions to complete this step successfully.
- Generate a Bitcoin Wallet Address: Once your hardware wallet is set up and verified, it will generate a unique Bitcoin wallet address. This address is a combination of letters and numbers that can be shared with others to receive Bitcoin.
Once you have created a Bitcoin wallet on your hardware wallet, it is important to keep your PIN, recovery seed, and wallet address in a safe and secure location. Avoid sharing this information with anyone and be cautious of phishing attempts or scams.
Remember, the hardware wallet serves as a secure container for your Bitcoin, allowing you to store and manage your funds offline. By setting up a Bitcoin wallet on your hardware wallet, you gain full control over your private keys, ensuring the security and integrity of your cryptocurrency holdings.
Accessing Your Bitcoin Wallet on your Hardware Wallet
To access your Bitcoin wallet on your hardware wallet, you need to connect the device to your computer or mobile device and follow a few simple steps. Here’s a step-by-step guide on how to access your Bitcoin wallet on your hardware wallet:
- Connect Your Hardware Wallet: Plug in your hardware wallet to your computer or connect it via Bluetooth to your mobile device. Ensure that you have the required software installed on your device.
- Unlock Your Hardware Wallet: Power on your hardware wallet and enter the PIN or password that you set during the initial setup. This step is essential for securely accessing your Bitcoin wallet.
- Launch the Wallet Software/App: Open the wallet software or app that is specific to your hardware wallet manufacturer. This software will serve as your interface to access and manage your Bitcoin wallet.
- Select Bitcoin Wallet: Within the wallet software, locate and select the Bitcoin wallet. If you have multiple cryptocurrencies stored on your hardware wallet, make sure to specifically choose the Bitcoin wallet.
- Verify Wallet Balance: Once you’ve accessed your Bitcoin wallet, the wallet software/app will display your wallet balance and transaction history. Take a moment to confirm that the balance matches your expectation.
- View Bitcoin Wallet Address: In the wallet software/app, you can view your Bitcoin wallet address. This address is a combination of numbers and letters and is used to receive funds from others.
- Initiate Bitcoin Transactions: With access to your Bitcoin wallet on your hardware wallet, you can now initiate various transactions, including sending Bitcoin to others or receiving funds from external wallets.
- Disconnect and Secure Your Hardware Wallet: After you have completed your transactions, safely disconnect your hardware wallet from your computer or mobile device. Store the hardware wallet in a secure place, such as a safe or locked drawer, to protect it from unauthorized access.
By following these steps, you can securely access your Bitcoin wallet stored on your hardware wallet. Always ensure that you are using trusted and official wallet software/apps provided by the hardware wallet manufacturer to prevent potential scams or security risks.
Remember, accessing your Bitcoin wallet on your hardware wallet gives you control over your private keys and enhances the security of your funds. Regularly double-check the authenticity of the wallet software/app and keep your hardware wallet and access credentials secure to protect your Bitcoin from unauthorized access or loss.
Initiating the Transfer from your Exchange Wallet
To transfer your Bitcoin from your exchange wallet to your hardware wallet, you need to follow a few simple steps. Here is a step-by-step guide on how to initiate the transfer:
- Log in to Your Exchange Account: Access your cryptocurrency exchange account using your login credentials. Make sure you are using a reputable and secure exchange.
- Navigate to the Withdrawal/Send Bitcoin Section: Once logged in, locate the option to withdraw or send Bitcoin. The precise location of this option may vary depending on the exchange platform.
- Enter Your Hardware Wallet Address: In the withdrawal/sending section, you will be prompted to enter the recipient address. Copy and paste the Bitcoin wallet address generated by your hardware wallet into the appropriate field.
- Specify the Amount: Enter the amount of Bitcoin you want to transfer to your hardware wallet. Double-check the amount to ensure accuracy.
- Review Transaction Details: Before confirming the transfer, review the transaction details. Ensure that the recipient address matches the one associated with your hardware wallet and verify the transfer amount.
- Confirm the Transfer: Once you have reviewed and verified the transaction details, confirm the transfer. Depending on the exchange, you may need to enter a verification code or provide additional security measures as per the exchange’s protocols.
- Wait for Confirmation: After confirming the transfer, the exchange will process the transaction. Depending on the network congestion, it may take several minutes to an hour for the transaction to be confirmed on the Bitcoin network.
- Monitor the Transfer: You can monitor the progress of the transfer by using a blockchain explorer. Simply input the transaction ID or your hardware wallet address in the explorer to track the transaction’s confirmation.
By following these steps, you can initiate the transfer of Bitcoin from your exchange wallet to your hardware wallet. It’s important to exercise caution when copying and pasting the wallet address to ensure accuracy and prevent any loss of funds.
Remember to always use trustworthy and reputable exchanges and double-check all transaction details before confirming. By transferring your Bitcoin to a hardware wallet, you gain full control and ownership of your digital assets, improving security and reducing the risks associated with keeping your funds on an exchange.
Confirming the Transaction on your Hardware Wallet
Once you have initiated the transfer of Bitcoin from your exchange wallet to your hardware wallet, the next step is to confirm the transaction on your hardware wallet. This ensures that you have complete control over the process and provides an additional layer of security. Here’s a step-by-step guide on how to confirm the transaction on your hardware wallet:
- Connect Your Hardware Wallet: Plug in your hardware wallet to your computer or connect it via Bluetooth to your mobile device. Ensure that the wallet software/app is open and ready for use.
- Navigate to the Transaction Details: On your hardware wallet’s screen or in the wallet software/app, locate the transaction details for the Bitcoin transfer that you initiated from your exchange wallet.
- Verify the Transaction Details: Take a moment to carefully review the transaction details, including the recipient address, the amount of Bitcoin being transferred, and any applicable fees. Confirm that everything matches your intention.
- Confirm the Transaction: Once you have verified the transaction details and ensured their accuracy, follow the on-screen instructions on your hardware wallet to confirm the transaction. This may involve pressing a button or entering a verification code, depending on your specific hardware wallet model.
- Wait for Confirmation: After confirming the transaction on your hardware wallet, the device will sign the transaction and broadcast it to the Bitcoin network. It may take some time for the transaction to be confirmed on the network, depending on the network congestion and the transaction fees you opted for.
- Monitor the Transaction Status: You can monitor the progress of the transaction by using a blockchain explorer or checking your hardware wallet’s transaction history. This allows you to track the confirmations and ensure the successful transfer of your Bitcoin.
By confirming the transaction on your hardware wallet, you are affirming that you authorize and validate the transfer from your exchange wallet to your hardware wallet. This additional step enhances the security of the transfer and ensures that you have complete control over your Bitcoin holdings.
Remember to keep your hardware wallet securely stored after confirming the transaction to protect it from unauthorized access. Verifying the transaction details on your hardware wallet provides peace of mind and strengthens the overall security and privacy of your Bitcoin transactions.
Verifying the Bitcoin Transfer on the Blockchain
Once you have confirmed the transaction on your hardware wallet, it is important to verify the transfer on the blockchain. The blockchain serves as a public ledger that records all Bitcoin transactions. Verifying the transaction on the blockchain provides transparency and ensures the successful transfer of your Bitcoin. Here’s a step-by-step guide on how to verify the Bitcoin transfer on the blockchain:
- Obtain the Transaction ID: Retrieve the transaction ID from your hardware wallet or exchange platform. This unique identifier is a hexadecimal string that uniquely identifies your transaction on the blockchain.
- Use a Blockchain Explorer: Open a blockchain explorer, such as blockchain.com, blockchair.com, or explorer.btc.com, in your web browser. These tools allow you to search and view specific transactions on the Bitcoin network.
- Enter the Transaction ID: Enter the transaction ID in the search bar of the blockchain explorer. Double-check the accuracy of the ID to ensure you’re viewing the correct transaction.
- View Transaction Details: Once you submit the transaction ID, the blockchain explorer will display the details of the transaction. This includes information such as the sender and recipient addresses, the amount transferred, and the transaction confirmation status.
- Look for Confirmations: Confirmations indicate the number of times the transaction has been included in successfully mined blocks. Each confirmation increases the level of security and immutability of the transaction. It is generally recommended to wait for at least 6 confirmations for a transaction to be considered fully confirmed.
- Verify Transaction Success: By checking the confirmations, you can ensure that the Bitcoin transfer from your exchange wallet to your hardware wallet has been successfully completed. If the transaction has the desired number of confirmations, it demonstrates the successful transfer of your Bitcoin.
Verifying the Bitcoin transfer on the blockchain allows you to independently confirm the transaction’s authenticity and ensure it has been successfully processed. It provides a transparent and immutable record of your transaction on the decentralized Bitcoin network.
Remember to keep your transaction ID and other transaction details private and secure. By verifying the transaction on the blockchain, you can have confidence in the integrity of your Bitcoin transfer and ensure the accuracy of your digital asset holdings.
Storing your Hardware Wallet Securely
Once you have transferred your Bitcoin to a hardware wallet, it is important to store the device securely to protect your digital assets. The following are some key tips to help you keep your hardware wallet safe:
- Choose a Secure Location: Select a secure and preferably fireproof location to store your hardware wallet. Consider using a safe, safety deposit box, or a hidden compartment in your home. The goal is to ensure that it is protected from theft, loss, or damage.
- Avoid Keeping it in Plain Sight: Do not leave your hardware wallet lying around where it is easily visible or accessible. Storing it out of sight reduces the risk of it being targeted for theft.
- Keep it Offline: Disconnect your hardware wallet from your computer or mobile device when not in use. This prevents potential remote attacks and minimizes the risk of unauthorized access to your Bitcoin wallet.
- Backup your Recovery Seed: Safely and securely store the recovery seed (24-word phrase) provided by your hardware wallet. Consider using a secure and offline method, such as writing it down on paper and keeping it in a separate location from your hardware wallet. This ensures that you can recover your wallet if the device is lost, damaged, or stolen.
- Protect it from Physical Damage: Handle your hardware wallet with care to avoid physical damage. Keep it away from liquids, extreme temperatures, and strong magnetic fields, as these can potentially harm the device’s components or compromise its security.
- Enable Additional Security Features: Depending on the model of your hardware wallet, you may have additional security features available, such as passphrase protection or two-factor authentication. Enable these features if they are provided to add an extra layer of protection.
- Update Firmware and Software: Regularly check for firmware and software updates for your hardware wallet. These updates often include important security fixes and patches to address any vulnerabilities that may have been discovered.
- Test Wallet Recovery: Periodically practice recovering your wallet using the recovery seed phrase. This ensures that you have correctly stored and can successfully restore access to your Bitcoin wallet in case of emergencies or hardware failures.
By following these best practices for storing your hardware wallet, you can enhance the security of your Bitcoin holdings and minimize the risk of unauthorized access or loss. Remember to be diligent in protecting your hardware wallet and maintaining its security features regularly.
Tips for Keeping your Bitcoin Safe on a Hardware Wallet
Ensuring the security of your Bitcoin on a hardware wallet is of utmost importance. Here are some essential tips to help you keep your Bitcoin safe:
- Double-Check Addresses: Before initiating any transaction, verify the accuracy of the recipient address. It is crucial to avoid any typos or errors that could result in a loss of funds.
- Keep your Software Updated: Regularly update the firmware and software of your hardware wallet. These updates often include security enhancements and bug fixes that help protect against potential vulnerabilities.
- Protect your Recovery Seed: Safely store the recovery seed phrase that is provided by your hardware wallet. Keep multiple copies in separate secure locations and protect it from physical damage and unauthorized access.
- Enable Password/PIN/Passphrase Protection: Utilize the password, PIN, or passphrase protection features provided by your hardware wallet. This adds an extra layer of security, especially if your hardware wallet is lost or stolen.
- Use a Secure Computer/Mobile Device: Make sure you are using a clean and secure computer or mobile device when interacting with your hardware wallet. Avoid using public or insecure networks that may compromise the security of your transactions.
- Beware of Phishing Attempts: Be cautious of phishing attempts through emails, messages, or websites trying to obtain your wallet’s sensitive information. Only access your wallet through trusted sources and be wary of any suspicious communication.
- Implement Multi-Signature: Consider using multi-signature functionality when available. This requires multiple signatures to authorize transactions, adding an extra layer of security and reducing the risk of unauthorized access.
- Create a Separate Wallet for Daily Use: If you frequently transact with Bitcoin, consider using a separate wallet for day-to-day transactions. Keep a smaller amount on this wallet and the majority of your Bitcoin on a separate hardware wallet for long-term storage.
- Test in a Safe Environment: Before making large transactions or trying out new features, it is advisable to test the process in a safe environment, such as with a minimal amount or using a testnet, to ensure familiarity and avoid potential mistakes.
- Regularly Verify Balance and Transactions: Periodically review your hardware wallet’s balance and transaction history to ensure there are no unauthorized or suspicious activities. This helps in detecting and resolving any potential security breaches at an early stage.
By following these tips, you can significantly enhance the security of your Bitcoin on a hardware wallet. Remember, maintaining cyber hygiene practices, staying vigilant, and being proactive in safeguarding your assets are key to keeping your Bitcoin safe and secure.