
Setting Up a Group Email on Your iOS Device
Setting up a group email on your iPhone or iPad can be incredibly useful, especially when you need to send out the same message to multiple contacts. Fortunately, iOS offers a convenient way to create and manage groups right from the built-in Contacts app. Here’s how you can set up a group email on your iOS device:
1. Open the Contacts app on your iPhone or iPad.
2. Tap on the “+” icon to add a new contact.
3. Enter a name for your group, such as “Work Colleagues” or “Family Members”.
4. Tap on the newly created group to open its details.
5. Tap on “Add Contact” to add members to the group.
You can now start adding individual contacts to the group by selecting them from your existing contacts list. Repeat the process until you have added all the desired contacts to the group.
Once you have created a group, you can easily access it whenever you want to send an email to all the members. This eliminates the need to manually select each recipient every time you want to send a group email.
It is worth noting that creating a group email on your iOS device using the Contacts app only allows you to access the group on your device. If you want to sync the group across all your iOS devices or access it through iCloud, you will need to create the group using iCloud Contacts, which will be covered in a later section.
This method of setting up a group email on your iOS device is simple and effective, and it can save you a significant amount of time and effort when you need to communicate with multiple contacts simultaneously. Now that you have set up your group, let’s move on to learn how to add contacts to an existing group.
Using the Contacts App to Create a Group
The Contacts app on your iOS device provides a straightforward way to create a group and manage your contacts efficiently. Follow these steps to create a group using the Contacts app:
- Open the Contacts app on your iPhone or iPad.
- Tap on the “+” icon to add a new contact.
- Enter a name for your group, such as “Work Colleagues” or “Family Members”.
- Tap on the newly created group to open its details.
- Tap on “Add Contact” to add members to the group.
Now, you can start adding individual contacts to the group by selecting them from your existing contacts list. Simply scroll through your contacts, tap on the desired contacts, and they will be added to the group automatically. Repeat this process until you have added all the desired contacts to the group.
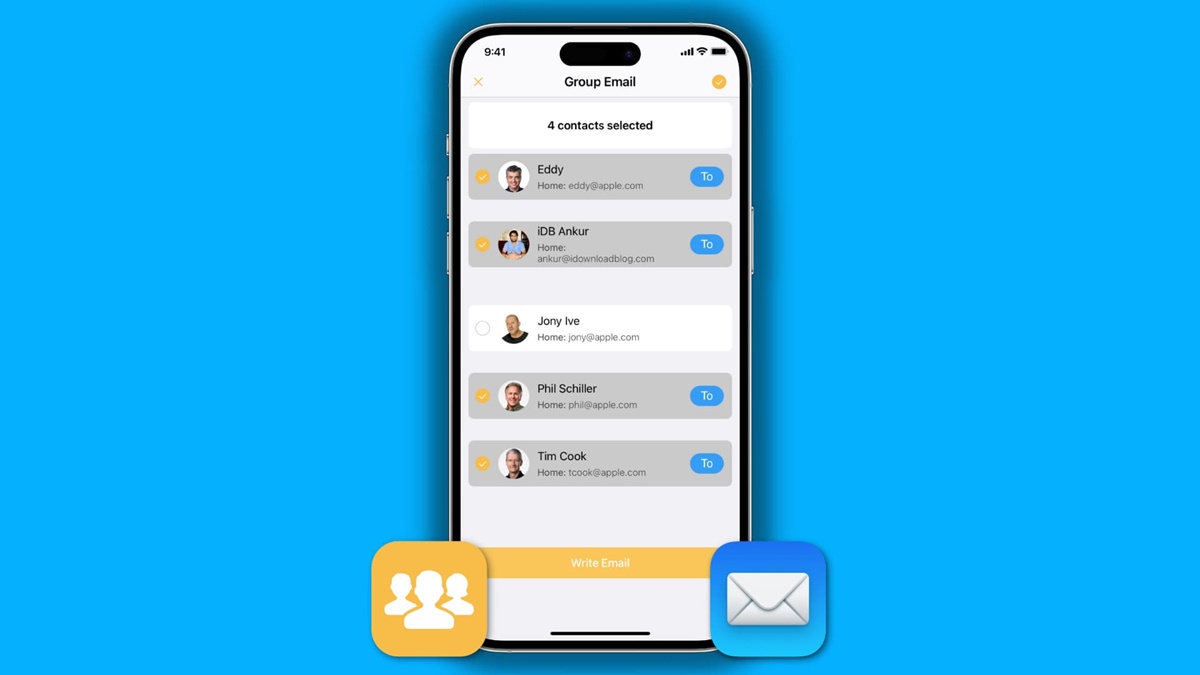
Once your group is created, you can easily access it whenever you want to send an email to all the members. Open the Mail app on your iOS device, compose a new email, and enter the group name in the recipient field. The group’s name should appear as a suggestion, simply tap on it to select the entire group as the recipient. This saves you the hassle of individually selecting each contact every time you want to send a group email.
It’s important to note that creating a group using the Contacts app only allows you to access the group on your device. If you want to sync the group across all your iOS devices or access it through iCloud, you will need to create the group using iCloud Contacts, which will be covered in a later section.
Utilizing the Contacts app to create a group enables you to efficiently manage your contacts, making sending group emails a breeze. Now that you know how to create a group using the Contacts app, let’s move on to learn how to add contacts to an existing group.
Adding Contacts to an Existing Group
Once you have created a group using the Contacts app on your iOS device, you can easily add new contacts to an existing group. This ensures that all relevant contacts are included when sending a group email. Follow these steps to add contacts to an existing group:
- Open the Contacts app on your iPhone or iPad.
- Tap on the group name to which you want to add contacts.
- Tap on the “Edit” button in the top right corner.
- Scroll through your contacts and tap on the ones you want to add to the group.
- Once you have selected all the desired contacts, tap on the “Done” button.
By following these steps, the selected contacts will be added to the existing group in your Contacts app. Now, whenever you want to send a group email, you can simply select the group’s name as the recipient, and all the added contacts will be included automatically.
It’s worth mentioning that you can also remove contacts from an existing group using the same editing feature in the Contacts app. Simply follow the steps above, but instead of selecting contacts to add, tap on the ones you want to remove from the group, and then tap on the “Done” button.
Using the Contacts app to add contacts to an existing group provides an effortless way to update your group and ensure that all relevant contacts are included. Now that you know how to add contacts to an existing group, let’s move on to the next section to learn how to send an email to a group.
Sending an Email to a Group
After setting up a group and adding contacts to it, you can easily send an email to the entire group using your iOS device. Here’s how to send an email to a group:
- Open the Mail app on your iPhone or iPad.
- Tap on the “Compose” button to create a new email.
- In the recipient field, type the name of the group you want to email.
- The group’s name should appear as a suggestion, simply tap on it to select the entire group as the recipient.
- Compose your email message.
- You can add attachments, format your text, and customize your email just like you would for an individual email.
- Once your email is ready, tap on the “Send” button to send it to all the members of the group.
Sending an email to a group saves you the hassle of individually selecting each contact every time you want to reach out to the entire group. It’s important to note that the Mail app sends separate emails to each recipient within the group, so each member will receive their own copy of the email.
Additionally, if any of the contacts in the group have multiple email addresses associated with them, the Mail app will prompt you to choose the appropriate email address for each recipient. This ensures that your email is delivered to the correct email account for each contact.
Now that you know how to send an email to a group, let’s explore how you can edit or delete a group if needed.
Editing or Deleting a Group
If you need to make changes to an existing group or remove it entirely, the Contacts app on your iOS device allows you to easily edit or delete a group. Here’s how you can do it:
To Edit a Group:
- Open the Contacts app on your iPhone or iPad.
- Select the group you want to edit.
- Tap on the “Edit” button in the top right corner.
- Make the desired changes to the group’s name or its member contacts.
- Tap on the “Done” button to save the changes.
By following these steps, you can easily update the name of the group or add/remove contacts as needed. This allows you to keep your group organized and up-to-date with the latest contact information.
To Delete a Group:
- Open the Contacts app on your iOS device.
- Select the group you want to delete.
- Tap on the “Edit” button in the top right corner.
- Scroll down to the bottom of the group’s details.
- Tap on the “Delete Group” button.
- Confirm the deletion by tapping on “Delete Group” again.
By following these steps, you can easily remove a group that is no longer needed. It’s important to note that deleting a group in the Contacts app removes the group and its name, but it does not delete the individual contacts within the group.
Now that you know how to edit or delete a group, let’s explore how to create groups in iCloud Contacts for syncing across all your devices.
Creating Groups in iCloud Contacts
If you want to create groups that sync across all your iOS devices and access them through iCloud, you can use iCloud Contacts to manage your groups. Here’s how you can create groups in iCloud Contacts:
- Open a web browser on your computer and go to iCloud.com.
- Sign in to your iCloud account using your Apple ID and password.
- Click on the “Contacts” app to open iCloud Contacts.
- In the bottom left corner, click on the “+” button to create a new contact.
- Enter a name for your group in the “Company” field.
- Click on the “Save” button to create the group.
By creating groups in iCloud Contacts, you ensure that these groups are accessible across all your iOS devices linked to the same iCloud account. This allows you to manage your groups seamlessly and maintain consistency across your devices.
To add contacts to a group in iCloud Contacts, follow these steps:
- Open iCloud Contacts on your computer.
- Click on the group name to which you want to add contacts.
- Click on the “+” button in the group details to add a new contact.
- Enter the contact details in the respective fields.
- Click on the “Done” button to save the contact.
Just like using the Contacts app on your iOS device, you can easily manage groups and add contacts within iCloud Contacts. This ensures that any changes made in iCloud Contacts will be reflected across all your iOS devices.
Now that you know how to create groups in iCloud Contacts, let’s move on to the next section to learn how to sync group emails across all your devices.
Syncing Group Emails Across All Your Devices
One of the advantages of using iCloud Contacts to create and manage your groups is the ability to sync group emails across all your iOS devices. This ensures that your group emails are accessible and up to date across all your devices. Here’s how you can sync group emails across all your devices:
1. Make sure you are signed in to the same iCloud account on all your iOS devices.
2. On each device, go to “Settings” and tap on your name at the top of the screen.
3. Tap on “iCloud” and make sure “Contacts” is toggled on.
4. Your groups and contacts will now sync across all your devices connected to the same iCloud account.
Once the syncing process is complete, any changes you make to your groups, such as adding or removing contacts, will be automatically reflected on all your devices. This ensures that you have access to the most up-to-date group email information wherever you go.
In addition to syncing group emails, iCloud also allows you to access your group contacts through iCloud.com. This means that even if you don’t have your iOS device with you, you can still manage and send group emails using a web browser on any computer.
Syncing group emails across all your devices provides a seamless and consistent experience, allowing you to effortlessly communicate with your groups no matter which device you are using. Now that you know how to sync group emails, let’s move on to the next section to troubleshoot common issues with group emails on iOS.
Troubleshooting Common Issues with Group Emails on iOS
While sending group emails on your iOS device is usually a smooth process, you may encounter some common issues along the way. Here are some troubleshooting tips to help you resolve these issues:
1. Group Not Appearing in Mail App:
If a group you created does not appear in the recipient suggestions when composing an email in the Mail app, try the following:
- Ensure that you have added contacts to the group.
- Restart the Mail app or your iOS device to refresh the contact suggestions.
- If the group was created in iCloud Contacts, ensure that your device is connected to the internet to sync the group.
2. Group Email Not Sending:
If you are unable to send a group email, consider the following troubleshooting steps:
- Check your internet connection to ensure you have a stable connection.
- Verify that the email addresses of the recipients are correct and properly formatted.
- Ensure that you have entered the group name correctly in the recipient field.
- Check the size of the email and ensure it does not exceed any limitations imposed by your email provider.
3. Group Email Arriving as Individual Emails:
If the recipients of your group email are receiving individual emails instead of a group email, try the following:
- Double-check that you have selected the group name as the recipient, rather than manually entering each contact separately.
- Verify that your device and email settings are not causing the group email to be split into individual messages.
- If using iCloud Contacts, make sure the group is correctly set up and synced across all devices.
4. Contacts Missing from a Group:
If some contacts are missing from a group, try the following troubleshooting steps:
- Confirm that the missing contacts have been added to the specific group in the Contacts app.
- Check if the missing contacts are part of another group that might be conflicting with the desired group.
- If using iCloud Contacts, ensure that the group is properly synced across all devices.
By following these troubleshooting tips, you can resolve common issues and enjoy a smooth experience when sending group emails on your iOS device. Now, let’s explore some alternative methods to sending group emails on iOS.
Alternatives to Group Emails on iOS
While group emails are a convenient way to communicate with multiple contacts simultaneously on your iOS device, there are alternative methods you can explore for sending messages to groups. Here are a few alternatives to group emails on iOS:
1. Group Messaging:
Instead of sending an email, you can use the group messaging feature on your iOS device. With group messaging, you can create a group chat and send messages, photos, and videos to all the members of the group. This allows for real-time, interactive communication among the group members.
2. Social Media Groups:
If the members of your group are active on social media, you can create a private group or a group chat on platforms like Facebook, WhatsApp, or Slack. This allows for easy communication, sharing of files and media, and collaboration within the group.
3. Collaboration Tools:
For more complex group communication and collaboration, you can use productivity and collaboration tools like Microsoft Teams, Google Workspace (formerly G Suite), or Asana. These tools offer features like group chats, shared calendars, task management, and document collaboration, making them ideal for teams or larger groups working together.
4. Contact Group Apps:
There are various apps available on the App Store that specialize in managing contact groups. These apps allow you to create, edit, and send messages to groups of contacts with ease. Some popular options include Groups by Qbix and Groupy.
Exploring these alternative methods can provide you with different communication and collaboration options depending on the needs of your group. While group emails remain a simple and effective way to communicate, these alternatives can offer additional features and flexibility for different scenarios.
Now that you are aware of these alternatives, you can choose the method that best suits the requirements of your specific group.