
Sign in to your Gmail account
Gmail is a widely used email service provided by Google. To send a file attachment with Gmail, the first step is to sign in to your Gmail account. Here’s how:
1. Open your preferred web browser and visit the Gmail website.
2. Enter your Gmail email address in the designated field and click “Next”.
3. Enter your account password in the corresponding field.
4. Click “Sign in” to access your Gmail account.
If you don’t have a Gmail account, you can easily create one by clicking on the “Create account” or “Sign up” option on the Gmail login page.
Once you have signed in to your Gmail account, you can proceed to compose a new email and attach a file to it. Gmail provides a user-friendly interface and convenient tools for sending file attachments, allowing you to share documents, images, videos, and more with ease.
Now that you know how to sign in to your Gmail account, let’s move on to the next step: composing a new email.
Compose a new email
Once you have signed in to your Gmail account, you can begin composing a new email to send your file attachment. Follow these steps:
1. On the main Gmail screen, locate and click on the “Compose” button. This will open a new email composition window.
2. In the “To” field, enter the recipient’s email address. You can add multiple recipients by separating their email addresses with commas.
3. If you want to add a subject to your email, click on the “Subject” field and type a brief description of your email’s content. This step is optional but recommended.
4. Next, you can begin typing the content of your email in the main body section. This is where you can provide any additional information or context related to the file attachment you are about to send.
5. If you wish to format your email’s text, use the formatting toolbar located above the main body section. Here, you can make the text bold, italic, underline it, change the font and size, and more.
6. If you want to include any other attachments in addition to the file you plan to send, click on the paperclip icon located below the formatting toolbar. This will allow you to attach multiple files to your email.
7. Once you have written your email and attached the necessary files, you can review it to ensure everything is in order. Take a moment to proofread and ensure your email conveys your intended message clearly.
Now that you have composed your email, let’s move on to the next step: attaching the file to your email.
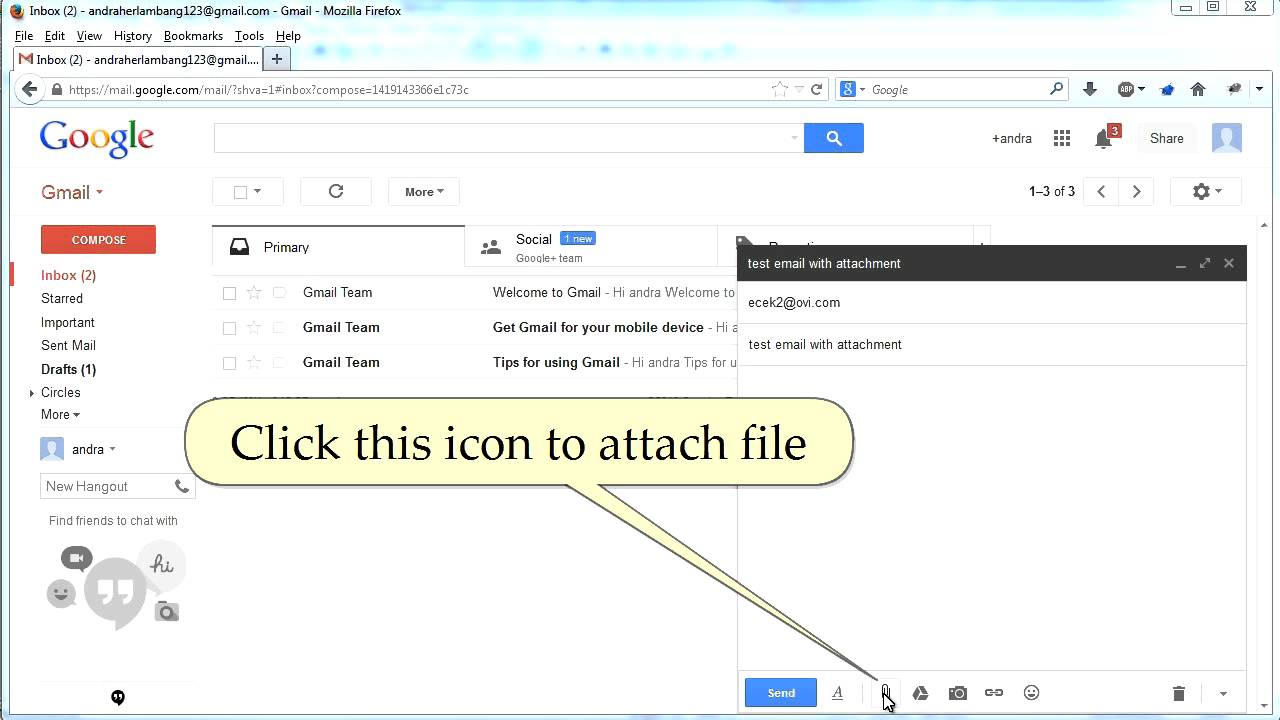
Click on the paperclip icon
Attaching a file to your email is a straightforward process in Gmail. Just follow these steps:
1. In the email composition window, locate the paperclip icon. The icon is typically located on the toolbar above the email body section, next to other formatting options.
2. Click on the paperclip icon. This will open a file browser window, allowing you to select the file you wish to attach.
3. Navigate to the location of the file on your computer. You can search for the file if you’re unsure of its exact location.
4. Once you’ve located the file, click on it to select it.
5. After selecting the file, click on the “Open” button in the file browser window. This will attach the file to your email.
6. Depending on the size of the file, it may take a moment to upload. Gmail will display a progress indicator to show the status of the file attachment.
7. Once the file has been successfully attached, you will see its name along with a paperclip icon in the email composition window.
8. If you want to attach additional files, you can repeat the process by clicking on the paperclip icon again and selecting another file.
It’s important to note that there are limits to the size of files you can attach in Gmail. The maximum file size allowed is 25 MB for regular Gmail accounts and up to 50 MB for Gmail’s paid business and education accounts. If your file exceeds these limits, you may need to consider alternative methods for sending large files, such as using file-sharing services or compressing the file to reduce its size.
Now that you have successfully attached the file to your email, it’s time to add a subject and message before sending it.
Select the file you want to attach
When attaching a file to your email in Gmail, it’s important to choose the correct file that you want to include with your message. Here’s how you can select the file you want to attach:
1. After clicking on the paperclip icon, a file browser window will appear.
2. In the file browser window, navigate to the folder or location where your desired file is stored. You can browse through different folders or use the search bar to find the file quickly.
3. Once you have located the file you want to attach, click on it to select it. Gmail accepts a wide range of file types, including documents (.doc, .docx, .pdf), images (.jpg, .png, .gif), videos (.mp4, .mov, .avi), and more.
4. You can select multiple files at once by holding down the Ctrl key (Cmd key on a Mac) while clicking on each file. This is useful if you need to attach multiple files to the same email.
5. After selecting the file(s), click on the “Open” button in the file browser window. This will attach the selected file(s) to your email.
6. Depending on the size of the file and your internet connection speed, it may take a few moments for the file to finish uploading to your email.
7. Once the file has been attached successfully, you will see its name displayed in the email composition window, along with a paperclip icon indicating that a file has been attached.
Make sure to double-check that you have selected the correct file before proceeding to the next steps. If you realize you have attached the wrong file, you can remove it by clicking on the small “X” icon next to the file name in the email composition window.
Now that you have successfully selected the file you want to attach, you can proceed to the next step: attaching the file to your email.
Attach the file to your email
Once you have selected the file you want to attach, the next step is to attach it to your email in Gmail. Here’s how you can do it:
1. After selecting the file, click on the “Open” button in the file browser window. This will attach the file to your email.
2. Depending on the size of the file and your internet connection, it may take a few moments for the file to finish uploading to your email. You will see a progress indicator to keep you informed about the uploading process.
3. Once the file has been successfully attached, you will see its name displayed in the email composition window, along with a paperclip icon indicating that a file has been attached.
4. If you want to attach additional files, you can repeat the process by clicking on the paperclip icon again and selecting another file.
5. If you need to remove a file that you have attached, simply click on the small “X” icon next to the file name in the email composition window.
6. It’s worth noting that Gmail imposes certain limitations on the size of file attachments. The maximum file size allowed is 25 MB for regular Gmail accounts, and up to 50 MB for Gmail’s paid business and education accounts. If your file exceeds these limits, you may need to consider alternative methods for sending large files, such as using file-sharing services or compressing the file to reduce its size.
7. Additionally, Gmail scans all file attachments for viruses or malware to ensure the security of both senders and recipients.
Now that you have successfully attached the file to your email, the next step is to add a subject and message before sending it.
Check the file size
When sending a file attachment with Gmail, it’s important to check the size of your file to ensure that it meets Gmail’s attachment limitations. Here’s how you can check the file size:
1. In the email composition window, locate the attached file. You will see the file name displayed along with a paperclip icon.
2. Right-click on the file and select “Properties” (Windows) or “Get Info” (Mac). This will open a window displaying detailed information about the file.
3. Look for the file size information in the properties or info window. The file size is usually displayed in bytes (B), kilobytes (KB), megabytes (MB), or gigabytes (GB).
4. Take note of the file size. Ensure that it is within the allowed limits for your Gmail account. Regular Gmail accounts have a maximum file size limit of 25 MB, while Gmail’s paid business and education accounts allow up to 50 MB for file attachments.
5. If your file exceeds the allowed size limit, you have a few options. First, consider compressing the file using compression software such as ZIP or RAR. This will reduce the file size without compromising its content. Alternatively, you can use file-sharing services or cloud storage platforms to share large files, such as Google Drive or Dropbox. These services allow you to share a link to the file instead of attaching it directly to the email.
Checking the file size is crucial to ensure that your email is successfully delivered without any issues. By keeping the file size within the allowed limits, you can avoid encountering errors or bouncing emails due to oversized attachments.
Now that you have checked the file size, let’s move on to adding a subject and message to your email.
Add a subject and message to your email
When composing an email in Gmail, it’s important to include a subject and message to provide context and clarity to your recipient. Follow these steps to add a subject and message to your email:
1. In the email composition window, locate the “Subject” field. This field is typically located below the recipient’s email address field.
2. Click on the “Subject” field, and type a brief and descriptive subject for your email. The subject should summarize the content or purpose of your email in a concise manner. This step is optional, but it is highly recommended to help your recipients understand the intent of your email.
3. Once you have added the subject, move to the main body section of the email composition window. This is where you can type your message to the recipient.
4. Begin by addressing the recipient with a courteous salutation, such as “Dear [Recipient’s Name]” or “Hello [Recipient’s Name]”.
5. In the body of the email, include your message. Be clear, concise, and specific in your communication. This is your opportunity to convey any necessary information or instructions related to the attached file. You can also personalize your message and add a friendly tone to establish rapport with the recipient.
6. If desired, you can further enhance your message by formatting the text using the formatting toolbar provided in the email composition window. Use features like bold, italics, bullet points, or numbered lists to make your message more visually appealing and organized.
7. Take a moment to review your subject and message to ensure accuracy, clarity, and professionalism. Double-check for any spelling or grammatical errors that may detract from your message.
8. If you wish to save a draft of your email to work on it later, you can click on the “Save draft” button located at the bottom of the email composition window.
Now that you have added a subject and message to your email, you are ready to send it with the file attachment. Let’s move on to the next step: sending your email.
Send your email with the file attachment
Once you have composed your email, added a subject, and attached the necessary file, the final step is to send your email in Gmail. Follow these steps to send your email with the file attachment:
1. Before sending, it’s always a good practice to review your email to ensure that everything is correct. Double-check the recipient’s email address, subject, message content, and file attachment to make sure they are accurate and complete.
2. If you need to make any changes, you can click on the “Edit” button at the bottom-left corner of the email composition window to go back and make the necessary modifications.
3. Once you are satisfied with your email, click on the “Send” button. It is located at the bottom-right corner of the email composition window and is represented by a paper airplane icon.
4. After clicking “Send”, Gmail will attempt to send the email with the file attachment to your recipient(s). You may briefly see a confirmation message indicating that your email has been sent successfully.
5. Depending on the file size, it may take a few moments for the email to be delivered. During this time, Gmail will display a progress indicator to show the status of the email delivery.
6. Once the email has been successfully sent, it will appear in your “Sent” folder, providing you with a record of the email you sent.
7. If you need to track the delivery or view the status of the email, you can enable the “Send and Track” feature in Gmail. This feature allows you to receive notifications when your recipient opens or interacts with your email.
Now that you have sent your email with the file attachment, you can proceed with other tasks or compose more emails as needed. Remember to check your “Sent” folder for a confirmation that your email was successfully delivered.
Preview your email before sending
Before sending your email with the file attachment in Gmail, it’s essential to take a moment to preview it. Previewing allows you to review the email’s content, formatting, attachments, and ensure that everything is in order. Here’s how you can preview your email:
1. In the email composition window, take a moment to read through your email’s content. Pay attention to the clarity and tone of your message. Ensure that the message effectively conveys the information you want to share with your recipient.
2. Check the subject line to verify that it accurately summarizes the purpose or topic of your email.
3. Review any formatting applied to the text, such as bold, italics, underlining, or bullet points. Confirm that the formatting enhances the readability and organization of your email.
4. Take a close look at any file attachments you have added to the email. Verify that the correct files are attached and that they will be relevant to your recipient’s needs.
5. Check for any spelling or grammatical errors that may have been missed during the composition process. Spotting and correcting these errors before sending will help maintain a professional and polished appearance.
6. If you have any doubts or concerns about the content or presentation of your email, consider seeking a second opinion from a colleague or friend. They may notice potential areas for improvement or provide valuable feedback.
7. Once you are satisfied that your email is accurate, clear, and well-constructed, proceed to the final step of sending it.
Previewing your email before sending is a crucial step to ensure professionalism and enhance the effectiveness of your communication. It allows you to catch errors or make improvements to your email to deliver the best possible message to your recipient.
Now that you have previewed your email and ensured its accuracy and quality, you are ready to send it with confidence.
Troubleshoot common issues with file attachments
While attaching files to emails in Gmail is usually a smooth process, there are some common issues that may arise. By familiarizing yourself with these issues and their solutions, you can troubleshoot any problems that may occur with file attachments. Here are some common issues and their troubleshooting steps:
1. File size exceeds the attachment limit: Gmail has a maximum file size limit of 25 MB for regular accounts and up to 50 MB for paid accounts. If your file exceeds these limits, consider compressing the file using software like ZIP or RAR, or use file-sharing services like Google Drive or Dropbox to share a link to the file instead.
2. Unsupported file format: Gmail supports a wide range of file formats. However, some formats may be blocked due to security reasons. If you encounter an unsupported file format, consider converting the file to a different format that is supported by Gmail.
3. Slow upload or attachment failure: If you experience slow upload or attachment failure, check your internet connection. A slow or unstable connection can cause issues with file attachments. Also, ensure that you have enough storage space in your Gmail account to accommodate the attachment.
4. File not opening or corrupted: If your recipient is unable to open the attached file or if they report that it appears corrupted, try re-attaching the file. It’s possible that the attachment may have been damaged during the upload or download process. Make sure to select a reliable method to transmit the file and verify its integrity before sending.
5. Virus warning: Gmail scans all file attachments for viruses or malware. If a file is detected to have malicious content, Gmail may block its delivery. If you believe the file is safe, you can upload it to a cloud storage service and share the link with your recipient instead.
6. Recipient unable to download the attachment: If your recipient is unable to download the attachment, it may be due to compatibility issues or network restrictions. In this case, you can try sending the attachment in a different format or provide alternative download options.
By being aware of these common issues and their troubleshooting steps, you can address any problems that may arise when attaching files to your emails in Gmail. Remember to double-check the attachments before sending to ensure a smooth and successful delivery of your files.