
Why Screen Recording is Useful on Chromebook
Screen recording is a valuable feature that can be incredibly useful for Chromebook users. Whether you’re a student, professional, or content creator, screen recording allows you to capture and share important moments, demonstrations, tutorials, presentations, and more. Here are a few reasons why screen recording is beneficial on your Chromebook:
1. Interactive Learning: Screen recording can revolutionize the way you learn and teach. It enables you to record and share your screen while demonstrating complex concepts, software usage, or step-by-step tutorials. Students can replay these recordings at their own pace, ensuring a deeper understanding of the material.
2. Remote Collaboration: In the increasingly remote work and study environments, screen recording becomes an indispensable tool for collaboration. You can record virtual meetings, presentations, or training sessions and share them with team members or classmates who couldn’t attend in real-time. This helps to ensure that everyone has access to the information and can stay up-to-date.
3. Technical Support: Screen recording simplifies troubleshooting and technical support. Instead of trying to explain an issue verbally, you can record your screen and provide step-by-step visuals to the support team. This saves time and reduces misunderstandings, allowing for more efficient problem-solving.
4. Content Creation: If you’re a content creator, screen recording is an essential tool for producing high-quality tutorials, reviews, or gameplay videos. With screen recording, you can easily capture your actions along with your commentary, making it engaging and informative for your audience.
5. Documentation: Screen recording is an effective method for documenting processes and procedures. Whether you’re creating instructional videos for employees or recording software demonstrations for clients, screen recording ensures that crucial information is properly documented and easily accessible.
These are just a few examples of why screen recording is valuable on your Chromebook. By utilizing this feature, you can enhance your learning, collaboration, troubleshooting, content creation, and documentation processes. The following sections will outline different methods you can use to screen record on your Chromebook.
Different Ways to Screen Record on Chromebook
Now that you understand the benefits of screen recording on your Chromebook, let’s explore the various methods available to achieve this. Here are three different ways you can screen record on your Chromebook:
Method 1: Using the Built-in Screen Recorder
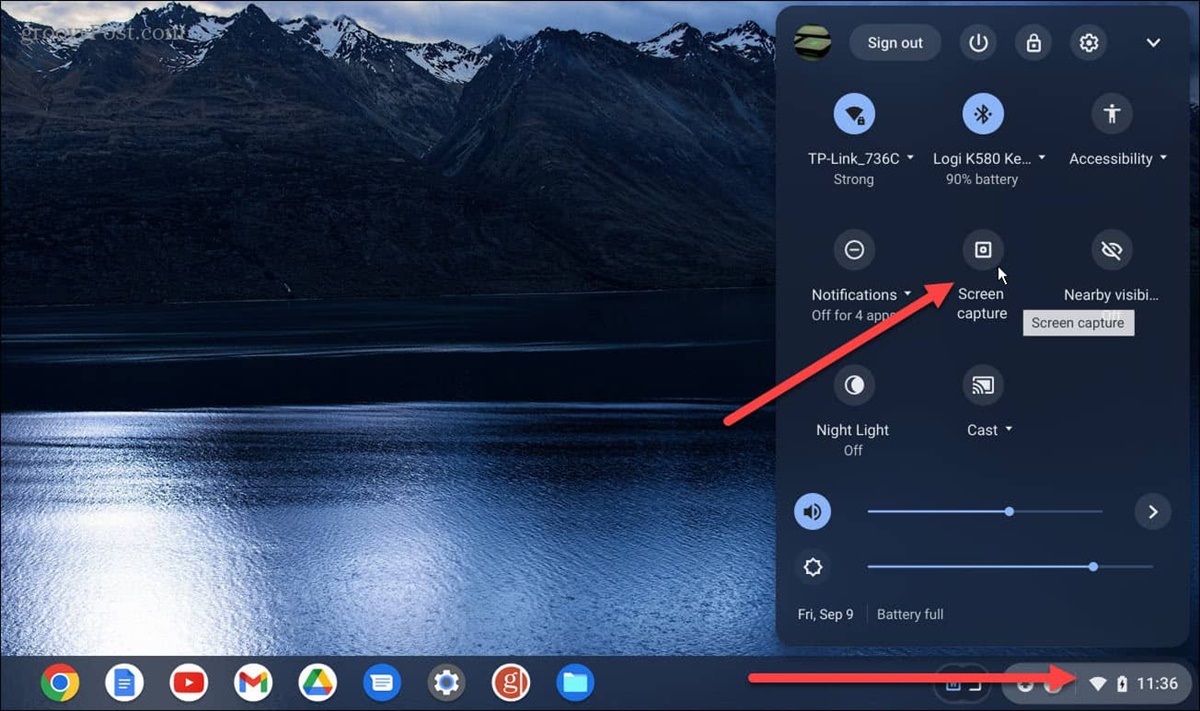
Your Chromebook comes equipped with a built-in screen recording feature that allows you to capture your screen without the need for any additional software or extensions. Simply press the “Ctrl” and “Shift” keys together, then press the “Switch Window” key (typically located at the top row, next to the “Brightness Down” key) to start recording. You can choose to record the full screen or a specific area by clicking and dragging your cursor. To stop the recording, press the “Ctrl” key.
Method 2: Using a Chrome Extension
If you’re looking for more advanced features or customization options, you can opt for a screen recording Chrome extension. One popular extension is “Loom”, which offers a simple and intuitive interface for capturing your screen, adding webcam footage, and recording audio. Another reliable option is “Screencastify”, which provides a range of editing tools and the ability to save your recordings directly to Google Drive or YouTube.
Method 3: Using Online Screen Recording Tools
If you prefer to use online screen recording tools, there are several web-based applications available that allow you to record your Chromebook screen without the need for any installations. “Apowersoft Free Online Screen Recorder” is a user-friendly web tool that offers both screen and webcam recording options, along with basic editing features. “Screencast-O-Matic” is another popular online screen recorder that provides a seamless recording experience with the ability to record system audio and microphone input.
Choose the method that best suits your needs and preferences. The built-in screen recorder provides a simple and quick solution, while Chrome extensions and online tools offer additional features and flexibility. Experiment with different methods to find the one that works best for you.
With these different ways to screen record on your Chromebook, you can easily capture and share your screen for various purposes, be it for educational, professional, or creative endeavors. The next section will provide some useful tips and tricks to help you optimize your screen recording experience.
Method 1: Using the Built-in Screen Recorder
One of the simplest ways to screen record on your Chromebook is by utilizing the built-in screen recorder feature. This method allows you to quickly capture your screen without the need for any external tools or extensions. Follow these steps to use the built-in screen recorder:
Step 1: Open the application or webpage that you want to record on your Chromebook.
Step 2: Press the “Ctrl” and “Shift” keys together on your keyboard.
Step 3: While holding down the “Ctrl” and “Shift” keys, press the “Switch Window” key. The “Switch Window” key is typically located at the top row of your keyboard, next to the “Brightness Down” key. It looks like a rectangle with two vertical lines on either side.
Step 4: After pressing the “Switch Window” key, your screen will be highlighted, and you can choose to capture the entire screen or a specific area by clicking and dragging your cursor.
Step 5: Once you’ve selected the desired area, the screen recording will start automatically.
Step 6: To stop the recording, simply press the “Ctrl” key on your keyboard.
After stopping the recording, a notification will appear in the bottom right corner of your screen. Click on the notification to access and view your recorded screen capture.
The built-in screen recorder provides a convenient and straightforward solution for basic screen recording needs. However, keep in mind that it may not offer advanced editing or customization features compared to other methods. If you require additional capabilities, such as audio recording or annotations, consider exploring the Chrome extensions or online tools mentioned in the previous section.
Now that you know how to use the built-in screen recorder on your Chromebook, feel free to start recording and sharing your screen in no time. Experiment with different recording scenarios and explore the various features offered by your Chromebook’s native screen recording functionality.
Method 2: Using a Chrome Extension
If you’re looking for more advanced features and customization options for your screen recording needs on your Chromebook, utilizing a Chrome extension can be a great option. There are several reliable and user-friendly screen recording extensions available in the Chrome Web Store. Follow these steps to use a Chrome extension for screen recording:
Step 1: Open the Chrome Web Store by typing “chrome://extensions” in the address bar of your Chrome browser.
Step 2: Search for a screen recording extension; popular choices include “Loom” and “Screencastify”.
Step 3: Install the extension by clicking on the “Add to Chrome” button.
Step 4: Once the extension is added, an icon will appear in your Chrome browser toolbar.
Step 5: Click on the extension icon to open the screen recording interface.
Step 6: Depending on the extension, you will have various options to customize your recording, such as selecting specific areas of the screen, recording audio, or adding webcam footage.
Step 7: Once you have configured your recording settings, click on the record button to start capturing your screen.
Step 8: To stop the recording, click on the stop or pause button within the extension interface.
Step 9: After stopping the recording, you can preview, trim, and edit your recording using the editing tools provided by the extension.
Step 10: Finally, save your recording to your desired location, such as your device’s storage or cloud storage services like Google Drive or Dropbox.
Using a Chrome extension for screen recording allows you to access additional features and functionalities that may not be available through the built-in screen recorder. You can choose an extension that suits your specific requirements, whether it’s adding annotations, recording system audio, or directly sharing your recordings with others.
Remember to check the reviews and ratings of the extension before installing it to ensure its reliability and compatibility with your Chromebook. Additionally, be mindful of any usage limitations or subscription requirements that may apply to certain extensions.
With a reliable Chrome extension, you can harness the power of advanced screen recording features and create high-quality recordings for educational, professional, or creative purposes.
Method 3: Using Online Screen Recording Tools
If you prefer the convenience of web-based applications and don’t want to install any additional software or extensions on your Chromebook, you can opt for online screen recording tools. These tools allow you to capture your screen directly from your browser, providing flexibility and ease of use. Here’s how to use online screen recording tools:
Step 1: Open your Chrome browser and search for online screen recording tools, such as “Apowersoft Free Online Screen Recorder” or “Screencast-O-Matic”.
Step 2: Visit the website of the online screen recording tool of your choice.
Step 3: Launch the tool by clicking on the designated “Start” or “Record” button on the website.
Step 4: Allow the tool to access your screen and microphone when prompted.
Step 5: Configure the recording settings, such as selecting the area of your screen to record or enabling audio recording.
Step 6: Start the recording by clicking on the “Record” or “Start” button.
Step 7: Perform the actions on your screen that you want to capture.
Step 8: Once you’re done recording, click on the “Stop” or “Finish” button to end the recording session.
Step 9: Preview the recorded video and make any necessary edits using the editing tools provided by the online tool.
Step 10: Save the recording to your preferred location, whether it’s your local storage or cloud storage services like Google Drive or Dropbox.
Online screen recording tools offer the advantage of accessibility and portability. You can use them on any device with an internet connection without the need for installations or specific hardware requirements.
Before using an online screen recording tool, ensure that the website is reputable, trustworthy, and secure. Additionally, be aware of any restrictions or limitations imposed by the tool, such as recording duration or video resolution.
By utilizing online screen recording tools, you can quickly and easily capture your screen on your Chromebook, making it a great option for on-the-go recording needs.
Tips and Tricks for Better Screen Recording on Chromebook
To ensure that your screen recordings on your Chromebook are of the highest quality and meet your specific requirements, here are some useful tips and tricks:
1. Plan your recording: Before you start recording, plan out what you want to capture. Have a clear outline of the steps, content, or sections you want to include in your recording. This will help you stay focused and avoid unnecessary edits later on.
2. Clear your desktop and notifications: Minimize distractions by closing any unnecessary tabs, applications, or notifications on your Chromebook. This will create a cleaner and more professional-looking recording without any interruptions or distractions.
3. Use a high-quality microphone: If your recording involves narration, consider using an external microphone for better audio quality. USB or Bluetooth microphones can enhance the clarity and reduce background noise, providing a more professional and engaging experience for your viewers.
4. Optimize screen resolution: Ensure that your screen resolution is set to an appropriate and optimal level for your recording. Higher resolutions can offer clearer visuals, but keep in mind that they may result in larger file sizes. Find the right balance based on your specific needs and available storage space.
5. Utilize keyboard shortcuts: Familiarize yourself with the keyboard shortcuts for screen recording on your Chromebook. This will help you start and stop recordings quickly and efficiently, allowing you to capture specific moments or actions seamlessly.
6. Consider using a stylus or mouse: If your screen recording involves precise annotations, consider using a stylus or a mouse for more accurate and neat drawings or highlighting. This can enhance the clarity and effectiveness of your explanations or demonstrations.
7. Preview and edit your recordings: After capturing your screen, take the time to preview the recording and make any necessary edits. Trim any unnecessary parts, adjust audio levels, or add annotations to enhance the clarity and quality of your video.
8. Experiment with different recording tools: While the built-in screen recorder on your Chromebook is convenient, don’t hesitate to explore other screen recording tools, such as Chrome extensions or online applications. Different tools offer various features, settings, and editing capabilities. Experiment with different options to find the one that best suits your needs.
9. Save frequently: If you’re working on a longer recording, make it a habit to save frequently to avoid losing any progress or footage due to unexpected interruptions or technical issues.
10. Practice and refine: Like any skill, screen recording takes practice. Record and review your recordings to identify areas for improvement. Refine your techniques, delivery, and organization to create polished and effective screen recordings.
By following these tips and tricks, you can optimize your screen recording experience on your Chromebook and capture high-quality videos that effectively convey your message or instructions.