
Why screen recording is useful
Screen recording has become an increasingly popular feature on smartphones, including Android devices. This powerful tool allows you to capture and save everything that happens on your screen, whether it’s a video call, a tutorial, a gaming session, or a demonstration of a new app. There are several reasons why screen recording is highly useful:
- Creating tutorials and demonstrations: Screen recording is invaluable for creating step-by-step tutorials and demonstrations. Whether you’re teaching someone how to use a new software, showing the gameplay of a challenging level, or explaining a complex process, screen recording allows you to capture every movement and action on your screen, making it easier for viewers to follow along.
- Sharing knowledge and expertise: By recording your screen, you can share your knowledge and expertise with others. Whether you’re a tech reviewer, a DIY enthusiast, or a cooking aficionado, screen recording enables you to showcase your skills and share your passion with a wider audience.
- Providing customer support: Screen recording is an excellent tool for customer support representatives. Instead of relying solely on written instructions or phone calls, support agents can now record and share their screen to visually guide customers through troubleshooting steps, helping them resolve issues more effectively and efficiently.
- Preserving memories and capturing moments: Screen recording allows you to capture precious moments and memories that occur on your screen. Whether it’s a heartfelt video message from a loved one, a hilarious social media post, or a memorable victory in a game, screen recording enables you to preserve these digital moments and revisit them whenever you please.
- Improving collaboration and communication: Screen recording is an excellent tool for remote collaboration and communication. Whether you’re working on a team project or collaborating with clients, screen recording helps you share ideas, demonstrate concepts, and provide feedback more effectively, regardless of geographical barriers.
Overall, screen recording on Android devices offers a myriad of benefits. It empowers users to capture, share, and preserve content in a way that words alone cannot. Whether you’re a teacher, a content creator, a professional, or simply someone who wants to capture moments, screen recording is a versatile tool that enhances your Android experience and unlocks new possibilities.
Built-in screen recording feature on Android 11 and later versions
Android 11 introduced an exciting new feature for its users: built-in screen recording. This native screen recording functionality eliminates the need for third-party apps, making it easier than ever to capture and share what’s happening on your screen.
To access the built-in screen recording feature on Android 11 and later versions, follow these simple steps:
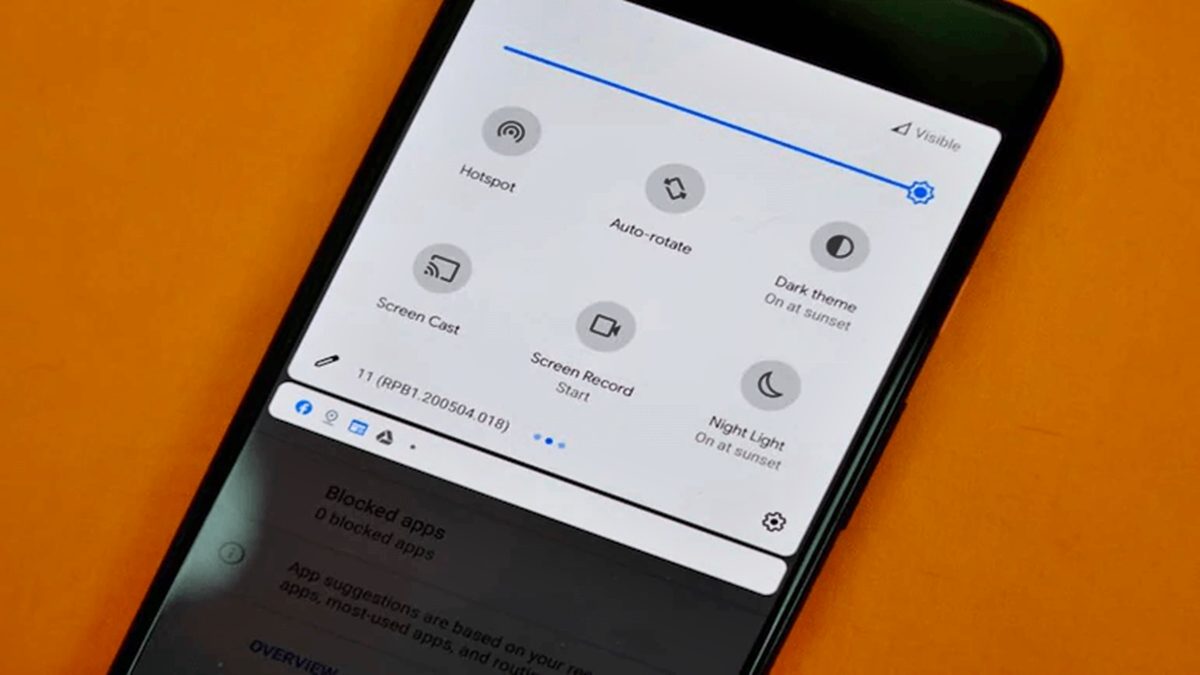
- Swipe down from the top of your screen to open the notification shade.
- Look for the Screen Recording icon, typically represented by a rectangular “Record” button. If you don’t see it, you can add it by customizing your Quick Settings panel.
- Tap on the Screen Recording icon to start the recording process. A countdown or notification might appear on the screen to indicate that the recording is in progress.
- Perform the actions you want to record on your screen. Whether it’s navigating through apps, playing games, or demonstrating a feature, the screen recording tool will capture everything within a designated area.
- To stop the screen recording, you can either tap the Screen Recording icon again or open the notification shade and tap the “Stop” button on the screen recording notification.
- Your screen recording will be saved as a video file in your phone’s gallery or internal storage, depending on your device’s settings.
With the built-in screen recording feature, Android users can effortlessly capture and share their screen activities without the need for external apps. It provides a seamless experience and ensures that you have full control over your recordings.
Furthermore, Android 11 also offers various customization options for screen recording. You can access these settings by long-pressing the Screen Recording icon in the Quick Settings panel and selecting “Settings.” Here, you can specify audio preferences, choose the video quality, toggle microphone recording, and even enable touch interactions to be recorded along with the display.
Android’s built-in screen recording feature is an excellent addition that simplifies the process of capturing and sharing activities on your device. Whether you need to create tutorials, troubleshoot issues, or simply document moments, this native feature provides a convenient and user-friendly solution.
Using third-party screen recording apps on older Android versions
If you’re using an older version of Android that doesn’t have the built-in screen recording feature, don’t worry! There are plenty of third-party screen recording apps available in the Google Play Store that can fulfill your screen recording needs.
Here is a step-by-step guide to using third-party screen recording apps on older Android versions:
- Open the Google Play Store on your Android device.
- Search for “screen recording apps” in the search bar.
- Browse through the list of available apps and read reviews to find a reliable and highly-rated screen recording app that suits your requirements.
- Select a preferred app and tap on the “Install” button to download and install it on your device.
- Open the screen recording app after installation.
- Follow the app’s instructions to set up the recording settings, such as video quality, audio source, and recording duration.
- Once the settings are configured, tap on the “Record” button within the app to start the screen recording.
- Perform the actions you want to capture on your screen.
- To end the recording, either tap on the recording app’s notification or return to the app and tap on the “Stop” or “Finish Recording” button.
- The recorded video will be saved in your device’s gallery or a designated folder within the recording app, depending on the app’s settings.
It’s worth noting that different screen recording apps may offer additional features and customization options. Some apps may provide editing tools, the ability to add text or annotations to the recording, or even the option to live stream your screen to platforms like YouTube or Twitch.
When selecting a third-party screen recording app, make sure to check the app’s compatibility with your Android version, as some apps may require specific Android versions or device capabilities. Additionally, pay attention to user reviews and ratings to ensure that you choose a reliable and stable app.
Using a third-party screen recording app on older Android versions allows you to access the benefits of screen recording, even if your device doesn’t have the built-in feature. It’s a convenient way to capture and share your screen activities while enjoying additional features and flexibility provided by these apps.
Step-by-step guide for built-in screen recording on Android 11 and later versions
Android 11 introduced a convenient built-in screen recording feature that allows users to capture and share their screen activities without the need for third-party apps. Here’s a step-by-step guide to help you make the most of this native screen recording functionality:
- Swipe down from the top of your Android device’s screen to open the notification shade.
- Look for the Screen Recording icon in the Quick Settings panel. It is usually represented by a rectangular “Record” button. If you don’t see the icon, you can add it by customizing your Quick Settings panel.
- Tap on the Screen Recording icon to start the recording process. You may see a countdown or a notification indicating that the recording has begun.
- Perform the actions you wish to record on your device’s screen. Whether it’s navigating through apps, playing games, or showcasing a new feature, the screen recording tool will capture everything within the designated area.
- To stop the screen recording, either tap the Screen Recording icon again or open the notification shade and tap the “Stop” button on the screen recording notification.
- Your screen recording will be automatically saved as a video file in your device’s gallery or internal storage, depending on your device’s settings.
Android 11’s built-in screen recording feature also provides customization options to enhance your recording experience. Here’s how you can access and adjust these settings:
- Long-press the Screen Recording icon in the Quick Settings panel.
- Select “Settings” from the options that appear.
- In the Screen Recorder settings, you can specify audio preferences, choose the video quality, enable/disable microphone recording, and even include touch interactions in the recording.
By using the built-in screen recording feature on Android 11 and later versions, you gain a convenient and integrated tool for capturing and sharing your screen activities. It offers a seamless experience and allows you to have full control over your recordings.
Whether you want to create tutorials, demonstrate features, troubleshoot issues, or simply capture memorable moments on your device, the built-in screen recording feature is a powerful tool that enhances your Android experience.
Customizing screen recording settings on Android 11 and later versions
Android 11’s built-in screen recording feature not only allows you to capture your device’s screen activities but also provides customization options to enhance your recording experience. Here’s a step-by-step guide on how to customize the screen recording settings on Android 11 and later versions:
- Access the Quick Settings panel on your Android device by swiping down from the top of the screen.
- Look for the Screen Recording icon, which is represented by a rectangular “Record” button. If you don’t see it, you can add it by customizing your Quick Settings panel.
- Long-press on the Screen Recording icon until a new overlay menu appears.
- Select “Settings” from the overlay menu to access the screen recording settings.
- In the Screen Recorder settings, you will find various customization options:
- Audio preferences: Choose whether you want to record audio from your device’s internal audio, microphone, or both. This option is useful if you want to record audio while capturing the screen activities.
- Video quality: Select the desired video quality for your screen recordings. Higher quality may result in larger file sizes, so make sure you have enough storage space.
- Microphone recording: Enable or disable microphone recording during screen recording. This option allows you to include or exclude audio in your recordings.
- Include touches: Toggle this option to display your touch interactions on the screen during the recording. It can be helpful for tutorial videos or demonstrations where viewers need to see where you tap on the screen.
- Show touches on start: Enable this option if you want the screen recording to display touch indicators when you start recording. It helps to visually indicate where you touch the screen.
- Recording duration: Set the maximum duration for your screen recordings. This option can be useful if you want to limit the length of your recordings.
Once you have customized the screen recording settings according to your preferences, you can start using the built-in screen recording feature on Android 11 and later versions with the configured options. These customization options allow you to tailor your screen recordings to meet your specific needs and enhance the overall quality of your recordings.
Keep in mind that different Android devices may have slight variations in the screen recording settings, but the general process remains the same. Explore the settings and experiment with different configurations to find the setup that works best for you.
Exploring advanced screen recording features on Android 11 and later versions
Android 11’s built-in screen recording feature offers more than just basic recording capabilities. It comes equipped with advanced features that allow you to further enhance your screen recording experience. Let’s explore some of the advanced screen recording features available on Android 11 and later versions:
1. Screen recording pause and resume: Android 11 allows you to pause and resume your screen recordings without having to stop and start a new recording. This is especially useful if you need to take a short break or want to exclude certain parts of your recording.
2. External microphone support: If you want to record high-quality audio using an external microphone, Android 11 enables you to connect a compatible microphone to your device and use it for screen recording. This ensures better audio clarity and reduces background noise.
3. Simultaneous front and back camera recording: With Android 11, you can now record your screen while simultaneously using both the front and back cameras. This feature is handy for vloggers, tutorial creators, or anyone who wants to include their reactions or facecam footage in their screen recordings.
4. Screen recording notifications: When you’re actively recording your screen, Android 11 displays a persistent notification that indicates the ongoing recording process. This provides a visual reminder that your screen activities are being captured and allows you to easily access the recording controls or stop the recording when needed.
5. Audio source selection: Android 11 lets you choose the audio source for your screen recordings, allowing you to select between internal audio, microphone input, or both. This flexibility ensures that you can record audio from various sources and customize the recording experience to suit your needs.
6. Screen recording shortcuts: Android 11 provides shortcuts for screen recording on your device’s power menu. Simply press and hold the power button to access the power menu options, including the screen recording feature. This makes it even more convenient to start recording your screen with just a few taps.
7. Floating toolbar: During screen recording, Android 11 displays a floating toolbar that provides quick and easy access to recording controls. You can pause or resume the recording, enable or disable the microphone, and stop the recording directly from this floating toolbar, simplifying the recording process.
These advanced screen recording features on Android 11 and later versions offer added flexibility and convenience for users. They empower you to create more professional and engaging screen recordings while providing greater control over the recording process.
Take advantage of these advanced features to enhance your screen recording experience and create high-quality videos that captivate and inform your audience.
Step-by-step guide for using third-party screen recording apps on older Android versions
If you’re using an older version of Android that doesn’t have a built-in screen recording feature, don’t worry! There are plenty of third-party screen recording apps available on the Google Play Store that can fulfill your screen recording needs. Here’s a step-by-step guide on how to use third-party screen recording apps on older Android versions:
- Open the Google Play Store on your Android device.
- Search for “screen recording apps” in the search bar.
- Browse through the list of available apps and read reviews to find a reliable and highly-rated screen recording app that suits your needs.
- Select a preferred app from the search results and tap on the “Install” button to download and install it on your device.
- Once the app is installed, open it from your app drawer.
- When you launch the screen recording app, it will usually provide an interface with various recording options.
- Adjust the settings according to your preferences. You may have options to select the recording area, choose video quality, enable audio recording, and specify other settings depending on the app.
- After configuring the settings, tap on the “Record” button or a similar icon within the app to start the screen recording.
- Perform the actions you want to capture on your device’s screen. Whether it’s demoing an app, giving a tutorial, or showcasing gameplay, the app will capture everything within the recording area you’ve selected.
- To stop the screen recording, either tap on the app’s notification or return to the app and tap on the “Stop” or “Finish Recording” button.
- The recorded video will be saved in your device’s gallery or a designated folder within the app, depending on the app’s settings.
It’s important to note that different screen recording apps may offer additional features such as video editing capabilities or the ability to add text or annotations to recordings. Take the time to explore the app and familiarize yourself with its features to make the most out of your screen recordings.
When choosing a third-party screen recording app, pay attention to user reviews, ratings, and compatibility with your specific Android version. This ensures that you select a reliable app that works seamlessly with your device.
Using a third-party screen recording app on older Android versions provides you with the ability to capture and share your screen activities, even without a built-in feature. Explore the options available to you on the Google Play Store and find the app that best suits your needs.
Comparing different third-party screen recording apps for Android
When it comes to third-party screen recording apps for Android, there are numerous options available in the Google Play Store. Each app offers unique features and capabilities to enhance your screen recording experience. Here, we’ll compare different screen recording apps to help you make an informed choice:
1. AZ Screen Recorder: AZ Screen Recorder is a popular choice known for its user-friendly interface and comprehensive set of features. It offers various recording modes, including full-screen recording, HD video quality, live stream support, and the ability to pause and resume recordings. The app also provides an on-screen drawing tool for annotating videos and an overlay window for recording additional footage.
2. DU Recorder: DU Recorder is another highly-rated screen recording app that offers a range of advanced features. It includes options to record in various resolutions and bitrates, add on-screen touches, capture audio from both internal and external sources, and enable facecam recording using the front camera. Additionally, DU Recorder offers a built-in video editor for trimming and merging recordings.
3. Mobizen Screen Recorder: Mobizen Screen Recorder is renowned for its simplicity and versatility. It provides a user-friendly interface with essential features such as screen recording, audio recording, front camera recording, and real-time drawing tools. The app also offers options for editing recorded videos, adding intros and outros, and even live streaming to platforms like YouTube.
4. ScreenCam Screen Recorder: ScreenCam Screen Recorder is a lightweight app that focuses on providing a straightforward and hassle-free recording experience. It offers basic screen recording features, including adjustable video quality and orientation. The app is known for its simplicity and minimal resource usage, making it an excellent choice for those seeking a lightweight and efficient screen recording solution.
5. Rec. (Screen Recorder): Rec. is a feature-packed screen recording app with a variety of customization options. It allows users to choose video resolutions, adjust frame rates, enable touch gesture recording, and even schedule recordings. Rec. also offers integration with Tasker, allowing users to automate screen recording based on specific triggers or conditions.
When choosing a third-party screen recording app, consider your specific needs, such as the desired video quality, audio recording capabilities, editing tools, and additional features that may be important to you. It’s also beneficial to read user reviews and ratings to gauge the app’s performance and reliability on different devices.
Regardless of the app you choose, make sure it is compatible with your Android version and offers a user-friendly interface that suits your preferences. Take some time to explore the different options and find the screen recording app that best aligns with your requirements.
Tips and tricks for optimizing screen recording quality on Android
When recording your screen on Android, it’s important to ensure that you capture high-quality recordings to provide a clear and visually appealing viewing experience. Here are some tips and tricks to help you optimize the screen recording quality on your Android device:
1. Adjust video resolution and bitrate: Most screen recording apps allow you to customize the video resolution and bitrate. Higher resolutions and bitrates generally result in better quality recordings. However, keep in mind that higher settings may also result in larger file sizes and require more storage space.
2. Utilize a stable screen recording app: Choose a reliable and stable screen recording app that is well-rated and frequently updated. This ensures that you have a smooth recording experience without any glitches or interruptions that could compromise the quality of the recording.
3. Optimize device performance: Prioritize a smooth recording experience by closing unnecessary background applications, clearing cache and junk files, and ensuring your device has sufficient storage space. This helps prevent lags or frame drops during screen recording.
4. Record in landscape orientation: Recording in landscape orientation is generally preferred as it provides a widescreen aspect ratio that is more suitable for most viewing platforms. This ensures that your recording captures a larger portion of the screen and improves the overall quality of the visuals.
5. Check lighting conditions: Ensure that the environment where you’re recording has sufficient lighting. Poor lighting can result in dark and low-quality recordings. Good lighting not only enhances visibility but also makes the recording look more professional and visually appealing.
6. Minimize background noise: If you need to record audio while capturing the screen, make sure you’re in a quiet environment to minimize background noise. Eliminating distractions and background sounds results in clearer and more professional-sounding audio in your recordings.
7. Pause and edit: Many screen recording apps allow you to pause and resume recordings. Utilize this feature to eliminate any unnecessary or undesirable content during recording. It gives you the chance to review and edit your recording, ensuring that only the relevant parts are included in the final video.
8. Use a compatible external microphone: If you’re using an external microphone for recording audio, ensure that it is compatible with your device and that it provides good sound quality. A high-quality microphone can significantly enhance the audio clarity and overall quality of your screen recordings.
9. Preview and adjust: Before finalizing your screen recording, preview and review the footage to ensure everything appears as intended. This gives you an opportunity to spot any issues, make adjustments, and optimize the recording quality accordingly.
10. Utilize post-processing tools: After completing the screen recording, take advantage of post-processing tools or video editing software to further enhance the quality of your recordings. These tools can help with trimming, cropping, adding transitions, and applying filters or effects to polish your videos.
By following these tips and tricks, you can optimize the screen recording quality on your Android device. Whether you’re creating tutorials, capturing gameplay, or showcasing an app, these optimizations will help you produce high-quality and visually appealing screen recordings.
Troubleshooting common issues with screen recording on Android
While screen recording on Android can be a powerful tool, you may encounter some common issues that can hinder your recording experience. Here are some troubleshooting tips to help you overcome these issues:
1. Blank or black screen: If you’re seeing a blank or black screen in your recordings, check if the screen recording app has the necessary permissions to record your screen. Go to your device’s settings, navigate to the app permissions, and ensure that the screen recording app has been granted permission to access your screen.
2. Poor video quality: If your recordings appear pixelated or blurry, try adjusting the video resolution and bitrate settings within the screen recording app. Increase the resolution and bitrate for better quality, but keep in mind that higher settings may result in larger file sizes.
3. Lag or frame drops: If you’re experiencing lag or frame drops during screen recording, close any unnecessary applications running in the background to free up system resources. Additionally, make sure your device has sufficient storage space, as low storage can impact the smoothness of the recording.
4. Inaudible or low-quality audio: If the recorded audio is inaudible or of poor quality, ensure that the microphone settings are properly configured within the screen recording app. You may also need to adjust the microphone sensitivity or volume settings on your device for optimal audio capture.
5. Recording interruptions: If your screen recording is being interrupted by notifications or incoming calls, enable the “Do Not Disturb” mode or configure the screen recording app to automatically block interruptions during recording. This ensures uninterrupted screen recording sessions.
6. Limited recording time: Some screen recording apps impose a time limit on recordings. If you need to record for a longer duration, consider using an app that offers unlimited recording or allows you to extend the recording time through in-app purchases or subscriptions.
7. Compatibility issues: Ensure that the screen recording app is compatible with the Android version on your device. Some apps may require specific Android versions or may not be optimized for certain devices, which can result in compatibility issues during recording.
8. App crashes or freezes: If the screen recording app crashes or freezes frequently, try updating the app to the latest version or reinstalling it. Clearing the app cache or restarting your device can also help resolve app-related issues and improve the recording experience.
9. Storage management: Regularly check your device’s available storage space. Insufficient storage can prevent proper recording and may result in corrupted or incomplete video files. Clear unnecessary files and consider transferring older recordings to cloud storage or an external device to free up space.
10. Screen overlay issues: If you’re encountering screen overlay issues where certain elements or pop-ups are not being captured in the recording, disable any screen overlay apps or overlays in your device’s settings. These overlays can interfere with the screen recording process.
By troubleshooting these common issues, you can ensure a smoother and more reliable screen recording experience on your Android device. Remember to keep your apps and device updated to benefit from the latest bug fixes and enhancements that can improve your recording sessions.
Ensuring privacy and security when screen recording on Android
While screen recording on Android can be a powerful and useful feature, it’s essential to prioritize privacy and security. Here are some important considerations to ensure your privacy and protect sensitive information while screen recording on Android:
1. Respect others’ privacy: Be mindful of the content you record and ensure that you have the necessary permissions to capture and share it. Avoid recording private conversations, personal information, or confidential data without explicit consent.
2. Use trusted screen recording apps: Only download screen recording apps from trusted sources, such as the Google Play Store. Read reviews and check app permissions to ensure that the app doesn’t have access to unnecessary or sensitive information on your device.
3. Secure your screen recording files: Take precautions to secure your recorded files, especially if they contain sensitive or confidential information. Consider encrypting the files or storing them in a secure folder or cloud storage service with strong access controls.
4. Be cautious when sharing recordings: When sharing screen recordings, carefully consider the platform and permissions you grant. Avoid sharing sensitive information or recordings publicly unless necessary. Take advantage of privacy settings to limit the visibility and accessibility of your recordings.
5. Disable notifications during recording: To prevent potentially sensitive information from being captured in your screen recordings, disable notifications or switch to the “Do Not Disturb” mode before initiating a recording session.
6. Avoid recording sensitive information: Be cautious when recording content where sensitive information, such as login credentials or financial details, might be visible on your screen. Pause or edit the recording to exclude any sensitive data before sharing it.
7. Secure your device: Ensure that your Android device is adequately protected with a strong passcode or biometric authentication, such as fingerprint or facial recognition. This adds an additional layer of security, preventing unauthorized access to your recorded files.
8. Regularly update your device and apps: Keep your Android device and screen recording apps updated with the latest security patches and improvements. Updates often include bug fixes and security enhancements that help protect against potential vulnerabilities.
9. Be mindful of screen sharing: If you’re recording a video call or sharing your screen during a conference, be aware that other participants may be able to view your screen and any sensitive information displayed on it. Take extra precautions when sharing confidential or personal data in such situations.
10. Educate yourself on laws and regulations: Familiarize yourself with the laws and regulations regarding screen recording in your jurisdiction. Understand the rights and responsibilities when capturing and sharing screen recordings to ensure compliance with legal and ethical standards.
By prioritizing privacy and security in your screen recording practices, you can enjoy the benefits of this feature while protecting confidential information and respecting the privacy of others.
Best practices for sharing and editing screen recordings on Android
Once you have captured a screen recording on your Android device, it’s important to follow best practices for sharing and editing to ensure that your recordings are well-presented and effectively convey the desired message. Here are some best practices to consider:
1. Review and edit: Before sharing your screen recordings, review them to ensure they meet your expectations. Trim or remove any unnecessary footage, adjust the video’s brightness or contrast if needed, and apply video stabilization if the recording is shaky.
2. Use video editing apps: Take advantage of video editing apps available on the Google Play Store to enhance your screen recordings. These apps offer features like adding text, applying filters or effects, incorporating transitions, and cropping or resizing the video for optimal viewing.
3. Compress video files: If your screen recording results in large file sizes, consider compressing them using video compression apps or software. This helps reduce the file size without significantly compromising the quality, making it easier to share and upload.
4. Choose appropriate video formats: When exporting or saving your screen recordings, choose video formats suitable for sharing and compatibility. Popular formats such as MP4 or MOV are widely supported across different devices and platforms.
5. Host the videos on reputable platforms: If you plan to share your screen recordings publicly, consider hosting them on reputable video-sharing platforms like YouTube or Vimeo. These platforms provide convenient sharing options, customizable privacy settings, and a wider audience reach.
6. Share responsibly: Be mindful of sharing screen recordings that may contain sensitive or private information. Double-check your recordings to ensure that no personal details, login credentials, or confidential data are visible. If necessary, blur or obscure such information before sharing.
7. Provide context and titles: When sharing screen recordings, add meaningful titles or descriptions that provide context to viewers. This helps them better understand the content and purpose of the recording, making it more accessible and engaging.
8. Consider adding captions or subtitles: To make your screen recordings accessible to a wider audience, consider adding captions or subtitles. This is particularly helpful for viewers who may have hearing impairments or prefer to watch videos with captions enabled.
9. Test playback and quality: Before sharing your screen recordings widely, test the playback on different devices and platforms to ensure compatibility and quality. This ensures that viewers can smoothly watch your recordings without any playback issues.
10. Seek feedback and iterate: Share your screen recordings with a trusted audience or group to gather feedback. Consider their suggestions for improvement and iterate on your recordings or editing techniques to enhance the overall quality of your future screen recordings.
By following these best practices for sharing and editing screen recordings on Android, you can ensure professional-quality videos that effectively communicate your message to your intended audience. Remember to prioritize clarity, accessibility, and responsible sharing to make the most out of your screen recording efforts.
Exploring alternative methods for capturing video on Android
In addition to screen recording, there are alternative methods for capturing videos on Android that can be useful in various situations. Let’s explore some of these alternative methods:
1. Camera app: The most straightforward method for capturing videos on Android is through the device’s built-in camera app. With advancements in smartphone camera technology, modern Android devices offer excellent video recording capabilities. The camera app allows you to record videos in different resolutions and frame rates, apply filters, and make use of features like optical or digital zoom.
2. Third-party camera apps: Many third-party camera apps offer advanced features, manual controls, and additional video recording options. These apps provide more flexibility in terms of adjusting settings like exposure, white balance, ISO, and focus. They may also offer features like slow-motion recording, time-lapse, or specific video recording modes tailored to different types of content, such as vlogging or action shots.
3. Social media apps: Various social media apps, such as Instagram, Snapchat, and TikTok, provide built-in camera functionality that enables you to capture videos within the app. These apps often come with filters, effects, and editing tools that allow you to enhance your videos, add stickers or text overlays, and post them directly to your social media feed.
4. Video editing apps with recording functionality: Some video editing apps also offer recording capabilities alongside their editing features. These apps allow you to capture videos directly within the app, apply real-time filters or effects, and have more control over the recording settings. This can be particularly useful if you’re looking for a one-stop solution for recording and editing videos on your Android device.
5. Screen mirroring apps: Screen mirroring apps, such as Google Home or Microsoft’s Your Phone, allow you to mirror your Android device’s screen onto a larger display, such as a computer or smart TV. You can then use screen recording software on the mirrored screen to capture high-quality videos of your device’s activities. This method is especially useful when you need to demonstrate an app, showcase gameplay, or record a tutorial for a large audience.
6. External hardware accessories: Another alternative to capturing videos on Android is through the use of external hardware accessories. For example, you can attach external microphones, tripods, or stabilizers to your device for improved audio quality, stability, and diverse shooting angles. These accessories can elevate the quality of your videos by providing better audio capture and professional-looking footage.
7. Live screen recording apps: Some apps allow you to stream your Android device’s screen in real-time, which can be a convenient alternative to traditional screen recording. These apps usually require a stable internet connection and may offer additional features such as live chat or interaction with viewers. They can be useful when you want to showcase your screen activities to a live audience or engage in remote collaboration or support.
Each of these alternative methods for capturing video on Android offers unique features and benefits. Depending on your specific needs, preferences, and the content you want to record, you can choose the method that best suits your requirements and provides the desired level of control and flexibility.