
Checking for Time Machine Backup
If you are looking to restore your Mac to an earlier date, the first step is to check if you have a Time Machine backup. Time Machine is a built-in backup feature available on macOS that allows you to restore your computer to a previous state. Here’s how you can check for a Time Machine backup:
- Connect your Time Machine backup drive to your Mac.
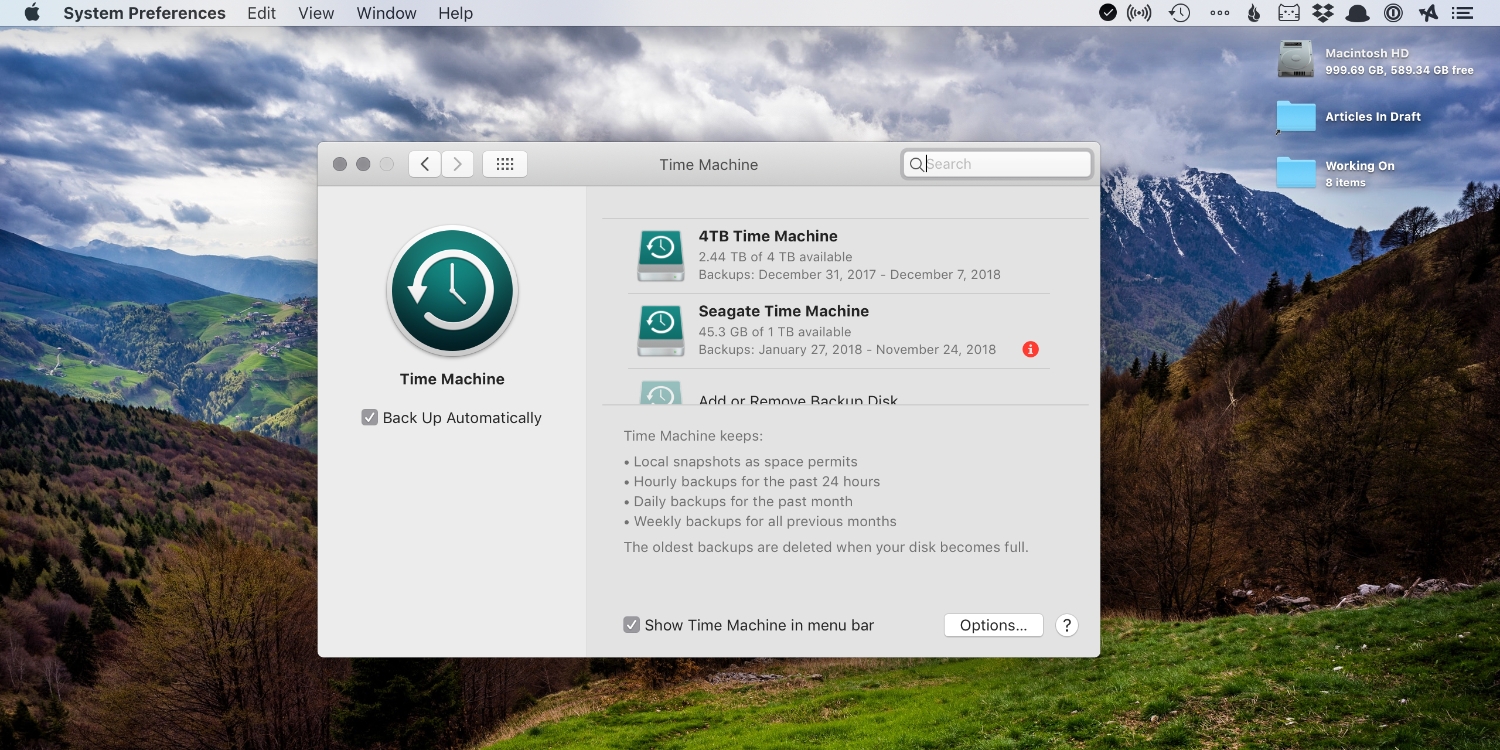
- Click on the Apple menu in the top-left corner of your screen and select “System Preferences.”
- In the System Preferences window, click on “Time Machine.”
- You will see a list of available backups on the right side of the window.
- If you see a backup from the desired date or time period, you can proceed with the restore process.
- If you don’t see any backups or the desired backup, it is possible that Time Machine was not enabled or the backup drive was not connected during the desired period. In this case, you can explore other methods of restoring your Mac to an earlier date.
It is important to note that Time Machine backups are typically created automatically on a regular basis. However, if you have manually disabled the feature or have not connected your backup drive, there may not be a suitable backup available. In such cases, you may need to consider alternative methods to restore your Mac.
Using Time Machine to Restore
If you have a Time Machine backup available, you can easily restore your Mac to an earlier date using the following steps:
- Ensure that your Time Machine backup drive is connected to your Mac.
- Click on the Apple menu in the top-left corner of your screen and select “System Preferences.”
- In the System Preferences window, click on “Time Machine.”
- On the Time Machine interface, click on the “Restore from Time Machine Backup” button.
- A new window will appear, showing a timeline on the right side. You can scroll through the timeline to find the desired backup date or use the search bar to locate a specific file or folder.
- Select the backup you want to restore and click on the “Restore” button.
- Time Machine will prompt you to confirm the restoration. Review the information and click on “Continue” to proceed.
- The restoration process will begin, and your Mac will be reverted to the selected backup. This may take some time depending on the size of the backup and the speed of your Mac.
- Once the restoration is complete, your Mac will restart, and you will be able to use it as it was on the selected backup date.
Keep in mind that when you restore your Mac using Time Machine, it reverts not only your files but also your system settings. This means that any changes made after the selected backup date will be lost. It is recommended to back up any important files or data before proceeding with the restoration process.
Restoring from a Snapshot
In addition to Time Machine backups, macOS also allows you to restore your Mac from a snapshot. Snapshots are point-in-time copies of your system’s state that can be created using the built-in snapshot functionality. Here’s how you can restore from a snapshot:
- Restart your Mac and hold down the Command + R keys until the Apple logo appears. This will boot your Mac into macOS Recovery mode.
- In macOS Recovery mode, select “Disk Utility” and click on “Continue.”
- In the Disk Utility window, select the volume you wish to restore from the sidebar. This is typically your main startup disk.
- Click on the “Restore” tab at the top of the Disk Utility window.
- You will see a list of available snapshots for the selected volume. Choose the snapshot that corresponds to the desired date and time.
- Click on the “Restore” button and follow the prompts to confirm the restoration process.
- Once the restoration is complete, your Mac will restart, and you will be able to use your system as it was at the time of the selected snapshot.
Restoring from a snapshot is a convenient option if you have regularly enabled the snapshot feature on your Mac. However, it is important to note that snapshots are typically available only on macOS systems that use the APFS file system. If your Mac uses the HFS+ file system, this feature may not be available.
Before restoring from a snapshot, it’s advisable to back up any important files or data, as the restoration process may overwrite your existing files and settings. This will ensure that you have a separate backup of any critical information.
Using a Third-Party Backup
If you don’t have a Time Machine backup or access to snapshots, another option to restore your Mac to an earlier date is by utilizing a third-party backup software. There are several reliable third-party backup solutions available that provide similar functionality to Time Machine. Here’s how you can use a third-party backup to restore your Mac:
- Ensure that you have a compatible third-party backup software installed on your Mac. Some popular options include Carbon Copy Cloner, SuperDuper!, and Backblaze.
- Open the backup software and locate the option to restore your Mac or access your backups.
- Select the backup from the desired date or time that you want to restore your Mac to.
- Confirm the restore process and follow any on-screen instructions provided by the backup software.
- The third-party backup software will begin restoring your Mac from the selected backup. This process may take some time, depending on the size of the backup and the speed of your system.
- Once the restoration is complete, your Mac will restart, and you can begin using it as it was on the selected backup date.
It’s important to note that the specific steps for using a third-party backup software may vary depending on the software you are using. Consult the software’s documentation or support resources for guidance specific to your chosen backup solution.
While third-party backup software may not be as integrated into macOS as Time Machine, it can still provide a reliable way to restore your Mac to an earlier date. Make sure to regularly backup your data using the third-party solution to ensure you have the necessary backups available for restoration when needed.
Restoring from iCloud Backup
If you have been using iCloud as your primary backup method, you can restore your Mac to an earlier date by utilizing an iCloud backup. iCloud allows you to automatically back up your data and settings, including apps, documents, photos, and more. Here’s how you can restore from an iCloud backup:
- Ensure that your Mac is connected to the internet.
- Click on the Apple menu in the top-left corner of your screen and select “System Preferences.”
- In System Preferences, click on “Apple ID” and then select “iCloud.”
- Make sure that the “iCloud Drive” option is enabled. This will ensure that your files are synced with your iCloud account.
- Click on “Time Machine” within the iCloud preferences.
- Check if an iCloud backup is available for the desired date or time period.
- If a suitable backup is found, click on the “Restore from iCloud” button.
- Authenticate with your Apple ID credentials to start the restoration process.
- The Mac will connect to your iCloud account and begin restoring your data and settings. This process may take some time, depending on the size of the backup and your internet connection speed.
- Once the restoration is complete, your Mac will restart, and you will be able to use it as it was at the time of the selected iCloud backup.
In order to use iCloud for backup and restoration, it’s important to ensure that you regularly enable iCloud backups on your Mac. This will ensure that your data is up-to-date and readily available for restoration if needed.
Remember that restoring from an iCloud backup will replace your current data and settings with the data and settings from the selected backup. It’s advisable to back up any important files or data before initiating the restoration process to avoid the loss of any valuable information.
Using macOS Recovery
If you are unable to restore your Mac using Time Machine, snapshots, or third-party backups, you can utilize macOS Recovery to restore your system to an earlier date. macOS Recovery provides various tools and options to troubleshoot and restore your Mac. Here’s how you can use macOS Recovery:
- Restart your Mac and hold down the Command + R keys until the Apple logo appears. This will boot your Mac into macOS Recovery mode.
- In macOS Recovery mode, you will see the “macOS Utilities” window.
- If you have an internet connection, you can select “Reinstall macOS” to download and reinstall the latest version of macOS on your Mac. This option may not restore your Mac to an earlier date, but it can be helpful in resolving software-related issues.
- If you have a Time Machine backup or a compatible backup disk connected, you can select “Restore from Time Machine Backup” to restore your Mac to a specific backup point.
- If you don’t have a backup available, you can select “Disk Utility” to access macOS Disk Utility and repair or erase your disks if needed. However, keep in mind that this option will not restore your Mac to a previous date.
- If you are faced with hardware issues, you can select “Get Help Online” to access Apple’s support website for further assistance.
- Follow the prompts and select the appropriate option to restore your Mac or troubleshoot the issue you are facing.
- Once the restoration process is complete, your Mac will restart, and you will be able to use it as it was at the time of the selected restore point if applicable.
Using macOS Recovery can be a useful option when other backup methods are not available. However, it’s important to note that macOS Recovery is primarily designed for troubleshooting and repair purposes. It may not provide the same level of specificity and control as Time Machine or other backup solutions.
Before using macOS Recovery, it’s recommended to back up any crucial data to avoid potential data loss during the restoration process.
Performing a Clean Install and Restoring Data
If you are unable to restore your Mac using the methods mentioned above, or if you prefer to start fresh with a clean installation of macOS, you can perform a clean install and then restore your data manually. Here’s how you can perform a clean install and restore your data:
- Back up any important data that you want to keep before proceeding with the clean install. This can be done by manually copying your files to an external storage device or using a cloud storage service.
- Create a bootable macOS installation media. You can do this by downloading the macOS installer from the App Store and following the instructions provided by Apple. This will allow you to install a fresh copy of macOS on your Mac.
- Restart your Mac and hold down the Option key until the startup disk selection screen appears.
- Select the bootable macOS installation media you created earlier and click on “Continue.”
- Follow the on-screen instructions to install a clean version of macOS on your Mac.
- Once the clean install is complete, set up your Mac by signing in with your Apple ID and configuring preferences.
- Now it’s time to restore your data. Connect the external storage device or access your cloud storage service where you saved your backup data.
- Manually transfer your files and data back to your Mac. You can do this by dragging and dropping files from the external storage device to your desired locations on your Mac, or by downloading files from your cloud storage service.
- Reinstall any necessary applications from their original sources (e.g., App Store, official websites).
- Configure settings and preferences in your applications to match your previous configuration.
Performing a clean install can be a time-consuming process, but it allows you to start with a fresh installation of macOS and selectively restore the data you need. It can help resolve issues that may have been caused by software conflicts or corrupted system files.
Remember to exercise caution when manually restoring data from backups to avoid overwriting or deleting important files. Double-check your backups and ensure you have everything you need before proceeding with the clean install.
Troubleshooting Common Issues
When it comes to restoring a Mac to an earlier date, you may encounter some common issues along the way. Here are a few troubleshooting steps you can take to address these issues:
- Backup not available: If you don’t have a Time Machine backup, a snapshot, or a third-party backup, you may need to explore other options, such as using macOS Recovery or reinstalling macOS.
- Slow restoration process: Restoring from a backup or performing a clean install can take some time, especially if you have a large amount of data. Be patient and allow the restoration process to complete without interrupting it.
- Data loss: Before proceeding with any restoration method, make sure you have a current backup of your important files and data. This will help minimize the risk of data loss during the restoration process.
- Compatibility issues: Ensure that the backup you are trying to restore is compatible with your Mac and the version of macOS you are running. Incompatible backups may not restore properly and can lead to unexpected issues.
- Software conflicts: If you are experiencing software-related issues, consider performing a clean install of macOS. This can help resolve conflicts or corruptions that may be causing the problem.
- Hardware problems: If you are facing persistent issues even after restoration, it’s possible that the problem lies with your hardware. In such cases, it’s recommended to seek professional assistance or contact Apple Support for further guidance.
Remember that the restoration process involves making changes to your Mac’s system and files. It’s always a good idea to have a backup of your data and to proceed with caution.
If you encounter any specific issues during the restoration process, referring to official Apple documentation, support forums, or seeking assistance from Apple Support can provide valuable insights and troubleshooting steps.