
Why Reset Google Chrome?
Google Chrome is one of the most popular web browsers, known for its speed, functionality, and user-friendly interface. However, over time, you may encounter various issues while using Chrome, such as slow performance, frequent crashes, or strange behavior. These issues can be caused by a variety of factors, including outdated settings, conflicting extensions, or corrupt user profiles.
Resetting Google Chrome to its default state can help resolve these issues and restore the browser to its optimal performance. When you reset Chrome, you are essentially returning it to the same state it was in when you first installed it, with all your browsing data and settings removed. This process can help eliminate any problematic configurations, extensions, or cookies that may be causing issues.
Additionally, resetting Chrome can also be beneficial if you have made extensive customization to the browser and want to start fresh. It allows you to clear out all personalized settings and return to the default configuration, giving you a clean slate to work with.
It’s important to note that resetting Google Chrome is not something you should do without considering other troubleshooting steps first. However, if you have tried other methods to fix Chrome-related issues and they have been unsuccessful, resetting the browser can be a viable solution.
In the following sections, we will explore various methods you can use to reset Google Chrome. Whether you want to reset the browser settings, uninstall and reinstall Chrome, or clear browsing data and cookies, there are different approaches to choose from based on your specific needs.
Before You Reset: Back Up Your Data
Before proceeding with the reset process, it is essential to back up your data and settings in Google Chrome. This ensures that you do not lose any important information, such as bookmarks, saved passwords, or browsing history, during the reset. Here are a few steps to help you back up your data effectively:
- Export Bookmarks: Open Google Chrome and click on the three-dot menu icon in the top-right corner. From the dropdown menu, select “Bookmarks” and then “Bookmark Manager.” In the Bookmark Manager window, click on the three-dot menu icon again and choose “Export Bookmarks.” Save the exported bookmarks file to a safe location on your computer.
- Save Passwords: Google Chrome has a built-in password manager that allows you to save and autofill passwords. To export your saved passwords, type “chrome://settings/passwords” in the address bar and press Enter. Click on the three-dot menu icon next to “Saved Passwords” and select “Export Passwords.” Save the exported passwords file securely.
- Backup Settings and Preferences: Although Chrome syncs most of your settings through your Google account, it is a good practice to back up your preferences manually. Navigate to “chrome://settings” in the address bar and press Enter. Scroll down to the bottom and click on “Advanced” to expand the advanced settings. Under the “Reset and clean up” section, click on “Backup and restore” and select “Backup” to save your preferences to a file.
- Copy User Profile Data: Your Chrome user profile contains various data, including browser extensions, settings, and other personalized information. To back up your user profile, navigate to the following location on your computer, replacing “Username” with your actual username: “C:\Users\Username\AppData\Local\Google\Chrome\User Data” Copy and paste the “Default” folder to a backup location.
By following these steps, you can create a backup of your essential data in case anything goes wrong during the reset process. Remember to save the backup files to a safe location, such as an external hard drive or a cloud storage service. Once you have completed the reset, you can then import your bookmarks, passwords, and preferences back into Google Chrome, ensuring a seamless transition to your desired configuration.
Method 1: Resetting Chrome Settings
One of the simplest methods to reset Google Chrome is by resetting its settings. This process allows you to restore Chrome to its default state without affecting your bookmarks, saved passwords, or browsing history. Here’s how you can do it:
- Open Chrome Settings: Launch Google Chrome and click on the three-dot menu icon in the top-right corner of the browser window. From the dropdown menu, select “Settings” to open the Chrome Settings page.
- Scroll to Advanced Settings: At the bottom of the Settings page, click on “Advanced” to expand the advanced settings options.
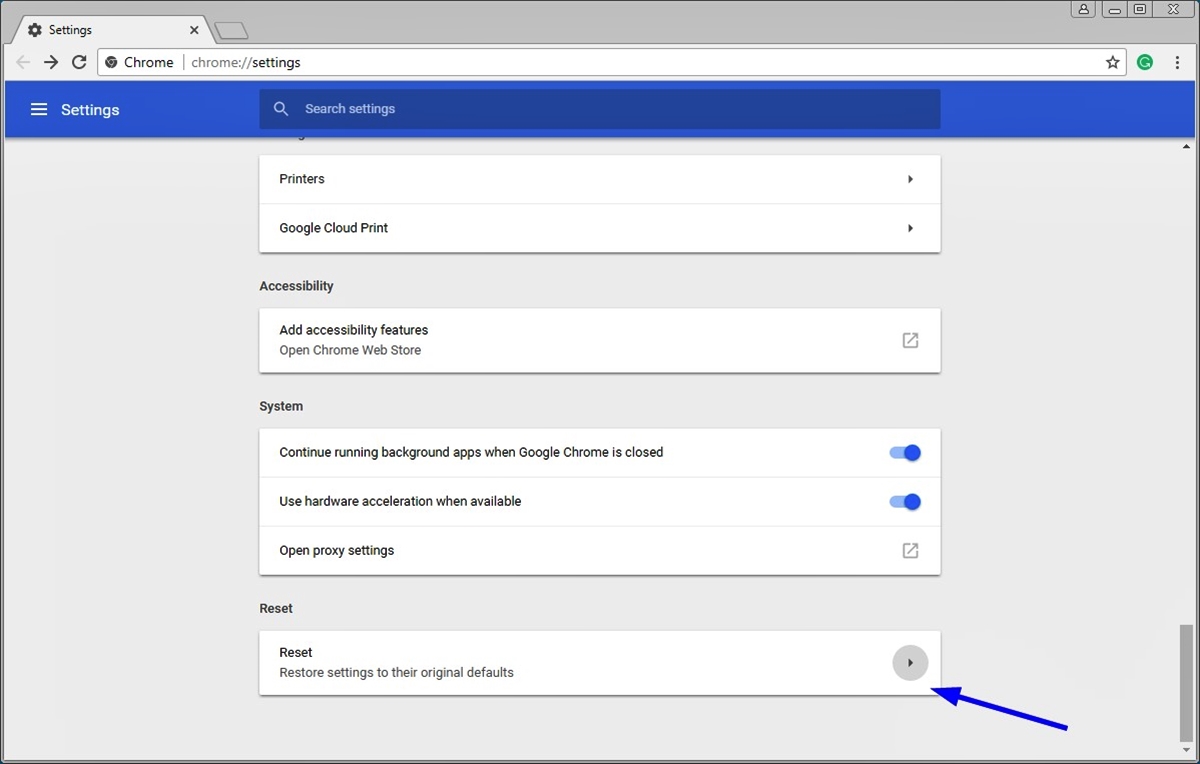
- Reset Chrome: Scroll down to the “Reset and clean up” section and click on “Restore settings to their original defaults.”
- Confirm Reset: A confirmation prompt will appear, explaining what will be reset and what will be kept. Click on the “Reset settings” button to proceed.
After following these steps, Google Chrome will reset its settings to the default configuration. You might notice changes in your browser’s appearance, such as the removal of any custom themes, bookmarks bar modifications, or previously set homepage. However, all your important data, including bookmarks, saved passwords, and browsing history, will remain intact.
It’s worth mentioning that resetting Chrome settings may not resolve all issues if the problem lies deeper within the browser. If you continue to experience problems after resetting the settings, you can explore other methods such as uninstalling and reinstalling Chrome or using Chrome’s advanced settings to further troubleshoot the issue.
Remember that resetting Chrome settings should be used as a last resort if other troubleshooting methods have failed. It is always a good idea to back up your data before proceeding with any changes to ensure you don’t lose any important information during the reset process.
Method 2: Uninstalling and Reinstalling Chrome
If resetting the settings did not resolve the issues you are facing with Google Chrome, uninstalling and reinstalling the browser can be an effective solution. This method ensures a fresh installation of Chrome, eliminating any potential underlying problems that may have occurred during the initial installation or over time. Here’s how you can uninstall and reinstall Google Chrome:
- Uninstall Chrome: On Windows, go to the “Control Panel” and open the “Programs” or “Apps & Features” section. Locate Google Chrome in the list of installed programs, right-click on it, and select “Uninstall.” Follow the on-screen prompts to complete the uninstallation process.
- Delete Chrome User Data: To ensure a clean reinstall, it is recommended to manually delete the Chrome user data. Navigate to the following location on your computer, replacing “Username” with your actual username: “C:\Users\Username\AppData\Local\Google\Chrome\User Data” Delete the entire “Default” folder.
- Reinstall Chrome: Visit the official Google Chrome website (www.google.com/chrome) and click on the “Download Chrome” button. Run the installation file and follow the on-screen instructions to reinstall Google Chrome.
After reinstalling Google Chrome, the browser will be restored to its default settings and configurations. You can then personalize Chrome by adding your preferred extensions, customizing the appearance, and signing in to sync your bookmarks, passwords, and other data.
Keep in mind that uninstalling and reinstalling Chrome will remove all your browsing history, saved passwords, and bookmarks if you did not sync them with your Google account. Therefore, it is important to back up any important data before proceeding with this method.
Uninstalling and reinstalling Chrome is a more drastic measure and should be used when other troubleshooting methods have failed to resolve the issues. It can often be an effective way to fix persistent problems that you may have encountered in the browser.
Method 3: Using Chrome’s Advanced Settings
Google Chrome provides a range of advanced settings that can be accessed and customized to troubleshoot and resolve various issues. By exploring these advanced settings, you can fine-tune Chrome’s behavior and potentially address any problems you may be experiencing. Here’s how you can use Chrome’s advanced settings:
- Open Chrome Settings: Launch Google Chrome and click on the three-dot menu icon in the top-right corner of the browser window. From the dropdown menu, select “Settings” to open the Chrome Settings page.
- Access Advanced Settings: Scroll to the bottom of the Settings page and click on “Advanced” to expand the advanced settings options.
- Explore Advanced Settings: Within the advanced settings section, you’ll find a wide range of options related to privacy and security, downloads, languages, system, and more. You can click on any category to explore the available settings and make adjustments as needed.
- Reset Advanced Settings: If you have made extensive changes to the advanced settings and want to revert to the default configuration, you can click on the “Reset settings to their original defaults” link located at the bottom of the advanced settings section.
By using Chrome’s advanced settings, you can customize various aspects of the browser to suit your needs. For example, you can clear specific browsing data, manage site permissions, disable or remove extensions, and tweak experimental features through Chrome flags. These settings provide a high level of control over Chrome’s functionality and performance.
Exploring and adjusting the advanced settings can help you troubleshoot issues related to browser performance, security, or compatibility. However, it is important to exercise caution when modifying these settings, as inappropriate changes can potentially cause new problems or unintended consequences. If you are unsure about a particular setting, it’s always a good idea to research and understand its implications before making any changes.
Using Chrome’s advanced settings can be a powerful tool to address specific issues and optimize your browsing experience. It is worth exploring these settings before resorting to more drastic measures like resetting or reinstalling Chrome.
Method 4: Clearing Browsing Data and Cookies
If you are experiencing performance issues or strange behavior in Google Chrome, clearing your browsing data and cookies can often help resolve these issues. Over time, your browser accumulates a significant amount of temporary files, cookies, and cached data, which can impact Chrome’s performance. Clearing this data can eliminate potential conflicts or corruption and improve the browser’s overall performance. Here’s how you can clear browsing data and cookies in Google Chrome:
- Open Chrome Settings: Launch Google Chrome and click on the three-dot menu icon in the top-right corner of the browser window. From the dropdown menu, select “Settings” to open the Chrome Settings page.
- Access Browsing Data: In the Chrome Settings page, scroll down and click on “Privacy and security” in the left sidebar. Then, click on “Clear browsing data” under the “Privacy and security” section.
- Select Time Range: In the clear browsing data window, choose the time range for which you want to remove data. You can select options like “Last hour,” “Last 24 hours,” “Last 7 days,” or “All time” based on your needs.
- Select Data to Clear: Chrome provides various options for the type of data you can clear, including browsing history, cookies and other site data, cached images and files, and more. Select the checkboxes for the data you want to clear.
- Clear Data: Once you have made your selections, click on the “Clear data” button to initiate the clearing process.
After clearing your browsing data and cookies, Chrome will remove the selected data from your browser. This will include your browsing history, website login information, and site preferences. Clearing this data can improve browsing speed, resolve website loading issues, and enhance overall performance.
It’s important to note that clearing browsing data and cookies will sign you out of most websites and remove personalized settings. However, it will not affect your bookmarks, saved passwords, or other data synced with your Google account.
Clearing browsing data and cookies should be considered as a regular maintenance task to ensure optimal performance and privacy in Google Chrome. By periodically removing accumulated data, you can keep your browser running smoothly and minimize potential conflicts or issues.
Method 5: Resetting Chrome Flags
Chrome Flags are experimental features and settings in Google Chrome that allow users to enable or disable certain functionalities. While these flags can provide additional customization options, they can also sometimes cause problems or conflicts within the browser. If you are experiencing issues in Chrome, resetting the Chrome Flags to their default settings can help resolve the problem. Here’s how you can reset Chrome Flags:
- Open Chrome Flags: Type “chrome://flags” in the address bar of Google Chrome and hit Enter. This will take you to the Chrome Flags page where experimental features are listed.
- Reset Flags to Default: To reset Chrome Flags, click on the “Reset all to default” button located at the top-right corner of the Flags page.
- Relaunch Chrome: After resetting the flags, Chrome will prompt you to relaunch the browser for the changes to take effect. Click on the “Relaunch” button to restart Google Chrome.
By resetting the Chrome Flags, you are essentially disabling any experimental settings or features that may be causing issues. This will revert the flags back to their default state, eliminating any potential conflicts or instabilities.
It’s worth noting that not all Chrome Flags are problematic, and some can enhance your browsing experience. If you have customized specific Chrome Flags in the past, you might want to take note of them before resetting. After resetting, you can selectively enable any flags that you find beneficial while monitoring for any potential issues.
Resetting Chrome Flags can be a useful troubleshooting step if you suspect that experimental features are causing problems in the browser. However, if the issues persist after resetting the flags, you may need to explore other methods, such as resetting Chrome settings or uninstalling and reinstalling the browser, to resolve the problem.
Overall, resetting Chrome Flags provides a simple way to troubleshoot and resolve issues related to experimental features and settings in Google Chrome. It allows you to start with a clean slate and ensures that your browser runs smoothly without any unnecessary experimental elements.
Method 6: Deleting User Profiles and Reinstalling Chrome
If you continue to experience persistent issues in Google Chrome, deleting your user profile and then reinstalling the browser can be an effective solution. Your user profile contains personalized settings, extensions, and other data associated with your Chrome account. By deleting the user profile, you can eliminate any corrupt or conflicting data that may be causing problems. Here’s how you can delete user profiles and reinstall Chrome:
- Open Chrome User Data Folder: Close Google Chrome and navigate to the following location on your computer, replacing “Username” with your actual username:
– Windows: “C:\Users\Username\AppData\Local\Google\Chrome\User Data”
– macOS: “/Users/Username/Library/Application Support/Google/Chrome/”
In the User Data folder, you will find folders for each user profile, typically named “Default” or using your Chrome account’s email address. - Delete User Profile: Identify the user profile folder you want to delete and either delete it or move it to a different location as a backup. Deleting the user profile folder will remove all the associated data and settings for that profile.
- Reinstall Chrome: Visit the official Google Chrome website (www.google.com/chrome) and download the installation file. Run the installer and follow the on-screen instructions to reinstall Google Chrome.
After reinstalling Google Chrome, a new default user profile will be created. This fresh profile ensures that any previous issues associated with your user profile are resolved. You can then sign in to your Google account and sync your bookmarks, passwords, and other data to restore your personalized settings.
It’s important to note that deleting your user profile will permanently remove all the associated data, including browsing history, extensions, saved passwords, and settings. Therefore, it is essential to back up any important information or settings before proceeding with this method.
Deleting user profiles and reinstalling Chrome should be considered as a last resort if other troubleshooting methods have failed to resolve the issues. This method provides a clean slate to start anew with a fresh profile, potentially resolving any complex or persistent problems within the browser.