
How to Recognize a Phishing Email
Phishing emails have become increasingly sophisticated, making it essential to be able to identify and avoid falling victim to these malicious attempts. Here are some key factors to consider when recognizing a phishing email:
1. Suspicious Sender: Pay close attention to the sender’s email address. Scammers often use email addresses that may resemble legitimate companies or organizations. Look for misspellings or unusual domain names that don’t match the supposed sender.
2. Urgency and Threats: Phishing emails often create a sense of urgency or use threats to manipulate recipients into taking immediate action. Be cautious of emails demanding urgent information or threatening consequences for not complying.
3. Poor Grammar and Spelling: Phishing emails frequently contain grammatical errors, spelling mistakes, and awkward sentence structures. Legitimate companies typically have strict quality control measures for their communications.
4. Suspicious URLs: Hover your mouse over any URL in an email to preview the link’s destination. Be cautious of shortened URLs or URLs that don’t match the context of the email. Legitimate links will usually lead to the company’s official website.
5. Requests for Personal Information: Legitimate companies typically won’t ask you to provide sensitive information, such as social security numbers, passwords, or financial details, via email. If an email requests such information, it’s likely a phishing attempt.
6. Unexpected Attachments or Downloads: Phishing emails may include attachments or links to download files. Avoid clicking on any attachments or downloading files unless you’re absolutely certain they are safe. These attachments could contain malware or viruses.
7. Generic Greetings: Phishing emails often use generic greetings like “Dear Customer” instead of addressing you by your name. Legitimate emails from trusted sources usually address you personally.
8. Unusual Requests: Be cautious of emails requesting unusual actions or out-of-the-ordinary requests. Phishing emails may ask you to send money, purchase gift cards, or provide access to sensitive accounts.
Remember: Always trust your instincts. If something feels off about an email you’ve received, it’s better to be safe than sorry. By recognizing the signs of a phishing email, you can protect yourself and your personal information from falling into the wrong hands.
Step 1: Don’t Click Any Links or Download Any Attachments
When you suspect that an email might be a phishing attempt, the first and most crucial step is to resist the temptation to click on any embedded links or download any attachments. Here’s why this step is so important:
1. Protection from Malware: Clicking on a malicious link or downloading an attachment from a phishing email can expose your device to malware, such as viruses, ransomware, or spyware. These harmful programs can compromise your data, steal personal information, or even take control of your device.
2. Avoiding Phishing Websites: Phishing emails often contain links that redirect you to fake websites made to resemble legitimate ones. These websites are designed to trick you into entering sensitive information, such as usernames, passwords, or credit card details. By refraining from clicking on these links, you can avoid falling victim to these scams.
3. Preventing Credential Theft: Phishing attacks often aim to steal your login credentials for various online platforms, such as email accounts, social media, or financial websites. By refraining from clicking on any suspicious links, you can protect yourself from unknowingly giving away your login information to scammers.
4. Maintaining Data Privacy: Clicking on links or downloading attachments from unknown sources can compromise the privacy of your personal data. Phishing emails may contain hidden tracking or data collection mechanisms that can harvest your information without your knowledge.
5. Limiting the Spread of Phishing: By avoiding interaction with suspicious links or attachments, you help prevent the spread of phishing attacks. Phishing emails often contain embedded links that, when clicked, validate the email address as active, making it a target for future phishing attempts or for reselling on the dark web.
Tips: Don’t be swayed by urgent or threatening language in phishing emails, even if they claim dire consequences for not taking action. Legitimate companies typically do not use such tactics, and it is always better to verify the authenticity of an email through other means.
Remember: When in doubt, it is best to err on the side of caution. By refraining from clicking on any links or downloading attachments from suspicious emails, you can greatly reduce the risk of falling victim to phishing attacks and keep your personal information safe.
Step 2: Report the Phishing Email to Microsoft
Reporting phishing emails to Microsoft helps protect yourself and others from falling victim to scams. There are several methods you can use to report phishing emails directly to Microsoft:
Method 1: Using the “Report Message” Functionality: Most email clients, including Microsoft Outlook, have a “Report Message” feature. Simply select the suspicious email and click on the “Report Message” button. This will alert Microsoft, and their security team will investigate the email for potential phishing activity.
Method 2: Using the Outlook.com Web Interface: If you are accessing your email through the Outlook.com web interface, you can report phishing emails by selecting the suspicious email and clicking on the “Junk” dropdown menu. From there, choose “Phishing” to report the email to Microsoft.
Method 3: Using the Microsoft Phishing Reporting Tool: Microsoft offers a dedicated reporting tool called the “Microsoft Phishing Reporting Tool.” You can access this tool by visiting their website or searching for it in your preferred search engine. This tool allows you to report the details of the phishing email directly to Microsoft’s security team.
Method 4: Forwarding the Email to Microsoft: If the above methods are not available to you, or if you prefer a simple solution, you can forward the suspicious email as an attachment to Microsoft. Their dedicated email address for reporting phishing is phish@office365.microsoft.com. This will allow their security team to analyze the email and take appropriate action.
When reporting a phishing email, it is crucial to include as much information as possible to assist Microsoft in their investigation. Be sure to include the email headers, which contain important details about the email’s origin and routing.
Tips: If you receive multiple phishing emails from the same source, it is not necessary to report each one individually. Reporting a single email from a particular sender provides Microsoft with the necessary information to take action against the phishing campaign.
Remember: Reporting phishing emails to Microsoft not only helps protect yourself but also helps protect others who may receive similar emails. By taking a proactive approach, you can play a role in combating scams and making the online world a safer place.
Method 1: Using the “Report Message” Functionality
One convenient way to report a phishing email to Microsoft is by utilizing the “Report Message” functionality available in most email clients, including Microsoft Outlook. This method allows you to easily report suspicious emails with just a few clicks. Here’s how to use the “Report Message” functionality:
Step 1: Open your email client and navigate to your inbox or the folder containing the phishing email.
Step 2: Select the suspicious email by clicking on it. Make sure the email is highlighted or appears as the active email.
Step 3: Look for the “Report Message” button or option in the email client’s toolbar. This button is generally located near the other email action buttons, such as “Reply” or “Delete.”
Step 4: Click on the “Report Message” button. A dropdown menu may appear with more reporting options, such as “Phishing” or “Junk.”
Step 5: Choose the appropriate reporting option, which is typically “Phishing” or something similar. This selection will notify Microsoft’s security team about the suspicious email for further investigation.
Step 6: Follow any additional prompts or instructions provided by your email client to complete the reporting process. This may include confirming the report or providing additional details about the phishing email.
By using the “Report Message” functionality, you are actively contributing to the fight against phishing attacks. Microsoft’s security team will analyze the reported email and take appropriate action to protect users from potential scams.
Remember: Reporting a phishing email through the “Report Message” functionality is quick and easy, and it helps Microsoft identify and mitigate phishing threats. However, it’s important to note that this method only reports the specific email you have selected. If you receive multiple phishing emails from the same source, it’s recommended to report all of them to provide Microsoft with a comprehensive overview of the phishing campaign.
Utilizing the “Report Message” functionality in your email client is an effective way to report phishing emails promptly and efficiently. By taking this proactive step, you are helping to protect yourself and other users from falling victim to phishing scams.
Method 2: Using the Outlook.com Web Interface
If you access your emails through the Outlook.com web interface, you have the option to report phishing emails directly within the platform. Reporting suspicious emails helps Microsoft identify and take action against potential phishing attempts. Here’s how to report phishing emails using the Outlook.com web interface:
Step 1: Log in to your Outlook.com account using your preferred web browser.
Step 2: Navigate to your inbox or the folder containing the phishing email you want to report.
Step 3: Select the suspicious email by clicking on it. The email should be highlighted or appear as the active email.
Step 4: Look for the “Junk” dropdown menu located in the toolbar or menu options above the email list.
Step 5: Click on the “Junk” dropdown menu, and a list of options will appear.
Step 6: From the list of options, choose “Phishing” to report the email as a phishing attempt.
Step 7: Follow any additional prompts or instructions provided by the Outlook.com web interface to complete the reporting process.
By utilizing the reporting feature within the Outlook.com web interface, you can quickly notify Microsoft’s security team about suspicious emails. Their team will investigate the reported email and take necessary actions to prevent further phishing attempts.
Remember: When reporting phishing emails using the Outlook.com web interface, it’s important to report any additional suspicious emails from the same sender or related to the same phishing campaign. This ensures that Microsoft has a comprehensive view of the threat.
Using the Outlook.com web interface to report phishing emails offers a user-friendly and efficient way to contribute to a safer online environment. By actively reporting suspicious emails, you play an essential role in protecting yourself and fellow Outlook.com users from falling victim to phishing scams.
Method 3: Using the Microsoft Phishing Reporting Tool
Microsoft provides a dedicated reporting tool called the “Microsoft Phishing Reporting Tool” to report phishing emails directly to their security team. This tool allows you to provide detailed information about the phishing email, aiding in their investigation and proactive measures against phishing attempts. Here’s how to use the Microsoft Phishing Reporting Tool:
Step 1: Access your preferred web browser and visit the official Microsoft website.
Step 2: Search for the “Microsoft Phishing Reporting Tool” or visit the URL provided by Microsoft for reporting phishing emails.
Step 3: Once you’re on the reporting tool page, provide the required information. This typically includes your email address, the subject line of the phishing email, and any additional details about the email.
Step 4: Take a screenshot of the phishing email if possible, and attach it to the reporting form. This visual evidence can assist Microsoft’s security team in their investigation.
Step 5: Submit the form containing your report by clicking the appropriate button. This will send all the reported information to Microsoft’s security team.
Step 6: Follow any additional instructions provided by the reporting tool, such as confirming your report or providing any supplemental details if necessary.
Using the Microsoft Phishing Reporting Tool allows you to directly contribute to Microsoft’s efforts in combating phishing attempts. By reporting the specific details of the phishing email, you enable Microsoft to analyze the threat and take appropriate measures to protect users.
Remember: When using the Microsoft Phishing Reporting Tool, it’s crucial to provide as much accurate and detailed information as possible. This includes the content of the email, any suspicious links or attachments, and any other relevant information that can help Microsoft in their investigation.
By utilizing the Microsoft Phishing Reporting Tool, you actively participate in creating a safer online environment for yourself and others. Your contribution assists in identifying and mitigating phishing attempts, ultimately helping to safeguard individuals and organizations from falling victim to these scams.
Method 4: Forwarding the Email to Microsoft
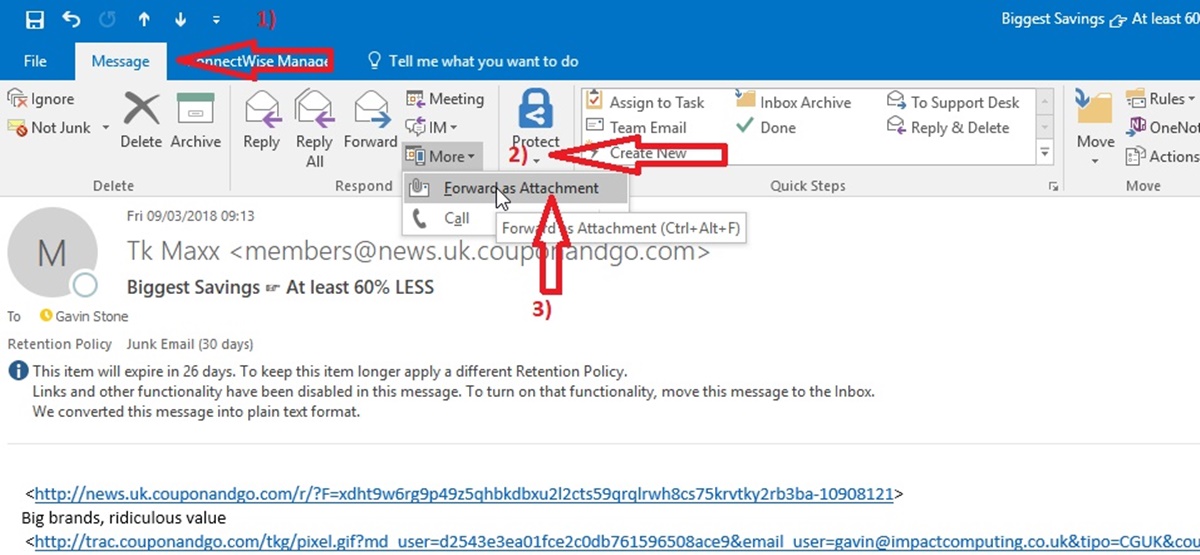
If you prefer a straightforward method to report a phishing email to Microsoft, you can simply forward the suspicious email as an attachment to Microsoft. This method allows their security team to analyze the email directly and take necessary actions against phishing attempts. Here’s how to forward the email:
Step 1: Open your email client and log in to your account.
Step 2: Locate the phishing email that you want to report.
Step 3: Click on the “Forward” button or option in your email client. This will open a new email composition window.
Step 4: In the recipient field of the new email, enter the following email address: phish@office365.microsoft.com. This is the dedicated email address for reporting phishing emails to Microsoft.
Step 5: Attach the suspicious email as an attachment by clicking on the attachment icon in the email composition window. This will allow Microsoft’s security team to examine the original email in its entirety.
Step 6: Add any additional information or comments you may have in the body of the email. This can include any observations or details about why you believe the email to be a phishing attempt.
Step 7: Send the email. Once Microsoft receives the forwarded email, their security team will analyze it for potential phishing activity.
By forwarding the phishing email to Microsoft, you provide them with the evidence necessary to investigate the email further and take appropriate action to protect users from similar scams.
Remember: It’s important to forward the suspicious email as an attachment rather than just forwarding the email itself. By attaching the original email, Microsoft can review all elements of the email, including headers and other hidden information.
Forwarding phishing emails to Microsoft is a simple yet effective way to contribute to the fight against phishing attempts. By doing so, you play an active role in helping to protect yourself and others from falling victim to these fraudulent schemes.
Step 3: Delete the Phishing Email from Your Inbox
After you have recognized a phishing email and reported it to Microsoft, the next important step is to delete the email from your inbox. Here’s why deleting the phishing email is crucial:
1. Preventing Accidental Interaction: By deleting the phishing email, you eliminate the risk of accidentally interacting with the malicious content within it. This includes avoiding the temptation to click on any suspicious links, download attachments, or reply to the email.
2. Avoiding Future Exposure: If the phishing email contains any potentially harmful elements, such as malware or tracking mechanisms, keeping the email in your inbox increases the chance of accidentally accessing or triggering them later. Deleting the email minimizes the risk of further exposure to these threats.
3. Cleaning up Your Inbox: Removing phishing emails from your inbox helps keep your email environment clean and organized. By deleting these fraudulent messages, you can focus on legitimate and important emails, reducing the chances of confusion or overlooking genuine correspondences.
4. Preventing Repetitive Scams: Some phishing attack methods involve repetitive emails from the same sender or related senders. By promptly deleting the initial phishing email, you help avoid confusion and potential interaction with subsequent fraudulent messages originating from the same source.
5. Protecting Others: Deleting the phishing email from your inbox eliminates the chance of accidentally forwarding or sharing it with others. By taking this proactive step, you prevent inadvertently spreading the phishing attempt to unsuspecting individuals.
Tips: In situations where you’re unsure if an email is genuine or fraudulent, it’s best to err on the side of caution and delete it. If the email turns out to be legitimate, the sender can always reach out to you again through another communication channel.
Remember: Deleting the phishing email from your inbox is an important step in stopping its influence and preventing further risks. By promptly removing these fraudulent messages, you enhance your email security and help maintain a safer online environment.
Step 4: Educate Yourself and Stay Protected From Phishing Attacks
Phishing attacks continue to evolve, making it vital to stay educated and informed about the latest tactics used by scammers. By taking proactive measures to protect yourself, you can minimize the risk of falling victim to these fraudulent schemes. Here are some key steps to help you stay protected:
1. Stay Informed: Keep up to date with the latest news and information about phishing attacks. Stay informed about new tactics, trends, and scams by following reliable cybersecurity sources, reading news articles, and staying connected with online security communities.
2. Be Skeptical: Develop a healthy skepticism when it comes to emails, especially those requesting personal information or urgent action. Verify the legitimacy of emails by contacting the organization through official channels or visiting their website directly. Remember, if something seems off or too good to be true, it probably is.
3. Strengthen Passwords: Use strong, unique passwords for all your online accounts and avoid reusing the same password across different platforms. Consider using a reliable password manager to help generate and securely store your passwords.
4. Enable Two-Factor Authentication: Implement two-factor authentication (2FA) whenever possible. This adds an extra layer of protection by requiring a secondary verification method, such as a code sent to your mobile device, in addition to your password.
5. Be Wary of Unsolicited Requests: Be cautious when providing personal information online. Avoid sharing sensitive data, such as credit card numbers, social security numbers, or passwords, in response to unsolicited requests. Legitimate organizations typically do not ask for such information via email.
6. Update Security Software: Keep your devices protected by regularly updating your antivirus and security software. This helps detect and block malicious software or emails before they can cause any harm.
7. Verify URLs: Double-check the URLs before clicking on any links in emails or messages. Hover over a link to view the full URL and verify that it matches the expected destination. Beware of URLs that use misspellings or slight variations to deceive users.
8. Be Cautious on Public Networks: Avoid accessing sensitive information or entering personal data when connected to public Wi-Fi networks. These networks can be vulnerable to interception, making it easier for attackers to collect your data.
9. Regularly Backup Your Data: Protect your important files by regularly backing them up to an external hard drive or cloud storage. In case of a successful phishing attack or other security incidents, you’ll still have access to your data.
Remember: Phishing attacks can be sophisticated, but by staying informed, employing best practices, and maintaining a healthy level of skepticism, you can significantly reduce the risk of falling victim to these scams. Educate yourself and regularly review your security practices to keep yourself and your sensitive information safe.