
Assess Your Scooter’s Battery
Before diving into the process of replacing your electric scooter’s battery, it’s important to assess the condition of your current battery. By doing so, you can determine whether a replacement is truly necessary or if there are other underlying issues causing the scooter’s power problems. Here are a few simple steps to assess your scooter’s battery:
- Check the battery voltage: Use a multimeter to measure the voltage of your scooter’s battery. A fully charged battery should read around 12.6-13.2 volts. If the voltage is significantly lower than this, it may indicate a problem with your battery’s capacity.
- Inspect for physical damage: Examine the battery closely for any signs of physical damage such as cracks or leaks. Damaged batteries can be hazardous, and it’s important to replace them promptly.
- Assess the battery’s performance: Pay attention to how long your scooter’s battery lasts on a single charge. If you notice a significant decrease in run-time or the battery struggles to hold a charge, it’s a sign that replacement is necessary.
- Consider the age of the battery: Electric scooter batteries typically have a lifespan of 2-3 years. If your battery is nearing this time frame or has exceeded it, it’s likely time for a replacement.
By going through these assessment steps, you can gain a clearer understanding of your scooter’s battery health. If you find that your battery is not performing optimally or is showing signs of damage, it’s recommended to proceed with the replacement process.
Purchase a Replacement Battery
If you’ve determined that your electric scooter’s battery needs to be replaced, the next step is to find and purchase a suitable replacement. Here are some important considerations to keep in mind when purchasing a replacement battery:
- Check the specifications: Look for a battery that matches the specifications of your current battery. Check the voltage, capacity, and dimensions to ensure compatibility.
- Choose a reputable brand: Opt for batteries from well-known and reputable brands. These batteries are often of higher quality and come with warranties, providing peace of mind.
- Read customer reviews: Before making a purchase, take the time to read customer reviews of the battery you’re considering. This can give you valuable insights into its performance and reliability.
- Consider battery technology: Electric scooter batteries can come in various technologies such as lead-acid, lithium-ion, or nickel-metal hybrid. Research the advantages and disadvantages of each type to determine which one best suits your needs.
- Compare prices: Look for competitive prices while ensuring that you’re not compromising on quality. Consider factors such as warranty and customer support when comparing prices.
Once you have chosen the replacement battery that meets your scooter’s requirements, proceed with the purchase. You can find batteries at your local scooter dealership, online retailers, or specialty battery stores. It’s recommended to compare prices and read reviews from multiple sources to ensure you’re getting the best product for your money.
Prepare Your Tools and Work Area
Before you begin the process of replacing your electric scooter’s battery, it’s important to gather the necessary tools and set up a suitable work area. This will ensure a smooth and efficient battery replacement process. Here are the steps to prepare your tools and work area:
- Gather the tools: Some common tools you may need include a socket set, pliers, wire cutters/strippers, a multimeter, and a screwdriver. Check your scooter’s manual or online resources for any specific tools recommended for battery replacement.
- Ensure safety: Safety should be a top priority when working with batteries. Make sure to wear protective gear such as gloves and safety goggles to protect yourself from potential hazards.
- Choose a suitable work area: Find a clean, well-lit, and well-ventilated area to work on your electric scooter. This can be a garage, driveway, or any other space where you have enough room to maneuver around the scooter comfortably.
- Clear the work area: Remove any obstacles or clutter from the work area to create a clean and organized space. This will prevent any accidents or damage to your scooter during the battery replacement process.
- Have a work surface: Use a stable workbench or a sturdy surface to place your tools and keep the battery and its components during the replacement process. This will help you stay organized and minimize the risk of losing or misplacing small parts.
- Keep the scooter manual handy: It’s always a good idea to have the scooter’s manual nearby. It can provide helpful instructions, diagrams, and safety precautions specific to your scooter model.
By following these steps to prepare your tools and work area, you’ll be well-equipped to efficiently replace your electric scooter’s battery. Taking the time to gather the necessary tools and create an organized work environment will contribute to a successful and hassle-free battery replacement experience.
Disconnect the Scooter’s Power
Before you begin removing the old battery from your electric scooter, it’s crucial to disconnect the scooter’s power to ensure your safety and prevent any electrical mishaps. Here’s a step-by-step guide on how to disconnect the scooter’s power:
- Turn off the scooter: Make sure the scooter is completely powered off before proceeding. Locate the power switch and turn it off to disconnect the power supply.
- Remove the key: If your scooter has a key ignition, remove the scooter key from the ignition slot. This will further ensure that the scooter is powered off and cannot accidentally turn on while you’re working on it.
- Locate the battery connector: The battery connector is typically located near the battery or under a protective cover. Look for a plug or connector that connects the battery to the scooter’s power system.
- Disconnect the battery connector: Using your hands or appropriate tools, carefully unplug the battery connector by gently pulling it apart. Take note of any locking mechanisms or tabs that may need to be released before the connector can be separated.
- Verify power disconnection: After disconnecting the battery connector, double-check that there are no sparks or signs of electrical activity. This indicates a successful disconnection of the scooter’s power.
It’s essential to handle all electrical components with caution and ensure proper power disconnection to avoid injuries or damage. By following these steps to disconnect the scooter’s power, you’ll be ready to safely proceed with the next steps of replacing the battery.
Remove the Battery Cover
Once you have disconnected the power from your electric scooter, the next step in replacing the battery is to remove the battery cover. The battery cover typically protects the battery and provides access for replacement. Here’s a step-by-step guide on how to remove the battery cover:
- Locate the battery cover: The battery cover is usually located near the base or underneath the seat of your electric scooter. Refer to your scooter’s manual or consult online resources if you’re unsure of its exact location.
- Identify fasteners or screws: Take note of the type of fasteners or screws that secure the battery cover in place. It could be screws, bolts, clips, or any other fastening mechanism. This will help you choose the appropriate tools to remove them.
- Prepare the necessary tools: Based on the type of fasteners you identified, gather the required tools such as a screwdriver or socket set to remove them. Ensure that you have the correct size and type of tool for the fasteners.
- Unfasten the battery cover: Use the appropriate tool to carefully remove the fasteners holding the battery cover in place. Turn screws counterclockwise or release clips as needed. Be mindful not to force or strip the fasteners.
- Set aside the fasteners: As you remove each fastener, set them aside in a safe place to prevent loss or damage. Keeping them organized will make it easier to put everything back together later.
- Gently lift off the battery cover: Once all the fasteners are removed, gently lift off the battery cover from its position. Be cautious not to damage any wires or other components connected to the cover.
By following these steps, you will be able to successfully remove the battery cover from your electric scooter. Remember to exercise care and precision during this process to avoid any accidental damage to the scooter’s components. With the battery cover removed, you’ll be one step closer to replacing the old battery with a new one.
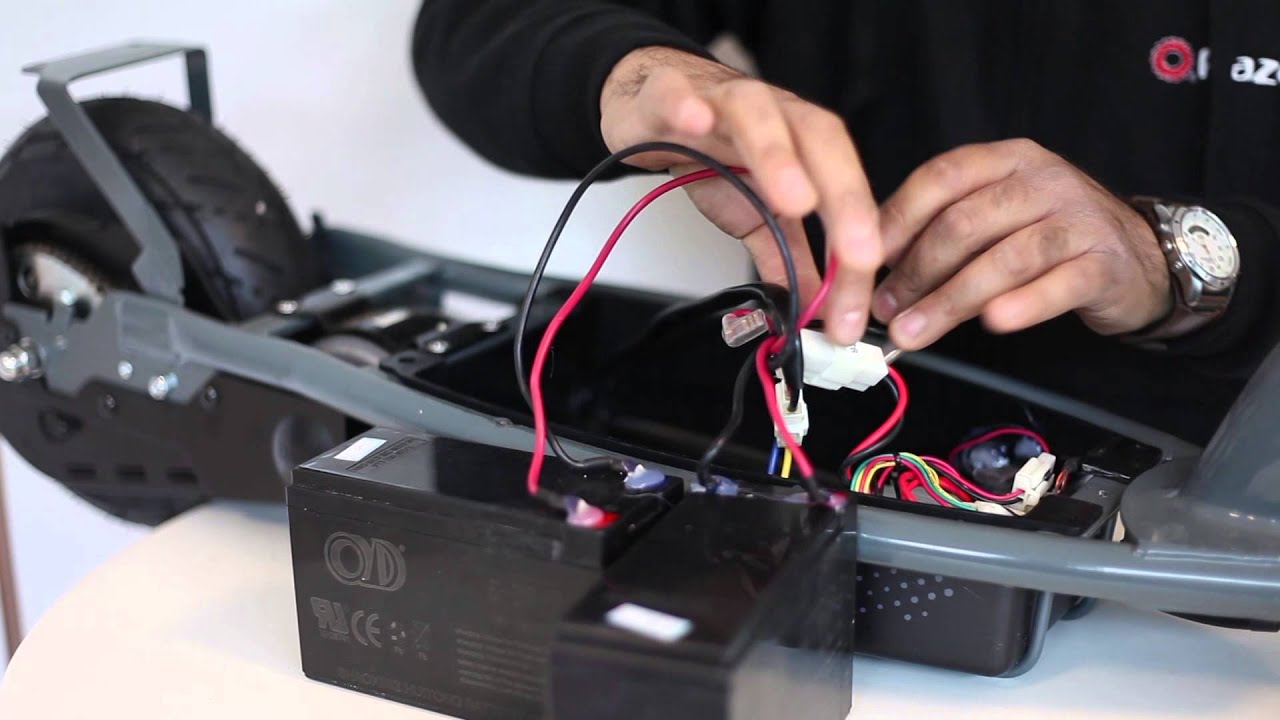
Disconnect the Wires from the Old Battery
With the battery cover removed, the next step in replacing your electric scooter’s battery is to disconnect the wires from the old battery. It’s essential to handle the wires carefully and follow the correct procedure to ensure a safe and smooth transition. Here’s a step-by-step guide on how to disconnect the wires from the old battery:
- Identify the battery terminals: Take note of the positive (+) and negative (-) terminals on the old battery. These terminals are usually labeled or color-coded for easy identification.
- Ensure safety precautions: Before proceeding, wear protective gloves to protect yourself from any potential electrical shocks. This is an important safety measure when working with the battery terminals.
- Disconnect the negative wire: Start by disconnecting the negative wire (usually black or marked with a “-“) from the battery terminal. Use a wrench or appropriate tool to loosen the terminal nut or screw, and gently remove the wire from the terminal.
- Disconnect the positive wire: Now, proceed to disconnect the positive wire (usually red or marked with a “+”) from the battery terminal. Again, use a wrench or the required tool to loosen the terminal nut or screw, and carefully disconnect the wire.
- Keep the wires separate: As you disconnect each wire, make sure to keep the positive and negative wires separate from each other. This prevents accidental contact and potential short circuits.
- Inspect the wires: While the wires are disconnected, take a moment to inspect them for any signs of damage or wear. If you notice any issues, such as fraying or exposed wires, it’s advisable to replace or repair them before proceeding.
By following these steps, you will have successfully disconnected the wires from the old battery. Pay close attention to safety precautions and handle the wires with care to avoid any accidents or damage. With the wires disconnected, you can now move on to removing the old battery from your electric scooter.
Remove the Old Battery
Now that you have disconnected the wires from the old battery of your electric scooter, it’s time to remove the old battery itself. Removing the old battery is a crucial step in the battery replacement process. Here are the steps to follow to successfully remove the old battery:
- Ensure safety: Before proceeding, ensure that you are wearing protective gloves to avoid any potential electrical shocks. Safety should always be a top priority when working with batteries.
- Locate the battery: Identify the exact location of the old battery in your electric scooter. It is typically located underneath the battery cover or in a designated compartment.
- Inspect for securing mechanisms: Check for any straps, clips, or brackets that may be securing the battery in place. These mechanisms will need to be loosened or unfastened before the battery can be removed.
- Loosen or remove securing mechanisms: Use the appropriate tools such as a screwdriver or wrench to loosen or remove any securing mechanisms. Take care not to damage any surrounding components or wiring during this process.
- Gently lift out the old battery: With the securing mechanisms undone, carefully lift the old battery out of its compartment or housing. Make sure to support the weight of the battery and keep it level to avoid any spills or accidents.
- Place the old battery in a safe location: Once you have removed the old battery, place it in a safe and designated area away from flammable or sensitive materials. Old batteries should be appropriately stored and disposed of in accordance with local regulations.
By following these steps, you will be able to safely and efficiently remove the old battery from your electric scooter. Take your time and exercise caution during this process to avoid any damage to the scooter or injuries. With the old battery removed, you are now ready to install the new battery and complete the battery replacement procedure.
Install the New Battery
Now that you have successfully removed the old battery from your electric scooter, it’s time to install the new battery. Proper installation ensures the longevity and optimal performance of your scooter’s electrical system. Follow these steps to effectively install the new battery:
- Choose a suitable location: Place the new battery in the designated battery compartment or housing of your electric scooter. Ensure that it fits securely and aligns with the battery terminals.
- Position the battery correctly: Pay close attention to the battery’s alignment. The positive (+) terminal should match with the positive wire, and the negative (-) terminal should correspond to the negative wire.
- Connect the positive wire: Take the positive wire, usually red or marked with a “+,” and attach it to the positive terminal of the new battery. Use a wrench or the appropriate tool to secure the wire to the terminal by tightening the nut or screw.
- Connect the negative wire: Take the negative wire, usually black or marked with a “-,” and attach it to the negative terminal of the new battery. Again, use the necessary tool to secure the wire to the terminal.
- Ensure proper wire connections: Double-check that the wires are securely connected to the correct battery terminals. Loose or incorrect connections can result in electrical issues or damage to the battery and scooter.
- Secure the new battery: If there were any securing mechanisms, such as straps or clips, that held the old battery in place, reattach or tighten them to ensure the new battery remains stable and secure.
It’s important to perform the installation process carefully and accurately to avoid any damage to the scooter’s electrical system. Take your time to align the battery correctly, securely attach the wires, and ensure proper connections. With the new battery successfully installed, you are ready to reconnect the power and test the scooter’s functionality.
Reconnect the Wires to the New Battery
After installing the new battery in your electric scooter, the next step is to reconnect the wires to the new battery. Properly connecting the wires ensures a secure and reliable electrical connection, allowing your scooter to function optimally. Follow these steps to reconnect the wires to the new battery:
- Check wire insulation: Before reconnecting the wires, inspect them for any signs of damage or wear. If you notice any frayed or exposed wires, it’s important to repair or replace them to ensure a safe and reliable connection.
- Identify the battery terminals: Locate the positive (+) and negative (-) terminals on the new battery. They are usually labeled or color-coded for easy identification.
- Reconnect the positive wire: Take the positive wire, usually red or marked with a “+,” and attach it to the positive terminal of the new battery. Use a wrench or the appropriate tool to securely fasten the wire to the terminal.
- Reconnect the negative wire: Take the negative wire, usually black or marked with a “-“, and attach it to the negative terminal of the new battery. Again, use the necessary tool to ensure a tight and secure connection.
- Double-check wire connections: Confirm that the positive and negative wires are correctly connected to the corresponding battery terminals. Ensure that they are securely fastened to minimize the risk of loose connections or electrical issues.
- Verify wire positions: Make sure that the wires are positioned away from any moving parts or areas of potential interference. Proper wire routing helps protect them from damage and ensures the wires do not cause any disruptions when the scooter is in operation.
By following these steps, you will have successfully reconnected the wires to the new battery. Take care to double-check the wire connections and ensure they are secure before proceeding. Properly connecting the wires is essential for the safe and efficient operation of your electric scooter.
Secure the Battery Cover
After reconnecting the wires to the new battery in your electric scooter, it’s time to secure the battery cover. The battery cover protects the battery and ensures it remains in place while you ride your scooter. Follow these steps to securely fasten the battery cover:
- Check for any alignment guidelines: Before securing the battery cover, ensure that it aligns properly with the scooter’s body. Look for any alignment guidelines or indicators that will help you position the cover correctly.
- Place the battery cover in position: Carefully position the battery cover over the battery compartment or housing. Ensure that it fits snugly and aligns with any holes or slots for the fasteners.
- Identify the fasteners: Take note of the type of fasteners used to secure the battery cover. They could be screws, bolts, clips, or any other appropriate fastening mechanism.
- Insert and fasten the fasteners: Use the appropriate tool, such as a screwdriver or wrench, to insert and fasten the necessary fasteners. Tighten them securely but avoid overtightening, which could damage the cover or the scooter’s body.
- Check for a secure fit: Once the fasteners are in place, gently test the battery cover to ensure it is securely fastened and does not wobble or move excessively. A properly secured battery cover will protect the battery and maintain its integrity.
It’s crucial to securely fasten the battery cover to prevent it from coming loose while riding your electric scooter. A loose or improperly secured cover can pose safety risks and potentially damage the battery or other components. By following these steps, you can ensure a secure and snug fit for the battery cover, providing protection and stability to your scooter’s electrical system.
Test the Scooter’s Power
After replacing the battery and securing the battery cover on your electric scooter, it’s important to test the scooter’s power to ensure that everything is functioning correctly. Testing the scooter’s power will help verify the successful installation of the new battery and identify any potential issues. Follow these steps to test the scooter’s power:
- Turn on the scooter: Flip the power switch or insert the scooter key into the ignition, depending on your scooter’s configuration. This will restore power to the scooter’s electrical system.
- Check for power indications: Look for any power indicators on the dashboard or control panel of your electric scooter. These indicators may include lights, displays, or gauges that signify the scooter’s power status.
- Assess battery voltage: Use a multimeter to measure the voltage of the new battery. Ensure that the voltage reading falls within the acceptable range for your specific scooter model, typically around 12.6-13.2 volts for a fully charged battery.
- Test scooter functionality: Take a short ride or operate the scooter’s controls to assess its functionality. Check if the scooter accelerates smoothly, brakes properly, and all other features are working as expected.
- Monitor battery performance: During the test ride, pay attention to how the battery performs. Observe if the scooter’s range has improved and if the battery holds a charge without any significant drop in power.
- Listen for unusual sounds: While testing the scooter’s power, listen for any unusual or concerning sounds such as clicking, grinding, or excessive motor noise. Unusual sounds may indicate a potential issue that requires further inspection.
By following these steps, you can effectively test the power of your electric scooter after installing the new battery. Identifying any issues or discrepancies in power or functionality early on allows you to address them promptly and ensure a smooth and enjoyable riding experience. If you notice any persistent power issues, it’s best to consult a professional or refer to your scooter’s manual for troubleshooting steps.
Dispose of the Old Battery Responsibly
After successfully replacing the battery of your electric scooter, it’s important to dispose of the old battery responsibly. Old batteries contain hazardous materials and should not be thrown in the regular trash, as improper disposal can harm the environment. Follow these steps to ensure the proper disposal of your old battery:
- Check local regulations: Research the local regulations and guidelines regarding the disposal of batteries in your area. Municipalities often have specific protocols or designated collection points for battery recycling.
- Look for recycling options: Find recycling centers, drop-off locations, or collection events that accept used batteries. These facilities are equipped to handle the safe disposal and recycling of batteries.
- Prepare for transportation: If you need to transport the old battery to a recycling facility, take the necessary precautions. Place the battery in a sturdy and secure container to prevent leaks or damage during transit.
- Follow recycling center guidelines: When visiting a recycling center, follow their guidelines for battery drop-off. Some centers may have specific procedures or restrictions that you need to adhere to for safe disposal.
- Consider battery trade-in or return programs: Some manufacturers or retailers offer battery trade-in or return programs. These programs allow you to return your old battery when purchasing a new one, ensuring proper disposal and potential recycling.
- Spread awareness: Educate others about the importance of proper battery disposal. Encourage family, friends, and fellow scooter riders to dispose of their old batteries responsibly to minimize environmental impact.
By following these steps, you can ensure that your old battery is disposed of in an environmentally responsible way. Proper battery disposal helps protect the environment by preventing toxic materials from contaminating landfills or water sources. Play your part in promoting sustainability and protecting our planet by responsibly disposing of your old electric scooter battery.