
What is a Watermark in Word?
In the context of Microsoft Word documents, a watermark refers to a faint text or image that is overlaid on the main content. It is typically positioned in the background and is used to convey additional information or indicate the status of the document. Watermarks can be seen behind the text and images in a document, appearing as a translucent layer.
Watermarks are often used for various purposes, including branding, security, and document management. For instance, businesses may use watermarks to add their logo or company name to their documents to enhance brand identity and establish a professional image. In legal or confidential documents, watermarks can be used to indicate the status of the document, such as “Draft” or “Confidential.” This helps prevent unauthorized access or distribution of sensitive information.
Additionally, watermarks can also serve as a deterrent against unauthorized copying or plagiarism. By adding a personalized watermark, it becomes more difficult for individuals to pass off your documents as their own. This can be particularly useful for artists, photographers, and writers who want to protect their creative work from unauthorized use or reproduction.
In Microsoft Word, you can easily insert watermarks by accessing the “Watermark” feature, which offers various options, including pre-designed watermarks or custom text and images. Watermarks can be added to individual pages or applied to the entire document, giving you flexibility in how you display the watermark.
Now that you have a basic understanding of what a watermark is in Microsoft Word, let’s move on to exploring why you might want to remove a watermark and the different methods you can use to do so.
Why Would You Want to Remove a Watermark?
While watermarks can serve valuable purposes, there may be situations where you need to remove them from your Word documents. Here are a few reasons why you might want to remove a watermark:
- Unprofessional appearance: In some cases, the watermark may not align with the visual aesthetics or formatting of your document. It can be distracting or interfere with the legibility of the text, making it necessary to remove it for a more professional look.
- Editing or revising: If you need to make edits or revisions to a document that contains a watermark, removing it temporarily can make the editing process easier. Once the changes are made, you can reapply the watermark if desired.
- Sharing or printing: Watermarks can sometimes obstruct the readability or appearance of a document when sharing or printing. To ensure that your document is easily viewable or printable without any distractions, removing the watermark may be necessary.
- Preventing confusion or misunderstanding: In some cases, a watermark that was added to indicate the document’s status, such as “Draft” or “Confidential,” may no longer be accurate. Removing the watermark can prevent any confusion or misunderstanding that could arise due to outdated information.
- Compliance requirements: Certain regulatory or compliance requirements may prevent the use of watermarks in specific types of documents. In such cases, removing the watermark becomes necessary to ensure compliance with the relevant guidelines.
It’s important to note that removing a watermark from a document should be done with caution. If the document carries legal or copyright implications, it is crucial to consider the permissions and rights associated with the content before removing the watermark. Additionally, always ensure that you have the authority or proper authorization to remove any watermarks from a document to avoid any legal issues.
Now that you understand why you might want to remove a watermark, let’s explore different methods that can help you accomplish this task in Microsoft Word.
Method 1: Removing Watermarks with the “Watermark” Option
Microsoft Word provides a built-in feature that allows you to easily remove watermarks using the “Watermark” option. Here’s how you can do it:
- Open the Word document that contains the watermark you want to remove.
- Go to the “Design” tab located at the top of the Word interface.
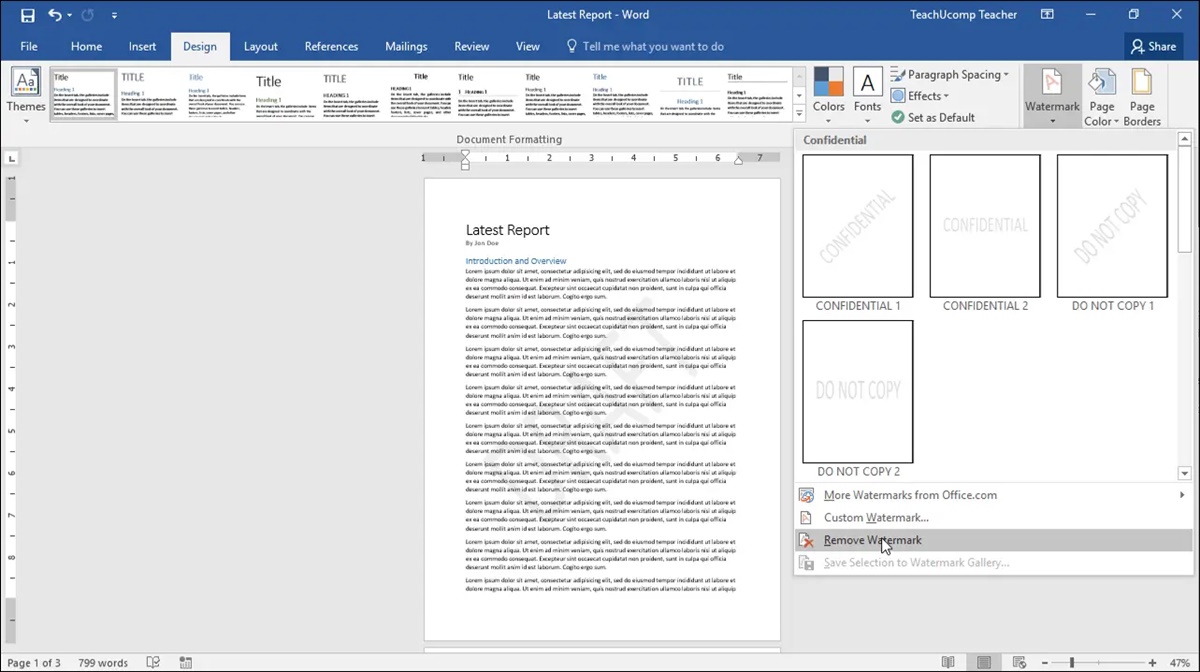
- In the “Page Background” section, you will find the “Watermark” button. Click on it to open the drop-down menu.
- In the drop-down menu, you will see options for pre-designed watermarks that are commonly used, such as “Confidential,” “Draft,” or “Urgent.” At the bottom of the drop-down menu, you will find the “Remove Watermark” option. Click on it.
- The watermark will be removed from your document immediately. You can now save the document without the watermark or continue working on it.
It’s important to note that this method removes the watermark from the entire document. If you only want to remove the watermark from specific pages, you can do so by following these additional steps:
- Double-click on the header or footer section of the page where you want to remove the watermark.
- In the “Design” tab, click on the “Watermark” button in the “Page Background” section.
- Select the “Remove Watermark” option from the drop-down menu.
- The watermark will be removed from the selected page(s) only, and the rest of the document will remain intact.
Using the “Watermark” option is the simplest and most straightforward method to remove watermarks from your Word documents. However, if this method doesn’t meet your requirements or if you need to explore other options, you can consider alternative methods that we will discuss in the upcoming sections.
Method 2: Removing Watermarks Using the “Header and Footer” Option
If you prefer a more detailed approach to removing watermarks in Microsoft Word, you can utilize the “Header and Footer” option. This option allows you to access the specific header or footer section where the watermark is located, making it easier to remove. Here’s how you can do it:
- Open the Word document that contains the watermark you want to remove.
- Double-click on the header or footer section of the page where the watermark is located. This action will open the “Header and Footer Tools” tab.
- In the “Header and Footer” tab, you will find various options and tools to customize the header and footer sections. Look for the “Design” tab, and click on it.
- In the “Options” group, you will see a checkbox labeled “Different First Page.” If the watermark is only present on the first page, make sure this checkbox is checked. If the watermark is present on multiple pages, skip this step.
- Look for the “Header & Footer” group, and click on the “Watermark” button. A drop-down menu will appear with various options.
- Select the “Remove Watermark” option from the drop-down menu.
- The watermark will be removed from the header or footer section of the page(s) you selected.
- To remove the watermark from additional pages, repeat steps 2 through 7 for each page where the watermark appears.
Using the “Header and Footer” option gives you more control over which pages have the watermark removed. This method is particularly useful if you have a document with multiple sections or if the watermark is only present on specific pages. By following these steps, you can effectively remove the watermark from the desired sections of your Word document.
If the watermark persists or if you need to explore other methods to remove watermarks, continue reading as we discuss additional options in the following sections.
Method 3: Removing Watermarks with the “Picture” Option
Another approach to removing watermarks in Microsoft Word is by utilizing the “Picture” option. This method allows you to directly select and delete the watermark image from your document. Here’s how you can do it:
- Open the Word document that contains the watermark you want to remove.
- Click on the “Insert” tab located at the top of the Word interface.
- In the “Illustrations” section, click on the “Pictures” button. This action will open the file explorer for you to browse and select an image.
- Navigate to the location of the Word document and select it.
- After selecting the document, all the images within it will be displayed.
- Look for the image that represents the watermark you want to remove. Click on the image to select it.
- Press the “Delete” button on your keyboard or right-click on the image and select “Delete.”
- The selected image, which represents the watermark, will be removed from your document.
- Save the document to preserve the changes without the watermark.
With the “Picture” option, you can target the specific watermark image and remove it directly from your Word document. This method is particularly useful if the watermark is in the form of an image rather than text. By following these steps, you can effectively eliminate the watermark image and have a clean document without any visual distractions.
If you are still unable to remove the watermark using the “Picture” option or if you want to explore alternative methods, continue reading as we discuss more options in the next section.
Method 4: Removing Watermarks by Reverting to a Previous Version
If you have been diligently saving different versions of your Word document, you can consider using the “Revert to Previous Version” feature to remove a watermark. This method allows you to restore an earlier version of the document that does not contain the watermark. Here’s how you can do it:
- Open the Word document that contains the watermark you want to remove.
- Click on the “File” tab in the top-left corner of the Word interface to access the backstage view.
- In the backstage view, click on the “Info” option in the sidebar.
- Under the “Versions” section, you will find a list of the available versions of the document.
- Click on the drop-down arrow next to the “Versions” heading to expand the list.
- Select a previous version of the document that does not contain the watermark. Word will automatically revert to that version, replacing the current version.
- Save the document to preserve the changes without the watermark.
By reverting to a previous version of the document, you can effectively eliminate the watermark. It is important to note that this method relies on the availability of saved versions of the document, so it may not always be applicable if you haven’t been regularly saving different versions. However, if you have been maintaining versions, this can be a simple and efficient way to remove the watermark.
If the watermark persists or if you want to explore additional options for removing watermarks in Word, continue reading as we discuss one more method in the next section.
Method 5: Removing Watermarks Using a Third-Party Tool
If the built-in options in Microsoft Word do not meet your needs, or if you’re dealing with a particularly stubborn watermark, you can consider using a third-party tool specifically designed for watermark removal. These tools provide advanced capabilities and flexibility to remove watermarks from Word documents. Here’s how you can remove watermarks using a third-party tool:
- Find a reliable third-party tool that specializes in watermark removal for Word documents. There are several available options, both free and paid, that you can explore.
- Download and install the chosen tool on your computer, following the instructions provided by the developer.
- Open the tool and load the Word document that contains the watermark you want to remove.
- Select the watermark removal option or feature within the tool’s interface. This can vary depending on the specific tool you are using.
- Follow the prompts or instructions provided by the tool to process and remove the watermark from your document.
- Once the watermark is successfully removed, save the document to preserve the changes.
Using a third-party tool gives you more control and options for removing watermarks from Word documents. These tools often have advanced algorithms and features that can effectively identify and eliminate even complex watermarks. However, it is essential to ensure that you choose a reputable and trustworthy tool to maintain document integrity and security.
Remember to always backup your documents before using third-party tools, and be cautious when installing or downloading any software from the internet to protect against potential security risks. Additionally, third-party tools may have different user interfaces and functionalities, so refer to the tool’s documentation or support resources for detailed instructions on how to remove watermarks from your Word documents.
With this method, you can achieve precise and reliable watermark removal, especially in cases where other methods may not be effective. However, exercise caution and ensure the tool you choose is legitimate and safe.
Tips for Removing Watermarks in Word Successfully
Removing watermarks in Microsoft Word can sometimes be a tricky task, especially when dealing with complex or persistent watermarks. However, with the right approach and techniques, you can ensure successful removal. Here are some helpful tips to help you remove watermarks in Word successfully:
- Try built-in options first: Before exploring other methods or third-party tools, make sure to utilize the built-in watermark removal options provided by Microsoft Word. These options are easy to use and often sufficient for basic watermark removal needs.
- Use context-specific methods: Consider the location and type of watermark in your document. If the watermark appears in the header or footer, methods like “Header and Footer” or “Picture” options may be more effective. Tailor your approach based on the specific context of the watermark.
- Check document versions: If you have been consistently saving different versions of your Word document, check if an earlier version without the watermark exists. Utilize the “Revert to Previous Version” feature in Word to restore a version that does not contain the watermark.
- Use high-resolution images: If the watermark is an image, make sure to use a high-resolution version of the same image when attempting to remove it. Higher resolution images provide better clarity and accuracy during the removal process.
- Consider professional tools: If the built-in options fail or if you encounter stubborn watermarks, consider using third-party tools specifically designed for watermark removal in Word. These tools offer advanced features and capabilities that can enhance your success rate in removing watermarks.
- Take precautions: Before using third-party tools, ensure that you research and choose a reputable tool from trusted sources. Backup your documents before making any changes, and exercise caution when installing or downloading any software from the internet to avoid potential security risks.
By following these tips, you can increase your chances of successfully removing watermarks from your Word documents. Experiment with different methods and approaches to find the one that works best for your specific situation, and always prioritize document integrity and security throughout the process.