
What is CorelDRAW?
CorelDRAW is a popular vector graphics editor developed and marketed by Corel Corporation. It is widely used by graphic designers, illustrators, and artists to create stunning visual designs for print, web, and multimedia projects. CorelDRAW provides a powerful and intuitive set of tools and features that allow users to unleash their creativity and bring their ideas to life.
One of the key advantages of CorelDRAW is its ability to work with vector graphics. Unlike raster graphics, which are made up of individual pixels, vector graphics are based on mathematical equations that define the shapes, lines, and curves. This means that vector graphics can be scaled up or down without losing any image quality, making CorelDRAW ideal for creating logos, illustrations, and other graphics that need to be resized for different purposes.
CorelDRAW offers a wide range of drawing and editing tools, including the Pen tool, Shape tools, Text tools, and more. These tools allow users to create complex illustrations, manipulate shapes, add text and effects, and much more. The software also provides advanced features like layers, transparency, and blend modes, which further enhance the design capabilities.
In addition to its design tools, CorelDRAW also includes other useful features such as the ability to import and export files in various formats, the option to work with multiple artboards, and the availability of pre-designed templates and clipart. The software is constantly updated with new features and improvements, ensuring that users have access to the latest tools and technologies.
Whether you are a professional designer or a beginner, CorelDRAW offers a user-friendly interface that is easy to learn and navigate. It provides a seamless workflow that allows users to quickly create, edit, and export their designs. The software also provides ample resources and online tutorials to help users get started and master the art of graphic design.
Why do you need to remove the background?
Removing the background from an image can serve a variety of purposes and offers several benefits for both personal and professional use.
One of the main reasons to remove the background is to isolate an object or subject in an image. By eliminating the background, you can focus the viewer’s attention on the main element and create a cleaner, more professional look. This is particularly useful when you need to use the image in graphic design, marketing materials, product photography, or any other situation where you want the subject to stand out.
Removing the background can also help in creating compelling visual compositions. By extracting the subject from its original background, you have the freedom to place it in different settings or merge it with other elements seamlessly. This opens up endless creative possibilities in creating collages, photo manipulations, or composite images.
Another advantage of removing the background is the ability to create consistent branding. Many businesses require their products or services to have a consistent look across all their marketing materials. By removing the background from product images, the focus remains solely on the item itself, regardless of where it is placed or how it is used. This helps to create a cohesive and professional appearance, reinforcing brand identity and recognition.
Furthermore, removing the background allows for easy integration of images into various design projects. When the background is removed, the image can be seamlessly placed on different backgrounds, such as website banners, social media graphics, or promotional materials. This flexibility and adaptability enable designers to create visually appealing and engaging content without having to worry about distracting or clashing backgrounds.
Lastly, removing the background can also be useful in improving image quality. In cases where the original background is cluttered, poorly lit, or visually distracting, removing it can significantly enhance the overall aesthetic of the image. By isolating the subject, you can ensure that the focus remains on the important details and eliminate any unwanted visual noise.
Using the Magic Wand tool
The Magic Wand tool is a powerful feature in CorelDRAW that allows you to select and remove specific areas of an image with just a few clicks. It is a useful tool for quickly removing backgrounds that have consistent colors or tones.
To use the Magic Wand tool, follow these steps:
- Open CorelDRAW and import the image you want to work with.
- Select the Magic Wand tool from the toolbox on the left side of the screen.
- Click on the area of the image you want to remove. The Magic Wand tool will automatically select pixels with similar colors or tones.
- If necessary, adjust the Tolerance setting in the tool options bar to refine the selection. A higher tolerance value will select a wider range of colors, while a lower value will select fewer colors.
- Once you are satisfied with the selection, press the Delete key on your keyboard to remove the selected area.
- Repeat these steps for any other areas you want to remove.
It is important to note that the Magic Wand tool may not always provide perfect results, especially if the background colors or tones are complex or irregular. In such cases, you may need to combine the Magic Wand tool with other selection tools, such as the Lasso tool or the Pen tool, to achieve a more accurate and precise selection.
Additionally, the Magic Wand tool works best on images with clear boundaries between the subject and the background. If the edges are fuzzy or there are fine details in the background, you may need to use other methods, such as the Background Eraser tool or the Extract tool, for better results.
Experiment with the Magic Wand tool and explore its different settings to see how it can help you efficiently remove backgrounds and enhance your images. Remember to save your work frequently to avoid losing any changes and always work on a duplicate of the original image, so you can easily go back to the original if needed.
Refining the selection with the Lasso tool
When removing a background from an image in CorelDRAW, you may encounter situations where the Magic Wand tool does not provide the desired level of accuracy. This is where the Lasso tool comes in handy. The Lasso tool allows you to manually draw a selection around the desired area, giving you more control over the selection process.
Here’s how you can use the Lasso tool to refine your selection:
- Open CorelDRAW and import the image you want to work with.
- Select the Lasso tool from the toolbox on the left side of the screen.
- Click and hold the left mouse button and drag the cursor to draw a freehand selection around the area you want to keep.
- Release the mouse button to complete the selection.
- If needed, you can add to or subtract from the selection by holding the Shift or Alt key while drawing with the Lasso tool.
- Once you have the desired selection, go to the Edit menu and choose Cut to remove the selected area.
- Repeat these steps as necessary to refine the selection around other areas of the image.
The Lasso tool offers more precision and control than the Magic Wand tool, especially when dealing with intricate or irregular shapes. It allows you to manually trace the edges of the subject, ensuring a more accurate selection.
Keep in mind that the Lasso tool requires a steady hand and may take some practice to achieve smooth and precise selections. Don’t be afraid to zoom in on the image for more detailed work. Additionally, you can always use the Undo command (Ctrl+Z) if you make a mistake or want to start over.
Remember to save your progress regularly to avoid losing any changes. It’s also a good idea to work on a duplicate of the original image, so you can easily revert back if needed.
By using the Lasso tool in conjunction with other selection tools like the Magic Wand tool, you can refine your selection and remove the background with greater accuracy, allowing you to create stunning images with clean, isolated subjects.
Removing the background with the Background Eraser tool
The Background Eraser tool in CorelDRAW is a handy feature that allows you to remove the background from an image accurately, especially when dealing with complex backgrounds and fine details. The Background Eraser tool detects and erases pixels based on their color similarity, making it ideal for images with textured or multi-colored backgrounds.
Follow these steps to use the Background Eraser tool:
- Open CorelDRAW and import the image you want to edit.
- Select the Background Eraser tool from the toolbox on the left side of the screen.
- Adjust the brush size and hardness settings according to the image’s details and the desired level of accuracy. A smaller brush size is suitable for fine details, while a larger brush size is more efficient for larger areas.
- Click and drag over the areas of the background you want to remove. The Background Eraser tool will dynamically erase pixels with similar colors as you drag the brush.
- Continue using short, overlapping strokes to erase the background thoroughly. Pay attention to edges and areas with color variations to ensure a clean removal.
- If necessary, use the Zoom tool to get a closer view and work on finer details.
- Once you have erased the background, you can further refine the selection by adjusting the Tolerance and Contiguous settings in the tool options bar. Tolerance controls the color range the tool considers as background, while Contiguous determines the degree of color similarity.
- When you are satisfied with the result, go to the Edit menu and choose Cut to remove the selected background.
It’s important to note that the Background Eraser tool works by erasing pixels based on color similarity. Therefore, it may not be as effective when dealing with backgrounds that have similar colors to the subject. In such cases, you may need to combine the Background Eraser tool with other selection tools, such as the Magic Wand or the Lasso tool, to achieve a more precise and refined selection.
As always, remember to save your work frequently to avoid losing any progress, and consider working on a duplicate of the original image to preserve the original if needed.
The Background Eraser tool is a valuable tool in CorelDRAW for removing complex backgrounds with precision and efficiency. With a bit of practice and experimentation, you can achieve clean and professional-looking images with ease.
Removing the background with the Extract tool
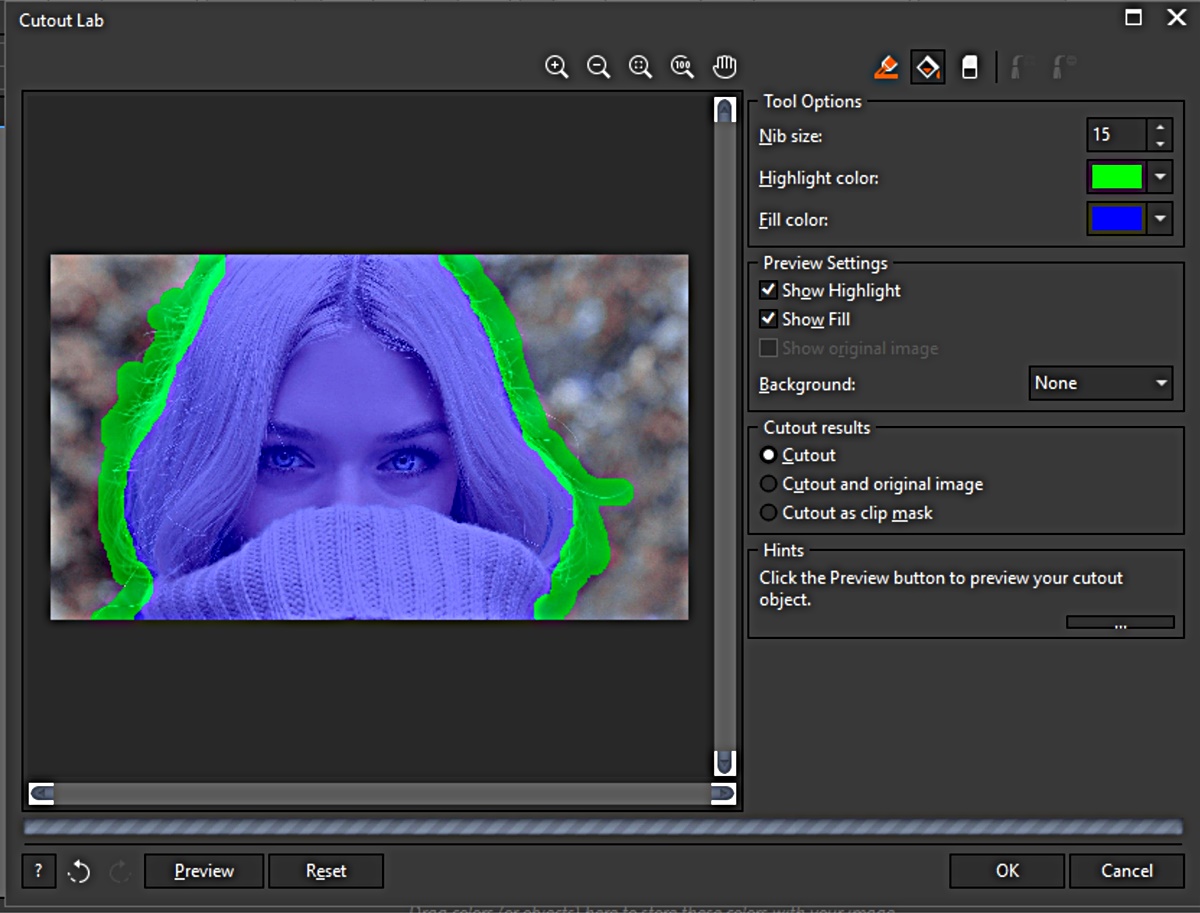
The Extract tool in CorelDRAW is a powerful feature that allows you to remove the background from an image with precision and ease. It utilizes advanced algorithms to automatically detect and extract the subject from its background, even in complex scenarios. The Extract tool is particularly useful when dealing with images that have fine details or hair.
To use the Extract tool, follow these steps:
- Open CorelDRAW and import the image you want to edit.
- Select the Extract tool from the toolbox on the left side of the screen.
- Adjust the tool’s settings, such as brush size and edge details, according to the image and your desired level of accuracy.
- Begin painting over the edges of the subject in the image. The Extract tool will automatically detect and highlight the subject, separating it from the background.
- If needed, switch to the Fill tool to mark areas inside the subject that should be preserved.
- Continue refining the selection by painting or filling until the subject is accurately highlighted.
- Once you are satisfied with the selection, click the Extract button to remove the background.
The Extract tool provides a non-destructive process, which means that you can always go back and make further refinements to the selection if needed. You can adjust the selection boundaries, add or subtract areas, and fix any imperfections by painting or using the Fill tool again.
After extracting the subject from the background, you can further enhance the image by adding effects, adjusting the lighting, or placing it on a new background to create a seamless composition.
It’s worth noting that the success of the Extract tool depends on the complexity of the image and the contrast between the subject and the background. In some cases, particularly with images that have similar colors or tones, manual refinement using other selection tools like the Lasso tool may be necessary to achieve the desired result.
Remember to save your work regularly to avoid losing any changes and consider working on a duplicate of the original image to preserve the original if needed.
The Extract tool in CorelDRAW is an invaluable asset for removing backgrounds efficiently and accurately. With its advanced algorithms and intuitive interface, you can achieve seamless and professional results even with challenging images.
Removing the background with the Mask tool
The Mask tool in CorelDRAW is a powerful feature that allows you to remove the background from an image by creating a mask. A mask is a non-destructive way of hiding or revealing parts of an image while preserving the original data. With the Mask tool, you can precisely define which areas of the image you want to keep or remove, giving you full control over the background removal process.
To remove the background using the Mask tool, follow these steps:
- Open CorelDRAW and import the image you want to edit.
- Make sure the image is selected, and go to the Object menu. From there, choose Mask > Edit Mask.
- A window will appear, showing the image with a temporary transparent layer on top.
- Use the selection or drawing tools, such as the Rectangle, Ellipse, or Freehand tools, to create the mask shape. This should cover the area you want to preserve. You can also use the eraser tool to remove areas that you want to be transparent.
- Refine the mask further by adjusting the properties of the mask, such as feathering or opacity, to achieve a smooth transition between the subject and the background.
- Click “Apply” or “Commit” to finalize the mask and see the result.
With the mask created, you can now easily modify the image without affecting the masked areas. You can change the background, apply effects or filters, or replace the masked area with another image or design element.
The Mask tool offers a flexible and non-destructive way to remove backgrounds, allowing you to make adjustments and refinements as needed. By using different mask shapes and properties, you can achieve precise and detailed background removal, even with complex images.
Remember to save your work regularly to avoid losing any changes, and consider working on a duplicate of the original image to preserve the original if needed.
The Mask tool in CorelDRAW provides a powerful and flexible solution for removing backgrounds, giving you the freedom to create stunning compositions and designs with ease.
Tips for a clean background removal
When removing the background from an image, achieving a clean and professional result is essential. Here are some tips to help you achieve the best possible outcome:
- Choose the right selection tool: Depending on the complexity of the image and the subject, different selection tools may be more effective. Experiment with tools like the Magic Wand, Lasso, Background Eraser, Extract, or Mask tool to find the one that works best for your specific image.
- Zoom in for precision: When working with fine details or intricate edges, zoom in on the image to get a closer look. This will allow you to make more precise selections and ensure a clean removal.
- Refine the selection: After using an initial selection tool, refine it further using other selection tools or by manually adjusting the selection. Pay attention to edges and areas with color variations to ensure a seamless transition between the subject and the background.
- Take advantage of feathering: Feathering the selection creates a soft transition between the subject and the background, helping to blend the edges and avoid a harsh, unnatural cutout. Experiment with different feathering values to achieve the desired effect.
- Avoid jagged edges: To prevent jagged or pixelated edges in the final result, work with higher resolution images and use anti-aliasing options when available. This will create smoother edges and a more professional finish.
- Consider shadow and transparency: If the subject has natural shadows or transparent areas, preserve them when removing the background to maintain a realistic look. Pay attention to lighting and make adjustments if necessary.
- Adjust the color and tone: Once the background is removed, make any necessary adjustments to the color and tone of the subject to ensure it blends well with the new background or remains consistent in the overall design.
- Save your work as a transparent image: To use the image with a transparent background in other projects, save it in a format that supports transparency, such as PNG or GIF. This will preserve the transparency, allowing you to easily overlay the image on different backgrounds.
Remember that practice makes perfect when it comes to background removal. Take your time, experiment with different tools and techniques, and don’t be afraid to make adjustments and refinements until you achieve the desired result. With patience and attention to detail, you can create clean and professional background removals that enhance your images and designs.
Saving the image with a transparent background
After successfully removing the background from an image, it’s important to save it with a transparent background to preserve the transparency for future use. Saving the image in a format that supports transparency, such as PNG or GIF, will allow you to overlay the image seamlessly onto different backgrounds without any unwanted artifacts or white backgrounds.
Here’s how you can save an image with a transparent background:
- Ensure that the background has been completely removed and the subject is isolated.
- Verify that the image file has been saved in a format that supports transparency, such as PNG or GIF.
- In CorelDRAW, go to the File menu and choose Save As (or Export if available) to open the save window.
- Select the desired file format, such as PNG or GIF, from the list of available formats.
- Choose a location on your computer to save the file and enter a descriptive file name.
- Adjust any additional settings specific to the chosen file format, such as color depth or compression.
- Ensure that the option to preserve transparency or alpha channel is selected, if available.
- Click Save to save the image.
By saving the image with a transparent background, you can easily use it across various projects and applications. The transparency allows you to place the image on different backgrounds without any visible borders or unwanted background colors.
When using the image with a transparent background, keep in mind that the file format you choose may affect the quality and file size. PNG is a commonly used format that provides lossless compression and supports transparency. GIF is another option that supports transparency but may be more suitable for images with limited colors or simple designs.
Remember to organize and store your files in a logical manner to easily locate and access images with transparent backgrounds when needed. Additionally, make backups of important files to avoid accidental loss or corruption.
By saving your images with a transparent background, you can effortlessly integrate them into various design projects and enjoy the flexibility of overlaying them on any background, allowing for seamless and visually appealing compositions.