
Assess the damage
Before replacing or removing a phone’s glass screen protector, it is important to assess the damage and determine the extent of the problem. By doing so, you can make an informed decision on whether to replace the screen protector or address the underlying issue.
Start by examining the screen protector for any visible cracks or scratches. If you notice significant damage, such as deep cracks or shattered glass, it is advisable to replace the protector right away. These damages not only compromise the integrity of the protector but may also hinder the functionality and visibility of the phone screen.
However, if the damage is minimal, such as light scratches or scuffs, you may be able to remove the protector and apply a new one without any further steps. In some cases, minor scratches may even go unnoticed once a new protector is applied.
In addition to visible damage, pay attention to any touch sensitivity or display issues. If you find that the touch screen is not as responsive or there are abnormalities in the display, it could indicate a problem with the phone itself. In such cases, it may be necessary to consult a professional or contact the phone manufacturer for assistance.
Assessing the damage is crucial as it allows you to determine the best course of action. Whether it’s a minor scratch or a shattered protector, knowing the extent of the problem will guide you in deciding whether to remove or replace the screen protector, or seek professional help if needed.
Gather the necessary tools
Before you begin the process of removing or replacing a phone’s glass screen protector, it’s important to gather the necessary tools. Having the right equipment at hand will ensure a smooth and hassle-free procedure. Here are the essential tools you’ll need:
- Clean microfiber cloth: This soft cloth is ideal for cleaning the phone screen and removing any dirt or smudges. Avoid using ordinary cloths or tissues as they may leave lint or scratches.
- Isopropyl alcohol or screen cleaning solution: Use a gentle cleaning solution specifically designed for electronic screens or isopropyl alcohol (70% concentration or higher) to clean the phone screen. Make sure to apply it to the cloth, not directly to the screen.
- Tape or adhesive strip: This can be helpful in removing the old screen protector. Use transparent tape or an adhesive strip that is strong enough but won’t leave residue on the screen.
- New screen protector: Purchase a high-quality screen protector compatible with your phone model. There are various options available, such as tempered glass or film protectors. Choose the one that suits your needs and preferences.
- Dust removal sticker or dust blower: These tools are essential for getting rid of any dust particles or lint that may get trapped between the screen and the new protector. They help ensure a clean and bubble-free application.
- Plastic card or squeegee: This tool helps in smoothing out the new screen protector, eliminating air bubbles, and ensuring a secure application.
Having these tools readily available will make the process of removing or replacing a phone’s glass screen protector much easier and more efficient. It’s important to use high-quality materials to ensure proper protection for your phone screen and to maintain its clarity and touch sensitivity.
Clean the phone screen
Before removing or replacing a phone’s glass screen protector, it is crucial to clean the phone screen thoroughly. This step ensures that the new protector adheres properly and provides optimal clarity. Here’s how you can clean the phone screen effectively:
- Gather the necessary tools: As mentioned earlier, you will need a clean microfiber cloth and a suitable screen cleaning solution or isopropyl alcohol.
- Power off the phone: Before cleaning the screen, turn off the phone to prevent accidental inputs or damage.
- Apply the cleaning solution: Spray a small amount of the screen cleaning solution onto the microfiber cloth. If you’re using isopropyl alcohol, dampen the cloth without soaking it.
- Wipe the screen: Gently wipe the phone screen in a circular motion, ensuring you cover the entire surface. Avoid pressing too hard as it may damage the screen.
- Pay attention to the edges: Clean the edges of the screen thoroughly, as this is where dust and dirt tend to accumulate. Use a gentle touch to avoid pushing debris into the phone’s ports or buttons.
- Dry the screen: After cleaning, allow the screen to air dry or use a dry portion of the microfiber cloth to gently pat it dry.
- Inspect for residue: Check the screen for any residue or streaks. If you notice any, repeat the cleaning process using a fresh section of the microfiber cloth.
- Ensure a dust-free environment: It is crucial to perform the cleaning process in a dust-free environment to minimize the risk of debris getting trapped under the new screen protector.
Cleaning the phone screen thoroughly ensures a clean and smooth surface for the new screen protector. It removes fingerprints, smudges, and dirt, allowing the protector to adhere properly. Taking the time to clean the screen properly will result in a better overall appearance and functionality of your phone.
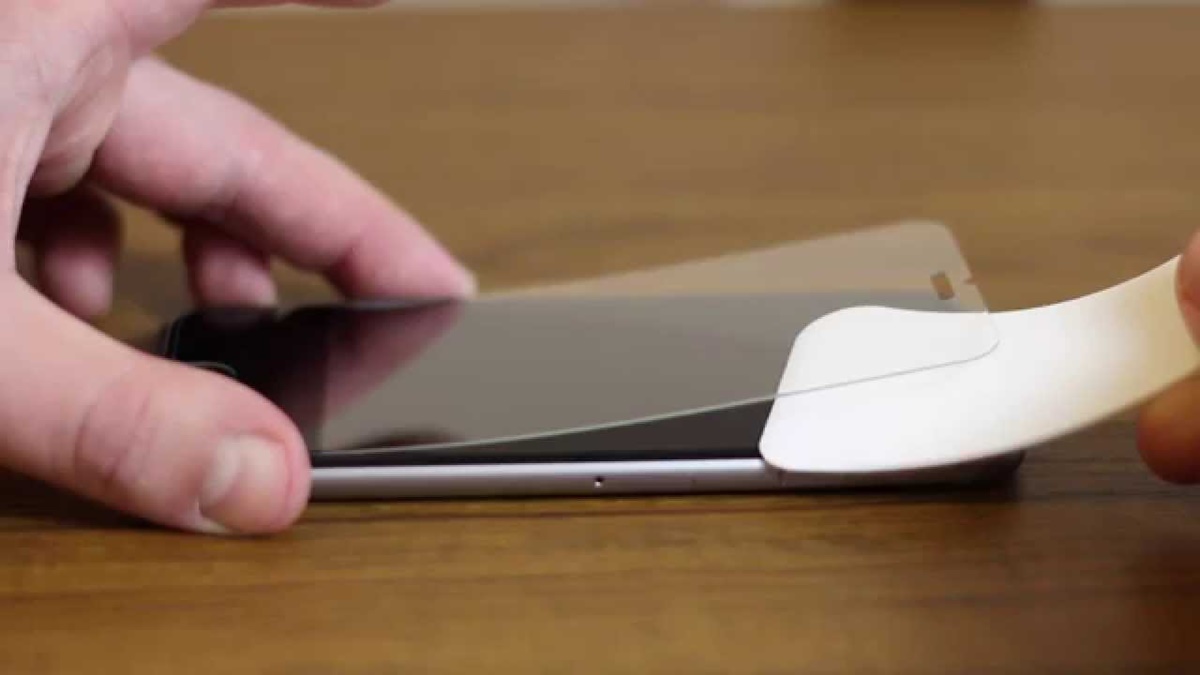
Peel off the old screen protector
Now that you’ve assessed the damage, gathered the necessary tools, and cleaned the phone screen, it’s time to remove the old screen protector. Follow these steps to peel off the old protector smoothly:
- Locate an edge: Start by identifying a corner or edge of the screen protector that you can lift easily. Use your fingernail or a piece of tape to get a good grip.
- Apply steady pressure: Once you have a grip on the edge, apply steady and gentle pressure to lift the protector. Avoid using excessive force as it may damage the screen underneath.
- Peel slowly: Slowly peel off the protector in a controlled manner, making sure not to pull at an angle that could cause the protector to break or shatter.
- Use tape if needed: If the protector is not coming off easily, you can use a piece of tape to lift it off gently. Attach the tape to a corner of the protector and pull it slowly in a parallel direction to the screen.
- Discard the old protector: Once the old protector is fully removed, dispose of it properly. Avoid bending or folding it, as it may cause injury or damage if mishandled.
- Inspect the screen: After removing the protector, inspect the phone screen for any residue or adhesive. If there are remnants left behind, proceed to the next step to remove them.
Peeling off the old screen protector requires patience and caution. By gently lifting the protector and peeling it off slowly, you minimize the risk of damaging the screen or leaving sticky residue behind.
Remove residue (if any)
After peeling off the old screen protector, it’s common to find residue or adhesive left on the phone screen. This residue can be sticky and may hinder the proper adhesion of the new screen protector. To ensure a clean surface, follow these steps to remove any residue:
- Dampen a clean microfiber cloth: Moisten a corner of the cloth with isopropyl alcohol or a screen cleaning solution. Ensure that the cloth is not dripping wet.
- Gently rub the residue: Use the damp part of the cloth to gently rub the areas where residue or adhesive is present. Apply light pressure and use circular motions to loosen the residue.
- Avoid using excessive force: Be careful not to use too much force or abrasive materials, as this may damage the screen. The goal is to remove the residue gently without causing any harm.
- Repeat if necessary: If the residue persists, dampen a new section of the cloth and continue to gently rub the affected areas. Repeat this process until the residue is completely removed.
- Dry the screen: Once the residue is removed, use a dry portion of the microfiber cloth to pat dry the screen. Ensure that there is no moisture left behind.
Removing residue from the phone screen is an important step to ensure a smooth and clean surface for the new screen protector. By using gentle motions and appropriate cleaning solutions, you can effectively eliminate any sticky residue or adhesive left behind.
Align the new screen protector
Once you have removed any residue from the phone screen, it’s time to align the new screen protector. Proper alignment is crucial to ensure full coverage and optimal functionality. Follow these steps to align the new protector accurately:
- Gather the necessary tools: Ensure you have the new screen protector, a dust removal sticker or dust blower, and a plastic card or squeegee.
- Inspect for any dust or debris: Before applying the new protector, check the screen for any remaining dust or debris. If you notice any, use the dust removal sticker or dust blower to remove them gently.
- Peel off the backing: Carefully peel off the backing of the new screen protector, exposing the adhesive side. Be sure to handle the protector by the edges to avoid leaving fingerprints or smudges.
- Align the protector with the screen: Hold the protector by the edges and align it with the edges of the phone screen. Carefully position it, ensuring that the cutouts for the front camera, speakers, and buttons line up accurately.
- Place it from one side: Once aligned, gently place one side of the protector onto the phone screen. Be careful not to touch the adhesive side or apply too much pressure at this stage.
- Smooth out the protector: Use the plastic card or squeegee to gradually smooth out the protector from the center towards the edges. This step helps to remove air bubbles and ensures proper adhesion.
- Work out any air bubbles: If air bubbles appear during the application process, use the plastic card or squeegee to push them towards the closest edge. Apply light pressure to eliminate the bubbles effectively.
- Reposition if necessary: If the alignment is not perfect or if the protector is not placed correctly, quickly lift it and reposition it. Repeat the smoothing process to ensure a proper fit.
Properly aligning the new screen protector is essential for optimal coverage and functionality. Taking the time to align it accurately and smooth out any air bubbles will result in a clean and clear screen, providing the necessary protection to your phone.
Apply the new screen protector
After aligning the new screen protector with the phone screen, it’s time to apply it. This step ensures that the protector adheres properly and provides the necessary protection. Follow these steps to apply the new screen protector correctly:
- Gently lift one edge: Using the edge of the protector, lift it slightly to create a gap between the protector and the phone screen. Be careful not to detach or remove the protector completely.
- Remove the backing: With the protector slightly lifted, peel off the backing from the adhesive side. Take your time and avoid touching the adhesive surface to prevent any fingerprints or smudges.
- Align and lower the protector: Gradually lower the protector onto the phone screen, aligning it with the edges and cutouts. Take your time to ensure it lines up accurately before making full contact.
- Apply gentle pressure: Once aligned, begin applying gentle pressure to the center of the protector. Use your fingers or a plastic card to smooth out the protector in a front-to-back motion.
- Work towards the edges: Continue applying gradual pressure and work towards the edges of the protector. This helps to eliminate any air bubbles and ensures proper adhesion.
- Smooth out any air bubbles: If air bubbles appear during the application, use a plastic card or squeegee to push them towards the closest edge. Apply light pressure to remove the bubbles effectively.
- Check for proper adhesion: Once applied, carefully inspect the protector for any areas where the adhesion may be compromised. If you notice any loose edges or bubbles, lift the protector slightly and reapply pressure to secure it.
- Give it time to adhere: Allow the new screen protector some time to adhere fully to the phone screen. Avoid touching or placing any additional pressure on it for at least 24 hours to ensure proper adhesion.
By following these steps, you can successfully apply a new screen protector to your phone. Take your time, ensure proper alignment, and apply gentle pressure to achieve a smooth and bubble-free finish that protects your phone screen from scratches and damage.
Smooth out air bubbles
After applying the new screen protector, it’s common to encounter air bubbles trapped beneath the protector’s surface. These bubbles can affect the clarity and functionality of the screen. Fortunately, there are ways to smooth out the air bubbles to achieve a bubble-free finish. Follow these steps to effectively remove air bubbles from your screen protector:
- Identify the air bubbles: Inspect the screen protector for any visible air bubbles. Bubbles can be small or large and may be located in various areas of the screen.
- Use a plastic card or squeegee: Take a plastic card or a squeegee specifically designed for screen protector installation. Start from the center of the screen and gently push towards the edges to disperse the air trapped beneath the protector.
- Apply even pressure: Use consistent and even pressure while smoothing out the bubbles. Be careful not to press too hard, as it may damage the protector or the phone screen.
- Work in a front-to-back motion: Move the plastic card or squeegee in a front-to-back motion across the screen. This motion helps to force the air bubbles towards the edges and out from under the protector.
- Focus on one bubble at a time: If there are multiple bubbles, tackle them individually. Start with the largest or most noticeable bubble and work your way towards the smaller ones.
- Apply extra pressure if necessary: For stubborn air bubbles that refuse to dissipate, apply a bit more pressure while smoothing them out. Be cautious and make sure not to damage the protector or the phone screen.
- Check for residual bubbles: After smoothing out the bubbles, check the screen protector to ensure that no residual bubbles remain. If you notice any, repeat the smoothing process until the surface is completely bubble-free.
- Allow time for adhesion: After effectively removing the air bubbles, let the screen protector adhere fully to the phone screen. Avoid touching or applying any additional pressure to the protector for at least 24 hours.
By following these steps, you can eliminate air bubbles and achieve a smooth and clear screen with your new protector. Taking the time to smooth out the bubbles ensures optimal functionality and maintains the visual appeal of your phone screen.
Clean and polish the screen
After successfully applying a new screen protector and smoothing out any air bubbles, it’s important to clean and polish the screen to enhance its appearance. This step ensures a crystal-clear view and maintains the overall cleanliness of your phone screen. Follow these steps to properly clean and polish the screen:
- Gather the necessary tools: You’ll need a clean microfiber cloth and a screen cleaning solution or isopropyl alcohol. Avoid using harsh chemicals or abrasive materials.
- Dampen the cloth: Moisten a corner of the microfiber cloth with a small amount of the screen cleaning solution or isopropyl alcohol. Ensure the cloth is not dripping wet.
- Wipe the screen gently: Use the dampened portion of the cloth to wipe the phone screen in a gentle motion. Avoid applying excessive pressure that could damage the screen or the applied protector.
- Focus on smudges and fingerprints: Pay special attention to areas with visible smudges or fingerprints. Use light, circular motions with the cloth to remove them effectively.
- Dry the screen: After wiping the screen, use a dry portion of the cloth to gently dry it. Ensure that there are no streaks or moisture left behind.
- Polish with a clean cloth: Take a dry and clean microfiber cloth and gently buff the screen in circular motions. This step helps to further enhance clarity and give the screen a polished finish.
- Inspect for cleanliness: After cleaning and polishing, inspect the screen to ensure that it is free from smudges, fingerprints, or streaks. If necessary, repeat the cleaning process until the screen is completely clean.
Cleaning and polishing the screen not only enhances its visual appeal but also ensures optimum touch sensitivity and clarity. By using a microfiber cloth and a suitable cleaning solution, you can effectively remove smudges, fingerprints, and other impurities from the screen surface. Taking the time to clean and polish the screen will leave it looking pristine and ready for use.
Test the new screen protector
After applying and cleaning the new screen protector, it’s crucial to test its functionality and ensure it provides the desired level of protection. Testing the screen protector allows you to identify any issues and make necessary adjustments if needed. Here are some steps to effectively test the new screen protector:
- Inspect for clarity: Take a moment to examine the screen under different lighting conditions. Ensure that the protector does not affect the brightness, color accuracy, or clarity of the phone screen.
- Test touch sensitivity: Interact with the phone’s touch screen and observe its responsiveness. Tap, swipe, and use various functions to ensure that the touch sensitivity is not compromised by the screen protector.
- Check for proper alignment: Verify that the screen protector is properly aligned and covers the entire phone screen. Look for any gaps or misalignment along the edges or around the cutouts for the front camera, speakers, and buttons.
- Assess fingerprint resistance: If the screen protector claims to be fingerprint-resistant, test its ability to repel fingerprints. Touch the screen with clean fingers and observe if fingerprints are easily visible or if they can be easily wiped away.
- Verify screen visibility: Ensure that the screen remains visible and readable from different angles. Tilt the phone and check for any distortion, color shifts, or reduction in visibility caused by the screen protector.
- Perform a swipe test: Swipe your finger across the screen in different directions to check for smoothness and any potential friction or resistance caused by the protector.
- Repeat touch gestures: Retrace various touch gestures, such as pinch-to-zoom or scrolling, to confirm that the screen protector does not hinder or interfere with these actions.
- Observe dust or debris accumulation: Keep an eye out for any accumulation of dust or debris around the edges of the screen protector. If necessary, use a dust removal sticker or dust blower to eliminate any particles.
By thoroughly testing the new screen protector, you can ensure that it meets your expectations in terms of functionality, protection, and visual quality. If you encounter any issues during testing, such as reduced touch sensitivity or poor alignment, consider reapplying or adjusting the protector to achieve the desired result.
Tips for preventing damage in the future
Taking precautions to prevent damage to your phone’s screen can help extend its lifespan and reduce the need for frequent protector replacements. By implementing these helpful tips, you can safeguard your phone screen from potential hazards:
- Use a protective case: Invest in a high-quality protective case that offers adequate coverage for your phone. The case should have raised edges to protect the screen from accidental bumps, drops, and scratches.
- Avoid placing the phone face-down: When placing your phone on a surface, make sure to keep it face-up to prevent direct contact with potentially abrasive materials or sharp objects.
- Keep the phone away from keys and coins: Avoid placing your phone in a pocket or bag with keys, coins, or other metal objects, as they can cause scratches or even screen damage.
- Store the phone separately: When not in use, store your phone in a dedicated compartment or pouch to avoid it getting scratched or damaged by other items in your bag or pocket.
- Regularly clean the screen: Gently clean the screen with a microfiber cloth to remove fingerprints, smudges, and dust. Regular cleaning helps maintain the screen’s visibility and prevents buildup that may impact touch sensitivity.
- Protect the screen during physical activities: If you engage in sports or other physical activities, consider using a sports armband or a protective phone holder to keep your phone secure and shielded from potential impacts.
- Avoid extreme temperatures: High temperatures can damage the screen, so avoid exposing your phone to direct sunlight for extended periods or leaving it in hot environments like a hot car or sauna.
- Be cautious with cleaning solutions: Only use screen cleaning solutions specifically designed for electronic devices. Avoid harsh chemicals or abrasive substances that may damage the screen or remove protective coatings.
- Handle with care: Treat your phone with care and avoid dropping it or subjecting it to unnecessary rough handling. A gentle touch and proper handling can go a long way in preventing screen damage.
Implementing these tips can significantly reduce the risk of damage to your phone’s screen. By being proactive and taking preventive measures, you can enjoy a vibrant and intact screen for an extended period of time.