
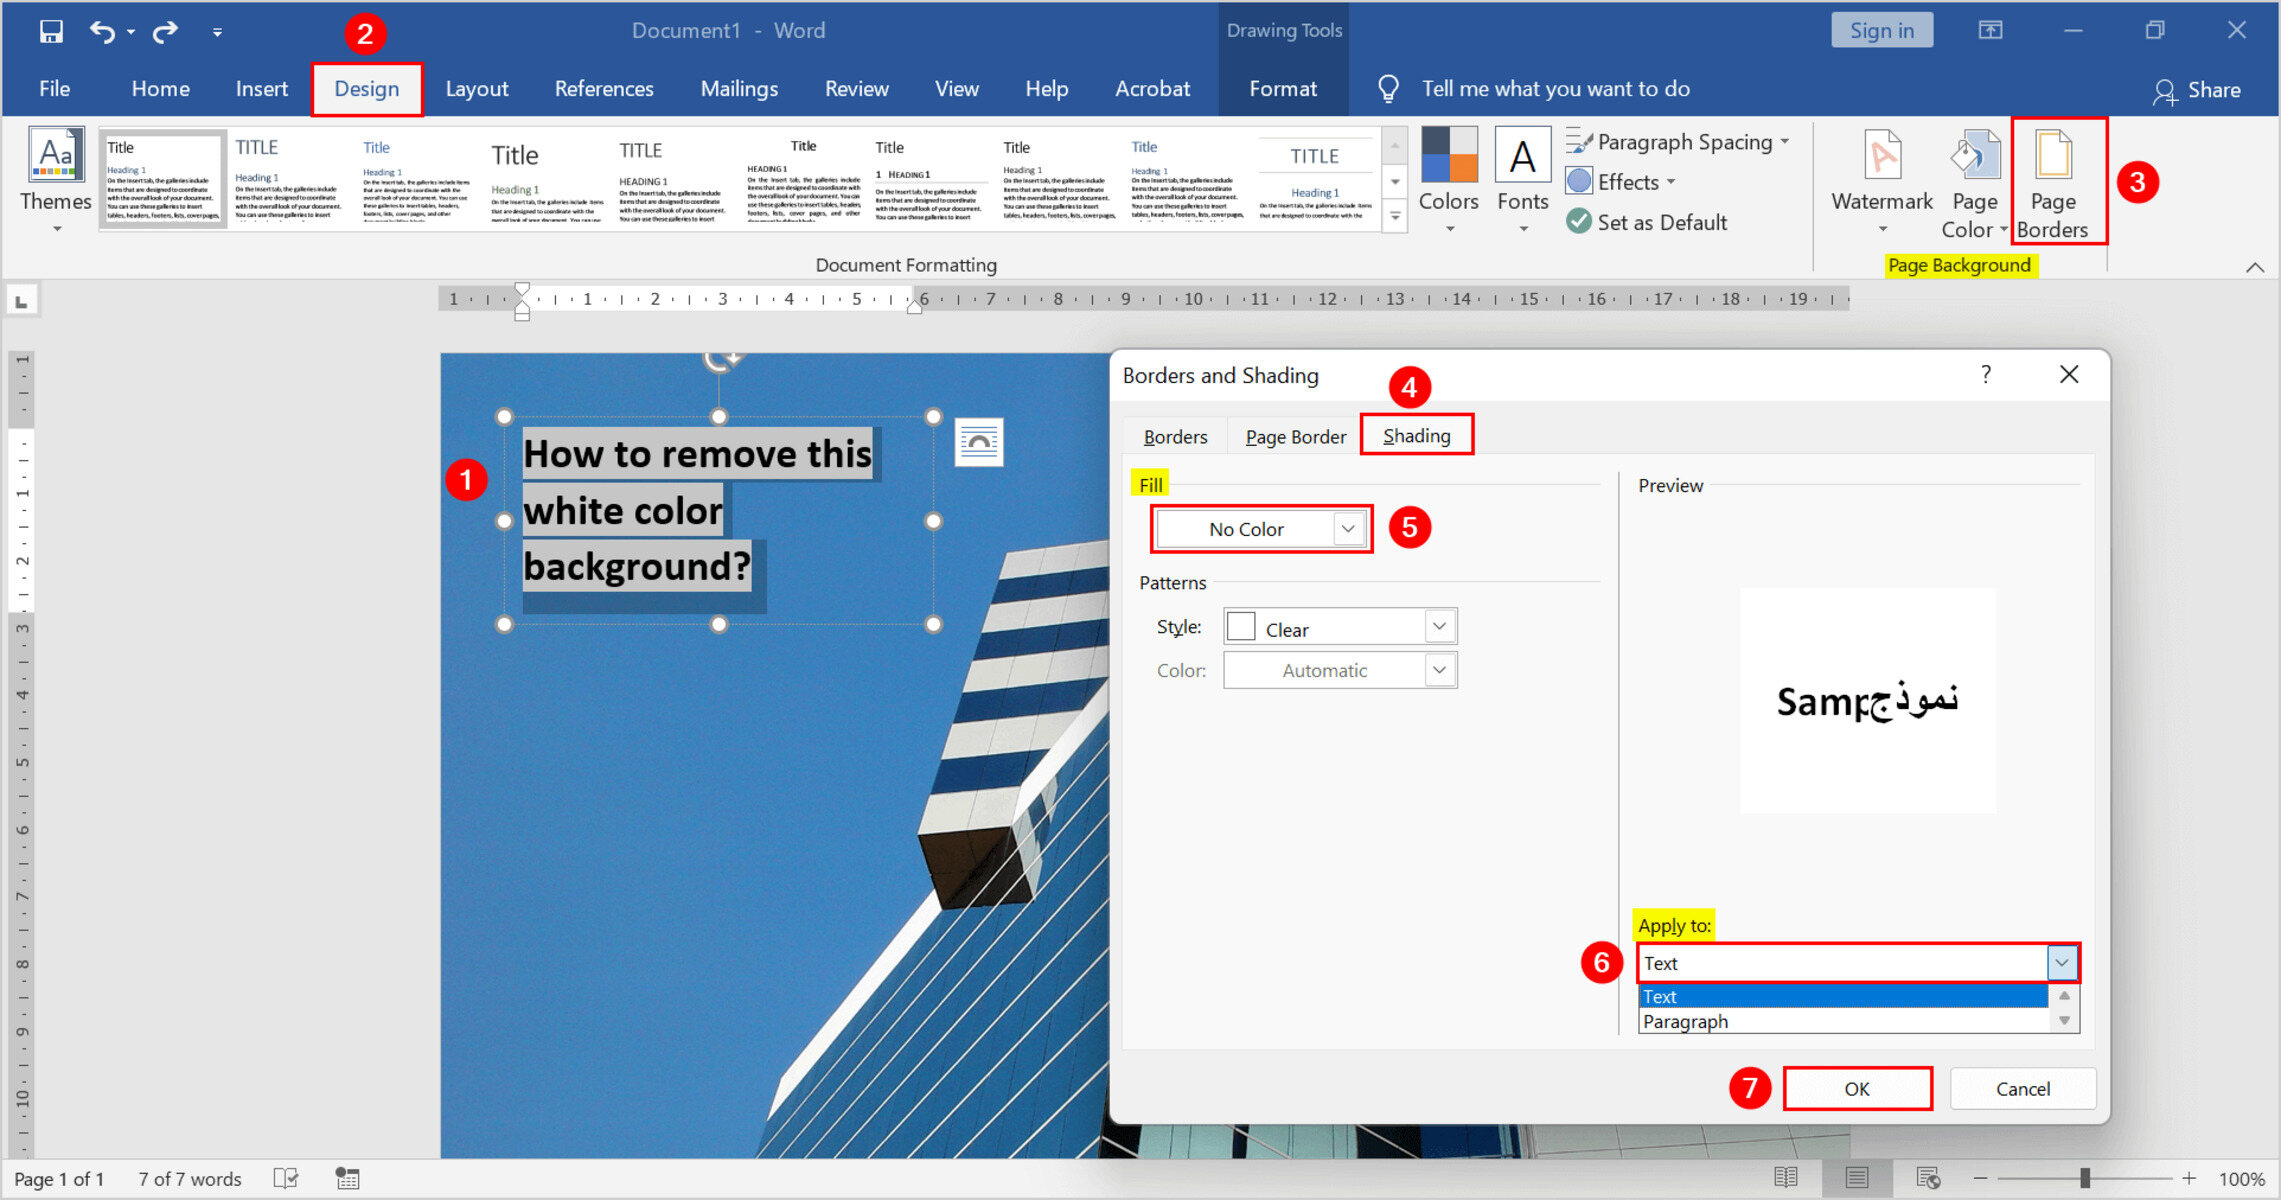
Why Remove Image Fill or Backgrounds?
When working with images in Microsoft Word, you may come across situations where you need to remove the fill or background of an image. This could be because the existing fill or background is distracting, clashing with the overall design, or simply not aligned with your desired aesthetic. Removing the image fill or background can help you achieve a cleaner and more professional-looking document.
There are various scenarios where you might need to remove the image fill or background. For example, if you want to insert an image into a document with a different background color or pattern, removing the existing fill or background of the image will ensure a seamless integration. Similarly, when creating presentations or reports, removing the background of an image can help emphasize the subject matter and make it stand out.
Additionally, removing the image fill or background can be beneficial when you want to extract the main subject of an image and place it on a different background. This can be especially useful when editing photos or creating collages, allowing for more flexibility in your design choices.
Whether you’re a student, professional, or creative individual, knowing how to remove image fill or backgrounds in Microsoft Word can significantly enhance your document creation process. By utilizing the methods outlined in the following sections, you’ll be able to seamlessly edit and customize images to suit your specific needs.
Method 1: Using the Transparency Tool
The transparency tool in Microsoft Word allows you to adjust the opacity of an image, making it partially or completely transparent. This method is ideal when you want to maintain the overall appearance of the image while reducing its visual impact.
To use the transparency tool, follow these simple steps:
- Select the image that you want to remove the fill or background from.
- Click on the “Format” tab that appears in the toolbar when the image is selected.
- Within the “Adjust” group, locate the “Transparency” option and click on it.
- A dropdown menu will appear, allowing you to adjust the transparency of the image. Move the slider to the left to increase transparency or to the right to decrease transparency.
- Keep adjusting the transparency until the desired effect is achieved.
By using the transparency tool, you can control the level of visibility of the image fill or background, blending it seamlessly into your document. It’s worth noting that the transparency tool only affects the image itself and does not remove the fill or background completely.
This method is particularly useful when working with images that have a simple background or a consistent color. However, for more complex backgrounds or images with intricate details, you may require a different method to achieve a clean and polished result.
Method 2: Using the Remove Background Tool
Microsoft Word provides a handy tool called “Remove Background” that helps you quickly remove the image fill or background. This tool is especially useful when working with complex images that have intricate backgrounds or when you want to precisely isolate the main subject of the image.
To use the Remove Background tool, follow these steps:
- Select the image that you want to remove the fill or background from.
- In the “Format” tab, click on the “Remove Background” option located in the “Adjust” group.
- A pink overlay will appear over the image, with a rectangular box encircling the main subject. Microsoft Word attempts to automatically detect the background, but you may need to further refine the selection.
- Resize and reposition the rectangular box as needed to include the entire main subject while excluding the background.
- Once you’re satisfied with the selection, press the “Keep Changes” button in the “Background Removal” tab that appears in the toolbar.
After using the Remove Background tool, Word will remove the highlighted areas and keep only the main subject of the image. You can further adjust and fine-tune the results using the tools available in the “Background Removal” tab, such as the “Mark Areas to Keep” and “Mark Areas to Remove” options.
Note that depending on the complexity of the image, the Remove Background tool may not produce perfect results every time. In such cases, combining it with other methods or using the manual removal approach discussed in the next section can help you achieve the desired outcome.
Method 3: Manually Removing the Image Fill or Background
If the previous methods don’t yield the desired results or if you prefer a more hands-on approach, you can manually remove the image fill or background in Microsoft Word. While this method requires more effort and precision, it allows you to have complete control over the removal process.
To manually remove the image fill or background, follow these steps:
- Select the image that you want to remove the fill or background from.
- In the “Format” tab, click on the “Picture Effects” button located in the “Adjust” group.
- A dropdown menu will appear, providing various image editing options. Choose the “Artistic Effects” option.
- In the “Artistic Effects” panel that appears, select the “No Effect” option.
- If necessary, adjust other image attributes such as brightness, contrast, or color to further enhance the image appearance.
By selecting the “No Effect” option, you effectively remove any applied fill or background from the image. This method works well for images with solid colors or simple backgrounds.
In cases where the image has a complex background or intricate details, you can manually remove the fill or background using additional editing features, such as cropping, erasing, or selecting specific areas to remove with precision. These tools are available under the “Format” tab in the “Picture Tools” section.
Remember to zoom in on the image for better accuracy and use a combination of tools to achieve the desired result. Take your time and experiment until you are satisfied with the appearance of the image.
Method 4: Using the Crop Tool
Another effective method to remove the image fill or background in Microsoft Word is by using the Crop tool. This method allows you to precisely select and remove unwanted portions of the image, including the fill or background.
To use the Crop tool to remove the image fill or background, follow these steps:
- Select the image that you want to edit.
- In the “Format” tab, click on the “Crop” button located in the “Size” group.
- Handles will appear around the image, indicating that the Crop tool is active.
- Click and drag the handles to crop and adjust the image according to your desired dimensions.
- To remove the background or fill, drag the handles inward to crop out the unwanted areas. Ensure that only the main subject of the image remains.
- Click outside the image to apply the crop and remove the fill or background.
By using the Crop tool, you can easily remove unwanted portions of the image and eliminate the fill or background. This method is particularly helpful when you want to focus on a specific part of the image or when the background is distracting or irrelevant to your document.
Experiment with different cropping techniques to achieve the desired result. Remember to maintain the composition and overall visual balance of the image while eliminating the fill or background.
Keep in mind that resizing the image before using the Crop tool can help you preserve the image’s resolution and clarity.
Method 5: Using the Format Picture Option
Microsoft Word offers a range of formatting options that can help you remove the image fill or background. By leveraging the available tools in the Format Picture option, you can customize the appearance of the image and eliminate any unwanted fill or background.
To use the Format Picture option to remove the image fill or background, follow these steps:
- Select the image that you want to edit in your Word document.
- In the “Format” tab, click on the “Format Picture” button located in the “Picture Styles” group.
- A format picture panel will appear on the right-hand side of the window.
- Under the “Picture” tab, explore the available formatting options.
- Adjust the image brightness, contrast, or saturation to alter its appearance and potentially minimize the visibility of the fill or background.
- Explore other available options such as artistic effects, picture styles, or color adjustments to further enhance or modify the image.
By experimenting with the various formatting options, you can effectively reduce or eliminate the image fill or background, depending on your requirements. The settings you choose will depend on the specific image and the desired outcome.
Remember to preview the changes in real-time by observing the image in your Word document. Make incremental adjustments until you achieve the desired result.
Using the Format Picture option is a versatile method that allows you to enhance the overall appearance of the image while removing any fill or background that detracts from the intended focus.
Method 6: Using Picture Effects
Microsoft Word provides a range of picture effects that can be applied to an image to remove the fill or background and achieve the desired visual impact. These effects allow you to modify the image’s appearance, add artistic touches, and eliminate any unwanted elements.
To use picture effects to remove the image fill or background, follow these steps:
- Select the image that you want to edit.
- In the “Format” tab, click on the “Picture Effects” button located in the “Adjust” group.
- A dropdown menu will appear, showcasing a variety of effects such as shadows, reflections, glows, and more.
- Explore the available effects and choose the ones that best suit your needs.
- Apply the selected effects to the image and observe the changes.
- Experiment with different combinations of effects to achieve the desired result.
By using picture effects, you can add layers of visual interest to the image while effectively removing the fill or background. Effects such as shadows or glows can create depth and separation, helping to eliminate unwanted elements and draw focus to the main subject.
Adjust the intensity and positioning of the effects to fine-tune their impact. Play around with different combinations and settings until you achieve the desired aesthetics.
Picture effects can provide a creative and visually appealing solution for removing the image fill or background. However, it’s important to exercise caution and not to overdo the effects, as they should complement the image rather than overpower it.