
Why Is Background Noise in Audacity a Problem?
Background noise is a common issue that can significantly impact the quality of your audio recordings. Whether you are recording a podcast, a voiceover, or a musical performance, unwanted noise can make your audio sound unprofessional and distract listeners from the main content.
First and foremost, background noise can reduce the clarity and intelligibility of your recordings. It can make it difficult for your audience to understand the words or lyrics you are speaking or singing, leading to a frustrating listening experience.
Additionally, background noise can diminish the overall production value of your audio. Even if the content itself is valuable, the presence of unwanted noise can make it seem amateurish or unpolished. This can be particularly problematic if you are sharing your recordings in a professional setting or trying to establish a reputable brand image.
Background noise can also interfere with the emotional impact of your audio. For example, imagine listening to a deeply moving monologue, only to be constantly distracted by the hum of an air conditioner or the buzzing of a nearby device. The immersion and connection with the content can be lost, significantly diminishing the intended impact.
Furthermore, background noise can introduce challenges when it comes to post-production editing. If there is a consistent hum or hiss throughout the entire recording, it can be challenging to apply equalization, compression, or other audio effects effectively. This can limit your options for enhancing the audio quality during the editing process.
Overall, background noise in Audacity can hinder the overall listening experience, diminish the perceived quality of your recordings, and hamper your ability to enhance and polish the audio during post-production. Removing or reducing background noise in Audacity is therefore essential to ensure that your audio projects sound professional, clear, and engaging.
Tools You Will Need
To effectively remove background noise in Audacity, you will need the following tools:
- Audacity: This is a free, open-source audio editing software that provides a range of features and effects to manipulate and enhance your audio recordings.
- Computer: You will need a computer or laptop with sufficient processing power to run Audacity smoothly. Make sure your computer meets the system requirements for Audacity.
- Microphone: A good-quality microphone will help capture clear and accurate audio. There are various types of microphones available, such as USB microphones, condenser microphones, or dynamic microphones. Choose one that suits your recording needs.
- Headphones: A pair of headphones will allow you to monitor your audio recordings closely and detect any remaining background noise or other issues that need to be addressed.
- Pop Filter/Windscreen: Using a pop filter or a windscreen can help reduce unwanted noises caused by plosive sounds (such as “p” or “b” sounds) or wind interference during recording. This can minimize the need for excessive noise removal in post-production.
- Noise Reduction Plugins: Although not necessary, there are various noise reduction plugins available that can be used in conjunction with Audacity to further enhance the background noise removal process. These plugins offer advanced algorithms and customization options.
Having these tools at your disposal will ensure that you have everything you need to effectively remove background noise in Audacity and achieve high-quality, professional-sounding audio recordings.
Step 1: Import Your Audio File
The first step in removing background noise in Audacity is to import your audio file into the software. Here’s how you can do it:
- Launch Audacity on your computer. If you haven’t already installed it, you can download it for free from the official Audacity website.
- Click on the “File” tab in the top menu and select “Import” from the dropdown menu. A file browser window will appear.
- Navigate to the location where your audio file is stored and select it. Click on the “Open” button to import the file into Audacity.
- Once the audio file is imported, you will see its waveform displayed in the Audacity workspace. You can zoom in or out on the waveform to get a better view by using the zoom tools located at the top left corner of the workspace.
It is important to note that Audacity supports a wide range of audio file formats, including WAV, MP3, AIFF, FLAC, and more. Ensure that your audio file is in a compatible format to be imported into Audacity.
Now that you have successfully imported your audio file into Audacity, you are ready to move on to the next step: identifying the background noise that needs to be removed.
Step 2: Identify the Background Noise
Before you can effectively remove background noise in Audacity, it is important to identify the specific areas in your audio where the noise is present. Here’s how you can do it:
- Ensure that your audio file is selected in Audacity. You can click on the track to highlight it.
- Play the audio by clicking on the “Play” button in the transport toolbar located at the top left corner of the Audacity window. Listen closely for any unwanted background noise that you want to eliminate.
- As you listen to the audio, take note of the parts where the background noise is most prominent. It can be a consistent hum, hiss, clicks, or other unwanted sounds. These areas will be your reference points for noise reduction.
- If you notice that the background noise varies throughout the audio, it can be helpful to create markers or labels in Audacity to indicate the specific sections with noise. To add a marker, simply click on the section of the waveform where the noise starts or ends, and go to the “Transport” menu, then select “Tracks” and click on “Add Label at Selection”. You can then name the label accordingly.
By identifying the specific areas in your audio where the background noise is present, you can target those sections during the noise reduction process and achieve more accurate results. This step is crucial in ensuring that you effectively remove the noise without affecting the quality of the desired audio content.
Step 3: Select the Silent Part of the Audio as a Noise Profile
Once you have identified the areas in your audio file where the background noise is present, the next step is to select a silent or quiet part of the audio to serve as a noise profile. This noise profile will be used by Audacity to identify and reduce the background noise. Follow these steps:
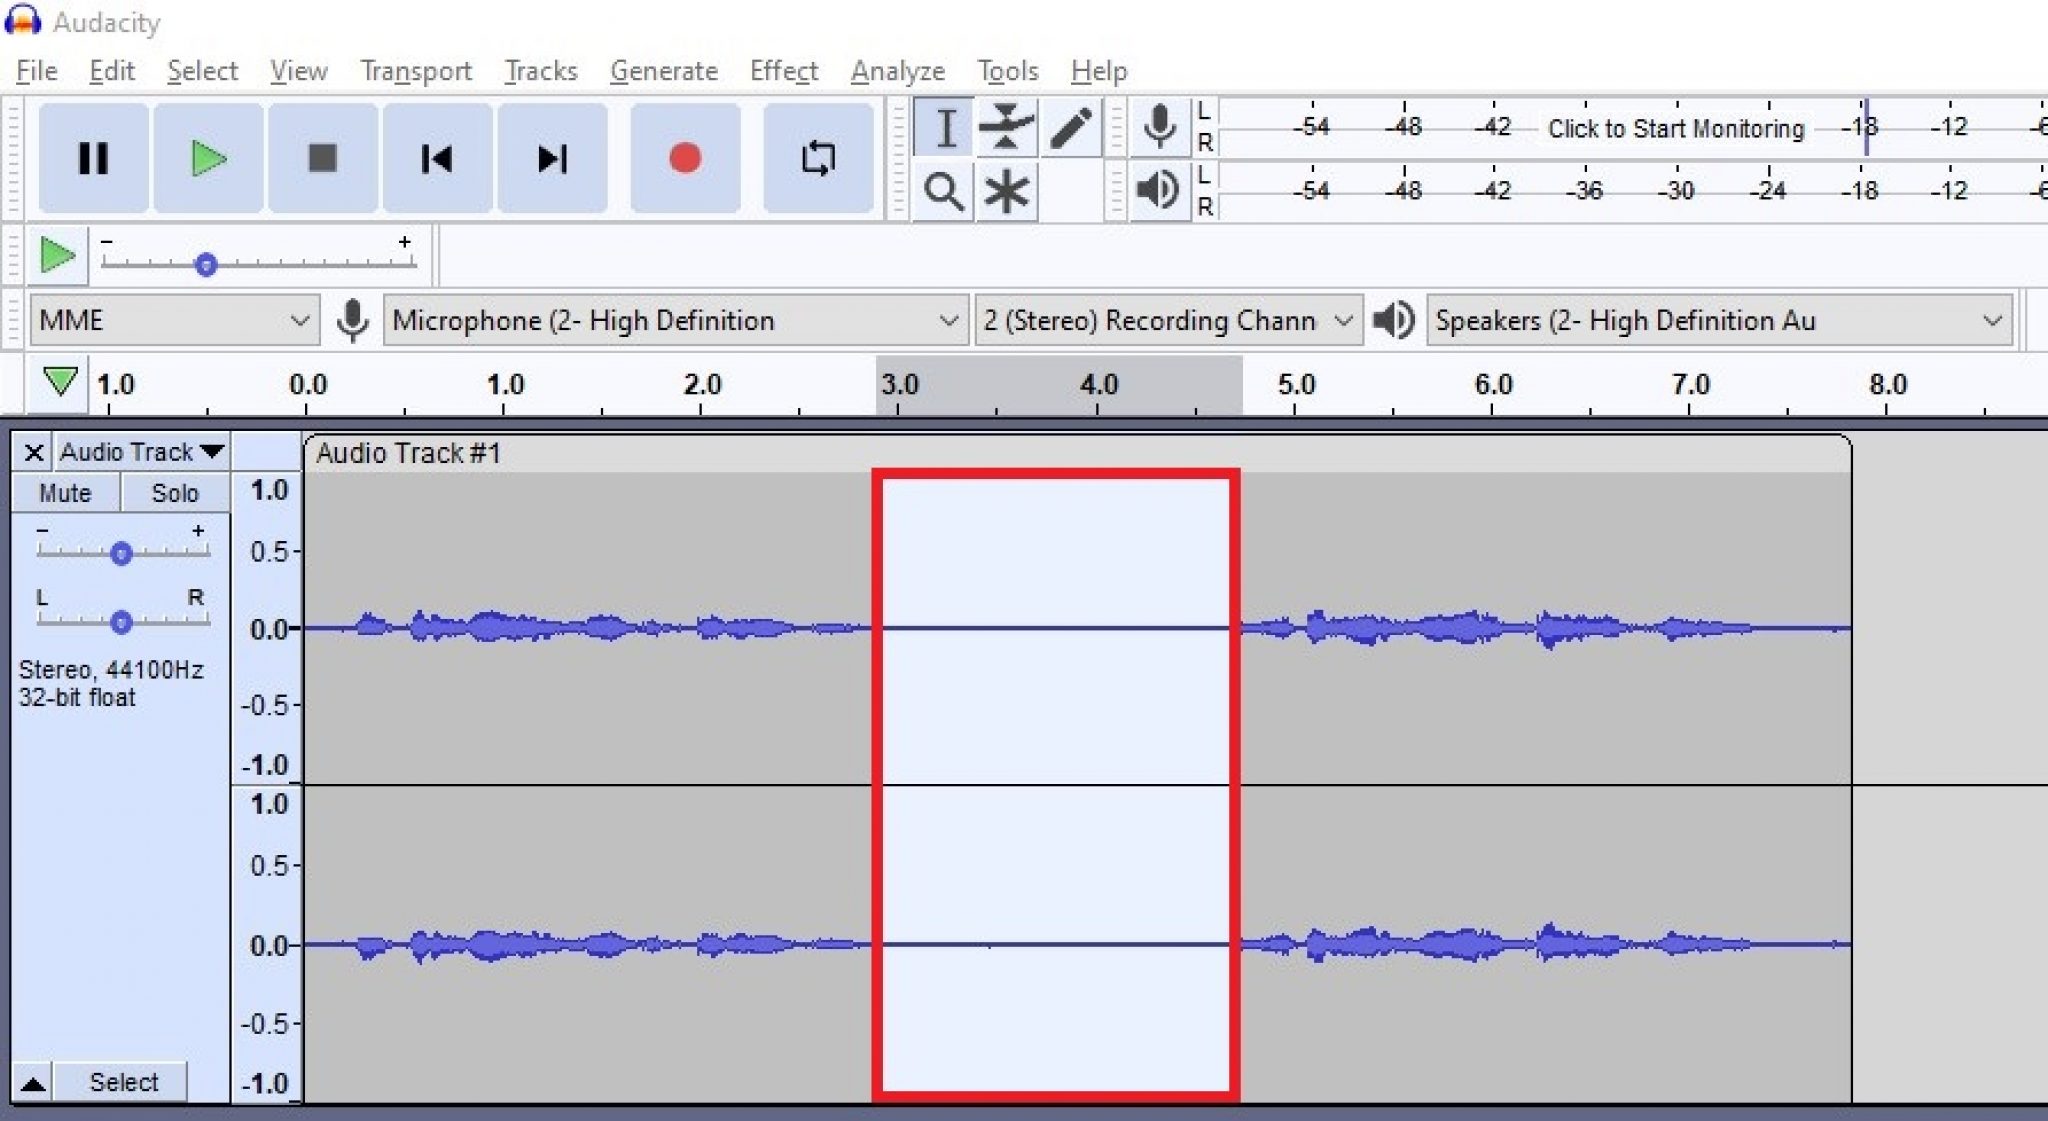
- Locate a section in your audio that contains no desired sound or background noise. This can be a silent portion at the beginning, in between sentences, or at the end of the recording.
- Select a portion of this silent part by clicking and dragging your cursor over the waveform to highlight it. Make sure to choose a section that is at least a few seconds long to get an accurate representation of the background noise.
- Once you have selected the silent part, go to the “Effects” menu in Audacity and choose “Noise Reduction”. This will open the Noise Reduction dialog box.
- In the Noise Reduction dialog box, click on the “Get Noise Profile” button. Audacity will analyze the selected silent part to create a noise profile, which is a snapshot of the background noise characteristics.
It is worth noting that the accuracy of the noise reduction process depends on the quality and representativeness of the noise profile. Therefore, try to select a silent part of the audio that closely resembles the background noise in terms of volume and characteristics.
By selecting a silent part of the audio as a noise profile, you are providing Audacity with a reference to identify and remove the background noise present in your audio recording. The next step will involve applying the noise reduction effect using the created noise profile to achieve cleaner and crisper audio.
Step 4: Apply Noise Reduction Effect
With the noise profile created, you can now apply the noise reduction effect in Audacity to minimize or eliminate the background noise. Follow these steps:
- Select the entire audio track by clicking on it. You can do this by clicking in the area below the waveform.
- Go to the “Effects” menu and choose “Noise Reduction” again. In the Noise Reduction dialog box, you will find various controls to adjust the noise reduction settings.
- Start by adjusting the “Noise Reduction” slider. This controls the overall strength of the noise reduction effect. Increase the slider to reduce more noise, but be cautious not to overdo it, as it may affect the quality of the desired audio.
- Next, you can adjust the “Sensitivity” slider. This determines how much of the background noise to remove based on the noise profile. Increasing the sensitivity may reduce more background noise, but it can also affect the desired audio content.
- Optionally, you can adjust the “Frequency Smoothing” slider to soften any artifacts or harshness introduced by the noise reduction effect. This can help maintain a natural sound quality.
- Once you have adjusted the settings to your liking, click on the “OK” button to apply the noise reduction effect to the audio track.
Keep in mind that the optimal settings for noise reduction may vary depending on the specific audio recording and the characteristics of the background noise. It may require some trial and error to achieve the desired result.
By applying the noise reduction effect, Audacity will use the noise profile to analyze the entire audio track and reduce or eliminate the background noise. However, the initial application of the effect may not completely remove all the noise. Additional adjustments and fine-tuning will be necessary in the following steps.
Step 5: Adjust the Settings for Better Results
After applying the noise reduction effect in Audacity, you may need to make further adjustments to optimize the results and achieve cleaner, high-quality audio. Here are some tips for fine-tuning the settings:
- Listen to the audio playback and pay close attention to the desired audio content. Ensure that the noise reduction effect has not distorted or affected the quality of the main audio. Adjust the “Noise Reduction” and “Sensitivity” sliders to strike a balance between noise reduction and preservation of the desired audio.
- Consider the type of background noise and its characteristics. If you have a specific type of noise, such as a hum or hiss, you may need to adjust other settings accordingly. For example, use the “Reduce” slider for hum removal or the “Residual” slider for hiss reduction.
- If you notice any artifacts or unusual artifacts introduced by the noise reduction effect, try adjusting the “Frequency Smoothing” slider. This can help reduce the harshness of the noise reduction and provide a smoother sound.
- Remember that removing all background noise completely may not always be desirable or practical, as it can result in an unnatural, artificial sound. Use a critical ear and find the right balance to ensure that the audio still sounds natural and retains its intended character.
- Keep in mind that every audio recording is unique, and the optimal settings for noise reduction may vary. It is essential to experiment with different settings, listen to the results, and make adjustments accordingly until you achieve the desired audio quality.
By adjusting the settings, you can fine-tune the noise reduction effect in Audacity and achieve better results. Regularly monitor the audio playback during the adjustment process to ensure that the desired audio content remains clear and unaffected. This step plays a crucial role in maximizing the effectiveness of the noise reduction and enhancing the overall quality of the audio recording.
Step 6: Preview and Fine-Tune the Noise Reduction
After adjusting the settings for noise reduction in Audacity, it’s important to preview the results and fine-tune the effect as needed. This step allows you to carefully listen to the audio and make any necessary adjustments for optimal noise reduction. Here’s how you can proceed:
- Select a portion of the audio that contains both desired content and background noise. This portion should be representative of the overall audio and include areas where the noise was prominent.
- Play the selected portion of the audio and listen attentively. Pay attention to any remaining background noise, artifacts, or any unwanted impact on the desired audio.
- If you notice that certain sections still contain noticeable background noise, you can try adjusting the noise reduction settings once again. Experiment with different combinations of the “Noise Reduction” and “Sensitivity” sliders to target specific types of noise.
- Similarly, if the noise reduction effect is adversely impacting the quality of the desired audio, make additional adjustments to minimize any distortion or artifacts. This may involve tweaking the “Frequency Smoothing” slider or other relevant parameters.
- Continue previewing the effect and fine-tuning the settings until you achieve a satisfactory balance between noise reduction and audio quality. Take your time and be patient, as it may require multiple iterations to obtain the best results.
Regularly monitor the audio playback and listen critically during the preview process. Trust your ears and make adjustments accordingly. Remember that the goal is to achieve a clean and natural sound while minimizing background noise as much as possible.
Fine-tuning the noise reduction in Audacity ensures that you are achieving the desired audio quality without compromising the integrity of the main content. By carefully listening and making necessary adjustments, you can effectively enhance the clarity and eliminate distracting background noise from your audio recordings.
Step 7: Use Effects and Plugins to Further Improve Audio Quality
After applying the noise reduction effect in Audacity, you can utilize additional effects and plugins to further enhance the audio quality. These tools can help fine-tune the audio and address any remaining imperfections. Here are some effects and plugins you can consider:
- Equalization (EQ): EQ can be used to adjust the frequency balance of the audio. It allows you to boost or cut specific frequencies, helping to compensate for any inconsistencies or tonal issues in the recording.
- Compression: Applying compression can help smooth out the dynamics of the audio, reducing the disparity between loud and soft parts. This can improve the overall balance and make the audio sound more polished.
- De-esser: A de-esser is useful for reducing sibilance, which refers to excessive “s” and “sh” sounds in vocal recordings. It can target and attenuate those frequencies, resulting in a more pleasant and natural-sounding vocal performance.
- Reverb: Adding a touch of reverb can give the audio a sense of depth and space. It can make the recording sound more professional and immersive, especially if it was recorded in a dry environment.
- Noise gate: A noise gate can be used to eliminate or attenuate low-level background noise during silent periods in the audio. It helps to maintain a clean and noise-free sound when there is no active audio signal present.
- Limiter: A limiter is useful for preventing any sudden peaks or volume spikes in the audio. It imposes an upper limit on the audio level, ensuring that it doesn’t exceed a certain threshold. This helps to avoid distortion and clipping.
- Additional Noise Reduction Plugins: If the built-in noise reduction in Audacity is not sufficient, you can explore third-party noise reduction plugins to further enhance the audio quality. These plugins offer advanced algorithms and controls for targeted noise removal.
Experiment with different effects and plugins to find the combination that works best for your audio. Remember to apply these effects in moderation and carefully monitor the impact on the audio quality. It is important to strike a balance between enhancing the audio and preserving its natural characteristics.
By utilizing effects and plugins, you can go beyond simple noise reduction and optimize the overall audio quality. These tools allow you to enhance the tonal balance, reduce specific audio issues, and add finishing touches to your recordings, resulting in a more professional and polished sound.
Step 8: Export Your Cleaned Audio File
Once you have successfully cleaned up the background noise and fine-tuned the audio in Audacity, the final step is to export your cleaned audio file. Exporting the file allows you to save the edited version and use it for various purposes. Follow these steps to export your audio:
- Ensure that you are satisfied with the noise reduction and audio quality after applying effects and plugins.
- Trim any unnecessary silence or gaps at the beginning or end of the audio to keep the final version concise and focused.
- Navigate to the “File” menu in Audacity and select “Export” or “Export Audio”. This will open the export dialog box.
- In the export dialog box, choose the desired file format for your exported audio. Audacity supports various file formats such as WAV, MP3, AIFF, and FLAC. Select the format that best suits your needs.
- Specify the name and location of the exported audio file. Choose a descriptive name that reflects the content or purpose of the recording.
- If applicable, set any additional options such as the desired audio quality or metadata tags.
- Click on the “Save” or “Export” button to start the export process. Audacity will process and export the cleaned audio according to your specifications.
- Once the export is complete, you can locate the exported audio file in the specified location. Play the exported file to ensure that it retains the desired audio quality and that the background noise has been effectively removed.
With your cleaned audio file exported, you can now use it for various purposes such as uploading to a podcast hosting platform, sharing on social media, incorporating it into a video project, or any other application you had in mind.
Remember to keep a backup of your original audio file, in case you need to make future edits or adjustments. It is also a good practice to save your Audacity project file (.aup) so that you can revisit and modify the editing settings if needed.
By exporting your cleaned audio file, you finalize the noise reduction process in Audacity and make the edited version ready for use in your desired applications or distribution channels.