
Why you might want to record calls on your computer
Recording calls on your computer has become increasingly important in today’s digital age. Whether you are a business professional, a journalist, a student conducting interviews, or simply someone who wants to keep a record of important conversations, having the ability to record calls can provide numerous benefits. Let’s explore some of the reasons why you might want to consider recording calls on your computer.
1. Documentation: Recording calls allows you to have an accurate and detailed record of conversations. This can be particularly useful for business professionals who need to have a reference for important discussions, agreements, or instructions received over the phone. By having a recorded copy of the call, you can ensure that there is no miscommunication or misunderstanding down the line.
2. Legal purposes: Recording calls can also serve as valuable evidence in legal situations. If you find yourself in a dispute or facing legal challenges, having a recorded conversation can provide you with concrete proof of the discussions that took place. This can be essential in defending your rights or supporting your claims in a court of law.
3. Learning and improvement: Recording calls can be a great tool for self-improvement, especially for those involved in sales or customer service roles. By reviewing recorded conversations, you can analyze your communication skills, identify areas for improvement, and learn from both successful and unsuccessful interactions. This feedback loop can help you refine your approach and better serve your customers or clients.
4. Interview and research purposes: For journalists, students, or researchers, recording calls can be invaluable. It allows you to capture interviews, gather information accurately, and refer back to the recorded conversation when needed. This ensures that you don’t miss any crucial details or misquote your sources, providing you with reliable and trustworthy information for your work.
5. Peace of mind: Sometimes, we need the reassurance of having a recording as a form of insurance. It can provide a sense of security, especially for important phone calls where the stakes are high. Knowing that you have a recording of the conversation can offer peace of mind, ensuring that you have a backup in case any disputes arise.
Overall, recording calls on your computer offers a range of practical benefits, from documentation and legal purposes to self-improvement and peace of mind. Having the ability to record calls is a valuable tool in today’s fast-paced and interconnected world.
What is Audacity
Audacity is a free and open-source digital audio editing software that allows users to record, edit, and manipulate audio tracks. It is available for Windows, Mac, and Linux operating systems, making it accessible to a wide range of users.
One of the key features that sets Audacity apart is its simplicity and user-friendly interface. Despite being a powerful tool, Audacity is designed to be easy to navigate even for beginners. The software offers a comprehensive set of tools and functionalities that can rival those found in professional audio editing software.
With Audacity, you can not only record audio from various sources, including microphones and external devices, but also import and edit existing audio files. The software supports a wide range of audio formats, including WAV, MP3, and AIFF, allowing you to work with files from different sources and save your projects in a format that suits your needs.
In addition to basic audio editing functions like cutting, copying, and pasting, Audacity provides advanced features such as noise reduction, equalization, and pitch correction. These tools allow you to enhance the quality of your recordings and create professional-sounding audio tracks.
Audacity also offers a range of effects and plugins that can further expand its capabilities. From adding reverb and echo to applying special effects like distortion or chorus, you can experiment with different audio effects to achieve the desired sound.
Another notable feature of Audacity is its ability to support multiple tracks. This means you can layer different audio tracks on top of each other, making it ideal for creating podcasts, music mixes, or adding voiceovers to videos.
Furthermore, Audacity supports real-time previewing, which allows you to listen to your edits and changes as you make them. This immediate feedback enables you to fine-tune your audio recordings and ensure they meet your desired quality standards.
Installing Audacity
Installing Audacity on your computer is a simple and straightforward process. The software is available for free and can be downloaded from the official Audacity website. Follow the step-by-step instructions below to install Audacity:
- Visit the official Audacity website at www.audacityteam.org.
- Navigate to the “Download” section of the website, which is usually located in the top menu bar.
- Choose the appropriate version of Audacity for your operating system (Windows, Mac, or Linux).
- Click on the download link to start downloading the installation file. The file size is typically small, so the download should complete quickly.
- Once the download is finished, locate the installation file on your computer (usually in the “Downloads” folder).
- Double-click the installation file to launch the installer.
- Follow the on-screen instructions provided by the installer. You may be prompted to choose the installation location and agree to the terms and conditions.
- Wait for the installation process to complete. This should only take a few moments.
- Once the installation is finished, you will have the option to launch Audacity immediately or access it later from your applications folder or desktop shortcut.
After successfully installing Audacity, you can start exploring its features and begin recording and editing audio on your computer. It is important to note that Audacity may require additional software components, such as the LAME MP3 encoder, to work with certain audio formats. If prompted, follow the instructions to install these additional components to ensure full functionality.
Installing Audacity is a straightforward process that allows you to gain access to a powerful audio editing tool. By following these simple steps, you can quickly set up Audacity on your computer and begin harnessing its capabilities for your audio recording and editing needs.
Setting up your audio source
Before you start recording calls using Audacity, it’s essential to set up your audio source properly. This ensures that you capture high-quality audio and have a smooth recording experience. Here are the steps to set up your audio source:
- Microphone: If you’re using a microphone to record your own voice or a conversation, make sure it’s properly connected to your computer. Check that your microphone is selected as the input device in your computer’s audio settings. You can usually access these settings by right-clicking on the speaker icon in the taskbar and selecting “Recording devices” or similar options.
- External device: If you’re recording audio from an external device, such as a phone or a mixer, connect the device to your computer using the appropriate cables or adapters. Ensure that you select the correct input on your device and set it as the input source in Audacity. Refer to the device’s manual or consult online resources for specific instructions on connecting and configuring your particular device.
- System audio: To record audio from your computer’s sound card, select the appropriate system audio source in Audacity. This allows you to capture audio from applications, web browsers, or any other sound that plays on your computer. Note that this method may also record background noise and other system sounds, so it’s essential to adjust the volume levels accordingly to achieve the desired recording quality.
- Mixing multiple sources: If you need to record audio from multiple sources simultaneously, such as a microphone and system audio, you can create stereo tracks within Audacity to capture both sources separately. This gives you more control during the editing process, allowing you to adjust the volume levels and apply effects to each track individually.
- Monitor your audio levels: Before you start recording, it’s important to monitor your audio levels to ensure they don’t peak or distort. Use the input level meters in Audacity to set the recording levels. Adjust the input gain on your microphone or external device if necessary, keeping an eye on the level meters to maintain a healthy signal without clipping.
By setting up your audio source correctly, you can ensure that your recordings are clear and of high quality. Take the time to configure your microphone, external device, or system audio settings in Audacity to get the best results. It’s always a good idea to do a test recording and playback to verify that everything is functioning as expected before conducting important calls.
Configuring Audacity for recording calls
Once you’ve installed Audacity and set up your audio source, the next step is to configure Audacity specifically for recording calls. Here’s a guide to help you configure Audacity for optimal call recording:
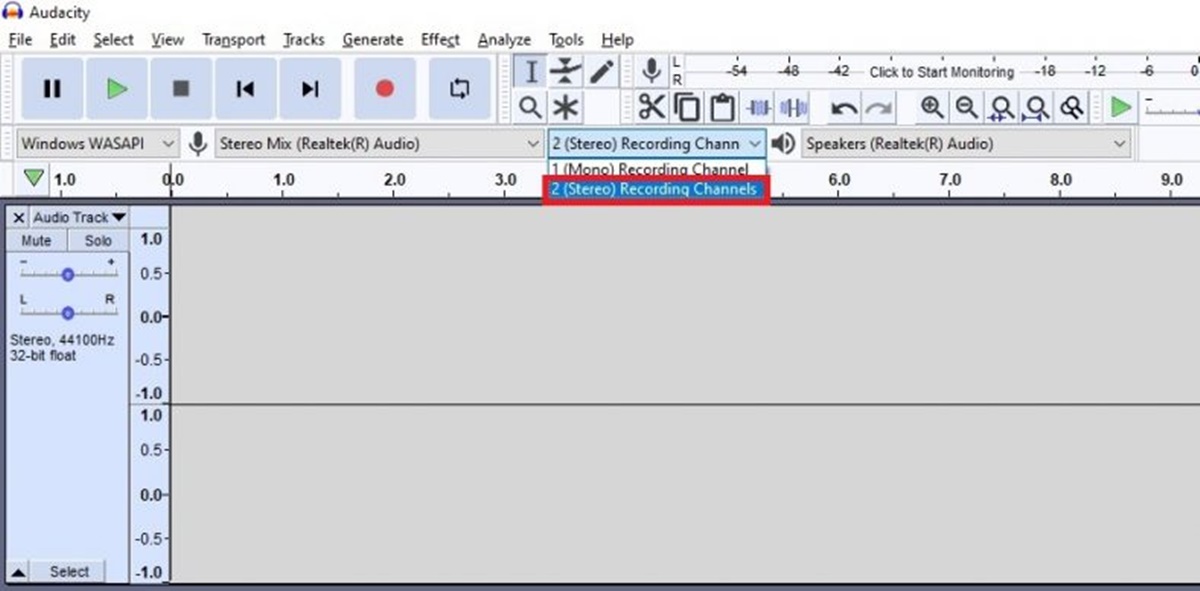
- Select the recording device: Launch Audacity and navigate to the toolbar. Click on the drop-down menu next to the microphone icon and select your desired recording device. This should be the same device that you set up in your computer’s audio settings and corresponds to your audio source for the call.
- Adjust the input levels: To ensure proper audio levels during the call, you’ll need to adjust the input levels in Audacity. Use the slider next to the microphone icon to adjust the input volume. You can also use the input level meters to monitor the levels and make sure they don’t peak or distort.
- Enable software playthrough: Enabling software playthrough allows you to hear the audio from the call in real-time while recording. This helps you monitor the call audio without any delay. To enable software playthrough, go to the “Edit” menu, select “Preferences,” and navigate to the “Recording” tab. Check the box that says “Software Playthrough (Play new track while recording it)” and click “OK.”
- Select the recording format: Audacity supports various audio formats for recording, including WAV, MP3, and AIFF. To select the recording format, go to the “File” menu, choose “Preferences,” and navigate to the “File Formats” tab. Select your preferred format from the drop-down menu next to “Uncompressed Export Format” or “MP3 Export Format.”
- Configure recording settings: In the Audacity toolbar, you’ll find options to configure the recording settings. The default settings should be sufficient for most cases. However, you can fine-tune the settings according to your specific needs. For example, you can adjust the recording channels, sample rate, and bit depth by clicking on the corresponding settings in the toolbar.
- Perform a test recording: Before you start recording actual calls, perform a test recording to ensure everything is set up correctly. Make a short test call or create a mock conversation to verify that the audio is being captured properly. Check the recording levels and listen to the playback to confirm that the audio quality meets your expectations.
By following these steps and configuring Audacity correctly, you’ll be ready to record your calls with confidence. Take the time to adjust the settings according to your needs and preferences. Remember to perform test recordings to ensure everything is working as intended before starting any important calls.
Recording your calls
Now that you have Audacity configured for recording calls, you’re ready to start capturing your conversations. Follow these steps to record your calls using Audacity:
- Open Audacity: Launch Audacity on your computer. Make sure your audio source is connected and properly configured.
- Start the recording: Click on the red “Record” button in the Audacity toolbar to begin recording. As soon as you start the recording, Audacity will capture the audio from your selected source, whether it’s a microphone, external device, or system audio.
- Engage in the call: Start your conversation or make your phone call as normal. Audacity will keep capturing the audio in real-time, allowing you to record the entire call from start to finish.
- Monitor the recording: While recording, keep an eye on the recording levels in Audacity. Ensure that the levels are not peaking or distorting. Also, listen to the software playthrough or use headphones to monitor the call’s audio quality if you enabled software playthrough.
- Pause or stop the recording: If you want to pause the recording temporarily, click on the yellow “Pause” button in the Audacity toolbar. This allows you to pause and resume the recording without creating separate audio files. When you want to end the recording, click on the square “Stop” button.
- Review the recording: After stopping the recording, you can review the captured audio by playing it back within Audacity. Listen to the recording to ensure the audio is clear and that the desired conversation has been captured accurately.
- Make any necessary edits: If you need to edit the recording, such as removing unwanted sections, correcting audio issues, or adding effects, Audacity provides a range of editing tools and features to accomplish these tasks. Familiarize yourself with Audacity’s editing capabilities and make the necessary adjustments to achieve the desired outcome.
Remember to save your recordings in Audacity’s native project format (with the .aup file extension) to retain all your edits and settings. You can also export your recordings to various audio formats, such as WAV or MP3, for easy sharing and playback on different devices.
With Audacity’s recording capabilities, you can reliably and accurately capture your calls for documentation, reference, or creative purposes. Enjoy the flexibility and control that Audacity offers in recording and preserving your important conversations.
Editing your recording
After recording your calls in Audacity, you may need to make edits to enhance the quality or remove any unwanted sections. Audacity provides a range of powerful editing tools and features to help you refine your recordings. Follow these steps to edit your recording in Audacity:
- Select the portion to edit: Use the selection tool in Audacity’s toolbar to highlight the section of the recording you want to edit. You can click and drag the cursor to select a specific range or use keyboard shortcuts like Ctrl+A to select the entire recording.
- Use basic editing functions: Once you’ve selected the portion to edit, you can utilize basic editing functions in Audacity. Cut (Ctrl+X) to remove the selected section, copy (Ctrl+C) to duplicate it, or paste (Ctrl+V) to insert it elsewhere in the recording. These functions allow you to trim unwanted sections, rearrange segments, or duplicate a specific portion.
- Apply effects: Audacity offers a wide variety of built-in effects that can enhance the audio quality or add creative elements to your recording. From noise reduction and equalization to reverb and compression, explore the Effects menu to find the desired effect and apply it to your selected portion. Adjust the effect parameters to achieve the desired result.
- Utilize multi-track editing: If you recorded multiple tracks, such as separate audio sources or stereo channels, you can use Audacity’s multi-track editing feature to adjust the volume levels, apply effects independently, or align the tracks. This allows you to have more control over your recording and create a balanced mix.
- Preview your edits: After making edits to your recording, use Audacity’s playback function to preview the changes. Listen to the edited section or the whole recording to ensure that the edits are seamless and the audio quality is maintained. Make any necessary adjustments or reverts if needed.
- Save your edits: Once you’re satisfied with the edits, save your changes in Audacity’s native project format (.aup) to preserve all your edits and settings. Additionally, you can export the edited recording to various audio formats like WAV or MP3 for easy sharing or playback on other devices.
When editing your recording, pay attention to maintaining a smooth flow and natural transitions between sections. Take advantage of Audacity’s editing capabilities to refine your recording, eliminate any unwanted noise or gaps, and create a polished final product.
Remember to experiment with different effects, adjustments, and editing techniques in Audacity to achieve your desired audio outcome. With practice, you’ll become more proficient in using Audacity’s powerful editing tools to produce professional-sounding recordings.
Saving and exporting your recording
Once you have finished editing your recording in Audacity, it’s time to save and export your work. Audacity provides several options for saving and exporting your recordings in different formats. Follow these steps to save and export your recording:
- Save your project: First, save your project within Audacity’s native format (.aup) to preserve all your edits and settings. Click on the “File” menu and choose “Save Project” or use the shortcut Ctrl+S. This allows you to continue working on your project later and make further modifications if needed.
- Export your recording: To export your edited recording as an audio file, click on the “File” menu and select “Export” or use the shortcut Ctrl+Shift+E. This opens the export dialog box where you can choose the desired location and format for your exported file.
- Select the export format: In the export dialog box, choose the format in which you want to save your recording. Audacity supports various formats, including WAV, MP3, OGG, and FLAC. Select the format that best suits your needs and the intended use of the recording.
- Configure export settings: Depending on the selected format, you may be able to configure additional settings for the exported file, such as the audio quality, bit rate, or sample rate. Adjust these settings based on your preferences or any requirements you may have.
- Specify the export location: Choose the folder or directory where you want to save the exported file. Give the file a descriptive name that reflects its content or purpose. It’s also a good practice to create a dedicated folder for your exported recordings to keep them organized.
- Export the recording: Once you’ve finalized the export settings and chosen the destination folder, click “Export” or “Save” to start the export process. Depending on the duration and complexity of your recording, it may take a moment to complete the exporting process.
- Confirm the exported file: After the export is complete, navigate to the specified folder to locate and confirm the exported file. Play it back to ensure that the audio quality and content are as expected.
By saving and exporting your recording, you create a standalone audio file that can be shared, played back, or used in other applications. Whether you need the recording for personal reference, professional use, or collaboration, Audacity’s exporting capabilities allow you to create files in formats that are widely supported and compatible with various devices and platforms.
Remember to keep a backup of your project files (.aup) and exported recordings to prevent any data loss or accidental modifications. Regularly save your work and make backup copies of your recordings to ensure their long-term preservation and accessibility.