
Tools needed to remove a hard drive from a laptop
Removing a hard drive from a laptop may seem like a daunting task, but with the right tools and a little patience, it can be a straightforward process. Before you begin, gather the following tools:
1. Screwdriver set: A set of small screwdrivers with different types of heads will be necessary to remove the screws holding the laptop together. Make sure you have both Phillips and flathead screwdrivers in various sizes.
2. Anti-static wristband: If available, an anti-static wristband can help protect your laptop from electrical static discharge that could damage its internal components.
3. Pliers or tweezers: These tools can be handy for gripping and removing small cables or connectors.
4. External hard drive enclosure: If you plan to salvage or transfer data from the laptop’s hard drive, having an external hard drive enclosure will allow you to connect the removed hard drive to another computer.
5. External storage device: If you need to backup or transfer data from the hard drive, having an external storage device such as a USB flash drive or external hard drive will be useful.
With these necessary tools on hand, you are ready to begin the process of removing the hard drive from your laptop. Following the steps outlined in the next sections will guide you through the process and ensure a successful removal.
Step 1: Power down the laptop and disconnect it from any power source
The first step in removing a hard drive from a laptop is to ensure the device is powered off and disconnected from any power source. This is crucial to avoid any risk of electric shock or damage to the laptop’s components.
Begin by shutting down the laptop using the operating system’s shutdown option. Allow the laptop to fully power down before proceeding with the removal process. This ensures that all processes and data are safely closed and avoids any potential data corruption on the hard drive.
Next, disconnect the laptop from its power source. If the laptop is connected to an AC power adapter, unplug it from the wall outlet. If the laptop has a removable battery, it is advisable to remove it as well. This step is important to eliminate any residual electrical current that may still be present in the laptop.
By powering down the laptop and disconnecting it from any power source, you are taking the necessary precautions to ensure your safety and prevent any damage to the device during the hard drive removal process.
Step 2: Remove the laptop’s battery (if possible)
Before proceeding with the removal of the hard drive, it is advisable to remove the laptop’s battery if it is easily accessible. This step is not applicable to all laptops, as some models have non-removable batteries.
If your laptop has a removable battery, follow these steps to remove it:
- Locate the battery release latch or switch, usually located on the bottom or side of the laptop.
- Slide or press the latch/switch in the direction indicated, and hold it in place.
- While holding the latch/switch, gently slide or lift the battery out of its compartment.
- Set the battery aside in a safe location, away from any liquids or sources of heat.
Removing the battery serves multiple purposes. It ensures that the laptop is completely powered down and eliminates any electrical charge that may be stored in the battery itself. This is especially important when working with the internal components of the laptop, such as the hard drive.
Additionally, removing the battery reduces the risk of accidental damage to the battery during the hard drive removal process. It provides more space and easier access to the internal components without the battery obstructing your work area.
If your laptop has a non-removable battery, you can skip this step and proceed to the next step in the hard drive removal process.
Step 3: Locate the hard drive bay on the laptop
In order to remove the hard drive from your laptop, you first need to locate the hard drive bay. The exact location of the hard drive bay can vary depending on the laptop model, but it is typically situated on the bottom or side of the device.
To locate the hard drive bay, follow these steps:
- Refer to your laptop’s user manual: If you have the user manual that came with your laptop, it will provide detailed instructions on the location of the hard drive bay. Look for a section that describes the internal components or hardware upgrades.
- Check the laptop’s exterior: Look for any labels or icons engraved on the laptop’s exterior that may indicate the location of the hard drive bay. These labels or icons often resemble a small cylinder or rectangular shape.
- Search online resources: If you do not have the user manual or cannot find any visible indications of the hard drive bay, a quick internet search using your laptop’s make and model can provide detailed instructions or images showing the exact location of the hard drive bay.
Once you have successfully located the hard drive bay, you are ready to proceed to the next step in removing the hard drive from your laptop. Familiarize yourself with the layout and position of the bay to ensure a smooth and efficient removal process.
Step 4: Remove any screws securing the hard drive bay cover
After locating the hard drive bay on your laptop, the next step is to remove any screws that are securing the hard drive bay cover. These screws are typically small and can be found on the bottom or back panel of the laptop. The exact number of screws and their placement may vary depending on your laptop model.
To remove the screws securing the hard drive bay cover, follow these steps:
- Use a screwdriver that matches the type and size of the screws. Most laptops use Phillips screws, but some may require a flathead or Torx screwdriver.
- Identify the screws that are holding the hard drive bay cover in place. They are usually marked with an icon resembling a cylinder or hard drive symbol.
- Insert the screwdriver into each screw head and turn counterclockwise to loosen and remove the screws. Place the screws in a safe location, such as a small container or magnetic tray, to prevent them from getting lost.
- Once you have removed all the screws, set them aside and keep them organized for easy reinstallation later.
Removing the screws securing the hard drive bay cover allows you to access the internal components of your laptop and proceed with removing the hard drive. It is important to handle the screws carefully and keep them organized to ensure a smooth reassembly process when reinstalling the hard drive.
Step 5: Carefully remove the hard drive bay cover
With the screws securing the hard drive bay cover removed, it is time to carefully remove the cover itself. The hard drive bay cover is typically a small, rectangular panel that provides access to the internal components of the laptop, including the hard drive.
To remove the hard drive bay cover, follow these steps:
- Locate the notches or tabs on the edges of the cover. These notches are designed to secure the cover in place.
- Using your fingers or a small prying tool, gently push or lift the notches to release them. Be careful not to apply too much force, as this can cause damage to the cover or other internal components.
- Slide or lift the cover away from the laptop, exposing the hard drive bay and other internal components.
- Set the cover aside in a safe and clean location to prevent it from getting damaged or misplaced.
When removing the hard drive bay cover, it is important to be cautious and gentle. Take your time to ensure a smooth removal process without causing any unnecessary damage. Handle the cover with care, as it may be made of delicate materials such as plastic or metal.
Once the hard drive bay cover is removed, you will have clear access to the hard drive and its connections. You are now ready to proceed with the next steps in removing the hard drive from your laptop.
Step 6: Identify the hard drive and its connections
After removing the hard drive bay cover, it is important to properly identify the hard drive and its connections before proceeding with the removal process. By doing so, you can ensure that you are handling the correct component and understand how it is connected to the laptop.
To identify the hard drive and its connections, follow these steps:
- Locate the rectangular-shaped component inside the hard drive bay. This component is the hard drive and is typically secured with screws or brackets.
- Observe the connections on the hard drive. It will have two types of connections: a data cable and a power cable.
- The data cable is usually a narrow, flat cable with a connector on each end. It connects the hard drive to the laptop’s motherboard, allowing data to be transferred between the two.
- The power cable is a separate cable that supplies power to the hard drive. It is typically a wider cable with a specialized connector that matches the power port on the hard drive.
Take a moment to familiarize yourself with the connections and their orientation. This will help you when disconnecting the hard drive in the next step. It is important to handle the connections gently and avoid pulling on them at an angle to prevent damage.
By properly identifying the hard drive and its connections, you are ensuring that you are working with the correct component and understanding how it is connected within the laptop. This knowledge will be essential for safely disconnecting the hard drive in the subsequent steps.
Step 7: Disconnect the hard drive from the laptop
Now that you have identified the hard drive and its connections, it’s time to disconnect the hard drive from the laptop. This step involves removing the data and power cables that are currently connected to the hard drive.
To disconnect the hard drive from the laptop, follow these steps:
- Locate the data cable that is connected to the hard drive. Gently grasp the connector, which is attached to the end of the cable, and wiggle it back and forth while pulling it straight out from the hard drive.
- Next, locate the power cable that is connected to the hard drive. Similar to the data cable, gently grasp the connector and pull it straight out to disconnect it from the hard drive.
- Once both cables are disconnected, carefully set them aside, ensuring they do not get tangled or damaged.
When disconnecting the cables, it is important to handle them with care and avoid applying excessive force or pulling on them at an angle. Proceed slowly and verify that both connections have been properly detached before moving on to the next step.
By disconnecting the hard drive from the laptop, you are effectively separating it from the rest of the system, allowing for its removal. You are now ready to proceed with the subsequent steps in removing the hard drive from your laptop.
Step 8: Remove any screws securing the hard drive in place
With the hard drive disconnected from the laptop, the next step is to remove any screws that are securing the hard drive in place. These screws are used to secure the hard drive to the laptop’s internal frame or mounting brackets.
To remove the screws securing the hard drive, follow these steps:
- Inspect the area surrounding the hard drive to locate any screws holding it in place. The number and placement of these screws may vary depending on the laptop model.
- Using the appropriate screwdriver, carefully loosen and remove each screw by turning them counterclockwise. Place the screws in a secure location to avoid misplacement.
- Keep in mind that some laptops may have additional brackets or frames that need to be removed before accessing the hard drive. If necessary, remove any additional components as indicated by your laptop’s design.
During this step, it is important to handle the screws with care and keep them organized. Losing or mixing up the screws can make the reassembly process challenging. Take note of the location and orientation of each screw for easy reinstallation.
By removing the screws securing the hard drive, you are preparing it for removal in the next step. Ensure that all screws have been completely removed before proceeding to ensure a smooth and hassle-free hard drive removal process.
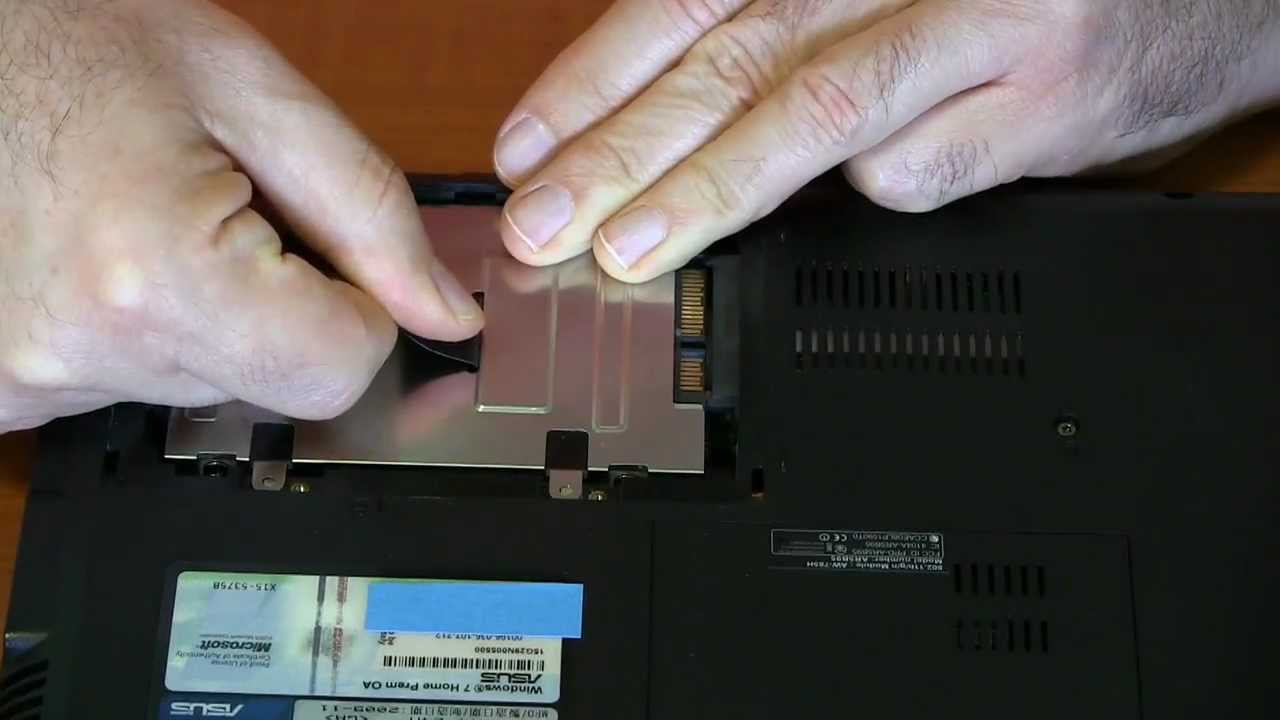
Step 9: Gently remove the hard drive from the laptop
Now that the screws securing the hard drive have been removed, it’s time to gently remove the hard drive from the laptop. This step requires caution and a delicate touch to prevent any damage to the hard drive itself or any surrounding components.
To remove the hard drive from the laptop, follow these steps:
- Hold the hard drive by its sides or edges. Avoid touching any of the sensitive components or circuitry on the hard drive.
- Gently slide or lift the hard drive out of its placement within the laptop. If the hard drive feels stuck or doesn’t move easily, double-check that all screws have been removed and any additional brackets or frames have been taken off.
- Ensure that you are following the correct path and not forcing or twisting the hard drive to remove it. Proceed slowly and carefully to avoid any accidental damage or dislodging of other components.
- Once the hard drive is free from its slot, set it aside on an anti-static surface or in an anti-static bag to protect it from static electricity.
Remember, the hard drive contains important data and is a delicate electronic component. Handling it with care is crucial to avoid any data loss or physical damage.
By gently removing the hard drive from the laptop, you have successfully completed the physical removal of the hard drive. Now, you can proceed with any necessary data transfer or storage, or continue with the reinstallation of another hard drive or SSD.
Step 10: Replace the hard drive bay cover and secure it with screws
After removing the hard drive from the laptop, it is important to replace the hard drive bay cover to protect the internal components and ensure proper functioning of the device. This step involves securely attaching the cover back in its original position using the screws that were previously removed.
To replace the hard drive bay cover and secure it with screws, follow these steps:
- Align the hard drive bay cover with the corresponding slots or hinges on the laptop’s chassis.
- Gently slide or press the cover into place, ensuring all edges and tabs align properly with the laptop’s frame.
- Take one of the screws that were removed earlier and insert it into its corresponding hole on the cover.
- Using the appropriate screwdriver, turn the screw clockwise to tighten it, but avoid overtightening, as it may damage the cover or the laptop’s frame.
- Repeat the previous step for each remaining screw until all screws have been securely fastened.
While tightening the screws, ensure that they are snug but not excessively tight. Overtightening can strip the threads or damage the cover, making it difficult to remove in the future if needed.
Once all screws are securely fastened, the hard drive bay cover is properly replaced, and the laptop’s internal components are protected. The laptop is now ready to be powered on and used normally.
Step 11: Reconnect the laptop’s battery (if it was removed)
If you had previously removed the laptop’s battery, it is now time to reconnect it. Reconnecting the battery is an important step to restore power to the laptop and ensure proper functionality.
To reconnect the laptop’s battery, follow these steps:
- Locate the battery compartment on your laptop. It is typically located on the bottom of the device and may have a latch or release mechanism.
- Hold the battery by its sides and align the contacts on the battery with the corresponding terminals in the battery compartment.
- Gently slide or press the battery into place, ensuring it is securely connected.
- If your laptop has a latch or release mechanism, use it to lock the battery in place.
Ensure that the battery is properly aligned and securely connected to avoid any power interruptions or unstable connections. Double-check that it is sitting flush in the compartment and that the latch is engaged, if applicable.
By reconnecting the laptop’s battery, you are restoring its power source and preparing it for normal operation. This step is particularly important if you intend to use the laptop without an external power source.
Step 12: Power on the laptop and ensure the hard drive was successfully removed
After completing the process of removing the hard drive from your laptop, it is important to power on the device and verify that the removal was successful. This final step will ensure that the laptop operates without any issues and that the hard drive has been properly removed.
To power on the laptop and check the successful removal of the hard drive, follow these steps:
- Ensure that the laptop is properly connected to a power source.
- If necessary, connect any peripheral devices such as a mouse or keyboard.
- Press the power button on the laptop to turn it on.
- Observe the startup sequence to ensure that the laptop boots up normally.
- If the laptop successfully powers on and operates as expected, it indicates that the hard drive removal was successful.
During the boot-up process, pay attention to any error messages or abnormal behavior that may suggest the absence of the hard drive. If you encounter any issues or errors, it is recommended to consult a professional or refer to the laptop’s user manual for troubleshooting steps.
By powering on the laptop and confirming the successful removal of the hard drive, you can proceed with confidence, knowing that the device is functioning without the previously installed hard drive. You are now ready to explore alternative storage options or proceed with any necessary repairs or upgrades.