
Reasons for PowerPoint Unsaving
It can be frustrating to work tirelessly on a PowerPoint presentation, only to have it vanish into thin air due to an unexpected unsaved status. Understanding the common reasons for unsaved PowerPoints can help you prevent future data loss and find ways to recover your work. Here are some of the most common factors that can lead to unsaved PowerPoint files:
- Power Outages or System Crashes: Sudden power outages, system crashes, or unexpected shutdowns can cause your PowerPoint file to go unsaved. Without a backup power source or regular saving habits, all your progress can disappear in an instant.
- Application Errors: Sometimes, the PowerPoint application itself can encounter errors or bugs that cause the program to malfunction. This can result in unsaved files or loss of recent changes.
- User Errors: It’s easy to accidentally close or exit the PowerPoint program without saving your work. Distractions, rushing, or simply forgetting to save can all contribute to unsaved PowerPoint files.
- Computer or Program Updates: Occasionally, software updates or computer restarts may interfere with the saving process, leading to unsaved PowerPoints. Make sure to save your presentation before initiating any updates or system changes.
- Network or Connection Issues: If you’re working on a cloud-based PowerPoint file, network or connectivity problems can interrupt the saving process. Ensure a stable internet connection to minimize the risk of unsaved files.
By being aware of these common causes, you can take steps to prevent unsaved PowerPoints and minimize the chances of losing your valuable work. It’s important to remember that prevention is always better than recovery when it comes to data loss. However, if you do find yourself with an unsaved PowerPoint, there are methods you can try to retrieve your progress.
Methods for Recovery in Office Versions 2016 and Later
If you’re using Office versions 2016 and later, you have several options available to recover unsaved PowerPoint files. Here are some methods you can try:
- Using the AutoRecover Feature: PowerPoint has an AutoRecover feature that automatically saves your progress at regular intervals. When you reopen the program after a crash or unexpected close, PowerPoint will prompt you to recover unsaved files. Simply click on the recovered file to retrieve your work.
- Locating the Temporary File: PowerPoint creates temporary backup copies of your unsaved files. To access them, open the File Explorer and type “%temp%” into the address bar. Look for files with the .tmp extension, navigate to the appropriate folder, and search for a file starting with “ppt” or “pptx”. Rename the file with a .ppt or .pptx extension and open it in PowerPoint to recover your content.
- Recovering from the Document Recovery Pane: If PowerPoint detects an unsaved file upon restarting, it will display a Document Recovery Pane. Simply click on the file you wish to recover and follow the prompts to restore your PowerPoint presentation.
These methods should help you recover your unsaved PowerPoint files in Office versions 2016 and later. However, it’s crucial to keep in mind that these recovery options may not always be successful, especially if the file was never saved or if the AutoRecover feature was disabled.
If you’re unable to retrieve your unsaved PowerPoint through these methods, there are still alternatives you can explore. One option is to use the PowerPoint Viewer, a free application that allows you to open and view PowerPoint files, even if you don’t have PowerPoint installed on your computer. Another alternative is to utilize data recovery software specifically designed to recover lost or deleted PowerPoint files.
Remember, it’s essential to save your work regularly to prevent the frustration of dealing with unsaved PowerPoint files. Additionally, enabling the AutoSave feature and maintaining backups of your presentations will further safeguard your data.
Method for Recovery in Office Versions Prior to 2016
If you’re using an Office version prior to 2016, the recovery process for unsaved PowerPoint files may be slightly different. Here’s a method you can try to retrieve your work:
- Using the Temp Folder: In earlier versions of Office, PowerPoint typically saves temporary versions of your unsaved files in a specific folder. Follow these steps to locate and recover your unsaved PowerPoint file:
- Open the File Explorer and navigate to the following folder:
C:\Users\[YourUserName]\AppData\Local\Microsoft\Office\UnsavedFiles. Note that “YourUserName” should be replaced with your actual username. - Look for files with the .tmp extension and sort them by date modified, with the most recent ones appearing first.
- Rename the file with a .ppt or .pptx extension and open it in PowerPoint to recover your content.
It’s important to note that the availability and success of this method may vary depending on your Office version and system configuration. If the unsaved PowerPoint file is not found in the UnsavedFiles folder or if you are unable to open the recovered file, consider utilizing alternative recovery options.
Regardless of your Office version, it’s crucial to implement good saving habits and regularly save your PowerPoint presentations to minimize the risk of unsaved files. Additionally, enabling the AutoSave feature and maintaining backups of your presentations will provide an extra layer of protection against data loss.
If none of these methods prove successful in recovering your unsaved PowerPoint file, consider reaching out to technical support for further assistance. They may be able to provide additional guidance or suggest specialized data recovery tools tailored specifically for PowerPoint files.
Using the AutoRecover Feature
If you have experienced a sudden PowerPoint crash or an unexpected closure of the application, you may be able to recover your unsaved work using the AutoRecover feature. The AutoRecover feature automatically saves your progress at regular intervals in case of unforeseen events. Here’s how you can use this feature to retrieve your unsaved PowerPoint:
- Open PowerPoint on your computer.
- If PowerPoint detects an unsaved file from a previous session, a Document Recovery Pane will appear on the left side of the screen.
- In the Document Recovery Pane, you will see a list of unsaved presentations. Look for the most recent file that contains the content you need.
- Click on the file to select it, and then click the “Open” button.
- The recovered file will open, and you will be able to see the contents of your unsaved PowerPoint.
- Now, make sure to save the recovered file to a desired location on your computer.
If you don’t see the Document Recovery Pane upon opening PowerPoint, it means that there are no unsaved files from the previous session. In this case, the AutoRecover feature may not be able to help you retrieve your work.
It’s important to note that the AutoRecover feature is not foolproof and may not always be able to recover unsaved files, especially if the file was never saved or if the program crashed unexpectedly without properly invoking the AutoRecover process. So, it’s always advisable to regularly save your PowerPoint files to prevent potential data loss.
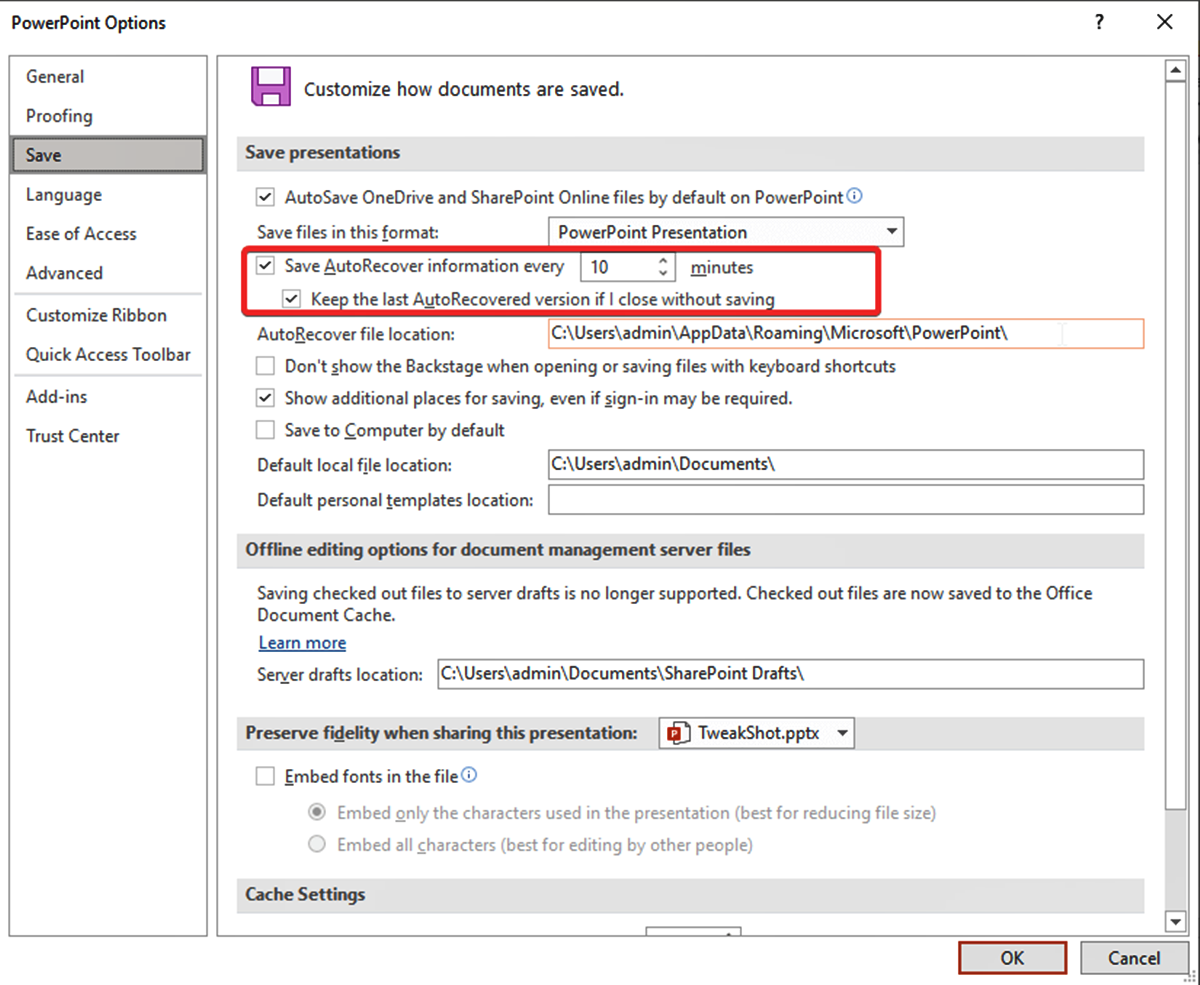
In addition to relying on the AutoRecover feature, it’s a good practice to enable the AutoSave feature in PowerPoint. AutoSave automatically saves changes to your PowerPoint file at regular intervals, reducing the risk of losing your work in the event of a crash or closure. To enable AutoSave, go to the “File” tab, click on “Options,” and then select “Save.” Check the “Save AutoRecover information every” box and set the desired interval for saving changes.
By utilizing the AutoRecover and AutoSave features, you can significantly improve your chances of recovering unsaved PowerPoint files and minimize the frustration of losing valuable work.
Locating the Temporary File
In the unfortunate event of an unsaved PowerPoint file, you may still have a chance to recover your work by locating the temporary file created by PowerPoint. This method involves searching for and accessing the temporary backup copies that PowerPoint generates. Here’s how you can locate and recover the temporary file:
- First, make sure that PowerPoint is closed.
- Open the File Explorer by clicking on the folder icon in the taskbar or pressing the Windows key + E on your keyboard.
- In the address bar of the File Explorer, type “%temp%” (without the quotation marks) and press Enter.
- The File Explorer will open the temporary folder where various temporary files are stored.
- Look for files with the .tmp extension. These files represent the temporary backup copies created by PowerPoint.
- Sort the files by “Date Modified” by clicking on the “Date Modified” column header, with the most recently modified files appearing at the top.
- Search for a file starting with “ppt” or “pptx” followed by a string of numbers and letters. This file contains the temporary backup of your unsaved PowerPoint presentation.
- Once you have located the file, right-click on it and choose “Rename”. Change the file extension from .tmp to .ppt or .pptx.
- After renaming the file, double-click on it to open it in PowerPoint.
- If everything goes smoothly, you should now be able to access your unsaved PowerPoint file with its recent changes restored.
While this method can be successful in recovering unsaved PowerPoint files, it’s important to note that the availability and success of temporary files may vary depending on your system configuration and PowerPoint version.
Remember, it is imperative to act promptly in attempting to recover your unsaved PowerPoint file through this method. Temporary files may be deleted by system processes or other activities, so ensure that you locate and rename the temporary file as soon as possible to increase the chances of successful recovery.
Additionally, it’s crucial to develop a habit of saving your work regularly to avoid relying solely on temporary file recovery. Regular saving ensures that you have a stable, up-to-date version to fall back on in case of unexpected events.
Recovering from the Document Recovery Pane
PowerPoint has a built-in feature called the Document Recovery Pane, which is designed to provide a quick and easy way to recover unsaved PowerPoint files. When you reopen PowerPoint after a crash or unexpected closure, this pane will appear if there are any unsaved files available for recovery. Here’s how you can use the Document Recovery Pane to retrieve your unsaved PowerPoint file:
- Open PowerPoint on your computer.
- If there are any unsaved files from a previous session, you will see the Document Recovery Pane on the left side of the screen.
- In the Document Recovery Pane, you will find a list of unsaved presentations. Each file will have a name with the prefix “AutoSave” followed by a date and time stamp.
- Locate the unsaved PowerPoint file that you want to recover and click on it to select it.
- Click the “Open” button to open the recovered file.
- The unsaved PowerPoint file will now open with the recovered content, allowing you to continue working on it.
- Make sure to save the recovered file to a desired location on your computer to ensure that your progress is not lost.
Using the Document Recovery Pane is an efficient and straightforward method to recover unsaved PowerPoint files. However, it’s important to note that this feature is only available if PowerPoint detects unsaved files upon reopening the application. If you don’t see the Document Recovery Pane, it means that there are no unsaved files from the previous session.
To avoid reliance solely on the Document Recovery Pane, it’s crucial to develop a habit of saving your PowerPoint presentations regularly. Saving your work periodically helps minimize the risk of losing valuable progress in the event of unexpected closures or crashes.
In addition to saving regularly, enabling features like AutoSave and AutoRecover can provide an extra layer of protection against data loss. AutoSave automatically saves changes to your PowerPoint file at regular intervals, while AutoRecover creates temporary backup copies to recover unsaved files in case of unexpected setbacks.
By incorporating these strategies and being familiar with the Document Recovery Pane, you can increase your chances of recovering unsaved PowerPoint files and safeguard your hard work from unexpected events.
Using the PowerPoint Viewer
If you find yourself unable to access PowerPoint or recover your unsaved PowerPoint files using the methods mentioned earlier, you can still view and retrieve your presentation by using the PowerPoint Viewer. The PowerPoint Viewer is a free application provided by Microsoft that allows you to open and view PowerPoint files, even if you don’t have PowerPoint installed on your computer. Here’s how you can use the PowerPoint Viewer:
- Download and install the PowerPoint Viewer from the official Microsoft website or a trusted software repository.
- Once installed, open the PowerPoint Viewer on your computer.
- Click on the “Open” button within the PowerPoint Viewer interface to browse for the unsaved PowerPoint file you want to recover.
- Navigate to the location where the unsaved PowerPoint file is saved and select it.
- The PowerPoint Viewer will open the file, allowing you to view its content.
- To retrieve the content of the unsaved file, you can either take screenshots of the slides or copy and paste the text and images into a new PowerPoint presentation.
- Create a new PowerPoint presentation and paste the retrieved content into the appropriate slides.
- Save the newly created presentation to a desired location on your computer.
While using the PowerPoint Viewer can help you regain the content of your unsaved PowerPoint file, it’s important to note that you may lose certain formatting or features that are specific to PowerPoint. Additionally, animations, transitions, and other dynamic elements may not be fully preserved when viewing the presentation with the PowerPoint Viewer.
It’s essential to remember that the PowerPoint Viewer is intended for viewing purposes only and does not offer the full range of editing capabilities available in Microsoft PowerPoint. Therefore, once you have recovered the content of your unsaved file, it’s advisable to open it in a fully-functional PowerPoint application to make any necessary modifications or enhancements.
By utilizing the PowerPoint Viewer, you can still access and retrieve the content of your unsaved PowerPoint files, providing you with an alternative solution when other recovery methods are unsuccessful. However, it’s important to implement regular saving practices and consider enabling features like AutoSave and AutoRecover to minimize the chances of encountering unsaved files in the first place.
Data Recovery Software for PowerPoint Files
If you have exhausted all the built-in recovery options and methods for unsaved PowerPoint files without success, you can consider utilizing data recovery software specifically designed for PowerPoint files. Data recovery software can scan your computer’s storage devices to locate and recover deleted or lost files, including unsaved PowerPoint presentations. Here’s how you can use data recovery software to recover your PowerPoint files:
- Research and select a reputable data recovery software that supports PowerPoint file recovery.
- Download and install the data recovery software on your computer.
- Launch the data recovery software and follow the provided instructions to begin the scanning process.
- Select the location or drive where you suspect the unsaved PowerPoint file was saved. It could be your computer’s hard drive, an external storage device, or a specific folder.
- Initiate the scanning process and wait for the software to analyze and retrieve any recoverable files, including unsaved PowerPoint presentations.
- Once the scanning is complete, carefully review the recovered files and locate the PowerPoint file that you want to recover.
- Select the unsaved PowerPoint file and choose the option to recover or restore it to a safe location on your computer.
- After the recovery process, open the recovered PowerPoint file in Microsoft PowerPoint to ensure that your content has been successfully retrieved.
- To prevent the loss of recovered files, immediately save the PowerPoint presentation to a new location and consider creating a backup to prevent future data loss.
It’s important to note that the success of data recovery software depends on various factors, such as the condition of the storage device and whether data has been overwritten. Additionally, data recovery software may only be effective for deleted or lost files, rather than specifically targeting unsaved files.
When using data recovery software, it’s crucial to follow the instructions carefully and choose a reliable software solution from a trusted source. Ensure that you understand the software’s capabilities and limitations, and make sure to take appropriate precautions to protect your data privacy and security.
Remember, while data recovery software can be a powerful tool, it’s always best to implement regular saving habits and enable features like AutoSave and AutoRecover to minimize the risk of unsaved files and potential data loss.
Preventing Future Data Loss with AutoSave and Backup
Experiencing the frustration of unsaved PowerPoint files can be avoided by implementing preventive measures such as enabling AutoSave and maintaining regular backups. Here are some strategies for preventing future data loss:
1. Enable AutoSave: Taking advantage of the AutoSave feature in PowerPoint can be a lifesaver. AutoSave automatically saves your changes at regular intervals, ensuring that even if an unexpected event occurs, your progress is preserved. To enable AutoSave, go to the “File” tab, click on “Options,” and select “Save.” Check the “Save AutoRecover information every” box and set the desired interval.
2. Regularly Save Your Work: Make it a habit to save your PowerPoint presentations regularly, especially after making significant changes. Use the keyboard shortcut Ctrl+S (Windows) or Command+S (Mac) to save your work instantly. Saving your presentation frequently reduces the risk of losing valuable progress in case of system crashes or accidental closures.
3. Create Backup Copies: Alongside AutoSave, manually creating backup copies of your PowerPoint files adds an extra layer of protection. Regularly save copies of your presentations to a different storage location, such as an external hard drive, cloud storage, or even a USB flash drive. This ensures that you have multiple copies of your work in case one becomes corrupted or lost.
4. Utilize Version Control: Consider implementing version control practices for your PowerPoint files. This involves maintaining different versions of the same presentation, documenting changes, and labeling each version with a revision number or date. Version control allows you to revert to a previous state if necessary and provides a reliable way to track and manage changes over time.
5. Embrace Cloud Storage Solutions: Storing your PowerPoint files on cloud-based platforms, such as Google Drive, Microsoft OneDrive, or Dropbox, adds an extra level of security. Cloud storage automatically saves and synchronizes your files across multiple devices, reducing the risk of data loss due to hardware failures or system crashes.
6. Regularly Update and Maintain Software: Keep your PowerPoint software up to date with the latest patches and updates. These updates often include bug fixes and stability improvements, reducing the likelihood of encountering issues that could result in unsaved files or data loss.
7. Educate Yourself and Others: Stay informed about best practices for PowerPoint file management and data protection. Educate yourself and your team members about the importance of saving work regularly, enabling AutoSave, and implementing backup strategies. By promoting a culture of data protection, you can help prevent future instances of unsaved files.
By implementing these preventative measures, you can significantly reduce the risk of unsaved PowerPoint files and minimize the potential for data loss. Remember, prevention is key, and taking proactive steps to safeguard your work ensures peace of mind and preserves your valuable presentations.