
Check the Wi-Fi network
In order to reconnect your Google Home Mini to a new Wi-Fi network, it is crucial to first ensure that the network is functioning properly. Make sure you are connected to the Wi-Fi network and that you have a stable internet connection on your device. This will ensure a smooth transition when connecting your Google Home Mini.
If you are unsure about the Wi-Fi network’s status, you can perform a quick check by opening a web browser on your device and loading a webpage. If the page loads successfully, it indicates that your Wi-Fi network is up and running.
Additionally, check if other devices in your home are connected to the Wi-Fi network without any issues. This will help rule out any potential network-related problems that may affect the reconnection process of your Google Home Mini.
If you find that your Wi-Fi network is not functioning properly, you may need to troubleshoot the network before proceeding with the reconnection process. This could involve restarting your router, checking network settings, or contacting your internet service provider for assistance.
It is important to ensure a stable and reliable Wi-Fi connection to guarantee seamless functioning of your Google Home Mini and to avoid any potential connectivity problems in the future.
Connect Google Home Mini to power source
Before reconnecting your Google Home Mini to a new Wi-Fi network, ensure that it is properly connected to a power source. The device requires a constant power supply to function and maintain a stable connection.
To connect your Google Home Mini to a power source:
- Locate the power cable that came with your Google Home Mini.
- Plug one end of the power cable into the micro USB port on the back of the device.
- Insert the other end of the cable into a power outlet.
Make sure the power outlet you use is easily accessible and has a reliable power supply. Avoid using extension cords or power strips that may not provide a consistent flow of electricity, as this can cause disruptions in the device’s functionality.
Once your Google Home Mini is connected to a power source, you will see the LED lights on the device illuminate, indicating that it is receiving power. These lights may change colors or patterns during the setup process.
It is important to keep your Google Home Mini connected to the power source at all times to ensure uninterrupted performance. Disconnecting the device from the power source may result in the loss of connectivity and require you to repeat the setup process.
Open the Google Home app
In order to reconnect your Google Home Mini to a new Wi-Fi network, you will need to use the Google Home app on your smartphone or tablet. The app allows you to manage and control your Google Home devices, including the setup and configuration process.
If you haven’t already done so, download and install the Google Home app from the App Store (for iOS) or Google Play Store (for Android). Once the app is installed, follow these steps to open it:
- Locate the Google Home app icon on your device’s home screen or app drawer.
- Tap on the icon to launch the app.
Alternatively, you can search for “Google Home” in your device’s app search feature to quickly find and open the app.
After opening the Google Home app, you may be prompted to sign in with your Google account. Make sure to use the same account that is associated with your Google Home Mini device to access all the necessary settings and options.
Once you have successfully opened the Google Home app and signed in, you will be ready to proceed with the next steps to reconnect your Google Home Mini to a new Wi-Fi network.
Tap on the device card
In order to reconnect your Google Home Mini to a new Wi-Fi network, you will need to locate and select the device card within the Google Home app. The device card represents your Google Home Mini and allows you to access its specific settings and configurations.
After opening the Google Home app, follow these steps to find and tap on the device card:
- On the main screen of the app, you will see a list of various devices connected to your Google account. Look for the card that represents your Google Home Mini.
- The device card typically includes an image or name of your Google Home Mini, making it easy to identify.
- Once you have located the device card, tap on it to access the specific settings for your Google Home Mini.
By tapping on the device card, you will be taken to a dedicated page that provides a range of options and configurations for your Google Home Mini. This includes settings related to Wi-Fi, audio, voice commands, and more.
If you are having trouble locating the device card within the Google Home app, make sure that you are signed in with the same Google account that is associated with your Google Home Mini. Additionally, ensure that your Google Home Mini is powered on and connected to the same Wi-Fi network as your device running the Google Home app.
Once you have successfully tapped on the device card, you will be ready to proceed with the next steps to reconnect your Google Home Mini to a new Wi-Fi network.
Tap on the Settings icon
Once you have accessed the device card for your Google Home Mini within the Google Home app, you will need to navigate to the settings section to begin the process of reconnecting to a new Wi-Fi network. The settings section contains all the necessary options and configurations for your Google Home Mini.
To access the settings section, follow these steps:
- On the device card page in the Google Home app, look for the settings icon. This icon usually appears as a gear or three vertical dots, and it is typically located in the upper right or left corner of the screen.
- Once you have located the settings icon, tap on it to open the settings menu for your Google Home Mini.
By tapping on the settings icon, you will be presented with a range of options and configurations to customize your Google Home Mini. These settings include Wi-Fi, network preferences, device information, and more.
If you are having trouble locating the settings icon, make sure you are in the device card view within the Google Home app. Also, ensure that you have selected the correct device card for your Google Home Mini.
Once you have successfully tapped on the settings icon, you will be ready to proceed with the next steps to reconnect your Google Home Mini to a new Wi-Fi network.
Scroll down and tap on “Wi-Fi”
Within the settings menu of the Google Home app, you will find various options to customize and configure your Google Home Mini. To reconnect your device to a new Wi-Fi network, you will need to locate and select the “Wi-Fi” option.
Follow these steps to find and tap on “Wi-Fi” within the settings menu:
- After accessing the settings menu, scroll down the page using your finger.
- Continue scrolling until you find the “Wi-Fi” option listed among the available settings.
- Once you have located the “Wi-Fi” option, tap on it to open the Wi-Fi settings for your Google Home Mini.
Tapping on “Wi-Fi” will allow you to view and manage the Wi-Fi network settings for your Google Home Mini. You will be able to see the current network your device is connected to, as well as the available networks in your vicinity.
If you are unable to find the “Wi-Fi” option within the settings menu, double-check that you are in the correct section of the app and that you have scrolled down far enough. It is also important to ensure that you have a stable internet connection on your device running the Google Home app.
Once you have successfully tapped on “Wi-Fi,” you will be ready to proceed with the next steps to reconnect your Google Home Mini to a new Wi-Fi network.
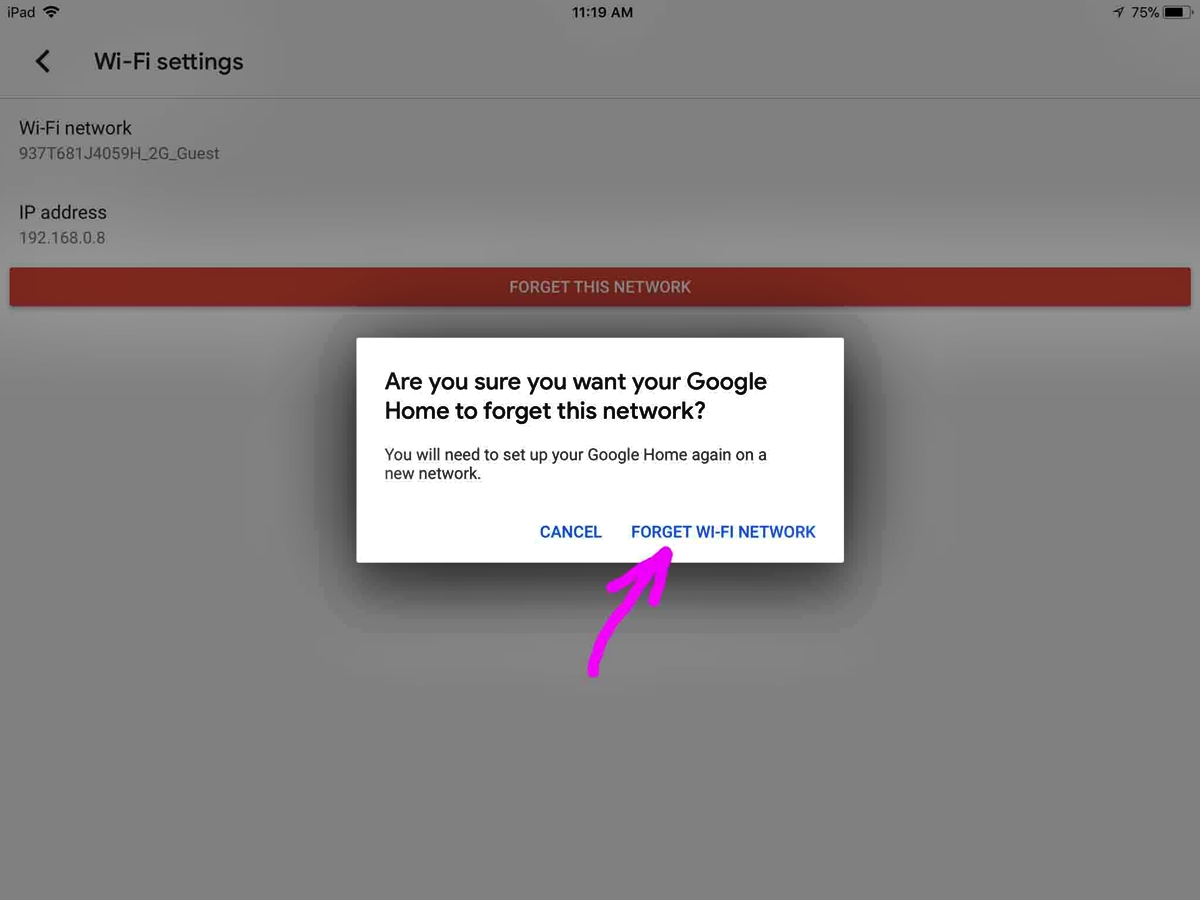
Tap on “Forget this network”
When reconnecting your Google Home Mini to a new Wi-Fi network, it is important to remove the previous network from its settings to ensure a clean and successful setup. To do so, you will need to locate and select the “Forget this network” option within the Wi-Fi settings.
Follow these steps to tap on “Forget this network” on your Google Home Mini:
- After accessing the Wi-Fi settings within the Google Home app, you will see a list of networks available for your device.
- Find and identify the Wi-Fi network that you want to disconnect or “forget” from your Google Home Mini. It will be listed along with other available networks.
- Once you have located the desired network, tap on it to open the network details.
- In the network details, look for the option called “Forget this network” and tap on it to initiate the process.
By tapping on “Forget this network,” your Google Home Mini will remove all previous network information, including the network name (SSID) and password associated with the selected Wi-Fi network. This step is important to ensure a clean slate for the reconnection process.
After successfully tapping on “Forget this network,” your Google Home Mini will no longer attempt to connect to the previously selected Wi-Fi network. This will allow you to proceed with connecting your device to a new Wi-Fi network.
If you are having trouble finding or selecting the “Forget this network” option within the network details, make sure you have tapped on the correct network and that you are in the Wi-Fi settings section of the Google Home app.
Once you have successfully tapped on “Forget this network,” you will be ready to proceed with connecting your Google Home Mini to a new Wi-Fi network.
Make sure the new Wi-Fi is discoverable
Before reconnecting your Google Home Mini to a new Wi-Fi network, it is essential to ensure that the network is discoverable by your device. This will allow your Google Home Mini to detect and connect to the new network seamlessly.
Follow these steps to ensure that the new Wi-Fi network is discoverable:
- Access the Wi-Fi settings on your device, such as a smartphone or tablet, that is running the Google Home app.
- Verify that the new Wi-Fi network is broadcasting and activated. Check the Wi-Fi settings on your device to confirm that the network’s SSID (network name) appears in the available networks list.
- If the new Wi-Fi network is hidden, you may need to unhide it by adjusting the network settings on your router or contacting your network administrator. Keep in mind that most Wi-Fi networks are set to be discoverable by default.
Ensure that the new Wi-Fi network has a stable and reliable connection. A weak or intermittent signal can hinder the reconnection process and lead to connectivity issues with your Google Home Mini.
If you are having trouble finding the new Wi-Fi network or it does not appear in the available networks list, try moving closer to the router or restarting the router to refresh the network list on your device. Additionally, double-check the Wi-Fi password to ensure it is entered correctly if prompted during the reconnection process.
By confirming that the new Wi-Fi network is discoverable, you can proceed with the next steps to connect your Google Home Mini to the network and enjoy its features and functionalities.
Tap on “Add to Wi-Fi”
Once you have confirmed that the new Wi-Fi network is discoverable and available, you can proceed with connecting your Google Home Mini to the network. To initiate the connection process, you will need to tap on the “Add to Wi-Fi” button within the Google Home app.
Follow these steps to tap on “Add to Wi-Fi” and begin connecting your Google Home Mini:
- On the Wi-Fi settings page of the Google Home app, you will see a list of available networks.
- Scroll through the list and locate the name of the new Wi-Fi network that you want to connect your Google Home Mini to.
- Once you have found the new Wi-Fi network, tap on its name to select it.
- Look for the “Add to Wi-Fi” button and tap on it to initiate the connection process.
Tapping on “Add to Wi-Fi” will prompt your Google Home Mini to establish a connection with the selected Wi-Fi network. During this process, your Google Home Mini will transmit and receive data to establish a secure connection.
It is important to ensure that you have entered the correct Wi-Fi password, if prompted, during the connection process. The correct password is essential for the successful establishment of the connection between your Google Home Mini and the new Wi-Fi network.
If you encounter any issues or receive an error message during the connection process, ensure that you are within range of the Wi-Fi network and that the network is functioning properly.
By tapping on “Add to Wi-Fi,” you are initiating the process of connecting your Google Home Mini to the new Wi-Fi network, allowing you to enjoy its features and functionalities seamlessly.
Choose the new network from the list
After tapping on “Add to Wi-Fi” within the Google Home app, you will be presented with a list of available Wi-Fi networks. From this list, you will need to choose the new network to which you want to connect your Google Home Mini.
Here are the steps to choose the new network from the list:
- On the “Add to Wi-Fi” page, you will see a list of Wi-Fi networks that are within range of your Google Home Mini.
- Scroll through the list to find and identify the name of the new Wi-Fi network that you want to connect your Google Home Mini to.
- Once you have located the new network, tap on its name to select it. The selected network will be highlighted or marked in some way to indicate your choice.
By choosing the new network from the list, you are indicating to your Google Home Mini that it should attempt to connect to that particular Wi-Fi network.
If you cannot find the new network in the list, ensure that the network is active and discoverable. Check that the Wi-Fi network is broadcasting and that you are within range of its signal.
It is important to select the correct network from the list to ensure a successful connection. Choosing the wrong network can result in connection issues or an inability to connect your Google Home Mini to the desired Wi-Fi network.
Once you have successfully chosen the new network from the list, you are ready to proceed with the next step in the reconnection process for your Google Home Mini.
Enter the password for the new network
After selecting the new Wi-Fi network from the list, you will need to enter the password for the network to establish a connection between your Google Home Mini and the Wi-Fi network. This password ensures the security and privacy of your network connection.
To enter the password for the new network, follow these steps:
- On the “Add to Wi-Fi” page, a text field or dialog box will appear, prompting you to enter the password for the selected Wi-Fi network.
- Using the on-screen keyboard, type in the password carefully, paying attention to any uppercase or lowercase letters and special characters.
- If needed, you can tap on the “Show password” option to temporarily reveal the characters entered in the password field.
Make sure to enter the password correctly to avoid any connection issues. Double-check the password before proceeding to ensure accuracy.
If you are unsure about the password for the new network, you can refer to the Wi-Fi router or contact the network administrator for assistance. It is essential to have the correct password to successfully connect your Google Home Mini to the Wi-Fi network.
Once you have entered the password for the new network, continue to the next steps in the reconnection process to allow your Google Home Mini to establish a connection and join the new Wi-Fi network.
Wait for Google Home Mini to connect to the new Wi-Fi
After entering the password for the new Wi-Fi network, you will need to wait for your Google Home Mini to establish a connection to the network. This process may take a few moments as your device communicates with the router and completes the necessary configurations.
During this time, it is important to be patient and avoid interrupting the connection process. Here are a few things to keep in mind while waiting for your Google Home Mini to connect to the new Wi-Fi:
- Avoid turning off or unplugging your Google Home Mini during the connection process, as it may disrupt or reset the process.
- Ensure that your device running the Google Home app remains within range of the Wi-Fi signal to maintain a stable connection.
- Keep an eye on the LED lights on your Google Home Mini. The lights may indicate the progress of the connection process, changing colors or patterns as the device establishes a connection.
- If the connection process takes longer than expected or encounters any issues, you can try restarting your Google Home Mini and repeating the reconnection steps.
Once your Google Home Mini successfully connects to the new Wi-Fi network, it will be ready to use and accessible from your device running the Google Home app. You can continue to enjoy the features and functionalities of your device with the newly established Wi-Fi connection.
If your Google Home Mini is unable to connect to the new Wi-Fi network, ensure that you have entered the correct password and that the network is functioning properly. Consider resetting your Wi-Fi router or contacting your network administrator for further assistance if needed.
By waiting for your Google Home Mini to connect to the new Wi-Fi network, you can ensure a stable and reliable connection for seamless use and enjoyment of your device.