
Check Power Connection
When your Google Home device is not functioning properly, the first step is to check the power connection. This simple troubleshooting tip can often resolve many issues. Follow these steps to ensure that your device is receiving power:
- Make sure the power cable is properly connected to both the Google Home device and the power outlet.
- Check if the power outlet is working by plugging in another device.
- Try using a different power cable or adapter, if available, to rule out any issues with the existing cable.
- If you are using an extension cord or power strip, try plugging the device directly into the wall outlet to eliminate any potential power supply problems.
- Check the power indicator light on the Google Home device. If it is not illuminated, there might be an issue with the power source or the device itself.
By ensuring a proper power connection, you can eliminate power-related issues that may be affecting the functionality of your Google Home device. If the problem persists, continue with the next steps to perform a soft reset on your device.
Perform a Soft Reset
If your Google Home device is experiencing persistent issues, performing a soft reset can often help resolve them. This process is like restarting the device and can be done without losing any personalized settings or data. Follow these steps to perform a soft reset:
- Locate the microphone mute button on your Google Home device.
- Press and hold the microphone mute button for about 15 seconds.
- After 15 seconds, release the button.
- Your Google Home device will go through a restart process.
- Wait for the device to fully restart and reconnect to your Wi-Fi network.
Performing a soft reset can help resolve temporary software glitches or connectivity issues. After the device has restarted, check if the problem has been resolved. If not, you might need to perform a factory reset, which will restore the device to its original settings.
Factory Reset Your Google Home Device
If you’re still encountering issues with your Google Home device after trying the previous troubleshooting methods, performing a factory reset may be necessary. This step will erase all personalized settings and data on the device, so it should be used as a last resort. Here’s how you can perform a factory reset:
- Locate the microphone mute button on your Google Home device.
- Press and hold the microphone mute button for about 15 seconds. Release the button when you see the device lights flashing.
- After releasing the button, your Google Home device will start the factory reset process. This process typically takes a couple of minutes.
- Wait until the device has finished resetting and the lights stabilize, indicating that it is ready for setup.
- Set up your Google Home device again using the Google Home app on your smartphone or tablet.
Note: Performing a factory reset will disconnect your Google Home device from any linked accounts or smart home devices. You will need to set up your preferences and reconnect any devices after the reset.
Factory resetting your Google Home device can help resolve persistent issues that other troubleshooting steps couldn’t fix. However, make sure to back up any important settings or data before initiating the process.
Reset Google Home Mini
If you own a Google Home Mini and need to troubleshoot or resolve any issues you’re facing, performing a reset can be a helpful solution. Resetting your Google Home Mini will restore it to its default factory settings. Follow these steps to reset your device:
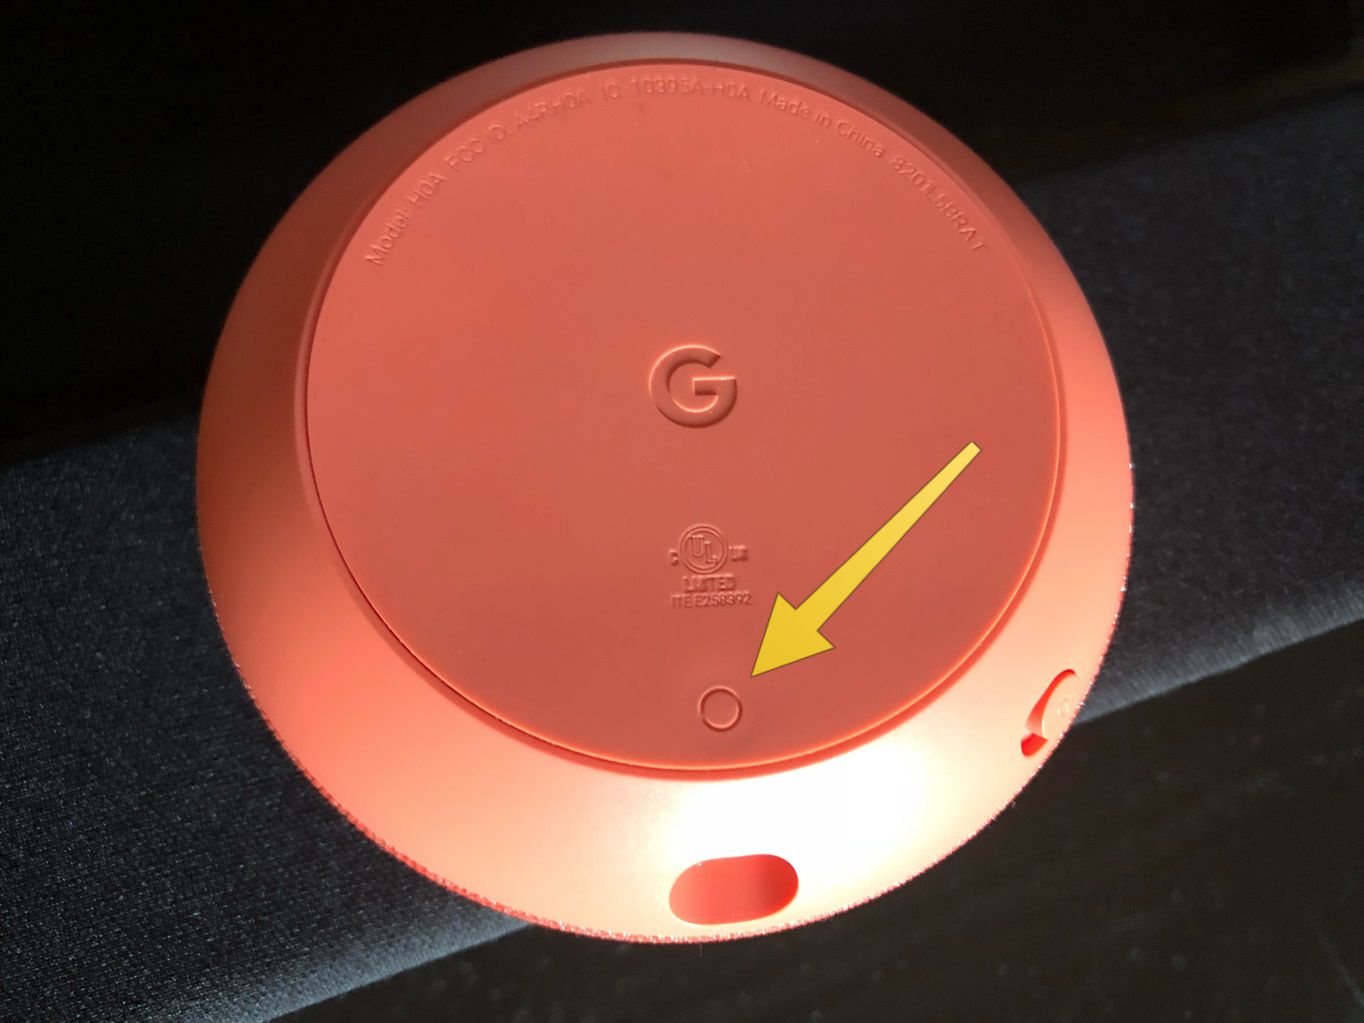
- Locate the factory reset button on the bottom of your Google Home Mini.
- Using a pin or paperclip, press and hold the factory reset button for about 15 seconds.
- The lights on top of the device will start flashing.
- After the lights stop flashing, release the factory reset button.
- Your Google Home Mini will now start the reset process and will be ready for setup again.
Resetting your Google Home Mini can help resolve issues such as unresponsiveness, connectivity problems, or persistent errors. However, keep in mind that performing a reset will remove any personalized settings and data associated with the device.
After the reset, you can set up your Google Home Mini anew by following the instructions provided in the Google Home app on your smartphone or tablet. Remember to connect it to your Wi-Fi network and reconfigure any desired settings to make the most of your device’s features.
Reset Google Nest Hub
If you’re encountering issues with your Google Nest Hub and need to troubleshoot or start fresh, performing a reset can often help resolve the problems you’re experiencing. Resetting your device will erase all personalized settings and data, so it should be used as a last resort. Follow these steps to reset your Google Nest Hub:
- Swipe down from the top of the screen on your Google Nest Hub.
- Tap on the gear icon to access the device settings.
- Scroll down and tap on “Device settings”.
- Scroll to the bottom and select “Factory reset”.
- Confirm the reset by tapping “Factory reset” again.
The reset process will begin, and your Google Nest Hub will be restored to its default factory settings. This process may take a few minutes.
After the reset is complete, you will need to set up your Google Nest Hub again from scratch. Follow the instructions provided on the screen to connect to your Wi-Fi network, sign in to your Google account, and customize your preferences.
Note: Resetting your Google Nest Hub will unlink any connected accounts and remove any personalized settings and data. If you have important information stored on your device, ensure that you back it up before performing the reset.
By resetting your Google Nest Hub, you can resolve persistent issues and start afresh with a clean slate. Remember to reconfigure any desired settings and reinstall any necessary apps or services for optimal functionality.
Reset Google Nest Hub Max
If you’re facing issues with your Google Nest Hub Max and need to troubleshoot or start fresh, performing a reset can often resolve the problems you’re experiencing. Resetting your device will restore it to its default factory settings. Follow these steps to reset your Google Nest Hub Max:
- Swipe down from the top of the screen on your Google Nest Hub Max.
- Tap on the gear icon to access the device settings.
- Scroll down and tap on “Device settings”.
- Scroll to the bottom and select “Factory reset”.
- Confirm the reset by tapping “Factory reset” again.
Your Google Nest Hub Max will now begin the reset process, which may take a few minutes to complete.
Once the reset is finished, you will need to set up your Google Nest Hub Max again. Follow the on-screen instructions to connect to your Wi-Fi network, sign in to your Google account, and personalize your device settings.
Please note that resetting your Google Nest Hub Max will unlink any connected accounts and erase any personalized settings and data. Therefore, it is important to back up any essential information before performing the reset.
By resetting your Google Nest Hub Max, you can resolve persistent issues and start anew with a fresh setup. Take this opportunity to reconfigure your preferences and reinstall any necessary apps or services for optimal performance.
Reset Google Nest Audio
If you’re experiencing issues with your Google Nest Audio speaker and need to troubleshoot or resolve any problems, performing a reset can often help. Resetting your device will restore it to its default factory settings. Here’s how you can reset your Google Nest Audio:
- Locate the factory reset button on the back of your Google Nest Audio speaker.
- Using a pin or paperclip, press and hold the factory reset button for about 15 seconds.
- The LED lights on the front of the speaker will start flashing.
- After the lights stop flashing, release the factory reset button.
- Google Nest Audio will now begin the reset process and return to its initial setup state.
Resetting your Google Nest Audio can help resolve issues such as audio interruptions, connection problems, or persistent errors. However, keep in mind that performing a reset will remove any personalized settings and data associated with the device.
After the reset, you can set up your Google Nest Audio speaker again by following the instructions provided in the Google Home app on your smartphone or tablet. Make sure to connect it to your Wi-Fi network and reconfigure any desired settings to enjoy your music and smart home features.
Note: Resetting your Google Nest Audio will also remove any linked accounts or connected devices. You will need to set them up again after completing the reset process.
By resetting your Google Nest Audio, you can overcome persistent issues and start afresh with a clean slate. Take this opportunity to reconfigure your preferences and settings, ensuring optimal performance and an enjoyable audio experience.
Reset Google Nest Wi-Fi
If you’re experiencing connectivity issues or need to troubleshoot your Google Nest Wi-Fi system, performing a reset can often help resolve the problems you’re facing. Resetting your Google Nest Wi-Fi will restore it to its default factory settings. Follow these steps to reset your Google Nest Wi-Fi:
- Locate your Google Nest Wi-Fi router.
- Using a pin or paperclip, press and hold the reset button on the back of the router for about 10 seconds.
- The LED lights on the front of the router will start flashing.
- After the lights stop flashing, release the reset button.
- Your Google Nest Wi-Fi system will now begin the reset process.
During the reset process, your Google Nest Wi-Fi router and any connected points will revert to their original factory settings. This process may take a few minutes to complete.
After the reset is finished, you’ll need to set up your Google Nest Wi-Fi system again. Follow the on-screen instructions provided in the Google Home app on your smartphone or tablet. Ensure that you connect your devices to the Wi-Fi network and customize your settings according to your preferences.
Note: Resetting your Google Nest Wi-Fi will remove any personalized settings, network configurations, and devices that were previously connected. Make sure to back up any essential settings or data before performing the reset.
By resetting your Google Nest Wi-Fi, you can troubleshoot connectivity issues and start fresh with a clean network setup. Take this opportunity to optimize your Wi-Fi settings, add new devices, and ensure a stable and reliable internet connection throughout your home.
Reset Google Nest Protect
If you’re having issues with your Google Nest Protect smoke and carbon monoxide detector or need to troubleshoot it, performing a reset can often help resolve the problems you’re experiencing. Resetting your Google Nest Protect will restore it to its default factory settings. Here’s how you can reset your device:
- Locate the Google Nest Protect device on the ceiling or wall.
- Press and hold the button on the side of the device for about 10 seconds.
- You will hear a voice prompt saying “The Nest Protect has been reset.”
- Release the button.
- Your Google Nest Protect will now reset and go into setup mode.
During the reset process, your Google Nest Protect will unlink from any connected accounts and restore its default settings. This process typically takes a couple of minutes.
After the reset is complete, you will need to set up your Google Nest Protect again. Open the Google Home app on your smartphone or tablet and follow the on-screen instructions to connect your device to your Wi-Fi network and customize your preferences.
Note: Resetting your Google Nest Protect will erase any personalized settings, connected accounts, and data associated with the device. If you have important information stored in the app, ensure that you back it up before performing the reset.
By resetting your Google Nest Protect, you can troubleshoot any issues you’ve been encountering and start with a fresh setup. Take this opportunity to review your smoke and carbon monoxide settings, test the device, and ensure the safety of your home and loved ones.
Troubleshooting Common Issues
While Google Home devices are designed to provide a seamless experience, you may encounter some common issues during their usage. Here are a few troubleshooting steps to address these problems:
- Wi-Fi Connectivity: Ensure that your Google Home device is within range of your Wi-Fi router and that the Wi-Fi network is working correctly. Restarting your router and checking for any firmware updates can also help resolve connectivity issues.
- Unresponsive Device: If your Google Home device is not responding to voice commands or actions, try unplugging it from the power source for a few seconds and then plugging it back in. This can often reset the device and restore functionality.
- Music Playback Problems: If you’re experiencing issues with playing music through your Google Home device, check if the streaming service you’re using is compatible and properly linked to your device. Also, verify that the volume is not muted and adjust it as needed.
- Inaccurate Responses: If your Google Home device is providing incorrect or inaccurate information, double-check your language settings and ensure that the device has the latest software updates installed. Restarting the device can also help resolve this issue.
- Voice Recognition: If your Google Home device is having trouble recognizing your voice, try retraining the voice model in the Google Home app. Make sure to speak clearly and remove any background noise that may hinder accurate voice recognition.
- Interference: If you’re encountering connectivity or performance issues, check for any potential sources of interference, such as other devices or appliances operating on the same frequency. Relocating your Google Home device away from these sources can help improve its performance.
If the above troubleshooting tips do not resolve your issues, you may want to reach out to Google support for further assistance. They can provide more specific guidance tailored to your device and its software version.
Remember that regular maintenance, keeping your device updated, and following best practices for usage can help minimize and prevent issues with your Google Home device.