
Checking for Physical Damage
Ensuring that your speaker wires and connections are in good physical condition is the first step in troubleshooting any audio issues. Here’s how you can check for physical damage:
- Inspect the cables: Carefully examine the speaker wires for any visible signs of damage, such as cuts, fraying, or exposed wires. If you spot any issues, it’s important to replace them to avoid interference or potential electrical hazards.
- Check the connectors: Inspect the connectors on both ends of the speaker wires. Look for any signs of corrosion, bent pins, or loose connections. If you notice any problems, clean the connectors or replace them if necessary.
- Look for damaged insulation: Besides checking the overall condition of the wires, pay close attention to the insulation. If you notice any sections where the insulation is cracked or compromised, it could lead to electrical shorts or signal loss.
- Ensure proper wire gauge: Make sure that you are using the correct gauge of speaker wire for your setup. Using wires that are too thin for the power demands of your speakers can result in signal degradation or even damage to your equipment.
- Check for pinched wires: Examine the speaker wire path to ensure that no wires are pinched or tightly bent. Pinched wires can cause impedance issues and affect the overall performance of your speakers.
By thoroughly inspecting your speaker wires for any physical damage, you can eliminate potential issues that may interfere with the audio quality. Remember, a small issue like a frayed wire or a loose connection can significantly impact your listening experience, so it’s crucial to address them promptly.
Checking for Proper Connection
Ensuring that your speaker wires are properly connected is essential for optimal audio performance. Here are some steps you can follow to check for proper connections:
- Verify the correct terminals: Make sure that each speaker wire is connected to the appropriate terminals on both the speakers and the audio source. Check the labels or user manual for guidance, as different speakers may have different terminal configurations.
- Secure connections: Ensure that the speaker wires are tightly and securely attached to the terminals. Loose connections can result in intermittent audio or signal dropouts.
- Polarity consistency: Maintain consistency in the polarity of the speaker connections. The positive terminal on the amplifier should be connected to the positive terminal on the speaker, and the same applies to the negative terminals. Mixing up the polarity can cause the audio signals to cancel each other out or result in phase issues.
- Labeling: Consider labeling the speaker wires or using color-coded cables to easily identify the correct connections. This can save you time and effort when troubleshooting or making adjustments in the future.
- Multi-speaker setups: If you have a multi-speaker setup, such as surround sound or a stereo configuration, ensure that each speaker is connected to the appropriate channel or output on the receiver or amplifier.
- Use quality connectors: Invest in high-quality connectors such as banana plugs or spade connectors to ensure a reliable and secure connection. These connectors not only provide a better electrical connection but also make it easier to swap speakers or troubleshoot if needed.
By carefully checking and ensuring proper connections, you can eliminate common connection-related issues and enjoy optimal audio performance. Remember to double-check the connections whenever you make changes to your setup or encounter any audio problems.
Testing for Continuity
Testing for continuity is an essential step to determine if there are any breaks or interruptions in the speaker wires. Here’s how you can test for continuity:
- Turn off all power: Before testing continuity, ensure that all power sources are turned off, including the amplifier, receiver, and any other audio equipment.
- Disconnect the speaker wires: Carefully disconnect the speaker wires from both the speakers and the audio source.
- Set the multimeter: Set your multimeter to the continuity mode. This mode allows the meter to produce a beep or indicate continuity when there is a complete connection between the probes.
- Probe the wires: With one probe of the multimeter touching one end of the speaker wire, touch the other probe to the opposite end of the wire. If the multimeter beeps or indicates continuity, it means that there is a solid connection throughout the wire.
- Repeat for each wire: Test the continuity of each individual speaker wire separately to identify any specific wires that may have breaks or interruptions.
- Repair or replace: If you discover any wires that do not produce continuity, you may have a break or interruption in the wire. In such cases, you can repair the damaged section or replace the wire altogether.
Testing for continuity helps pinpoint any physical issues with the speaker wires that may be affecting the audio quality. It allows you to identify any breaks, cuts, or loose connections that may need to be addressed for optimal performance. Make sure to be thorough in your testing to ensure all wires are working properly.
Measuring Resistance
Measuring resistance in speaker wires can provide valuable information about the integrity of the wires and the overall performance of your audio system. Here’s how you can measure resistance:
- Disconnect the wires: Start by disconnecting the speaker wires from both the speakers and the audio source to ensure accurate measurements.
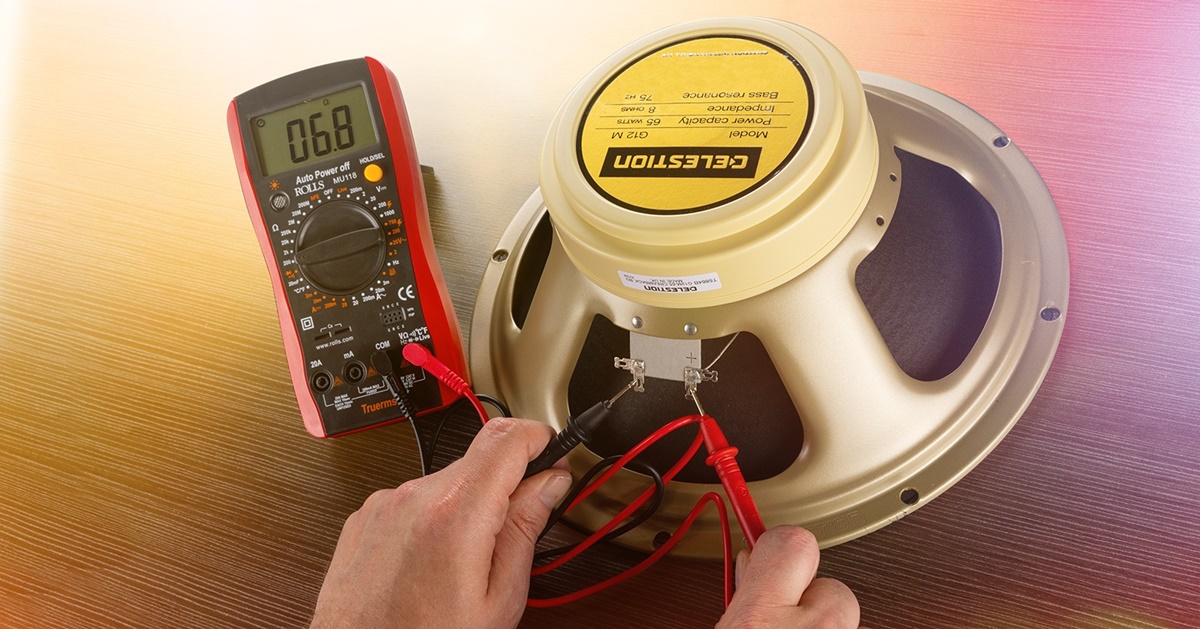
- Select a multimeter: Choose a multimeter that has a resistance measurement feature. Set the multimeter to the appropriate resistance range, usually denoted by the Greek letter omega (Ω).
- Probe the wires: Take one probe of the multimeter and touch it to one end of the speaker wire. Take the other probe and touch it to the opposite end of the wire.
- Read the resistance value: The multimeter will display a resistance value in ohms (Ω). This value represents the total resistance of the wire.
- Compare the reading: Compare the resistance reading to the specifications provided by the manufacturer. If the measured resistance is significantly higher or lower than the recommended range, there may be an issue with the wire’s thickness or quality.
- Repeat for each wire: Measure the resistance for each individual speaker wire separately to ensure consistency.
Measuring resistance in speaker wires helps identify any abnormal resistance values that may indicate issues such as damaged wires, loose connections, or impedance mismatches. It is important to note that resistance may vary depending on the length and gauge of the wire, so referring to the manufacturer’s specifications is essential for accurate assessment.
Checking for Polarity
Ensuring proper polarity in speaker connections is crucial for accurate sound reproduction and imaging. Follow these steps to check and maintain proper polarity:
- Identify polarity markings: Look for polarity markings on the speakers and speaker wires. They are typically indicated by a “+” and “-” sign or color-coded markings.
- Consistent polarity: Ensure that the positive (+) terminal on the speaker is connected to the positive terminal on the amplifier or receiver, and the negative (-) terminal is connected to the corresponding negative terminal.
- Polarity testing: You can use a 9-volt battery to test the polarity. Briefly touch the speaker wires to the battery terminals. If the speaker cone moves outwards, then the polarity is correct. If it moves inward or doesn’t move at all, the polarity may be reversed.
- Polarity correction: If you find reversed polarity, simply switch the connections of the positive and negative terminals on either the speaker or the amplifier/receiver to ensure proper alignment.
- Consistency across speakers: If you are using multiple speakers within a setup, make sure that all speakers are wired with the same polarity. This ensures consistent sound reproduction across the entire system.
Checking for and maintaining proper polarity is important to achieve accurate stereo imaging and balanced sound reproduction. Incorrect polarity can result in phase cancellation and a loss of low-frequency response. Regularly verifying and correcting polarity ensures optimal audio performance in your speaker system.
Listening for Distortion or Imbalance
Listening for distortion or imbalance in your audio system can help you identify potential issues with your speaker wires and connections. Follow these steps to assess the sound quality:
- Play a variety of audio: Select different types of music or audio content that you are familiar with, such as songs from various genres, podcasts, or movies.
- Listen for clarity: Pay attention to the overall clarity of the sound. Are there any muffled or distorted elements? Distorted sound may indicate issues with the speaker wires, such as poor connections or damaged cables.
- Check for volume consistency: Listen for any significant differences in volume levels between the left and right speakers. Imbalances in sound can be a sign of incorrect wiring or faulty connections.
- Identify channel imbalance: Observe if the sound appears to be weighted more towards one channel. This can indicate problems with the speaker connections or an imbalance in the stereo configuration.
- Listen for consistent sound: Ensure that the sound maintains consistency across the frequency spectrum. Look out for any particular frequency ranges that sound weak or overly emphasized, as this may suggest issues with the speaker wires or improper speaker placement.
- Pay attention to dynamic shifts: Listen for any abrupt changes in volume or dynamics while playing audio with varying dynamics. Sudden volume changes or distorted peaks during dynamic shifts can indicate issues with the speaker wire connections or amplifier performance.
By actively listening to the audio and assessing for distortion, imbalance, and other irregularities, you can identify problems with your speaker wires or connections. This will enable you to take the necessary steps to resolve the issues and restore high-quality sound reproduction in your audio system.
Testing with a Multimeter
A multimeter is a versatile tool that can be used to test various aspects of your speaker wires and connections. Here’s how you can use a multimeter to perform tests:
- Set the multimeter: Choose the appropriate setting on your multimeter to measure resistance or continuity, depending on the specific test you want to perform.
- Test for continuity: Use the continuity mode on your multimeter to check for a complete connection in the speaker wires. Touch the multimeter probes to each end of a wire and listen for a beep or look for the continuity symbol on the screen to indicate a proper connection.
- Measure resistance: Set your multimeter to the resistance mode and touch the probes to each end of a speaker wire. The multimeter will display the resistance value, which should match the expected resistance based on the wire’s specifications.
- Check for insulation: To test the insulation of the speaker wire, set your multimeter to the voltage mode. Touch one probe to the stripped end of the wire and touch the other probe to the outer insulation. If the multimeter shows a voltage reading, it may indicate a problem with the insulation.
- Verify voltage: Use the voltage mode on your multimeter to verify that the power source supplying the audio signal is providing the correct voltage to the speakers. This can help determine if a weak or distorted signal is due to an issue with the power source.
Testing with a multimeter allows you to gather precise measurements and diagnose potential problems with your speaker wires and connections. By using the appropriate modes and techniques, you can identify issues such as open circuits, shorts, improper resistance, and insulation problems, enabling you to take the necessary steps to resolve them.
Using a Test Tone Generator
A test tone generator is a valuable tool for accurately testing and calibrating speaker wires and connections. Here’s how you can use a test tone generator:
- Connect the test tone generator: Connect the output of the test tone generator to the audio source or amplifier that will be driving your speakers. Ensure that the connections are secure and properly matched.
- Select the test tone: Choose the appropriate test tone for the specific purpose of your test. Common options include sine waves, pink noise, or white noise.
- Start with low volume: Begin by playing the test tone at a low volume to avoid any potential damage to your speakers or audio equipment.
- Check for channel balance: Listen for any noticeable volume differences between the left and right channels of your speakers. Adjust the balance controls or speaker wire connections as needed to achieve an equal balance of sound.
- Assess frequency response: Use the test tone generator to play test tones at different frequencies. Listen for any inconsistencies or imbalances in the frequency response of your speakers. Adjust equalization settings if necessary to achieve a smooth and balanced sound across the frequency range.
- Identify distortion or abnormalities: Pay attention to any audible distortion, clipping, or unusual noises during the test tone playback. These can indicate issues with your speaker wires, connections, or audio equipment.
- Test various speaker wire configurations: If you have a complex speaker setup, such as a home theater system or multi-room audio system, use the test tone generator to check the functionality and effectiveness of each speaker wire connection.
Using a test tone generator allows you to accurately assess the performance and capabilities of your speaker wires and connections. By systematically testing different aspects of your audio system, you can identify and address any issues that may affect the overall sound quality and listening experience.
Checking for Loose Connections
Loose connections can be a common cause of audio issues in speaker systems. To ensure optimal performance, it’s important to regularly check for and address any loose connections. Here’s how you can do it:
- Power off your audio system: Before inspecting the connections, ensure that all power sources are turned off, including the amplifier, receiver, and any other audio equipment.
- Inspect the connections: Examine all the speaker wire connections, including those at the speakers, audio source, and any terminals or connectors in between. Look for any signs of loose or poorly attached wires.
- Tighten connections: If you find any loose connections, gently tighten them by hand. Use caution not to overtighten, as this can damage the connectors or terminals.
- Consider using connectors: If you frequently experience loose connections, consider using connectors such as banana plugs or spade connectors. These provide a more secure and reliable connection and make it easier to connect and disconnect the wires when needed.
- Test the connections: Once all the connections are tightened, power on your audio system and test the sound. Listen for any improvements in sound quality, as loose connections can cause audio disturbances or intermittent signal loss.
- Revisit the connections periodically: It’s good practice to periodically check the connections, even after tightening them initially. Over time, vibrations or movement can cause connections to loosen again, so regular maintenance is important.
Checking for and addressing loose connections in your speaker system is a simple yet effective way to improve audio performance. By ensuring that all connections are secure, you can minimize the risk of sound interruptions or poor audio quality, allowing you to enjoy your music, movies, or any other audio content with peace of mind.
Troubleshooting Common Issues
Even with proper maintenance and care, occasional issues may arise with your speaker wires and connections. Here are some common problems you may encounter and troubleshooting steps to address them:
- No sound: If you are not getting any sound from your speakers, check the connections at both ends of the speaker wires, ensuring they are securely plugged in. Verify that the audio source and amplifier/receiver are powered on and set to the correct input.
- Intermittent sound: If the sound from your speakers cuts in and out, start by inspecting the speaker wire connections. Look for any loose or damaged wires that may cause intermittent signal loss. Consider using connectors for a more secure connection.
- Low volume: If the volume level seems unusually low, confirm that the audio source and amplifier/receiver are set to an appropriate volume. Check for any volume controls or settings specific to your speakers. Ensure that the speaker wires are properly connected and that there are no loose connections impacting the signal.
- Distorted sound: Distorted sound can be caused by various issues, including loose connections, damaged speaker wires, or a faulty audio source. Check and tighten all connections. If the issue persists, try using different speaker wires or testing the speakers with a different audio source to narrow down the problem.
- Imbalanced sound: If you notice differences in volume levels between the left and right speakers, check the balance controls on your amplifier/receiver or audio source. Make sure the speaker wires are properly connected with consistent polarity. Adjust the speaker positioning or room acoustics if necessary.
- Noise or hum: An audible noise or hum can be introduced by various factors, such as ground loops or electrical interference. Check for proper grounding of your audio equipment. Ensure that all audio cables are not running parallel to power cables. Consider using shielded or balanced cables to minimize interference.
- One speaker not working: If one speaker is not producing sound, swap the speaker wires with a working speaker to determine if the issue lies with the speaker or the speaker wires. Inspect the connections and replace any faulty wires or connectors as needed.
Troubleshooting common issues with your speaker wires and connections requires a systematic approach. By identifying the problem and applying the appropriate troubleshooting steps, you can often resolve the issues and restore optimal audio performance in your speaker system.