
Benefits of Wiring Multiple Amps in Your Car
Wiring multiple amps in your car can have several significant benefits. Whether you’re looking to enhance your car audio system or power additional electrical components, this setup can provide improved sound quality, increased power output, and greater flexibility. Here are some of the key advantages:
1. Enhanced Sound Quality: By connecting multiple amps, you can distribute the workload and reduce strain on a single amplifier. This can result in cleaner, distortion-free audio playback, allowing you to enjoy your favorite music with greater clarity and fidelity.
2. Increased Power Output: Wiring multiple amps in parallel can provide a higher power output in comparison to using a single amp. This can be particularly beneficial if you have power-hungry speakers or subwoofers that require more wattage to perform at their best, ensuring that you can achieve the desired volume and bass levels without sacrificing audio quality.
3. Flexibility for Expanded System: Wiring multiple amps allows you to expand your car audio system or incorporate additional electrical components, such as amplifiers for separate channels or subwoofers. This flexibility enables you to customize your setup according to your preferences, whether you want to create a comprehensive sound experience or focus on specific frequency ranges.
4. Efficient Power Distribution: With multiple amps, you can distribute the power demand more evenly across the electrical system of your car. This can prevent voltage drops and minimize the risk of overloading the wiring and other components, ensuring a stable and reliable power supply to each amplifier.
5. Customization and Control: Wiring multiple amps also gives you the ability to customize the settings and controls for each amplifier individually. This means you can adjust the gain, crossover points, and equalization to optimize the performance of each component according to your preferences and the specific characteristics of your speakers or subwoofers.
6. Redundancy and Backup: In some cases, having multiple amps can serve as a backup in case one amplifier fails. This can help prevent complete system failure during a performance or a road trip, ensuring that you still have audio output from the other working amplifiers.
Overall, wiring multiple amps in your car can provide a range of benefits, including improved sound quality, increased power output, flexibility for system expansion, efficient power distribution, customization options, and redundancy. However, it is important to remember that proper installation, wiring, and configuration are crucial for maximizing these benefits and ensuring the safety and performance of your car audio system.
Understanding the Power Requirements of Your Amps
Before you start wiring multiple amps in your car, it is essential to understand the power requirements of each amplifier. This will help ensure that you have the necessary equipment and wiring to handle the electrical demands of your setup. Here are the key factors to consider:
1. Power Output: Determine the power output of each amplifier, usually measured in watts. This information is crucial because it will dictate the size of the power wire and the capacity of the wiring kit you will need to supply adequate power to the amps.
2. Continuous and Peak Power: Different amplifiers have both continuous power ratings, which represent the sustained power output, and peak power ratings, which indicate the maximum power output for short bursts. Consider both values to ensure that the wiring and electrical system can handle the maximum power demands of the amps.
3. Amp Efficiency: Amplifiers have an efficiency rating, typically represented as a percentage. This rating tells you how efficiently the amp converts electrical power into sound output. Higher efficiency means less power wasted as heat, which can affect your power requirements and cooling needs.
4. Total Power Consumption: Calculate the total power consumption of all the amps combined. This will help you determine the total current draw and select an appropriate fuse or circuit breaker size to protect the electrical system from overload.
5. Wiring Gauge: Choose the appropriate gauge of power and ground wires based on the total power consumption and the length of the wire run. Thicker wires have lower resistance and can handle higher current loads, ensuring that the amps receive adequate power without voltage drop issues.
6. Battery Capacity: Consider the capacity of your car’s battery to ensure it can handle the power demands of the amps, especially during intense sound reproduction or when the engine is not running. Upgrading to a higher-capacity battery may be necessary in some cases.
7. Alternator Output: Check the output capacity of your car’s alternator, which is responsible for generating electrical power to recharge the battery and supply power to the amps. If the alternator’s output is insufficient, upgrading to a higher-output alternator may be necessary to prevent excessive strain on the electrical system.
Understanding the power requirements of your amps is crucial to ensure a safe and reliable wiring setup. Failure to properly account for power demands can lead to inadequate power supply, voltage drops, overheating, or damage to your amps and other electrical components. Take the time to research and consult the amplifier specifications to make informed decisions about your wiring kit, battery capacity, and alternator output to meet the power requirements of your setup.
Choosing the Right Wiring Kit for Your Installation
When wiring multiple amps in your car, selecting the appropriate wiring kit is crucial to ensure proper power delivery and minimize the risk of electrical issues. Here are some factors to consider when choosing the right wiring kit for your installation:
1. Wire Gauge: The wire gauge refers to the thickness of the power and ground wires. The gauge you choose should be based on the power requirements of your amplifiers, the length of the wire run, and the current draw. Thicker wire gauges, such as 4 AWG or 8 AWG, are suitable for higher-power setups, while thinner gauges, like 10 AWG or 12 AWG, are appropriate for lower-power installations.
2. Kit Components: Check the contents of the wiring kit to ensure it includes all the necessary components, such as power wire, ground wire, RCA cables, speaker wires, fuse holders, and connectors. Having a complete kit eliminates the need for separately purchasing individual components and ensures compatibility.
3. Fuse or Circuit Breaker: A wiring kit should include a fuse or circuit breaker to protect your amplifiers and the electrical system from short circuits or power surges. Make sure the rating of the fuse or circuit breaker matches the power requirements of your setup. It is recommended to use a fused distribution block if you are wiring multiple amps.
4. Length of Wire Run: Consider the length of the wire run from the battery to the amplifiers. If the distance is significant, it is advisable to choose a wiring kit that includes longer power and ground wires. This ensures that you have enough length to properly route the wires, avoid unnecessary splicing, and maintain optimal voltage during power delivery.
5. Quality of Components: Opt for a wiring kit that includes high-quality components, such as OFC (Oxygen-Free Copper) wires. OFC wires have better conductivity compared to CCA (Copper-Clad Aluminum) wires, resulting in less power loss and improved performance.
6. Future Upgrades: If you plan to expand or upgrade your car audio system in the future, consider choosing a wiring kit that allows for easy scalability. Look for kits that provide extra wires or terminals to accommodate additional amplifiers or electrical components.
7. Budget and Brand Reputation: Determine your budget for the wiring kit and research reputable brands that offer reliable and durable products. While cost should not be the sole deciding factor, investing in a quality wiring kit can prevent future issues and ensure longevity.
Choosing the right wiring kit for your installation plays a critical role in the performance and safety of your multi-amp setup. Evaluate your power requirements, consider the length of the wire run, check the components included in the kit, and select a reputable brand to ensure a successful and efficient wiring installation that meets your current and future audio needs.
Gather the Necessary Tools and Supplies
Before you begin wiring multiple amps in your car, it’s important to gather all the necessary tools and supplies. Having the right equipment on hand will make the installation process smoother and more efficient. Here are some essential tools and supplies you’ll need:
1. Screwdrivers: A set of screwdrivers, including both flathead and Phillips head, will be necessary for removing panels and mounting the amps securely.
2. Wire Cutters and Strippers: These tools are essential for cutting and stripping the insulation from the power, ground, and speaker wires during the installation process.
3. Crimping Tool: A crimping tool is used to secure connectors onto the wires. This tool ensures a strong and reliable connection, preventing the wires from coming loose over time.
4. Electrical Tape / Heat Shrink Tubing: Electrical tape helps insulate and protect exposed wires, preventing short circuits. Heat shrink tubing provides a more permanent solution for protecting and securing wires by using heat to shrink the tubing tightly around the wires.
5. Multimeter: A multimeter is an essential tool for checking voltage, continuity, and resistance. It can help in troubleshooting and ensuring a proper electrical connection throughout the installation.
6. Wire Connectors and Terminals: These connectors are needed to secure the power, ground, and speaker wires together. Ring terminals and quick disconnects are commonly used for connecting wires to the amps and battery.
7. Drill and Drill Bits: In some cases, you may need to drill holes to mount the amps or run wires through the firewall. Having a drill and appropriate drill bits will make these tasks easier.
8. Zip Ties and Velcro Straps: These are essential for organizing and securing the wiring in your car. They help prevent wires from dangling and getting tangled, ensuring a clean and professional installation.
9. Fuse Holder and Fuses: A fuse holder is necessary to protect the electrical system from short circuits and power surges. Make sure to have the correct size of fuses for your specific amp and wiring setup.
10. Wire Loom or Split Conduit: Using wire loom or split conduit protects the wires from damage and provides a clean appearance by keeping them neatly bundled together.
11. Mounting Hardware: Depending on your specific installation, you may need mounting screws, brackets, or other hardware to secure the amps in place.
12. Reference Materials: It’s always helpful to have the user manuals for your amplifiers, wiring kit, and any other components involved. These manuals will provide detailed instructions and specifications for proper installation.
Gathering these tools and supplies before starting the installation will save you time and frustration. It’s important to have everything readily available to ensure a smooth and successful wiring process. Having the right tools will not only make the installation easier but also help maintain the integrity and reliability of your car audio system.
Identify and Prepare a Suitable Location for the Amps
Choosing the right location for your amplifiers is crucial for both functionality and aesthetics. Identifying a suitable location and properly preparing it will ensure a clean and secure installation. Here are important considerations when determining the placement of your amps:
1. Space Availability: Assess the available space in your vehicle and consider how much room is needed to accommodate the size of your amplifiers. Look for an area that offers sufficient space to mount the amps securely without obstructing other components or interfering with passenger comfort.
2. Air Flow and Cooling: Amplifiers generate heat, so it’s important to choose a location that allows for adequate air flow to prevent overheating. Avoid mounting amps near heat sources or in enclosed spaces lacking ventilation. Consider installing cooling fans or heat sinks if necessary.
3. Wiring Accessibility: Select a location that facilitates easy access to the power, ground, and speaker wires. This will make the installation process smoother and allow for potential maintenance or adjustments in the future.
4. Protection from Moisture and Vibration: Amps are susceptible to moisture and vibration, which can damage the electronic components. Choose a mounting location that shields the amps from exposure to water, condensation, and excessive vibrations from the vehicle’s movement.
5. Mounting Surface: Ensure that the chosen location provides a secure and stable surface for mounting the amps. Look for areas with structural support, such as metal or reinforced panels, to minimize vibration or flexing that could affect the performance of the amps.
6. Cable Management: Consider how you will manage and conceal the wiring for a clean and professional appearance. Look for locations that allow for easy routing and organizing of the power, ground, and speaker wires to minimize visibility and potential interference.
7. Future Accessibility: It’s also important to consider future accessibility. If you plan on adding or upgrading components in the future, choose a location that allows for easy access and expansion without major modifications to the existing setup.
8. Aesthetics: While functionality is key, maintaining a visually pleasing interior is also important. Choose a location that does not disrupt the overall aesthetics of your vehicle and blends in with the interior design. This will help create a seamless and polished look.
Once you have identified the suitable location, prepare it by ensuring the area is clean and free from debris. Remove any trim panels or other obstructions that may hinder the installation process. Secure the mounting area to prevent vibrations or movement that could potentially damage the amps.
By carefully considering these factors and properly preparing the location, you can ensure a secure and professional installation of your amplifiers. This will enhance both the functionality and appearance of your car audio system, providing a rewarding audio experience while driving.
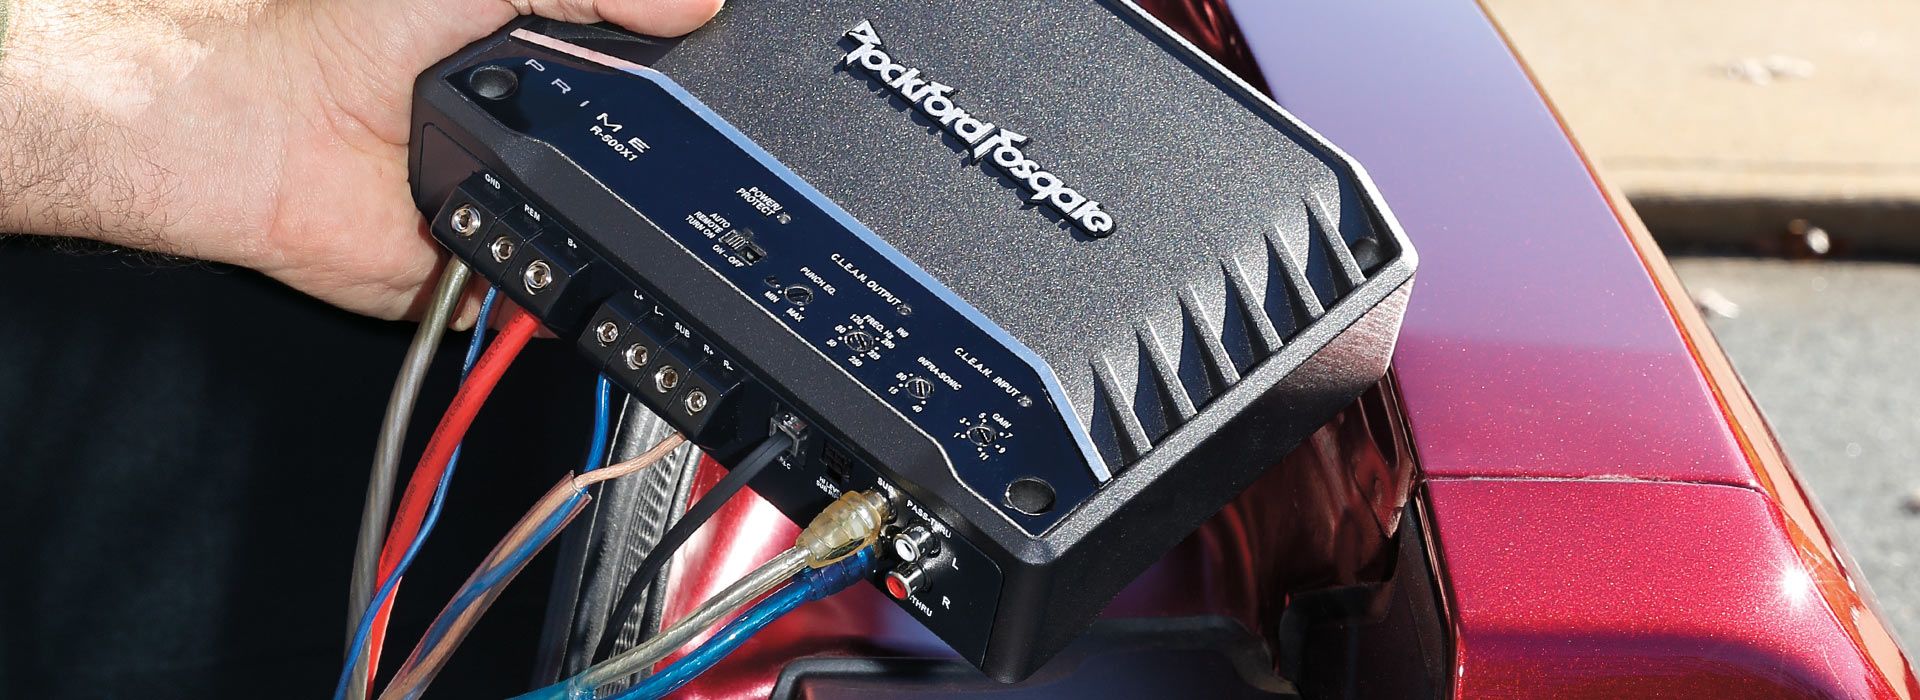
Connect the Positive Power Wire to the Battery
Connecting the positive power wire to the battery is a critical step when wiring multiple amps in your car. It is essential to ensure a secure and reliable electrical connection. Here’s a step-by-step guide on how to properly connect the positive power wire:
1. Disconnect the Battery: Before starting any electrical work, disconnect the negative (-) terminal from the battery to prevent any accidental short circuits or electrical shocks during the installation process.
2. Route the Power Wire: Determine the most convenient and safest route to run the power wire from the battery to the location where the amps will be mounted. It is recommended to route the power wire away from any moving parts, sharp edges, or areas with excessive heat.
3. Determine the Length: Cut the power wire to the appropriate length, leaving some extra slack for easier installation. Ensure that the wire is long enough to comfortably reach the battery while allowing for proper wire management and cable routing inside the vehicle.
4. Install a Fuse or Circuit Breaker: Install a fuse or circuit breaker near the battery as a safety measure. This protects the wiring and amplifiers from potential electrical faults and overloads. The proper fuse size is determined by the power rating of your amplifiers. Check the manufacturer’s specifications for the recommended fuse value.
5. Connect the Power Wire: Strip the insulation from the end of the power wire, exposing a sufficient amount of bare wire for a secure connection. Use a wire connector or ring terminal that matches the size of the battery terminal. Place the connector over the positive (+) terminal of the battery and secure it tightly.
6. Grounding: Locate a suitable grounding point near the amplifiers and connect the ground wire from the amps to this point. Ensure that the grounding point is clean, free of rust or paint, and securely fastened to the vehicle’s metal chassis. This creates a solid electrical connection and prevents potential ground loop issues.
7. Secure and Protect the Wiring: Secure the power wire and ground wire using cable ties or adhesive clips. Make sure the wiring is well-routed and protected from any sharp edges or moving parts that could damage the insulation. Use wire loom, split conduit, or electrical tape to protect the power wire from abrasion and potential short circuits.
8. Reconnect the Battery: Once all the connections are securely made and the wiring is properly protected, reconnect the negative (-) terminal back to the battery. Ensure that the connection is tight and secure.
9. Test the Amplifiers: After connecting the positive power wire to the battery, check the amplifiers to ensure they receive power. Turn on the vehicle’s ignition and verify that the amplifiers power up correctly. If not, double-check your connections and troubleshoot any issues.
Connecting the positive power wire to the battery is a crucial step in the proper installation of multiple amps in your car. By following these steps and taking the necessary precautions, you’ll establish a safe and reliable electrical connection, ensuring optimal performance for your car audio system.
Install a Fuse or Circuit Breaker
Installing a fuse or circuit breaker is a critical step when wiring multiple amps in your car. It acts as a crucial safety measure to protect your amplifiers and the electrical system from potential short circuits, overloads, and other electrical faults. Here’s a step-by-step guide on how to properly install a fuse or circuit breaker:
1. Determine the Fuse or Circuit Breaker Type: Determine whether you will be using a fuse or circuit breaker based on your preference and the specifications of your amp and wiring kit. Both options serve the same purpose of protecting the electrical system; however, circuit breakers can be reset and reused, while fuses need to be replaced if blown.
2. Select the Proper Fuse or Circuit Breaker Rating: Determine the appropriate rating for the fuse or circuit breaker. Refer to the manufacturer’s specifications of your amps to understand the maximum current draw or amperage they require. Choose a fuse or circuit breaker with a rating slightly higher than the maximum current draw to allow for power fluctuations and safe operation.
3. Find a Suitable Mounting Location: Find a suitable location near the battery where you can mount the fuse holder or circuit breaker. Ensure that the location is easily accessible and close to the power wire connection point.
4. Disconnect the Battery: Before starting any electrical work, disconnect the negative (-) terminal from the battery to eliminate the risk of short circuits or electrical shocks during the installation process.
5. Mount the Fuse Holder or Circuit Breaker: Securely mount the fuse holder or circuit breaker bracket to the chosen location. Ensure that it is positioned in a way that allows for easy access, visibility, and durability. Use appropriate fasteners to secure it tightly.
6. Connect the Power Wire: Connect one end of the power wire to the positive terminal of the battery. Strip the wire and secure it to the terminal using an appropriate connector or ring terminal. Make sure the connection is tight and secure.
7. Install the Fuse or Circuit Breaker: If using a fuse, insert it into the fuse holder, making sure it is correctly rated and properly seated. If using a circuit breaker, connect the power wire to the input terminal of the circuit breaker and tighten the connection securely.
8. Connect the Power Wire to the Amplifiers: After installing the fuse or circuit breaker, connect the other end of the power wire to the input terminal of the amplifiers. Strip the wire and use an appropriate connector to make a secure and tight connection. Ensure all connections are properly tightened.
9. Reconnect the Battery: Once all the connections are securely made and the fuse or circuit breaker is properly installed, reconnect the negative (-) terminal back to the battery. Ensure that the connection is tight and secure.
10. Test the Amplifiers: After installing the fuse or circuit breaker, test the amplifiers to ensure they receive power. Turn on the vehicle’s ignition and verify that the amplifiers power up correctly. If they do not, double-check your connections and troubleshoot any issues.
Installing a fuse or circuit breaker is a critical step in the proper installation of multiple amps in your car. By following these steps and selecting the appropriate size and type of fuse or circuit breaker, you’ll ensure the safety and protection of your amps and electrical system, allowing for optimal performance of your car audio system.
Connect Ground Wires
Connecting the ground wires is vital when wiring multiple amps in your car. Proper grounding ensures the safety and efficiency of your car audio system by providing a stable electrical reference point. Here’s a step-by-step guide on how to correctly connect the ground wires:
1. Determine a Suitable Grounding Point: Find a suitable grounding point near the location where you’ll be mounting the amplifiers. The grounding point should be a metal surface that is clean, free of rust or paint, and securely connected to the vehicle’s chassis.
2. Prepare the Ground Wires: Strip a sufficient amount of insulation from the end of each ground wire. It’s recommended to use a wire stripper to ensure a clean cut without damaging the wires.
3. Connect the Ground Wires to the Amplifiers: Identify the ground terminals on each amplifier and connect the ground wires to those terminals. Use an appropriate connector or ring terminal for a secure and solid connection.
4. Connect the Ground Wires to the Grounding Point: Locate the chosen grounding point and clean the surface to ensure a good electrical connection. Use a bolt or screw to attach the ground wires securely to the grounding point. Ensure that the connection is tight and secure.
5. Ensure Proper Grounding: Verify that all ground connections are properly made and securely fastened. Wiggle the wires and check for any looseness or movement. Loose ground connections can lead to electrical issues and poor system performance.
6. Avoid Ground Loop Issues: To prevent ground loop issues, it is recommended to ground all components to the same location. This will help eliminate potential ground loops and minimize unwanted noise or interference.
7. Insulate and Secure the Ground Wires: After making the connections, use electrical tape or heat shrink tubing to insulate the exposed metal parts of the ground wires. This helps protect the connections from moisture, vibration, and potential short circuits. Secure the ground wires using zip ties or adhesive clips to prevent them from dangling or interfering with other components.
8. Reconnect the Battery: Once all the ground connections are properly made and insulated, reconnect the negative (-) terminal back to the battery. Ensure that the connection is tight and secure.
9. Test the Amplifiers: After connecting the ground wires, test the amplifiers to ensure they are receiving proper grounding. Turn on the vehicle’s ignition and verify that the amplifiers power up correctly. If there are any issues, double-check the ground connections and troubleshoot if needed.
Properly connecting the ground wires is crucial for the overall performance and safety of your car audio system. By following these steps and ensuring secure and clean connections, you’ll establish a reliable grounding system, minimizing noise, improving signal integrity, and maximizing the efficiency of your amplifiers.
Run RCA Cables and Speaker Wires
Running RCA cables and speaker wires is an important step when wiring multiple amps in your car. Properly routing and connecting these cables ensures quality audio signal transmission and an overall clean installation. Here’s a step-by-step guide on how to run RCA cables and speaker wires:
1. Determine the Route: Plan the route for your RCA cables and speaker wires, considering the distance to your amplifiers and the desired cable management. Take into account any obstructions or potential sources of interference, and choose the most direct and efficient path.
2. Measure and Cut the Cables: Measure the required length for your RCA cables and speaker wires. It’s important to leave some extra length to accommodate twists, turns, and proper wire management. Cut the cables to the appropriate length using wire cutters or a sharp knife.
3. Run the RCA Cables: Start by running the RCA cables from the head unit or audio source to each amplifier. Avoid running the RCA cables parallel to power wires to minimize potential interference. Use existing cable channels, wiring harnesses, or specially designed cable routing accessories to keep the RCA cables organized and secured along their route.
4. Connect the RCA Cables: At each end of the RCA cables, connect the corresponding connectors to the appropriate inputs on the head unit and amplifiers. It’s important to ensure a secure connection by pushing the connectors firmly into the jacks and tightening any locking mechanisms if present.
5. Run the Speaker Wires: Route the speaker wires from the amplifiers to each speaker or subwoofer location. Keep the speaker wires away from power wires to minimize the risk of interference. Use existing wire channels, wiring harnesses, or create new routes by carefully threading the wires through the vehicle’s panels or under the carpet/flooring.
6. Connect the Speaker Wires: At each end of the speaker wires, strip a small portion of insulation from the wires using wire strippers. Connect the bare wire ends to the corresponding terminals on the amplifiers and speakers/subwoofers. Ensure that the connections are secure and tight, as loose connections can affect sound quality.
7. Secure and Manage the Cables: Use zip ties, adhesive clips, or wire loom to secure and manage the RCA cables and speaker wires. This will prevent them from moving around, becoming tangled, or rubbing against sharp edges. Proper cable management also helps maintain a neat and professional installation.
8. Test the Audio Signals: Once all the cables are connected and properly managed, test the audio signals to ensure that the RCA cables and speaker wires are transmitting the sound correctly. Check for any distortions, imbalances, or connectivity issues. If necessary, troubleshoot the connections and make any adjustments or corrections.
Running RCA cables and speaker wires correctly is essential for achieving high-quality audio performance in your car audio system. By following these steps and taking the necessary precautions, you’ll ensure proper signal transmission and minimize the risk of interference or signal degradation, resulting in optimal sound reproduction throughout your vehicle.
Connecting the Remote Turn-On Wire
Connecting the remote turn-on wire is an important step when wiring multiple amps in your car. The remote turn-on wire controls the power to the amplifiers, allowing them to turn on and off with the head unit or audio source. Here’s a step-by-step guide on how to correctly connect the remote turn-on wire:
1. Locate the Remote Turn-On Terminal: Identify the remote turn-on terminal on each of your amplifiers. This terminal is typically labeled as “REM” or “Remote” and is used to receive the remote turn-on signal from the head unit.
2. Determine the Source of the Remote Turn-On Signal: Identify the source of the remote turn-on signal in your car. This is usually the head unit’s wiring harness, which contains a remote turn-on wire. Alternatively, you can use a signal processor or relay to control the remote turn-on function.
3. Connect the Remote Turn-On Wire: Strip a small portion of insulation from the end of the remote turn-on wire using wire strippers. Connect the bare wire end to the remote turn-on terminal on each amplifier. Ensure that the connection is secure by tightening the terminal or using an appropriate connector.
4. Connect the Remote Turn-On Wire at the Head Unit: Route the remote turn-on wire from the amplifiers to the head unit. Connect the other end of the remote turn-on wire to the appropriate remote turn-on terminal on the head unit’s wiring harness. Refer to the head unit’s manual for the specific location of the remote turn-on terminal.
5. Test the Connection: With the head unit turned on, verify that the remote turn-on wire is properly connected by checking that the amplifiers turn on and off accordingly. If the amplifiers fail to turn on, check all connections and troubleshoot any issues, ensuring a solid and secure connection between the remote turn-on wire and the amplifiers as well as the head unit.
6. Secure and Manage the Remote Turn-On Wire: Use zip ties, adhesive clips, or wire loom to secure and manage the remote turn-on wire along with the other cables in your installation. This will prevent the wire from becoming tangled or falling into areas where it may cause interference or damage.
7. Double-Check the Operation: After securing the connections and managing the remote turn-on wire, test the entire system’s functionality. Turn on the head unit to confirm that all amplifiers power up simultaneously, ensuring that the remote turn-on wire is properly functioning.
Connecting the remote turn-on wire correctly ensures that your amplifiers turn on and off in sync with the head unit, providing a seamless and reliable operation of your car audio system. By following these steps and maintaining a secure and properly managed connection, you’ll have full control over the power state of your amplifiers, enhancing the overall functionality and convenience of your audio setup.
Configure the Amplifiers’ Input and Output Settings
Configuring the input and output settings of your amplifiers is an essential step when wiring multiple amps in your car. These settings allow you to optimize the performance of your amplifiers and ensure they are properly matched to your audio sources and speakers. Here’s a step-by-step guide on how to configure the input and output settings:
1. Gain Control: Adjust the gain control on each amplifier to set the input sensitivity. The gain control determines the amplification level and should be properly set to match the output voltage of your head unit or signal processor. Follow the amplifier’s manual to identify the optimal gain control setting based on the input voltage.
2. Crossover Settings: Configure the crossover settings to direct specific frequency ranges to the appropriate speakers or subwoofers. Most amplifiers offer low-pass filters for subwoofers and high-pass filters for speakers. Adjust these settings according to the speaker and subwoofer specifications and your desired audio performance.
3. Phase Control: If your amplifier has a phase control option, adjust it to ensure optimal phase alignment between the subwoofers and the other speakers. This helps eliminate any cancellation or interference that may occur due to phase differences.
4. Bass Boost and EQ Settings: If your amplifier provides bass boost and equalization (EQ) options, carefully adjust these settings to enhance the low-frequency response and tailor the sound to your preference. Be mindful of not overdoing it, as excessive bass boost or EQ can lead to distortion or damage to your speakers.
5. Speaker Impedance: Ensure that the amplifier’s output impedance is properly set or matched to the impedance rating of your speakers. This helps optimize power transfer and prevents damage to the amplifier and speakers. Consult the manuals or labels of your amplifiers and speakers for proper impedance matching guidelines.
6. Test the Audio Performance: After configuring the input and output settings, perform a sound test to ensure optimal audio performance. Play a variety of audio tracks and carefully listen for any distortions, imbalances, or unwanted sound artifacts. Make any necessary adjustments to the settings to achieve the desired sound quality and clarity.
7. Fine-Tuning: Take the time to fine-tune the settings based on personal preference and the specific characteristics of your audio sources and speakers. Experiment with different combinations of gain, crossover, and EQ settings until you achieve the desired sound reproduction and balance in your car audio system.
8. Properly Label the Settings: Once you have achieved the desired configuration, it’s important to document and label the settings for future reference. This will make it easier to readjust or make changes if needed and ensure consistency in your audio setup.
Configuring the input and output settings of your amplifiers is crucial for achieving optimal audio performance and protecting your audio equipment. By following these steps and carefully adjusting the gain, crossover, phase, bass boost, and EQ settings, you’ll be able to fine-tune your car audio system to meet your preferences and enjoy an enhanced and immersive listening experience.
Testing the Amplifier System
After completing the wiring and configuration of multiple amps in your car, it’s crucial to thoroughly test the amplifier system to ensure proper functionality and optimal audio performance. Here are the key steps to test your amplifier system:
1. Power-Up Sequence: Turn on your car’s ignition and start the head unit. Verify that all connected amplifiers power up simultaneously, indicating that the remote turn-on wire and wiring connections are functioning correctly.
2. Sound Output: Play various audio tracks with different frequencies and volume levels to assess the clarity and output of each amplifier. Listen for distortion, imbalance, or any unwanted noise that may indicate a wiring or configuration issue.
3. Balance and Fade: Adjust the balance and fade settings on your head unit to ensure that the sound is distributed evenly between all speakers. Test each speaker individually to verify that they are working correctly and producing the expected audio output.
4. Subwoofer Performance: Pay special attention to the performance of your subwoofers. Check their low-end frequency response, bass articulation, and overall impact. Adjust subwoofer settings, such as crossover frequency and level, to achieve the desired bass response without distortion.
5. Equalization and Tone Controls: Utilize the equalization and tone controls on your head unit or signal processor to fine-tune the audio settings. Adjust the settings based on your personal preferences and the acoustics of your car’s interior. Listen for any improvements or necessary adjustments in tonal balance and frequency response.
6. Volume Control: Test the volume control to ensure that the amplifiers can handle higher volumes without clipping or distortion. Gradually increase the volume and listen for any signs of distortion or overly strained sound reproduction.
7. Balance and Phase Checks: Verify that the speakers and subwoofers are in phase and properly balanced. Listen closely for any cancellation or phasing issues that may affect the overall sound quality. Make adjustments to ensure a cohesive and well-integrated audio output.
8. Subsequent Long-Term Testing: Take the time to evaluate the amplifier system during various driving conditions, such as different speeds and road surfaces. This extended testing will help you identify any potential issues or areas for further adjustment.
9. Review Wiring and Connections: During the testing phase, inspect the wiring and connections to ensure they remain secure and properly routed. Look for any signs of loose connections, frayed wires, or potential areas where interference may occur. Address any issues immediately to maintain optimal performance.
10. Consult Professional Assistance: If you encounter persistent issues or are uncertain about the performance of your amplifier system, consider seeking the assistance of a professional car audio installer or technician. They can provide expert guidance and resolve any complex issues that may arise.
Thoroughly testing your amplifier system is crucial to ensure optimal audio performance and troubleshoot any potential issues. By following these steps and addressing any concerns during the testing process, you can fine-tune your system and enjoy a high-quality audio experience in your car.
Troubleshooting Common Issues
When wiring multiple amps in your car, it’s important to be prepared for common issues that may arise during the installation process. Here are some troubleshooting tips to help you address common issues:
1. No Power: If none of your amplifiers are receiving power, check the connections to ensure that the positive power wire is securely connected to the battery. Verify that the remote turn-on wire is connected properly to the head unit or signal processor. Also, inspect the fuse or circuit breaker to ensure it is not blown or tripped.
2. Low or Distorted Sound: If you are experiencing weak or distorted sound, check the gain settings on your amplifiers. Adjust the gain controls to appropriate levels to ensure the input sensitivity matches the output of your head unit or signal processor. Additionally, check the speaker connections and ensure they are properly secured and connected to the correct terminals.
3. Ground Loop Noise: Ground loop noise generally manifests as a humming or buzzing sound. To address this issue, check all grounding connections. Ensure that the ground wire connections are tight, and the grounding points are clean and free of paint or rust. Consider using a ground loop isolator or noise suppressor to eliminate the unwanted noise.
4. Overheating or Amplifier Protection Mode: If your amplifiers are overheating or going into protection mode, ensure that there is adequate ventilation around the amplifiers. Check for any obstructions or blockages that may restrict airflow. Ensure the impedance of your speakers matches the amplifier’s specifications to avoid overload. If necessary, consider adding cooling fans or relocating the amplifiers to a cooler area.
5. RCA or Speaker Wire Noise: If you are experiencing noise or interference through the RCA cables or speaker wires, first check for any loose or faulty connections. Make sure the RCA cables are routed away from power wires to minimize potential interference. Additionally, inspect the RCA cables and speaker wires for any damage or wear and replace them if necessary.
6. System Integration Issues: If you have integrated your amplifier system with OEM components or aftermarket devices, verify that all integration modules or adapters are properly installed and functioning correctly. Consult the manuals or seek professional assistance if you are experiencing compatibility or integration issues.
7. Insufficient Bass: If you find that your bass response is lacking, examine the subwoofer settings. Ensure that the crossover frequency, gain, and phase are properly configured to suit your subwoofers and system preferences. Consider adjusting the bass boost or EQ settings, but exercise caution to avoid excessive boosting that may lead to distortion.
8. Consult Professional Assistance: If you encounter persistent issues or are uncertain about troubleshooting steps, it may be beneficial to consult a professional car audio installer or technician. They have specialized knowledge and experience to diagnose and address complex issues that may require advanced troubleshooting techniques.
When troubleshooting, it’s important to approach each issue systematically and methodically. Take your time, double-check connections, and apply logical steps to diagnose and resolve problems. By following these troubleshooting tips and seeking expert help when needed, you can overcome common issues and ensure optimal performance from your multi-amp car audio system.