
Selecting the Right Location for Your Home Theater Receiver
When setting up your home theater system, one of the crucial decisions you’ll need to make is finding the perfect spot for your home theater receiver. The receiver acts as the heart of your audio and video setup, so its placement is essential for optimal performance and convenience. Here are some factors to consider when choosing the ideal location for your home theater receiver:
1. Accessibility: Look for a location that is easily accessible. You will need to access the receiver frequently for adjustments, connecting new devices, and troubleshooting. Consider placing it in a position where you can easily reach the front and back panels without any obstacles.
2. Ventilation: Receivers can generate significant heat, so proper ventilation is crucial to prevent overheating. Avoid placing the receiver in enclosed spaces like cabinets or shelves without proper ventilation. Instead, opt for an open area with good airflow to allow heat to dissipate effectively.
3. Noise and Interference: Some receivers can emit a faint humming sound during operation. To minimize noise interference, avoid placing the receiver near other electronic devices that generate heat and noise, such as amplifiers or gaming consoles. Also, keep it away from sources of electromagnetic interference, such as wireless routers and cordless phones.
4. Cable Organization: Consider the placement of your input and output cables. Choose a location that allows for easy cable management and reduces clutter. Access to power outlets and cable routing should also be taken into account.
5. Line of Sight: If your receiver uses an infrared (IR) remote control, ensure that it has a clear line of sight to the receiver’s front panel. Placing the receiver behind closed cabinets or doors can obstruct the remote control signals, causing inconvenience.
6. Aesthetics: While the functionality of your home theater system is paramount, it’s also important to consider the overall aesthetics of your living space. If possible, select a location where the receiver blends seamlessly with your existing decor or where it can be hidden from view using specialized furniture or AV racks.
Gathering the Necessary Tools and Equipment
Before diving into the installation process, it’s important to ensure you have all the necessary tools and equipment at hand. By having everything ready, you can streamline the setup process and avoid any unnecessary delays or hiccups. Here’s a list of essential tools and equipment you’ll need:
1. Screwdriver Set: A reliable set of screwdrivers is essential for connecting cables and securing the receiver to your entertainment center or rack. Make sure you have a variety of screwdriver types and sizes to accommodate different screws.
2. HDMI Cables: High-Definition Multimedia Interface (HDMI) cables are used to transmit audio and video signals between your receiver, TV, and other devices. Ensure you have enough HDMI cables of suitable lengths to connect all your equipment efficiently.
3. Speaker Wire: Depending on your speaker setup, you’ll need speaker wire to connect your speakers to the receiver. Ensure that the wire gauge and length are suitable for the distance between the receiver and speakers, maintaining good signal flow.
4. Power Surge Protector: Protect your valuable equipment from power surges by investing in a surge protector. This device safeguards your receiver and other components against sudden voltage spikes, giving you peace of mind and avoiding potential damage.
5. Labeling Supplies: Keeping your cables organized and easily identifiable is key to a neat and hassle-free setup. Consider using labels or cable ties to label your cables and keep them organized, which will save you time when troubleshooting or making changes in the future.
6. Instruction Manuals and Documentation: Retrieve all the instruction manuals and documentation for your receiver, TV, speakers, and other devices. Having these resources readily available will assist you in understanding the setup process, troubleshooting issues, and maximizing the features of your equipment.
7. Assistant or Helper: While not a physical tool or equipment, having a helping hand can immensely facilitate the setup process. An assistant can assist in holding and positioning equipment, connecting cables, and troubleshooting. Plus, it’s always fun to have someone to enjoy the process with!
Gathering these essential tools and equipment in advance will ensure a smoother and more efficient installation process for your home theater receiver. With everything prepared, you’ll be ready to move on to the next steps without any unnecessary interruptions.
Unpacking and Inspecting the Receiver
After selecting the location and gathering the necessary tools, it’s time to unpack and inspect your home theater receiver. This step is crucial to ensure that the receiver is in good condition and to familiarize yourself with its various components. Follow these steps to unpack and inspect your receiver:
1. Carefully Remove the Packaging: Start by gently removing the packaging materials, such as bubble wrap or foam, around the receiver. Be cautious not to damage any cables, connectors, or delicate parts during this process.
2. Check for External Damage: Inspect the exterior of the receiver for any visible signs of damage, such as dents, scratches, or misaligned ports. If you notice any significant damage, contact the seller or manufacturer for assistance.
3. Check the Included Accessories: Review the contents of the receiver package and ensure that all the necessary accessories are included. This may include a remote control, batteries, antenna, power cord, and any additional cables or adapters mentioned in the product documentation.
4. Review the User Manual: Take some time to review the user manual or installation guide provided with the receiver. Familiarize yourself with the receiver’s features, ports, and connections to better understand how to set it up correctly.
5. Identify the Input and Output Ports: Locate the input and output ports on the receiver. These ports will be used to connect your TV, speakers, and other audio and video devices. Take note of the different types of ports, such as HDMI, optical, or RCA, and their corresponding labels.
6. Check the Power Requirements: Verify the power requirements of the receiver. Ensure that the voltage and power input specifications match the available power supply in your home. It’s crucial to use a suitable power outlet and avoid overloading the circuit.
7. Plan the Cable Connection: Before connecting any cables, plan the routing and organization of the wires. Consider the distance between components and the layout of your entertainment area to minimize cable clutter and maximize cable management.
8. Take Precautions: When handling the receiver, always exercise caution to avoid dropping it or causing any impact damage. Be mindful of any sensitive components and treat them with care.
By unpacking and inspecting your home theater receiver, you ensure that it is in proper working condition and familiarize yourself with its components and features. This step sets the foundation for a successful installation process, allowing you to proceed with confidence to the next steps.
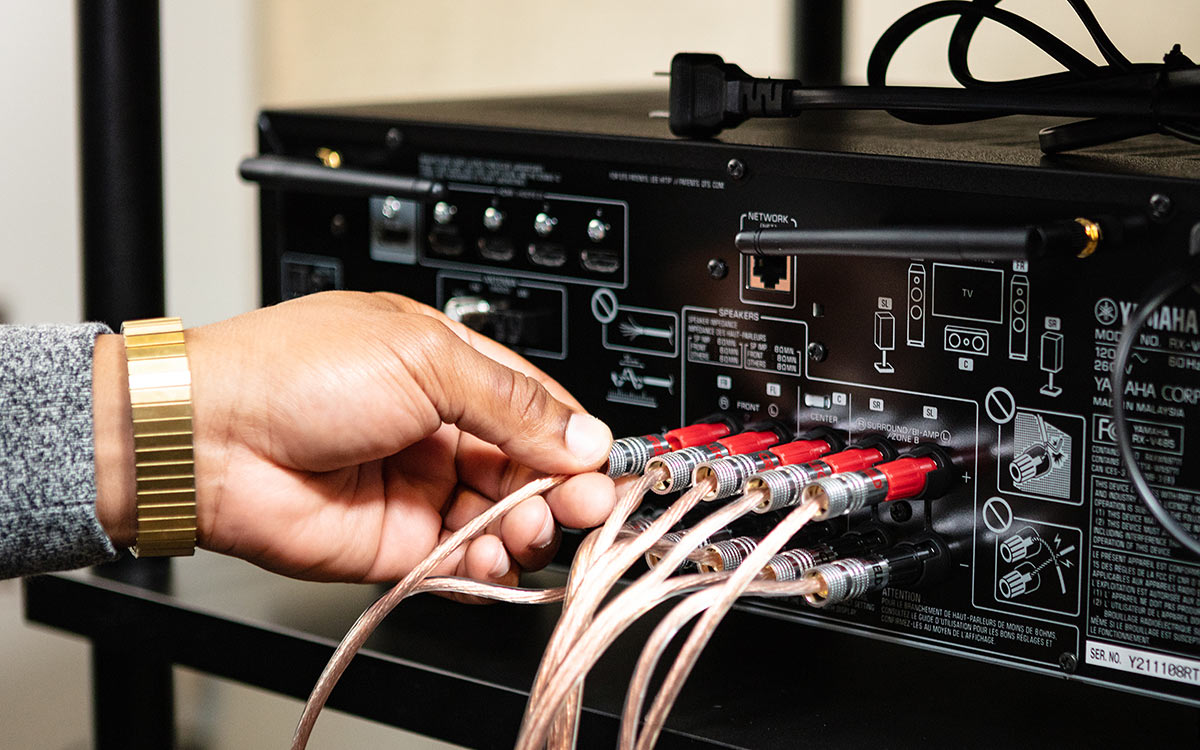
Connecting the Receiver to Your TV and Speakers
Now that you have unpacked and inspected your home theater receiver, it’s time to connect it to your TV and speakers. Properly setting up the audio and video connections ensures that you can enjoy a cinematic experience right in the comfort of your own home. Follow these steps to connect your receiver to your TV and speakers:
1. Power Off: Before connecting any cables, ensure that all devices are powered off, including the receiver, TV, and speakers. This is a precautionary measure to avoid any potential electrical hazards.
2. Locate the HDMI Ports: Depending on the available ports on your TV and receiver, find the HDMI input and output ports. HDMI carries both audio and video signals, making it the preferred connection option for high-quality playback.
3. Connect HDMI Cable: Take an HDMI cable and connect one end to the HDMI output port on the receiver, and the other end to an available HDMI input port on your TV. Ensure a secure connection by firmly pushing the cable into the ports.
4. Connect Speaker Wires: Identify the appropriate speaker wire terminals on the receiver and speakers. Strip the ends of the speaker wires and connect them to the corresponding terminals. Match the positive (+) and negative (-) terminals to ensure proper polarity.
5. Configuring the Speaker Setup: Access the receiver’s setup menu, either through the remote control or the front display panel. Configure the speaker setup by selecting the appropriate speaker size, distance, and channel assignment to optimize the audio performance.
6. Optical or RCA Connections: If your TV or external devices do not have HDMI ports, you can use optical or RCA connections. Optical cables transmit digital audio, while RCA cables transmit analog audio. Connect the corresponding cables to the appropriate ports on the receiver and TV or external devices.
7. Power On and Test: Power on all connected devices, starting with the receiver. Ensure that the TV is set to the correct input source. Play some content to test if the audio and video are properly transmitted from the receiver to the TV and speakers.
8. Additional Connections: If you have additional devices, such as a gaming console or Blu-ray player, connect them to the receiver using HDMI or other available input ports. This allows you to route all audio and video signals through the receiver for centralized control.
By connecting your receiver to your TV and speakers, you create the foundation of your home theater system. This setup enables you to enjoy immersive audio and video experiences, bringing your favorite movies, shows, and games to life in your living room.
Configuring Audio and Video Settings
Once you have connected your receiver to your TV and speakers, it’s important to configure the audio and video settings to optimize your home theater experience. Adjusting these settings will ensure that you get the best audio and video quality, tailored to your preferences. Follow these steps to configure the audio and video settings on your home theater receiver:
1. Access the Receiver’s Setup Menu: Using the remote control or the receiver’s front display panel, access the setup menu. This menu allows you to adjust various settings to customize your audio and video output.
2. Audio Output Format: Configure the audio output format according to your speaker setup and preferences. Select options such as stereo, surround sound, or Dolby Atmos, depending on your receiver’s capabilities and the audio content you will be consuming.
3. Speaker Configuration: In the setup menu, locate the speaker configuration settings. Adjust the size, distance, and levels of each speaker to ensure proper audio distribution and balance. This step is important for achieving optimal surround sound effects and audio imaging.
4. Room Correction and Equalization: Some receivers have built-in room correction and equalization features. Utilize these tools to fine-tune the audio performance based on the unique acoustics of your room. Follow the provided instructions to initiate and calibrate the room correction process.
5. Video Output Resolution: Configure the video output resolution based on your TV’s capabilities. Choose the highest resolution that your TV supports, such as 1080p or 4K, to ensure crisp and clear video playback. Adjust any other video settings, such as aspect ratio or color settings, according to your preference.
6. Input Assignments: Assign the correct input sources to each input port on your receiver. This ensures that the audio and video signals from external devices, such as gaming consoles or Blu-ray players, are routed correctly to the corresponding input source on the receiver.
7. Test and Fine-Tune: After making the necessary adjustments, it’s time to test the audio and video settings. Play various types of content, such as movies, music, or video games, to gauge the performance and make further tweaks if needed. Pay attention to the audio balance, surround sound effects, and video quality.
8. Firmware Updates: Check if there are any available firmware updates for your receiver. Updating the firmware can improve the performance, add new features, and fix any known issues. Follow the instructions provided by the manufacturer to update the receiver’s firmware, if necessary.
By configuring the audio and video settings of your home theater receiver, you can optimize the quality of your audio and video playback. Fine-tuning these settings ensures that you have a personalized and immersive home theater experience, tailored to your preferences and the capabilities of your equipment.
Connecting External Devices to the Receiver
Aside from connecting your TV and speakers, one of the key advantages of a home theater receiver is the ability to connect multiple external devices to enhance your overall entertainment experience. Whether it’s a gaming console, Blu-ray player, or streaming device, connecting these devices to your receiver allows you to centralize control and enjoy seamless audio and video playback. Follow these steps to connect external devices to your home theater receiver:
1. HDMI Connections: The easiest and most common way to connect external devices is through HDMI. Locate the HDMI inputs on the receiver and connect each device to a separate HDMI input using HDMI cables. Ensure a secure connection by firmly plugging the cables into the ports.
2. Optical or RCA Connections: If your devices don’t have HDMI outputs, you can use optical or RCA connections. Connect the audio output of the device to the corresponding audio input on the receiver, either using an optical cable or RCA cables for analog audio.
3. USB Connections: Some receivers feature USB ports that allow you to connect USB storage devices or flash drives. This enables you to play media files, such as music, movies, or photos, directly from the USB device through your receiver.
4. Wireless Connectivity: Many modern receivers are equipped with wireless connectivity options. This allows you to connect devices such as smartphones, tablets, or laptops wirelessly using Bluetooth, Wi-Fi, or AirPlay. Follow the receiver’s instructions to pair and connect your devices wirelessly.
5. Network Connections: If your receiver has network capabilities, connect it to your home network using an Ethernet cable or via Wi-Fi. This opens up a world of possibilities, such as streaming online content, downloading firmware updates, or accessing network-shared media files.
6. Gaming Console Setup: If you’re connecting a gaming console, follow the manufacturer’s instructions for optimal setup. Adjust any specific audio or video settings on both the receiver and the gaming console to ensure an immersive gaming experience.
7. Cable/Satellite Box: Connect your cable or satellite box to the receiver to enjoy surround sound and higher-quality audio from TV shows and movies. Use HDMI or optical connections, depending on the available options on your cable or satellite box and the receiver.
8. Test and Configure: After connecting each external device, test the audio and video playback to ensure everything is functioning correctly. Access the input settings on the receiver to assign correct labels for each input source, making it easier to switch between devices.
Connecting external devices to your home theater receiver expands your entertainment options and simplifies your setup. With all your devices routed through the receiver, you can enjoy a unified and immersive experience, with centralized control over your audio and video sources.
Programming and Setting Up the Remote Control
One of the conveniences of a home theater receiver is the ability to control various devices with a single remote control. Programming and setting up your remote control properly ensures that you can easily navigate and manage your entire home theater system with ease. Follow these steps to program and set up your remote control:
1. Check Compatibility: Ensure that your remote control is compatible with all the devices you want to control, including the TV, receiver, and external devices. Refer to the remote control’s user manual or manufacturer’s website to confirm compatibility.
2. Determine Programming Method: Determine the programming method for your specific remote control. This could involve entering specific codes for each device, using auto-search functions, or using online setup tools provided by the remote control manufacturer.
3. Locate Device Codes: If you need to enter specific codes, locate the device codes for your TV, receiver, and other external devices. These codes can usually be found in the user manual or on the manufacturer’s website. Make a note of these codes for easy reference during the setup process.
4. Enter Device Codes: Follow the instructions provided with your remote control to enter the appropriate device codes. Typically, you’ll input these codes using the remote control’s numeric keypad or dedicated programming buttons. Test each code to ensure successful programming.
5. Pairing and Syncing: Some remote controls and devices require pairing or syncing procedures to establish communication. Follow the instructions provided by the remote control and device manufacturer to ensure successful pairing between the remote control and your devices.
6. Button Mapping: After programming the remote control, check if all the buttons on the remote control are mapped correctly to their respective functions on each device. Test the key functions, such as power, volume control, channel selection, and input switching, to ensure proper operation.
7. Universal Remote Apps: Some remote controls have companion mobile apps that provide additional control options and customization. If available, download the app for your remote control and follow the app’s instructions to set up and configure additional features.
8. Fine-Tuning: Once the remote control is programmed and functioning correctly, take some time to customize the settings to your preferences. This may include adjusting the button backlighting, re-mapping certain buttons, or configuring macro buttons for easy access to specific functions.
Programming and setting up your remote control effectively streamlines the operation of your entire home theater system. With a single remote control, you can effortlessly navigate your devices, switch between input sources, adjust volume levels, and enjoy a seamless and immersive entertainment experience.
Testing Your Home Theater Setup
After completing the installation and configuration of your home theater system, it’s important to conduct thorough testing to ensure that everything is working correctly. Testing allows you to identify any potential issues or adjustments that need to be made for optimal performance. Follow these steps to test your home theater setup:
1. Power-On Sequence: Start by powering on your TV, receiver, and all connected devices according to the recommended sequence. This ensures that all devices sync properly and are ready for use.
2. Audio and Video Playback: Play different types of media, such as movies, TV shows, music, or video games, to test both the audio and video performance. Pay attention to the clarity, volume level, and balance of the audio. Ensure that the video playback is smooth and that colors and details are displayed accurately on the TV.
3. Surround Sound Test: If you have a surround sound system, test each speaker individually to ensure they are functioning correctly. Many receivers come with built-in test tones that can be used to verify the audio output of each channel. This allows you to identify any issues with speaker placement or wiring.
4. Input Source Switching: Test the ability to switch between different input sources on your receiver. Verify that the switching is seamless and that the correct audio and video signals are passed through to the TV and speakers for each input source.
5. Remote Control Functions: Test the functionality of your remote control by adjusting volume levels, navigating menus, and switching between devices. Ensure that the remote control operates properly and that all the programmed functions are responsive and accurate.
6. Network and Streaming: If your receiver has network connectivity, test streaming services, online content, or media files from networked devices. Verify that there are no issues with buffering, lag, or connectivity. Ensure that all devices can access and stream content without any interruptions.
7. Calibration and Fine-Tuning: Use the receiver’s settings to make any necessary adjustments or fine-tuning based on the results of your testing. This may include tweaking audio levels, speaker positioning, or video settings to achieve your desired audiovisual experience.
8. Repeat Tests and Evaluation: It’s a good idea to repeat the tests and evaluations over a period of time to ensure consistent performance. This allows you to identify any intermittent issues or to fine-tune the system to your preferences as you become more familiar with its capabilities.
Thoroughly testing your home theater setup ensures that you can enjoy a seamless and immersive entertainment experience. By identifying and addressing any potential issues, you can make the necessary adjustments to optimize the performance and enjoyment of your home theater system.
Troubleshooting Common Issues
While setting up a home theater system can be exciting, it’s not uncommon to encounter occasional issues. Understanding how to troubleshoot common problems will help you quickly resolve them and get back to enjoying your home theater setup. Here are some common issues you might encounter and their troubleshooting steps:
1. No Sound: If you’re experiencing no sound, start by checking the volume level on your receiver, TV, and external devices. Make sure all cables are securely connected, and check that the TV or receiver is set to the correct audio input. Verify that the mute function is not activated on any of the devices.
2. No Video or Poor Picture Quality: If you’re encountering no video or poor picture quality, ensure that all HDMI or other video cables are properly connected and secured. Check that the TV is set to the correct input source. Verify that the video output resolution on the receiver and TV is configured correctly to match the capabilities of your TV.
3. Remote Control Issues: If your remote control is not functioning, make sure the batteries are properly inserted and not depleted. Check if there are any obstructions between the remote control and the device it is trying to control. If you’ve recently programmed or reprogrammed the remote control, verify that the device codes were entered correctly.
4. Audio/Video Sync Issues: If you notice that the audio and video are not synchronized, check if your receiver or TV has an audio delay or sync adjustment setting. Adjust this setting until the audio and video are properly synchronized. Additionally, check your TV’s settings for any video processing features that might introduce delays, and disable them if necessary.
5. Network Connectivity Problems: If you’re experiencing issues with network connectivity, first check your Wi-Fi or wired connection to ensure it’s stable and properly set up. Restart your router and receiver to refresh the connection. If necessary, check the network settings on your receiver and verify that it’s connected to the correct network with the appropriate credentials.
6. Device Compatibility: If you’re encountering compatibility issues between devices, such as your receiver and external devices, ensure that they are all using the latest firmware updates. Check the manufacturer’s website for any specific compatibility issues or troubleshooting steps. If all else fails, consider contacting the manufacturer’s support for further assistance.
7. Speaker Issues: If you’re experiencing problems with one or more speakers, inspect the connections between the receiver and the speakers to ensure they are secure. Check that the speaker wires are properly stripped and inserted into the correct terminals. Test the affected speaker on a different channel to determine if the issue is with the speaker or the connection.
8. Overheating: If your receiver is overheating, check that it has adequate ventilation and is not placed in an enclosed space. Ensure that the receiver is not stacked on top of or pressed against other devices, impeding airflow. If necessary, use external cooling devices or fans to improve ventilation around the receiver.
By troubleshooting common issues encountered with your home theater setup, you can quickly resolve problems and enjoy uninterrupted entertainment. Always refer to the device’s user manuals, online resources, or contact customer support if you need further guidance in troubleshooting specific problems.
Final Tips and Recommendations
Congratulations on setting up your home theater system! To ensure that you have the best possible experience and get the most out of your investment, here are some final tips and recommendations:
1. Regularly Update Firmware: Keep your receiver, TV, and other devices up to date by regularly checking for firmware updates. Manufacturers often release updates to improve performance, add new features, and address any known issues. Updating firmware ensures that you take advantage of the latest enhancements.
2. Optimize Speaker Placement: Experiment with speaker placement to achieve the best audio performance. Consider using speaker stands, wall-mounts, or other accessories to position your speakers optimally for the desired surround sound effect. Reference the speaker placement guidelines in your receiver’s user manual for optimal positioning.
3. Calibrate Audio and Video: Take advantage of the calibration features on your receiver to fine-tune the audio and video settings. This includes adjusting levels, distances, and speaker sizes. Calibration can significantly enhance the audio imaging and ensure an immersive theater-like experience.
4. Invest in Quality Cables: Use high-quality cables, especially HDMI cables, to transmit audio and video signals. Quality cables are more durable and provide better signal transmission, resulting in improved audio and video performance. Avoid extremely long cable runs, as they can result in signal degradation.
5. Control Ambient Lighting: Consider controlling ambient lighting in your home theater room. Excessive light can degrade the contrast and overall viewing experience. Use blackout curtains, blinds, or dimmable light sources to minimize ambient light and create a more cinematic atmosphere.
6. Manage Cable Organization: Take the time to organize and manage your cables properly. Use cable ties, zip ties, cable clips, or cable management systems to keep your cables neat and tidy. This not only improves the aesthetics but also makes it easier to troubleshoot or make changes in the future.
7. Perform Regular System Maintenance: Maintain your home theater system by keeping it clean and free from dust. Dust can accumulate on components and affect their performance. Use a soft cloth or microfiber cloth to clean the surfaces of your devices regularly. Be careful not to use any liquids that may damage the equipment.
8. Enjoy the Experience: Sit back, relax, and enjoy your home theater system! Take the time to appreciate the immersive sound and stunning visuals that your setup provides. Experiment with different types of media, genres, and settings to fully immerse yourself in the cinematic experience.
With these final tips and recommendations, you’re well-equipped to enjoy your home theater system to the fullest. Remember to have fun, experiment, and make adjustments based on your personal preferences. Your home theater is a gateway to endless entertainment possibilities and a true cinematic experience right in your own home.