
Choosing the Right Room
Setting up a home theater system is an exciting endeavor that allows you to create a cinematic experience within the confines of your own home. But before diving into the technical aspects of selecting the right TV and sound system, it’s crucial to choose the right room for your home theater. Here are some key factors to consider when selecting the perfect space:
1. Room Size: The size of the room will play a significant role in determining the overall experience. Ideally, you’ll want a room that is spacious enough to accommodate your desired screen size, seating arrangement, and sound system without feeling cramped. However, if space is limited, there are ways to make the most of smaller areas with proper planning and furniture arrangement.
2. Lighting: Natural and artificial lighting can affect the quality of your viewing experience. It’s best to choose a room with minimal windows or the ability to block out light effectively. This will help prevent glare on the screen and maintain the immersive atmosphere.
3. Sound Isolation: The room should have good sound isolation to prevent sound from leaking in or out. This is particularly important if your home theater is located near bedrooms or common areas where noise could be disruptive. Consider soundproofing techniques such as acoustic panels or insulation to enhance the audio experience.
4. Shape and Layout: The shape and layout of the room can impact the distribution of sound and the placement of speakers. A rectangular or square-shaped room is generally preferred, as it allows for more even sound dispersion. Avoid irregularly shaped rooms or those with excessive angles, as they can cause audio distortion.
5. Accessibility: Consider the accessibility of the room. If it’s located far away from the main living spaces, you may need to invest in additional features like a mini-fridge or convenient storage for snacks and drinks. This will enhance your comfort and ensure that you have everything you need within reach during movie nights.
By carefully evaluating these factors and selecting the right room, you’ll lay a strong foundation for a remarkable home theater experience. With the perfect space in place, you can move on to the next crucial step: choosing the right TV to bring your movies to life.
Choosing the Right TV
When it comes to creating a captivating home theater experience, selecting the right TV is paramount. With a myriad of options available in the market, here are some key factors to consider when choosing the perfect TV for your home theater setup:
1. Screen Size: The size of the TV should be proportionate to the viewing distance and the size of the room. As a general rule, larger screens provide a more immersive experience, but it’s important to strike a balance to avoid visual strain. Measure the viewing distance from the seating area to determine the ideal screen size for optimal enjoyment.
2. Display Technology: Consider the display technology that best suits your needs. OLED and QLED TVs offer exceptional picture quality with vibrant colors and deep blacks, while LED TVs provide a more cost-effective option. Take the time to research and compare different display technologies before making a decision.
3. Resolution: The resolution of the TV is another crucial aspect to consider. High-definition (HD) TVs with a resolution of 1080p are still popular and offer excellent picture quality. However, if you want to experience the sharpest and most detailed images, consider investing in a 4K Ultra HD TV or even an 8K TV if your budget allows.
4. HDR Support: High Dynamic Range (HDR) technology enhances the contrast and color accuracy of the TV, resulting in a more lifelike and vibrant image. Look for TVs that support HDR content, such as HDR10 or Dolby Vision, to elevate your viewing experience.
5. Smart Features: Smart TVs offer built-in internet connectivity and access to streaming services, allowing you to enjoy a wide range of content without needing additional devices. Consider TVs with user-friendly interfaces and support for popular streaming platforms like Netflix, Hulu, and Amazon Prime Video.
6. Audio Support: While the focus is on visuals, don’t overlook the importance of audio. Some TVs feature built-in speakers with impressive sound quality, while others may require the addition of external speakers or a soundbar to deliver a more immersive audio experience. Consider your preferences and budget when evaluating the audio capabilities of different TVs.
By carefully considering these factors, you can narrow down your options and choose a TV that meets your specific requirements and enhances your home theater experience. Once you have selected the perfect TV, it’s time to move on to the next step: choosing the right sound system to complete your home theater setup.
Choosing the Right Sound System
When it comes to creating an immersive home theater experience, the sound system plays a crucial role. Sound quality can enhance the overall enjoyment of movies, TV shows, and games. Here are some key factors to consider when selecting the right sound system for your home theater:
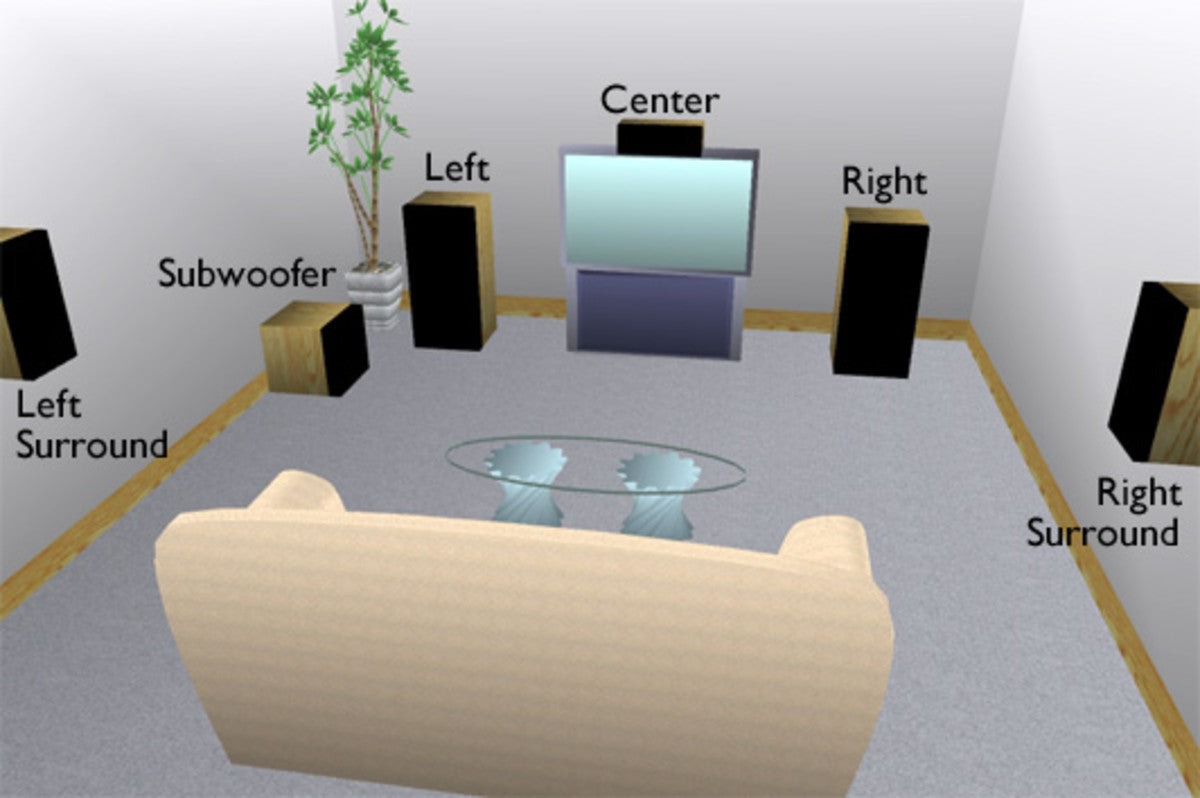
1. Speaker Configuration: Determine the speaker configuration that suits your needs and preferences. A typical home theater setup includes a combination of front speakers (left, center, right), surround speakers (rear or side), and a subwoofer for deep bass. Consider whether a 5.1, 7.1, or even a more sophisticated Dolby Atmos system will work best in your space.
2. Soundbar or Separate Speakers: Decide if you prefer the convenience and simplicity of a soundbar or the flexibility and customization options of a separate speaker setup. Soundbars are compact, easy to install, and can deliver immersive sound, while separate speaker systems offer more precise sound distribution and the ability to adjust each speaker’s placement.
3. Power and Amplification: The power and amplification of the sound system should match the size of the room. Ensure that the speakers and receiver have sufficient power to deliver clear and distortion-free sound. Consider factors like wattage and impedance when making your selection.
4. Audio Formats: Check if the sound system supports different audio formats, such as Dolby Digital, DTS, or Dolby TrueHD. This ensures compatibility with a wide range of media sources and content, providing an immersive and high-quality audio experience.
5. Wireless Connectivity: Look for sound systems that offer wireless connectivity options, such as Bluetooth or Wi-Fi, allowing you to stream music from your mobile devices or connect wirelessly to your TV. This adds convenience and flexibility to your home theater setup.
6. Room Acoustics: Consider the acoustics of your room and whether any acoustic treatment is necessary. Factors like wall materials, furniture placement, and carpeting can impact sound quality. You may want to explore acoustic panels, bass traps, or diffusers to optimize the audio performance within the space.
7. Budget: Determine your budget for the sound system and prioritize what features are most important to you. There are sound systems available in a wide range of price points, ensuring there’s an option for every budget.
By carefully evaluating these factors, you can select a sound system that delivers immersive and high-quality audio, elevating your home theater experience to new heights. Once you have chosen the right sound system, it’s time to move on to the next steps of setting up your home theater system.
Deciding on a Projector or TV
One of the key decisions you’ll need to make when setting up your home theater is whether to opt for a projector or a TV. Both options have their own advantages and considerations, so it’s important to carefully evaluate your needs and preferences. Here are some factors to consider when deciding between a projector or a TV:
1. Screen Size: If you desire a larger screen size, projectors are generally the way to go. They can produce massive images on the wall or a dedicated screen, providing a truly immersive experience. TVs, on the other hand, typically have a fixed screen size, although larger sizes are becoming more common.
2. Image Quality: When it comes to image quality, high-end TVs often deliver superior picture quality, with impressive contrast, color accuracy, and resolution. However, projectors have come a long way in recent years, with many now offering excellent image quality that rivals TVs, especially those with higher resolution and advanced image processing technologies.
3. Room Setup: Consider the layout and characteristics of your room. Projectors require a darkened room for optimal image quality, as ambient light can significantly affect the image. If you have control over lighting conditions and can create a dark theater environment, a projector might be a good choice. A TV, on the other hand, can work well in various lighting conditions and is more flexible in terms of room setup.
4. Viewing Distance: Determine the viewing distance between the screen and the seating area. Projectors work best with longer viewing distances, as they can produce larger images without losing detail. TVs, on the other hand, are suitable for smaller viewing distances, allowing you to sit closer and still enjoy a sharp and detailed image.
5. Installation and Portability: Consider the ease of installation and portability. Projectors require mounting or placement on a stable surface, along with cable management for power and video connections. TVs are generally more straightforward to set up as they can be placed on a stand or mounted on the wall without the need for extensive wiring or adjustments.
6. Cost: Budget is an essential consideration. Generally, projectors tend to be more affordable in terms of screen size compared to larger TVs. However, it’s important to factor in other costs such as screens, quality audio systems, and extra accessories when comparing projector and TV options.
Ultimately, the decision between a projector and a TV depends on your specific requirements, room conditions, and personal preferences. Consider the screen size, image quality, room setup, viewing distance, installation, portability, and cost before making a final decision. Whichever option you choose, remember to calibrate the display to optimize the settings for a truly remarkable home theater experience.
Evaluating Acoustic Treatment Options
Creating a well-balanced and immersive audio experience in your home theater involves considering the acoustics of the room. Acoustic treatment can help improve sound quality, reduce echoes, and eliminate unwanted reflections, ultimately enhancing your overall viewing experience. Here are some essential options to evaluate when it comes to acoustic treatment:
1. Diffusers: Diffusers scatter sound waves in multiple directions, reducing the intensity of reflections. They are particularly useful for controlling mid and high-frequency reflections, resulting in a more balanced sound. Diffusers come in different shapes and designs, such as QRD diffusers and skyline diffusers, providing a visually appealing element to the room.
2. Absorption Panels: Absorption panels are designed to absorb sound energy, reducing echoes and reverberations. They can be placed on walls, ceilings, or even behind the screen to improve clarity and speech intelligibility. Choose absorption panels with appropriate thickness and density to target specific frequency ranges, ensuring balanced sound absorption throughout the room.
3. Bass Traps: Bass traps are specially designed to address low-frequency issues, such as standing waves and room resonances. Placing bass traps in corners or along walls where bass problems are most prominent can help reduce boomy or muddy bass and improve overall bass response. Choose bass traps with adequate thickness and density to effectively absorb low-frequency energy.
4. Acoustic Panels/Ceilings: Acoustic panels or acoustic ceilings are effective in reducing overall reverberation and controlling excessive noise within the room. They consist of sound-absorbing materials covered with fabric or perforated panels that enhance acoustic performance. Installing these panels strategically on walls or ceilings can significantly improve the sound quality and clarity of your home theater.
5. Reflection Points: Identify the primary reflection points in your room, such as the points where sound waves bounce directly off walls. Placing absorption panels or diffusers at these reflection points can minimize unwanted reflections and create a more focused and balanced soundstage.
6. Room Layout and Furniture: Consider the arrangement of furniture and the layout of the room. Adding furniture like sofas, curtains, bookshelves, or rugs can help break up sound reflections and reduce echo. Additionally, strategically positioning seating and speakers can contribute to better sound dispersion and imaging.
7. Professional Consultation: If you’re unsure about the optimal acoustic treatment options for your home theater, consider consulting with a professional acoustics expert or audio engineer. They can analyze the characteristics of your room and provide personalized recommendations to maximize sound quality and create an immersive audio experience.
By carefully evaluating these acoustic treatment options and implementing appropriate measures, you can tailor the acoustics of your home theater to deliver optimal sound quality. Combining acoustic treatment with high-quality speakers, a well-calibrated receiver, and proper speaker placement will result in a truly remarkable audio experience.
Determining the Best Viewing Distance
Choosing the right viewing distance is essential for maximizing your enjoyment and comfort when watching movies, TV shows, or playing games in your home theater. The ideal viewing distance depends on several factors, including the screen size, resolution, and personal preferences. Here’s how to determine the best viewing distance for your home theater:
1. Screen Size: The size of your screen is a crucial factor in determining the optimal viewing distance. As a general rule, larger screens require a greater viewing distance to maintain image quality and prevent visual strain. For example, with a 55-inch TV, a recommended viewing distance would be around 6 to 9 feet, while a 75-inch TV would require a viewing distance of around 8 to 12 feet, and so on.
2. Screen Resolution: The resolution of your screen also affects the viewing distance. Higher resolution displays, such as 4K Ultra HD or 8K, offer greater detail and crispness. With these displays, you can sit closer to the screen without perceiving individual pixels. However, even with lower resolution displays, you can still enjoy a good viewing experience by maintaining an appropriate distance.
3. Field of View: Consider your personal preference for the field of view. Some people prefer a wider field of view, feeling more engaged in the on-screen action. Others may prefer a smaller field of view, where they can comfortably take in the entire screen without having to move their eyes too much. Experiment with different distances to find your ideal field of view.
4. Visual Comfort: Visual comfort is crucial for an enjoyable viewing experience. Sitting too close to the screen can result in eye strain, while sitting too far may cause you to miss out on details. Aim for a distance where you can comfortably take in the entire screen without having to strain your eyes or constantly adjust your viewing position.
5. Room Size and Layout: Take into account the size and layout of your room. Consider factors such as the distance between the screen and the seating area, as well as the distance from the speakers for proper audio experience. Explore different seating arrangements and distances within the available space to find the sweet spot that works best for your room.
6. Content and Viewing Experience: The type of content you typically watch and the desired viewing experience also influence the optimal viewing distance. For example, if you enjoy watching high-action movies or sports, you may prefer a slightly closer viewing distance to enhance the immersive experience. Consider your content preferences when determining the best viewing distance.
By taking these factors into account, you can determine the best viewing distance for your home theater setup. Experiment with different distances and seating arrangements to find the optimal balance between immersion, comfort, and visual quality. Remember, finding the perfect viewing distance is subjective, so trust your own preferences and adjust accordingly to create an enjoyable viewing experience.
Selecting the Right Screen Size
Choosing the right screen size is crucial for creating an immersive and visually pleasing home theater experience. The screen size directly impacts your viewing experience, as it determines the level of engagement, clarity, and comfort. Here are some factors to consider when selecting the right screen size for your home theater:
1. Viewing Distance: The viewing distance plays a significant role in determining the appropriate screen size. For an optimal experience, you’ll want to choose a screen size that allows you to comfortably view the content without having to strain your eyes or constantly adjust your position. As a general guideline, experts recommend a viewing distance that is approximately 1.5 to 2.5 times the screen diagonal measurement.
2. Room Size and Layout: Consider the size and layout of your room. A larger room can accommodate a larger screen size without overwhelming the space, whereas a smaller room may require a more compact screen size to ensure a balanced and proportionate viewing experience. Ensure that the screen size complements the dimensions of the room and allows for adequate seating distance.
3. Resolution: The resolution of your screen also affects the perceived quality at different screen sizes. Higher resolution displays, such as 4K or 8K, offer sharper and more detailed images, allowing you to sit closer to the screen without noticing individual pixels. If you opt for a larger screen size, consider investing in a higher resolution display to maintain optimum image quality.
4. Content Type: Consider the type of content you typically watch in your home theater. If you enjoy immersive movie experiences or gaming sessions, a larger screen size can enhance the sense of immersion and allow you to see more details on the screen. On the other hand, if you primarily watch TV shows or documentaries, a slightly smaller screen size may provide a more comfortable and intimate viewing experience.
5. Budget: Your budget is another important consideration when selecting the right screen size. Larger screens tend to be more expensive, especially if you opt for higher resolution or more advanced features. Determine a budget that suits your requirements and explore screen sizes within that range to ensure a good balance between price and performance.
6. Personal Preference: Ultimately, selecting the right screen size also depends on your personal preference and comfort level. If you prefer a more immersive and cinematic experience, you may lean towards a larger screen size. However, if you value a more intimate and cozy viewing experience, a slightly smaller screen size might be more suitable. Trust your instincts and prioritize your personal preferences when making the final decision.
By considering these factors and evaluating your specific needs, you can select the right screen size that delivers an optimal viewing experience in your home theater. Remember to strike a balance between screen size, viewing distance, room size, resolution, budget, and personal preference to create a captivating and enjoyable home theater environment.
Placing the Speakers for Optimal Sound
Proper speaker placement is essential for achieving optimal sound quality in your home theater setup. The placement of each speaker determines the accuracy of sound reproduction, soundstage imaging, and overall immersion. Here are some key considerations to keep in mind when placing the speakers in your home theater:
1. Center Channel Speaker: The center channel speaker plays a crucial role in delivering clear and distinct dialogue. It should be placed either directly above or below the screen, ideally at ear level when seated. This ensures that the dialogue appears to be coming from the center of the screen, creating a more realistic and immersive audio experience.
2. Front Left and Right Speakers: The front left and right speakers provide the main soundstage, including music, sound effects, and ambient sounds. Place them on each side of the TV or screen, slightly angled towards the seating area, forming an equilateral triangle with the center seating position. This arrangement enhances stereo imaging and creates a wider soundstage.
3. Surround Speakers: Surround speakers are responsible for creating a sense of envelopment and immersing you in the sound environment. Ideally, place them slightly above ear level, about 2-3 feet above the seated listeners, and around 90 to 110 degrees angle from the center seating position. This placement ensures that the surround effects come from around you and enhances the three-dimensional sound experience.
4. Height or Atmos Speakers: If you have a Dolby Atmos or other height speaker system, the placement and positioning of these speakers are crucial. Follow manufacturer guidelines for the specific speaker system you have, ensuring that height speakers are positioned correctly for optimal object-based sound reproduction and overhead effects.
5. Subwoofer: The subwoofer can be placed anywhere in the room as low-frequency sounds are less directional. Experiment with different subwoofer positions to find the spot that offers the best bass response and minimizes boominess or rattling. Common positions include corners, along walls, or near the front speakers.
6. Speaker Spacing: Proper spacing between speakers is vital for achieving a balanced soundstage. Maintain an equal distance between the front left and right speakers for accurate stereo imaging. The surround speakers should be equidistant from the center seating position to create a seamless surround sound effect. Aim for a symmetrical arrangement to ensure even sound dispersion.
7. Room Acoustics: Consider the acoustic characteristics of your room when placing the speakers. Rooms with hard surfaces, like wood or tile floors, may require additional acoustic treatments to minimize sound reflections and echoes. Experiment with room treatments, such as acoustic panels or curtains, to improve sound clarity and reduce unwanted resonances.
By carefully considering these factors and experimenting with the placement of your speakers, you can achieve optimal sound quality and create a truly immersive home theater experience. Take the time to fine-tune the positioning of each speaker and make adjustments based on your specific room characteristics and personal preferences. Enjoy the rich and dynamic sound that a properly placed speaker system can deliver in your home theater.
Setting Up the Speaker System
Setting up the speaker system in your home theater is a crucial step to ensure optimal sound performance. Proper installation and connection of the speakers will enhance your overall audio experience and immerse you in the soundstage. Here’s a step-by-step guide to help you set up your speaker system:
1. Speaker Placement: Start by placing each speaker in their designated positions as discussed earlier. Ensure that the center, front left and right, surround, and height/Atmos speakers are placed correctly for optimal sound reproduction.
2. Wiring and Connections: Use high-quality speaker wires for connecting the speakers to the audio receiver or amplifier. Proper connection is crucial for maintaining a strong and reliable audio signal. Ensure that the positive and negative terminals of each speaker are correctly connected to the corresponding terminals on the receiver.
3. Receiver Setup: Set up your audio receiver or amplifier according to the manufacturer’s instructions. Connect the receiver to your audio sources, such as Blu-ray players, game consoles, or streaming devices. Configure the receiver’s audio settings to match your speaker system and room setup, including speaker size, channel levels, and surround sound modes.
4. Calibration: Many audio receivers have built-in calibration systems or room correction features. Utilize these tools to automatically adjust the speaker levels, distances, and equalization to optimize the audio performance. Follow the instructions provided by the receiver’s manufacturer to run the calibration process.
5. Subwoofer Setup: Position the subwoofer in the desired location, considering factors such as bass response and room acoustics. Use a dedicated subwoofer cable to connect it to the designated subwoofer output on the receiver. Adjust the subwoofer’s volume and crossover settings to achieve a balanced and seamless integration with the other speakers.
6. Testing and Fine-Tuning: Once all the connections are in place and the receiver is properly configured, test your speaker system with different audio sources and content. Pay attention to channel balance, clarity, and overall sound quality. Make necessary adjustments to the receiver settings based on your personal preferences and the acoustic characteristics of your room.
7. Cable Management: Finally, ensure that the speaker cables and other wiring are neatly organized and managed to minimize clutter. Use cable management solutions, such as cable clips or raceways, to secure and hide the cables along walls or behind furniture for a clean and professional look.
By following these steps and taking the time to set up your speaker system properly, you’ll be rewarded with an immersive audio experience that complements the visual elements of your home theater. Enjoy the rich soundscapes and precise audio reproduction that a well-installed speaker system can deliver.
Calibrating the Audio and Video Settings
Calibrating the audio and video settings of your home theater system is essential for achieving accurate and immersive sound and picture quality. Proper calibration ensures that you are experiencing content as intended by the creators. Here are the steps to calibrate the audio and video settings in your home theater:
1. Audio Level Calibration: Use a sound level meter or the built-in calibration system of your audio receiver to calibrate the audio levels of each speaker. Adjust the volume levels of the individual speakers so that they are balanced and create a cohesive soundstage. This step ensures that sound effects and dialogue are heard at the appropriate levels relative to each other.
2. Speaker Distance and Delay Calibration: Most audio receivers have a setup menu that allows you to specify the distance between each speaker and the listening position. Enter the accurate measurements to ensure that the sound arrives at your ears simultaneously from all speakers. This calibration also involves adjusting the speaker delay or time alignment to synchronize sound arrival times.
3. Room Acoustic Correction: Use a dedicated room correction system or the built-in capabilities of your audio receiver to account for the acoustic properties of your room. These systems measure and analyze the room’s frequency response and apply digital signal processing to compensate for any irregularities. This correction helps to achieve a more balanced sound and compensate for resonance or reverberation issues.
4. Video Calibration: Properly calibrating the video settings ensures accurate color reproduction, contrast, and brightness levels. Start by adjusting the brightness and contrast settings of your TV or projector to achieve a balanced and realistic picture. Use a calibration disc or specialized software to fine-tune color temperature, color saturation, sharpness, and other video settings. This calibration process ensures that colors are accurate, skin tones look natural, and details are preserved.
5. Aspect Ratio and Display Settings: Adjust the aspect ratio of your TV or projector to match the content you are watching. Most modern displays have settings for different aspect ratios, including 16:9, 4:3, or automatic mode. Additionally, configure any display settings, such as motion smoothing or noise reduction, based on your personal preferences and the capabilities of your display.
6. Source Device Settings: Ensure that the audio and video settings on your source devices, such as Blu-ray players or game consoles, are properly configured. Confirm that the output resolution and audio formats are set to match the capabilities of your home theater system. This step ensures that you are getting the best possible quality from your source content.
7. Regular Re-Calibration: Keep in mind that the lighting conditions and room environment may change over time. Consider re-calibrating your audio and video settings periodically to maintain optimal performance. This is especially important if you make any significant changes to your equipment or room layout.
By taking the time to calibrate the audio and video settings of your home theater, you can enjoy a precise and immersive experience that truly brings your content to life. Whether it’s the dialogue of a film, the explosive sound effects of an action sequence, or the vibrant colors of a scenic landscape, proper calibration enhances every aspect of your home theater experience.
Configuring the Audio Receiver
Configuring the audio receiver is a crucial step in optimizing your home theater system’s audio performance. The audio receiver serves as the central hub for your audio sources, amplifies the sound signals, and directs them to the connected speakers. Here are the steps to configure your audio receiver:
1. Speaker Setup: Begin by accessing the audio receiver’s setup menu. Locate the speaker setup section, where you can specify the number and type of speakers in your system. Choose the appropriate speaker configuration, such as 2.0, 5.1, or 7.1, based on your setup.
2. Channel Levels: Adjust the volume levels of each speaker to ensure a balanced soundstage. The receiver may have a test tone feature that generates a test sound through each speaker. Use this test tone to set the volume levels of each speaker to match each other, creating a cohesive audio experience.
3. Speaker Distance: Specify the distance between each speaker and the main listening position in the receiver’s setup menu. This information helps the receiver time-align the sound from each speaker, ensuring that the audio arrives at your ears simultaneously from each channel.
4. Crossover Settings: Set the crossover frequency to determine which sounds are sent to the subwoofer. This is important for achieving a smooth transition between the main speakers and the subwoofer. The typical crossover frequency is around 80Hz, but adjust it based on your speakers’ capabilities and the room’s acoustics.
5. Audio Formats and Codecs: Configure the audio formats and codecs your receiver can support. Ensure that the receiver is set to decode the appropriate audio formats, such as Dolby Digital, DTS, or Dolby Atmos, based on your content sources. This ensures compatibility and allows for the best possible audio experience.
6. Room Acoustic Correction: Many modern audio receivers include built-in room correction systems, such as Audyssey or YPAO. Follow the manufacturer’s instructions to run the calibration process, which will adjust the audio settings based on your room’s acoustic characteristics to optimize sound quality.
7. Dual Speaker Presets: If your receiver supports dual speaker presets, you can configure different settings for different listening scenarios. For example, you can create one preset for movies and another for music, allowing you to switch between optimized settings with a simple button press.
8. Firmware Update: Check for firmware updates for your receiver and install them to ensure you have the latest features, bug fixes, and compatibility improvements. Follow the manufacturer’s instructions for updating the firmware through the receiver’s setup menu or using a network connection.
9. System Integration: If you have multiple devices connected to your audio receiver, such as a TV, streaming device, or gaming console, configure the receiver to integrate seamlessly with these devices. Set audio and video routing preferences, enable HDMI-CEC if available, and adjust any other settings necessary for smooth operation between devices.
By carefully configuring your audio receiver, you can optimize your home theater system’s audio performance and ensure a truly immersive audio experience. Take the time to explore and adjust the various settings available to match your speaker setup, room acoustics, and personal preferences. Enjoy the rich and accurate sound reproduction that a well-configured audio receiver delivers in your home theater.
Connecting External Devices
Connecting external devices to your home theater system allows you to enjoy a variety of audio and video content from different sources. Whether it’s a Blu-ray player, game console, or streaming device, proper connectivity ensures seamless integration and optimal performance. Here’s a guide to connecting external devices to your home theater:
1. Identify the Input Ports: Take note of the available input ports on your audio receiver or TV. Common ports include HDMI, optical, RCA, and USB. Check the device’s user manual or specifications to see which ports it supports.
2. HDMI Connection: HDMI connections offer the best audio and video quality. Connect one end of the HDMI cable to the HDMI output port of your device and the other end to an available HDMI input port on your receiver or TV. Use high-quality HDMI cables that support the required bandwidth and features, such as HDMI 2.0 or higher for 4K content.
3. Optical or Coaxial Connection: If HDMI is not available or not the preferred connection, use optical or coaxial digital cables to connect devices that have these output options. Connect one end to the device’s digital audio output port and the other end to the corresponding input on your receiver.
4. RCA Connection: RCA connections are commonly used for analog audio. Connect the red and white RCA cables from the audio output ports of your device to the corresponding input ports on your receiver. Ensure that you connect the left and right channels correctly.
5. USB Connection: USB ports on receivers or TVs can support various devices, such as flash drives or media players. Connect your USB device directly to the USB port for media playback or to access firmware updates for supported devices.
6. Wireless Connectivity: Many modern receivers and TVs offer built-in Wi-Fi or Bluetooth capabilities. This allows wireless connectivity with compatible devices, such as smartphones, tablets, or streaming devices. Follow the manufacturer’s instructions to pair and connect your devices wirelessly for music streaming or screen mirroring.
7. Network Connection: For devices that require an internet connection, such as smart TVs or streaming devices, connect them to your home network via Ethernet or Wi-Fi. This connection allows access to online streaming services, firmware updates, and other network-enabled features.
8. Power On and Configure: After connecting your external devices, power them on and configure the appropriate input settings on your receiver or TV. This ensures that the audio and video from the connected device is routed correctly for playback.
9. Test and Troubleshoot: Verify that the devices are functioning properly and adjust settings as needed. Test different sources and content to ensure proper audio and video playback. If any issues arise, refer to the device’s user manuals or online troubleshooting resources.
By properly connecting external devices, you can expand the capabilities of your home theater system and enjoy a wide range of audio and video content. Take care to use high-quality cables, follow the manufacturer’s instructions, and ensure compatibility between devices for a seamless and enjoyable home theater experience.
Setting Up the Subwoofer
Setting up the subwoofer in your home theater system is crucial for achieving deep and powerful bass that adds excitement and impact to your audio experience. Here are the steps to properly set up your subwoofer:
1. Placement: Identify the ideal location for your subwoofer. Place it near the front of the room, preferably along a wall or in a corner. Experiment with different placements to find the spot that provides the best bass response without overpowering or causing resonance issues.
2. Connection: Connect the subwoofer to the dedicated subwoofer output on your audio receiver or amplifier. Use a high-quality subwoofer cable to ensure a secure and reliable connection.
3. Crossover Frequency: Adjust the crossover frequency on your receiver or subwoofer. This setting determines the point at which low-frequency sounds are directed to the subwoofer instead of the main speakers. Start with a crossover frequency around 80Hz and fine-tune it based on your speakers’ capabilities and the acoustics of your room.
4. Volume Levels: Adjust the volume or gain control on your subwoofer. Begin by setting it to the midway point, and then play music or content with deep bass. Increase or decrease the volume until the bass blends seamlessly with the main speakers, avoiding any overpowering or overwhelming sound.
5. Phase Adjustment: Some subwoofers offer a phase adjustment control. Experiment with different phase settings to find the one that provides the smoothest and most cohesive integration of the subwoofer’s output with the main speakers.
6. Room Acoustics: Consider the acoustic characteristics of your room. If you notice excessive boominess or peaks in certain frequencies, you may need to address room acoustics. This can be done through the use of bass traps, diffusers, or acoustic panels to improve bass response and reduce unwanted resonances.
7. Testing and Versatility: Play various audio content, including music, movies, and games, to assess the performance of your subwoofer. Pay attention to the accuracy, depth, and impact of the bass. Make further adjustments if necessary to achieve the desired balance with your main speakers across different types of audio content.
8. Calibration and Room Correction: If your audio receiver offers automatic room correction or calibration features, run the calibration process to optimize the subwoofer’s performance based on your room’s acoustics. Follow the manufacturer’s instructions for the specific calibration system and make any recommended adjustments.
By properly setting up your subwoofer, you can enhance the low-frequency presence in your home theater system, adding depth, impact, and realism to your audio experience. Take the time to experiment with placement, adjust volume levels and crossover settings, and consider room acoustics for the best possible bass performance. Enjoy the powerful and immersive sound that a well-configured subwoofer brings to your home theater.
Positioning and Mounting the TV or Projector
The positioning and mounting of your TV or projector are fundamental steps in creating a comfortable and immersive viewing experience in your home theater. Proper placement ensures optimal viewing angles, reduces glare, and maximizes the visual impact of your screen. Here’s a guide to positioning and mounting your TV or projector:
1. TV Positioning: If you’re using a TV, determine the ideal position for it in the room. Place the TV at eye level when seated, ensuring that the screen is neither too high nor too low. Consider the viewing distance and angle from different seating positions to ensure everyone can enjoy a clear view.
2. Projector Placement: If you’re using a projector, consider the location that will deliver the best image quality. Look for a spot where the projected image will be large enough and fit within your desired screen size. Consider the distance from the screen, the projector’s throw distance, and any height adjustments necessary to align the projected image properly.
3. Mounting Options: Depending on your preferences and the characteristics of your room, there are different mounting options to consider. For a TV, you can choose between a wall mount, a stand, or a TV cabinet. Each option offers different benefits in terms of space-saving, aesthetics, and flexibility. For projectors, ceiling mounts are a popular choice to secure the projector in a fixed position and achieve optimal positioning.
4. Avoiding Glare: Whether using a TV or projector, take steps to minimize unwanted glare on the screen. Place the TV or position the projector in a location that avoids direct sunlight or bright sources of light that can cause reflections. Use curtains, blinds, or shades to control ambient light and improve contrast in the viewing area.
5. Screen Positioning: Place the screen in a position that provides a comfortable and unobstructed view for every viewer in the room. The screen should be centered and aligned with the seating area to ensure that everyone has an equal and immersive visual experience.
6. Screen Size: When positioning and mounting the TV or projector, consider the screen size that best matches your viewing distance. For TVs, choose a screen size that allows you to comfortably view details without straining your eyes. For projectors, adjust the distance and projection size to create an image that fills the screen area while maintaining clarity and sharpness.
7. Cable Management: To maintain a clean and organized appearance, use cable management solutions to hide and secure the cables. This will prevent a tangled mess and tripping hazards. Utilize cable clips, raceways, or conduits to route the cables neatly along walls or behind furniture.
8. Testing and Adjustment: After positioning and mounting the TV or projector, test and adjust the settings to ensure optimal audio and video performance. Check for any necessary picture adjustments, such as brightness, contrast, and color settings, to achieve a visually pleasing image. Additionally, verify that the audio is properly balanced and synchronized with the visuals.
By carefully considering the positioning and mounting of your TV or projector, you can create a comfortable and engaging viewing environment in your home theater. Take into account factors like viewing angles, glare reduction, screen size, and cable management to maximize the visual impact and enjoyment of your audiovisual content.
Arranging Furniture for Comfortable Viewing
The arrangement of furniture in your home theater plays a significant role in creating a comfortable and immersive viewing experience. Proper furniture placement ensures optimal viewing angles, seating comfort, and an unobstructed line of sight to the screen or projector. Here are some tips for arranging furniture for comfortable viewing:
1. Seating Position: Identify the central seating position that provides the best viewing experience. This position should have a direct line of sight to the screen or projector, allowing for an unobstructed view of the content. Consider the viewing distance and angle from this position to ensure optimal comfort and visual immersion.
2. Viewing Angles: Arrange the seating to optimize viewing angles for everyone in the room. The goal is to ensure that viewers can comfortably see the entire screen without having to strain their neck or eyes. Position the seats at a slight angle towards the screen to provide a more encompassing viewing experience.
3. Distance from Screen: Consider the appropriate distance between the seating and the screen to achieve an immersive and comfortable viewing experience. Use the screen size and recommended viewing distance guidelines to determine the optimal seating position. Striking the right balance prevents visual fatigue and allows for maximum enjoyment of the content.
4. Theater-Style Seating: If you have the space, consider arranging the furniture in a theater-style layout, with rows of seating at different levels. Optimal seating distance and elevated platforms create a more authentic cinema experience and better sightlines. This setup is well-suited for larger rooms and dedicated home theaters.
5. Reclining Seating: Reclining seating options offer added comfort and flexibility, allowing viewers to adjust their position for optimum relaxation during long movie nights. Recliners with built-in cup holders and USB charging ports provide convenience and enhance the theater-like experience.
6. Side Tables: Incorporate side tables or small stands next to seating areas to provide a convenient place for drinks, snacks, or remote controls. These additional surfaces reduce the need for viewers to reach for items and disturb their viewing experience.
7. Ambient Lighting: Consider the ambient lighting in the room and its effect on viewing comfort. Install dimmable wall sconces, floor lamps, or LED strip lights with remote controls to create a suitable viewing atmosphere. Ensure that the lighting does not cause glare or reflections on the screen.
8. Acoustic Considerations: Balance the arrangement of furniture with acoustic treatment considerations. Consider placing absorptive materials, such as curtains, rugs, or acoustic panels, strategically to minimize sound reflections and improve audio quality in the room.
By carefully arranging your furniture, you can create a comfortable and immersive viewing environment in your home theater. Put careful thought into seating position, viewing angles, seating distances, and convenience features to ensure an enjoyable and memorable home theater experience for all viewers.
Managing Cables and Wiring
Effective cable and wiring management is essential in maintaining a clean and organized home theater setup. Proper management not only improves the overall aesthetics of your space but also reduces the risk of tripping hazards and simplifies future maintenance or upgrades. Here are some tips for managing cables and wiring in your home theater:
1. Plan Ahead: Before setting up your home theater, plan the layout and placement of your devices and components. Determine the best routes for running cables and determine the optimal locations for cable connections.
2. Bundle Cables: Group similar cables together using cable ties, Velcro straps, or cable management sleeves. Bundling cables minimizes tangles and helps maintain a neat appearance.
3. Use Cable Channels or Raceways: Secure cables to walls or baseboards using cable channels or raceways. These plastic or metal conduits effectively hide and protect cables, providing a clean and professional look. Choose options that are paintable to match your room decor.
4. Conceal Cables Behind Furniture: Position furniture strategically to hide cables behind or beneath them. This method keeps cables out of sight and reduces visual clutter.
5. Use Cable Clips or Adhesive Hooks: Stick cable clips or adhesive hooks to the back of furniture or along the walls to keep cables in place and prevent them from dangling or tangling. This helps create a neater appearance and reduces the risk of tripping.
6. In-Wall or In-Ceiling Wiring: For a more permanent solution, consider running cables through the walls or ceilings. This option provides a clean and seamless look, but it may require professional installation and knowledge of local building codes.
7. Label Cables: Label each cable at both ends to identify its purpose or destination. This saves time during future maintenance or troubleshooting and makes it easier to identify which cable goes where.
8. Use Wireless Solutions: Whenever possible, take advantage of wireless technologies to eliminate or minimize the need for cables. Wireless audio transmitters, HDMI wireless extenders, or Wi-Fi-enabled smart devices reduce the number of visible cables in your setup.
9. Consider Cable Management Accessories: Explore cable management accessories such as cable raceways, cable sleeves, cable clips, or cable trays. These products are designed specifically to hide and organize cables for a cleaner and more streamlined look.
10. Regular Maintenance: Occasionally check the cables and wires in your home theater system for any signs of damage or wear. Ensure that connections are secure, and cables are positioned properly. This prevents potential issues and maintains the overall performance of your setup.
By implementing these cable and wiring management techniques, you can maintain a tidy and organized home theater space. Effective management not only enhances the aesthetics of your setup but also provides convenience and ensures the longevity of your equipment.