
Choosing the Right Room for Your Home Theater
When it comes to building a custom home theater system, selecting the right room is crucial. The room you choose will greatly impact the overall experience and enjoyment of your home cinema. Here are some factors to consider when selecting the perfect room for your home theater:
1. Size: Ideally, you want a room that is large enough to accommodate your desired screen size and seating arrangement. Consider the dimensions of the room to ensure it can comfortably fit all the necessary components.
2. Shape: The shape of the room can affect the acoustics and sound quality. Look for a room with a rectangular shape, as this will help minimize sound reflections and provide a more immersive audio experience.
3. Lighting: Natural light can be problematic for a home theater, as it can impact the clarity of the screen. Look for a room with minimal windows or the ability to install blackout curtains or blinds to create a dark and immersive environment.
4. Noise Control: Consider the location of the room in relation to other areas of your home. You want to minimize external noise that may disturb your viewing experience. Opt for a room that is away from high traffic areas or where you can implement soundproofing measures.
5. Accessibility: Think about how easily accessible the room is for you and your guests. You may want to choose a room that is close to amenities like a kitchen or bathroom, ensuring convenience during movie nights or extended viewing sessions.
Remember, the room you choose will set the foundation for your home theater system, so take the time to carefully evaluate these factors and make an informed decision. By choosing the right room, you can create a truly immersive movie-watching experience in the comfort of your own home.
Designing the Layout and Seating Arrangement
Once you have selected the room for your home theater, the next step is to design the layout and seating arrangement. This plays a crucial role in maximizing comfort and ensuring optimal viewing angles. Here are some key considerations when designing the layout and seating arrangement:
1. Viewing Distance: It is important to determine the ideal viewing distance between the screen and the seating. The general rule of thumb is to sit at a distance that is approximately 1.5 to 2.5 times the diagonal screen size. This helps to ensure an immersive viewing experience without straining your eyes.
2. Seating Options: Choose comfortable seating options that can accommodate the number of people you expect to have in your theater. Consider options such as recliners, sofas, or even dedicated home theater seating that includes features like cup holders, USB chargers, and built-in speakers for added convenience.
3. Seat Placement: When placing your seats, consider the viewing angles and the distance between each seat. You want to ensure that everyone has a clear and unobstructed view of the screen. Be mindful of any potential obstacles, such as columns or equipment, which may obstruct the view.
4. Room Layout: Plan the layout of your room to optimize the viewing experience. Consider the position of the screen, the arrangement of the speakers, and the placement of any other equipment. This will help ensure that both the audio and visual components are properly aligned for the best possible experience.
5. Consideration for Multiple Rows: If you have a larger space, you may want to consider incorporating multiple rows of seating. This allows for a tiered layout, similar to a commercial cinema, providing better visibility for those in the back rows.
Remember, the seating arrangement and layout should prioritize comfort and functionality. By carefully considering these factors, you can create a home theater that not only delivers a superior cinematic experience but also provides a visually appealing and comfortable space for you and your guests to enjoy.
Selecting the Right Projector or Television
One of the key components of any home theater system is the display. Choosing the right projector or television is crucial in ensuring a high-quality visual experience. Here are some factors to consider when selecting the perfect display for your home theater:
1. Screen Size: Determine the appropriate screen size based on the dimensions of your room and the viewing distance. A larger screen can create a more immersive experience, but be mindful of not going too big that it compromises the picture quality.
2. Resolution: Consider the resolution options available, such as Full HD (1080p), 4K Ultra HD, or even 8K if budget allows. Higher resolutions offer more details and sharper images, enhancing the viewing experience. However, keep in mind that the resolution should be compatible with the content you plan to watch.
3. Display Technology: Choose between a projector and a television based on your preferences and the characteristics of your room. Projectors offer larger screen sizes and can create a cinematic feel, while televisions offer sharper images and better visibility in well-lit rooms.
4. Brightness and Contrast: Look for displays with adequate brightness and contrast ratios to ensure vibrant and vivid images. High brightness levels are essential for well-lit rooms or environments with ambient light, while good contrast ratios provide depth and better black levels.
5. Connectivity Options: Consider the connectivity options available on the display, such as HDMI ports, USB ports, and wireless capabilities. These connections allow you to easily connect your media devices, gaming consoles, or streaming devices to the display.
6. Budget: Set a budget for your display and make sure to research and compare different models within your budget range. Remember to prioritize quality and performance over price alone, as the display is a critical component that greatly impacts your overall viewing experience.
Ultimately, the display you choose for your home theater system should fulfill your preferences and provide a visually stunning experience. Carefully assess these factors to select the right projector or television that will bring your movies, shows, and games to life.
Understanding Sound Systems and Speakers
When it comes to creating an immersive home theater experience, sound quality is just as important as the visual display. Understanding sound systems and speakers will help you design an audio setup that complements the visuals and transports you into the world of your favorite movies. Here’s what you need to know:
1. Surround Sound Formats: Familiarize yourself with different surround sound formats, such as Dolby Atmos or DTS:X. These formats offer a three-dimensional audio experience by placing sounds around and above you, enhancing the realism and immersion of your home theater.
2. Speaker Configuration: Determine the ideal speaker configuration based on your room size and layout. A common setup includes a center channel speaker for dialogue, front left and right speakers for main audio, surround speakers for ambient sounds, and a subwoofer to handle low-frequency effects.
3. Speaker Placement: Proper speaker placement is crucial for optimal sound distribution. Follow guidelines for speaker placement, such as placing the center channel speaker above or below the screen at ear level, and rear surround speakers at an angle behind the seating area. Experiment with speaker positions to find the best balance of sound and imaging.
4. Soundbar Options: If you have limited space or prefer a simpler setup, consider a soundbar. Soundbars are designed to provide immersive audio in a compact form factor. Look for models with virtual surround sound capabilities and built-in amplification for enhanced performance.
5. Subwoofer Performance: The subwoofer is responsible for reproducing deep bass frequencies and adding impact to explosions and dramatic moments. Ensure that your subwoofer is able to deliver clean and powerful low-frequency response without overpowering the rest of the audio spectrum.
6. Amplifier and Receiver: Invest in a quality amplifier or receiver for your home theater system. These audio components drive and control the audio signals sent to each speaker, ensuring optimal performance and compatibility with your equipment.
7. Calibration and Room Correction: Calibrate your audio system to optimize sound quality based on your room’s acoustic characteristics. Utilize room correction software or hire a professional to ensure accurate sound reproduction and eliminate any room-related audio issues.
By understanding the intricacies of sound systems and carefully selecting and positioning your speakers, you can achieve a truly immersive home theater experience. Take the time to research and invest in quality audio equipment to create a sonic environment that complements your visual display and brings your entertainment to life.
Setting up Lighting and Ambience
Creating the perfect ambience in your home theater is essential for enhancing the overall viewing experience. Lighting plays a crucial role in setting the mood and immersing you in the cinematic atmosphere. Here are some key considerations when setting up lighting and ambience for your home theater:
1. Ambient Lighting: Use dimmable lights or smart bulbs to create a cozy and subdued atmosphere. Install recessed lighting or wall sconces around the perimeter of the room to provide soft and indirect lighting that won’t interfere with the screen.
2. Backlighting: Consider adding backlighting behind your screen or along the edges of the room. This can help reduce eye strain and add depth to the visuals. LED strips or dedicated bias lighting kits can be easily installed for this purpose.
3. Lighting Control: Implement a lighting control system that allows you to adjust the brightness and color temperature of your lights with ease. This can be achieved through smart home automation or dedicated lighting control panels.
4. Colored Lighting: For a more immersive experience, experiment with colored lighting. Consider installing LED strips or smart bulbs that can change colors to match the mood or the content you are watching. This can add a dynamic and exciting element to your home theater.
5. Noise-Free Lighting: Ensure that any lighting fixtures or installations do not produce distracting sounds that can interfere with the audio experience. Opt for silent light fixtures or utilize wireless lighting solutions to eliminate potential noise disturbances.
6. Motorized Curtains or Blackout Shades: If your room has windows, invest in motorized curtains or blackout shades. These can be easily controlled to block out natural light completely when desired, ensuring an optimal viewing environment.
Remember, the goal is to create a cinematic atmosphere that enhances the immersion of your home theater. Experiment with different lighting strategies and find the right balance between functionality, aesthetics, and creating a captivating ambience for your movie-watching experience.
Acoustic Treatments for Optimal Sound Quality
Acoustic treatments play a critical role in achieving optimal sound quality in your home theater. They help reduce sound reflections, echoes, and unwanted noise, allowing you to fully immerse yourself in the audio experience. Here are some key considerations when implementing acoustic treatments:
1. Absorption Panels: Install acoustic panels on the walls to absorb and reduce sound reflections. These panels are designed to absorb high and mid-frequency sounds, reducing echo and improving sound clarity within the room.
2. Bass Traps: Use bass traps in the corners of the room to control low-frequency sounds and prevent bass buildup. These trap-like devices help eliminate unwanted resonances and deliver a more balanced and accurate sound reproduction.
3. Diffusion Panels: Incorporate diffusion panels to scatter sound waves and create a more even distribution of sound throughout the room. This helps improve the overall listening experience and creates a more natural acoustic environment.
4. Acoustic Curtains or Drapes: Consider using acoustic curtains or drapes to absorb sound reflections and control noise leakage. These specialized curtains are designed with sound-absorbing materials and can help improve sound quality while also enhancing the room’s aesthetic.
5. Speaker Placement: Properly position your speakers to minimize interaction with room boundaries and optimize sound imaging. Experiment with different speaker placements and angles to find the best position for balanced sound reproduction.
6. Flooring Considerations: If possible, choose sound-absorbing flooring materials such as carpet or rugs. Hardwood or tile floors can create sound reflections and negatively impact the acoustics of the room. Adding area rugs can help reduce sound reflections and improve overall sound quality.
7. Room Layout: Take into account the overall room layout and furniture placement when considering acoustic treatments. Avoid placing furniture or other objects that can obstruct sound waves or create sound reflections. Optimize the arrangement to allow for a free and unobstructed sound path.
By implementing these acoustic treatments, you can significantly enhance the sound quality in your home theater. Remember, every room is unique, so it may be beneficial to seek professional advice or conduct acoustic measurements to ensure you make the most effective treatments for your specific space.
Considering Smart Home Integration and Automation
Integrating smart home technology and automation into your home theater setup can greatly enhance the convenience, control, and overall experience. By connecting your audiovisual equipment and lighting to a smart home system, you can streamline operations and create a seamless cinematic experience. Here are some considerations for smart home integration:
1. Centralized Control: Utilize a smart home hub or controller to manage and control your home theater system. This allows you to consolidate control of multiple devices, such as your projector, sound system, streaming devices, and lighting, into a single interface.
2. Voice Control: Incorporate voice assistant devices, such as Amazon Alexa or Google Assistant, for hands-free control. This enables you to use voice commands to power on/off devices, adjust volume, change input sources, and even control room lighting, creating a truly effortless and immersive experience.
3. Automated System Startup/Shut Down: Program your smart home system to automatically power on/off your home theater components when you start or finish a movie or TV show. This eliminates the need to individually turn on/off each device and ensures a hassle-free setup every time.
4. Scene Settings: Create customized scene settings for different viewing experiences. For example, you can have a “Movie Night” scene that dims the lights, lowers the projector screen, and optimizes the sound settings with a single tap or voice command. This allows you to quickly set the mood for your movie-watching sessions.
5. Integration with Streaming Services: Connect your streaming devices, such as Apple TV or Roku, to your smart home system. This allows for easy access to streaming services and the ability to control playback, search for content, and adjust settings right from your smart home controller or voice assistant.
6. Smart Lighting Sync: Sync your smart lighting with your home theater system to enhance the viewing experience. For example, you can program the lights to gradually dim as the movie starts or have them change colors to match the on-screen action, creating a more immersive environment.
7. Remote Access: Remote access to your home theater system allows you to control and monitor it from anywhere, even when you’re not at home. This provides flexibility and convenience in managing your home theater system while ensuring that everything is ready for your arrival.
By integrating smart home technology and automation, you can simplify the operation of your home theater system and create a more immersive and enjoyable experience. Combine the power of voice control, intelligent automation, and seamless integration to take your movie-watching sessions to a whole new level.
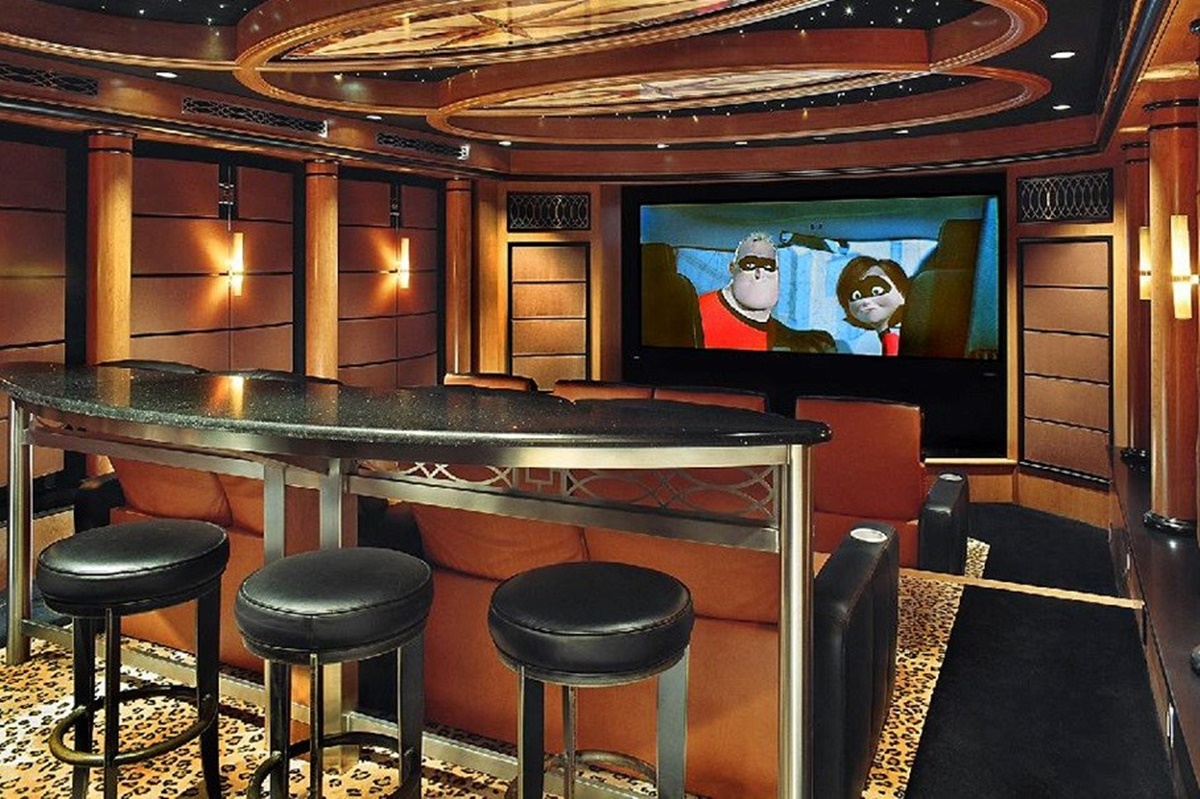
Selecting Comfortable and Stylish Furniture
When building a custom home theater system, selecting the right furniture is essential for creating a comfortable and stylish viewing space. The right furniture not only enhances the aesthetics of your home theater but also ensures that you and your guests can enjoy hours of movies and TV shows in utmost comfort. Here are some factors to consider when selecting furniture:
1. Seating Options: Choose seating options that prioritize comfort without compromising style. Look for recliners, sofas, or dedicated home theater seating that offer plush cushioning and ergonomic support. Consider features like built-in cup holders, USB chargers, and adjustable headrests for added convenience.
2. Material and Upholstery: Opt for durable and easy-to-clean materials such as leather or high-quality fabric upholstery. These materials not only add a touch of sophistication but are also comfortable and easy to maintain, ensuring longevity and a fresh look for your furniture.
3. Size and Configuration: Consider the size of your room and the number of people you expect to accommodate. Choose furniture that fits comfortably in the space without overcrowding. If you have a dedicated home theater, consider a sectional or modular seating configuration that can be customized to your specific needs.
4. Ergonomics: Look for furniture that provides proper support for your body during long viewing sessions. Opt for options that allow for adjustable headrests, lumbar support, and armrests that are at a comfortable height. Proper ergonomics ensure that you can enjoy your movies without discomfort or strain.
5. Style and Aesthetics: Select furniture that complements the overall theme and decor of your home theater. Whether you prefer a modern, minimalist look or a classic, luxurious ambiance, choose furniture that aligns with your style and blends seamlessly with the surrounding elements.
6. Accessory Storage: Consider furniture options that provide built-in storage for remote controls, media devices, and other accessories. This helps keep your home theater space organized and free from clutter, allowing you to fully relax and enjoy your movies without distractions.
Remember, the comfort and style of your furniture greatly contribute to the overall ambiance of your home theater. Take the time to test furniture for comfort, visualize how it will fit in your space, and consider the long-term durability and maintenance requirements. With the right furniture, you can create a cozy and stylish environment where you and your guests can immerse yourselves in the ultimate cinematic experience.
Wiring and Cable Management
Proper wiring and cable management are essential for a clean and organized home theater setup. With multiple devices, speakers, and power cords involved, managing cables effectively not only ensures a clutter-free environment but also facilitates easy maintenance and troubleshooting. Here are some tips for efficient wiring and cable management:
1. Plan Ahead: Before setting up your home theater, take the time to plan the wiring layout. Consider the location of power outlets, speaker placement, and the path of audio and video cables. This will help determine the length and types of cables you will need.
2. Use High-Quality Cables: Invest in quality cables that are appropriate for the devices you’re connecting. Use HDMI cables with sufficient bandwidth for high-definition video and audio transfer. Opt for cables with strong shielding to minimize interference and ensure reliable signal transmission.
3. Conceal Cables: Conceal cables as much as possible to create a clean and clutter-free look. You can achieve this by running cables along baseboards, behind walls using cable conduits or raceways, or using wireless transmission options when available.
4. Cable Ties and Clips: Use cable ties, clips, or cable management sleeves to bundle and secure cables together. This not only keeps them organized but also prevents tripping hazards and makes it easier to identify and trace specific cables if needed.
5. Labeling: Label each cable at both ends to identify its purpose and destination. This will save you time and effort when troubleshooting or making adjustments in the future. Use color-coded labels for easy identification.
6. Power Management: Consider a power strip or surge protector with built-in cable management to handle all power cords. This will help keep your power cables tidy and prevents cable clutter around the power outlets.
7. Ventilation and Heat Management: Ensure cables are not tightly bundled or obstructing ventilation areas of your equipment. Proper air circulation is crucial for preventing overheating, which can affect the performance and lifespan of your devices.
8. Regular Maintenance: Periodically check and adjust cables as needed to ensure they remain tidy and secure. This helps prevent cable tangling and maintains an organized home theater environment.
By paying attention to wiring and cable management, you can maintain a clean and organized home theater space while also simplifying troubleshooting and maintenance tasks. Taking the time to plan and implement effective cable management solutions will result in a visually appealing setup that enhances your overall home theater experience.
Organizing and Storing Your Media Collection
Organizing and storing your media collection is crucial for easy access, preservation, and enjoyment of your favorite movies, TV shows, and music. By implementing effective organization strategies, you can find and enjoy your desired media quickly, while keeping your collection in top condition. Here are some tips to help you organize and store your media collection:
1. Sorting and Categorizing: Sort your media collection by category, such as movies, TV shows, or music. Within each category, further categorize by genre, release year, or any other method that makes sense to you. This will help you easily locate a specific title or genre when you’re in the mood for something specific.
2. Alphabetical Order: Arrange your media collection alphabetically within each category. This method is straightforward and allows for quick browsing and retrieval. Consider using dividers or labels to separate sections and make it even easier to locate titles.
3. Digital Organization: If you have a digital media collection, utilize media manager software or platforms to organize your files. Assign metadata such as title, artist, genre, and cover art to keep your digital library visually appealing and easy to navigate.
4. Storage Systems: Choose a suitable storage system for physical media, such as DVDs, Blu-rays, or CDs. Options include shelves, cabinets, or media storage units designed specifically for media organization. Ensure that the storage system protects your media from dust, sunlight, and excessive heat or humidity.
5. Sleeves and Cases: Use protective sleeves or cases for physical media to prevent scratches, dust, and damage. Choose options that are sturdy and acid-free to avoid disc deterioration over time.
6. Labeling: Label your media cases or sleeves with titles and any relevant information to streamline searching. You can also number your cases or use a barcode system for easy cataloging.
7. Digital Library Software: If you have a large digital media collection, consider using digital library software to manage and organize your files. These software solutions allow you to search, filter, and organize your digital media collection, making it easy to find and play your favorite movies or music.
8. Disc Repair: If you have damaged discs, consider investing in a disc repair kit or seek professional disc repair services. Proper maintenance ensures that your media remains in playable condition and extends the lifespan of your collection.
Remember, whether you prefer physical media or digital files, organizing and storing your media collection is key to easy access and long-term enjoyment. Take the time to implement an organization system that works for you, and regularly maintain and update it as your collection grows.
Remote Control and Universal Remote Options
A convenient and efficient way to control your home theater system is through a remote control. With multiple devices and functions to manage, having a reliable remote control or universal remote can simplify the operation of your home theater. Here are some options to consider:
1. Original Equipment Remote: The simplest option is to use the remote control that comes with each individual device in your home theater system. While this ensures compatibility, it can lead to a clutter of remotes, making it cumbersome to switch between devices.
2. Universal Remote Control: A universal remote allows you to control multiple devices with a single remote. These remotes are programmed to work with a wide range of audiovisual equipment, eliminating the need for multiple remotes and simplifying the control of your entire system.
3. Smart Device Apps: Many audiovisual devices now have companion apps that can be downloaded on smartphones or tablets. These apps can serve as remote controls, allowing you to navigate menus, adjust settings, and control playback from your smart device.
4. Voice Control: Integration with voice assistants, such as Amazon Alexa or Google Assistant, allows you to control your home theater system using voice commands. Simply speak into a microphone-enabled remote or a separate voice assistant device to control playback, adjust volume, or switch between devices.
5. Customizable Solutions: Some advanced universal remotes offer customization options, allowing you to program specific commands or macros. This means you can create one-touch commands that turn on multiple devices, adjust settings, and switch inputs, simplifying the operation of your entire home theater system.
6. Smartphone Control: Some smart home automation systems allow you to control your home theater system through a smartphone app. These apps provide a user-friendly interface where you can access and control all your devices from one central location on your smartphone or tablet.
7. Touchscreen Remotes: Touchscreen remotes offer an intuitive interface with customizable layouts and icons. These remotes often provide visual feedback, making it easier to navigate through menus and control various functions of your home theater system.
When choosing a remote control or universal remote, consider the compatibility with your devices, the complexity of your system, and the level of convenience you desire. Ensure that the remote control is comfortable to hold and user-friendly for seamless operation. By selecting the right remote control option, you can simplify the management of your home theater system and enhance the overall viewing experience.
Installing Home Theater Curtains and Drapes
Home theater curtains and drapes are not only decorative elements but also serve a functional purpose in enhancing the viewing experience in your theater room. They provide light control, improve acoustics, and add an extra touch of elegance to your space. Here are some considerations when installing curtains and drapes in your home theater:
1. Light Control: Install blackout curtains or drapes to block out external light sources. This prevents glare on the screen and ensures a more immersive viewing experience. Look for curtains specifically designed for blocking light, with thick and opaque materials.
2. Noise Reduction: Opt for curtains with sound-dampening properties to minimize sound reflections and improve the acoustics of your home theater. Heavy, dense fabrics can absorb sound waves and reduce echo, resulting in better audio clarity and immersion.
3. Double-Layered Curtains: Consider using double-layered curtains for both light control and sound absorption. This involves having a sheer curtain layer for diffusing light and an opaque layer for blocking light and improving acoustics. It allows for greater flexibility in adjusting the lighting and sound in your theater room.
4. Curtain Thickness and Length: Choose curtains that are thick enough to effectively block light and offer sound-dampening properties. Opt for floor-length curtains that cover the entire height of your windows to prevent light leakage and enhance the aesthetic appeal of your theater room.
5. Motorized Curtains: Consider motorized curtain systems for added convenience and control. With motorized curtains, you can easily open or close them with the push of a button or through a remote control. This allows for seamless light control and adds a touch of sophistication to your home theater setup.
6. Home Theater Theme: Select curtains or drapes that align with the theme and décor of your home theater. Choose colors, patterns, or designs that complement the overall aesthetic of the space and enhance the cinematic atmosphere.
7. Drapery Hardware: Use sturdy and reliable drapery hardware for easy installation and maintenance. Quality curtain rods, hooks, and brackets ensure that your curtains are securely in place and can withstand the weight of heavy curtains.
Remember, home theater curtains and drapes not only add a stylish touch to your space but also serve practical purposes such as light control and sound absorption. Take the time to choose curtains that match your preferences and needs, and consider professional installation if necessary to ensure a seamless and visually appealing home theater experience.
Optimizing Audio and Video Calibration
To truly enjoy a cinematic experience in your home theater, it is important to optimize the audio and video calibration of your system. Calibration ensures that the audio and visual elements are finely tuned to provide the best possible quality. Here are some key steps to optimize audio and video calibration:
1. Audio Calibration:
– Speaker Placement: Position your speakers according to recommended guidelines for optimal sound distribution. Take into account the size and layout of your room to ensure balanced audio coverage.
– Adjust Levels and Delays: Use a sound level meter to adjust the volume levels of each speaker to ensure consistency and prevent one speaker from overpowering the others. Also, set appropriate delays to synchronize audio output for a cohesive experience.
– Equalization: Utilize an equalizer or room correction software to fine-tune the frequency response of your audio system. This will help compensate for any room acoustics issues and ensure accurate and balanced sound reproduction.
– Subwoofer Calibration: Properly set the crossover frequency and phase alignment of your subwoofer to avoid any inconsistencies in low-frequency reproduction. This will result in a more seamless and immersive audio experience.
2. Video Calibration:
– Contrast and Brightness: Adjust the contrast and brightness levels of your display to achieve a balanced and vibrant image. Use test patterns or calibration discs to ensure accurate and optimal settings.
– Color Accuracy: Adjust color temperature and color settings to achieve accurate and natural colors on your screen. Use test patterns or specialized calibration tools to assist in calibrating color accuracy.
– Gamma Settings: Adjust the gamma settings to optimize the balance between dark and light areas of the image. This will ensure that details are visible in both shadowed and bright scenes.
– Motion Settings: Customize motion settings based on personal preference. Some displays offer settings to reduce motion blur or judder, providing a smoother and more enjoyable viewing experience.
– Aspect Ratio and Overscan: Adjust the aspect ratio and overscan settings to ensure that the image fills the screen properly and is not cut off or stretched. This will ensure that you are seeing the entire intended frame.
3. Professional Calibration:
– Consider hiring a professional calibrator to fine-tune your audio and video settings. Professionals have specialized equipment and expertise to fully optimize your system for the best possible audio and visual performance.
By following these steps, you can optimize the audio and video calibration of your home theater system and achieve the highest quality audio and visual experience. Take the time to fine-tune your system, and you will be rewarded with a truly cinematic experience right in the comfort of your own home.
Proper Ventilation and Cooling Solutions
Proper ventilation and cooling are essential for maintaining the performance and longevity of your home theater equipment. As your devices generate heat during operation, it is crucial to implement effective cooling solutions to prevent overheating and ensure optimal performance. Here are some important considerations for proper ventilation and cooling in your home theater:
1. Adequate Airflow: Ensure that there is sufficient airflow around your audiovisual components. Avoid placing them in enclosed spaces or stacking them too closely, as this can restrict airflow and lead to heat buildup. Allow for at least a few inches of clearance on all sides to facilitate proper cooling.
2. Ventilation Paths: Arrange your devices in a way that promotes natural ventilation paths. Position them so that cool air can enter from the front or sides and hot air can exit from the rear or top. This helps to effectively dissipate heat and prevent components from overheating.
3. Ventilation Grilles and Fans: Utilize devices with built-in ventilation grilles and fans. These features help to improve airflow and keep components properly cooled. Ensure that the grilles and fans are not obstructed by furniture or other objects.
4. Cooling Systems: Consider installing additional cooling systems, such as fans or ventilation systems, to improve air circulation within the home theater space. These systems can help maintain a consistent temperature and prevent hotspots.
5. HVAC Considerations: Ensure that your home theater space is adequately serviced by your home’s heating, ventilation, and air conditioning (HVAC) system. Proper HVAC ventilation can help regulate temperature and humidity, preventing excessive heat or moisture buildup in the room.
6. Thermal Management: Some audiovisual components generate more heat than others. Pay attention to the thermal characteristics of your equipment and consider using cooling solutions like active cooling units, heat sinks, or thermal pads to prevent overheating in these specific devices.
7. Cable Management: Proper cable management contributes to efficient airflow and ventilation. Keep cables organized and away from ventilation paths to avoid obstructing airflow and trapping heat around your devices.
8. Regular Maintenance: Regularly clean dust and debris from the ventilation grilles or fans of your devices to prevent blockages and maintain optimal airflow. Replace filters in cooling systems or fans as recommended by the manufacturer.
Remember, proper ventilation and cooling are essential for the long-term performance of your home theater equipment. By implementing effective cooling solutions, you can prevent overheating and ensure the longevity and optimal functionality of your devices, ultimately enhancing your overall viewing experience.
Incorporating Gaming Consoles and Entertainment Devices
For many home theater enthusiasts, incorporating gaming consoles and other entertainment devices is an important aspect of their overall setup. Whether you’re a gaming enthusiast or enjoy streaming content from various sources, it’s essential to consider how to seamlessly integrate these devices into your home theater. Here are some key considerations:
1. Connectivity: Ensure that your home theater system has the necessary connectivity options for your gaming consoles and other devices. HDMI ports are typically essential for connecting gaming consoles, while additional USB ports or Bluetooth capabilities may be required for other entertainment devices.
2. Gaming Display Options: Consider the display options for gaming. Depending on your preferences, you may choose to use a large-screen television, a projector, or a gaming monitor for your gaming sessions. Each option offers different advantages in terms of size, resolution, and response time, so choose what suits your gaming needs best.
3. Gaming Sound: Gaming often involves immersive audio experiences, so it’s important to have a high-quality sound system. Make sure your audio setup delivers high-fidelity sound, allowing you to fully immerse yourself in the game. Consider a surround sound system or high-quality gaming headphones for an optimal gaming audio experience.
4. Game Storage and Organization: Designate a space in your home theater setup to store and organize your gaming consoles, games, and accessories. Invest in sturdy and functional storage solutions such as shelves, cabinets, or dedicated gaming racks to keep everything organized and easily accessible.
5. Streaming and Multimedia Devices: Many entertainment devices serve multiple purposes beyond gaming, such as streaming media players or set-top boxes. Incorporate these devices into your home theater system to enjoy a wide range of content from various streaming services, ensuring that you have the flexibility to access your favorite movies, TV shows, and music.
6. Input Management: Consider how to manage multiple inputs from various devices. Utilize an AV receiver or a HDMI switcher to connect multiple devices to your display and simplify the switching process. This allows for seamless transitions between gaming consoles, media players, and other entertainment devices.
7. Gaming Comfort: Ensure that your gaming setup provides comfort for long gaming sessions. Consider investing in ergonomic gaming chairs, bean bags, or loungers to enhance your gaming experience. Add a dedicated gaming desk or table for a convenient space to position your controllers and peripherals.
8. Gaming Lighting and Ambience: Enhance your gaming experience by incorporating customizable lighting options. Consider adding LED light strips or smart bulbs that can sync with your gaming console or respond to in-game events, creating a dynamic and immersive ambience.
By considering these factors, you can seamlessly incorporate gaming consoles and entertainment devices into your home theater setup. This allows for an enjoyable and versatile entertainment experience that caters to your gaming needs, streaming preferences, and overall multimedia enjoyment.
Choosing the Best Screen for Your Home Theater
The screen is one of the most crucial components of a home theater system. It is the canvas on which you’ll experience the visual magic of movies, TV shows, and gaming. Selecting the best screen for your home theater involves several factors to consider. Here are some key considerations to help guide your decision:
1. Screen Size: Determine the appropriate screen size based on the dimensions of your room and the viewing distance. A larger screen can create a more immersive experience, but be mindful of not going too big that it compromises the viewing quality or makes it uncomfortable to watch.
2. Screen Material: Choose the right screen material based on your room’s characteristics and the type of projector or display you’re using. Consider factors such as gain, viewing angle, and color accuracy. Options include white or gray screens, matte screens, and ambient light rejecting screens.
3. Aspect Ratio: Determine the aspect ratio that best suits your viewing preferences and the type of content you primarily watch. Common aspect ratios for home theaters include 16:9 (widescreen), 2.35:1 (cinemascope), and 1.85:1 (standard widescreen).
4. Projection or Television: Decide whether you want to use a projector and screen setup or a large-screen television. Projectors offer a cinematic experience and flexibility in terms of screen size, while televisions provide sharper images and better visibility in well-lit rooms.
5. Ambient Light Conditions: Consider the ambient light conditions in your room. If your theater room can be completely darkened, a standard white screen may suffice. However, if you have windows or ambient light, consider a screen with higher contrast or an ambient light rejecting screen to maintain image quality in brighter conditions.
6. Viewing Angle: Evaluate the seating arrangement in your room and the viewing angles from different positions. Ensure that the chosen screen provides good image quality and minimal distortion from various seating positions, allowing everyone to enjoy an optimal viewing experience.
7. Screen Mounting Options: Determine how you will mount or position your screen. Options include wall-mounting, ceiling-mounting, or using a motorized retractable screen. Choose a mounting option that suits your room layout and provides the desired functionality.
8. Budget Considerations: Set a budget for your screen and consider the trade-offs between cost, performance, and features. It’s essential to find a balance between the screen quality you desire and what you can afford within your budget.
Remember, choosing the best screen for your home theater is a subjective decision that depends on your preferences, room characteristics, and budget. Research and demo different screen options to ensure they meet your expectations for image quality, immersion, and overall viewing pleasure.
Building a Dedicated Media Room for the Ultimate Experience
For the ultimate home theater experience, consider building a dedicated media room that is specifically designed and optimized for cinematic enjoyment. A dedicated media room allows you to create a space that is meticulously tailored to fulfill all your entertainment needs. Here are some key considerations to build the ultimate dedicated media room:
1. Room Selection: Choose a room in your home that can be dedicated solely to your media room. Ideally, it should be a separate and enclosed space to minimize external distractions and optimize sound and lighting control.
2. Acoustic Treatments: Implement proper acoustic treatments to enhance sound quality and minimize sound reflections. Consider using acoustic panels, bass traps, and diffusers to create a balanced and immersive audio experience.
3. Soundproofing: Soundproof the room to minimize noise leakage and disturbance to the rest of the house. Install soundproofing materials on walls, ceilings, and floors to create a quiet and immersive environment.
4. Lighting Control: Incorporate lighting control systems that allow you to adjust the room’s lighting to suit different viewing scenarios. Use dimmable lights or smart bulbs for maximum control over brightness and ambiance.
5. Comfortable Seating: Invest in comfortable seating options that provide proper support and cushioning for long periods of sitting. Consider dedicated home theater seating with features like cup holders, built-in recliners, and USB chargers for added convenience.
6. Video Display: Choose a high-quality video display that meets your preferences and budget. Options include large-screen televisions or projectors with screens. Ensure that the display size, resolution, and aspect ratio align with the room size and seating arrangement for optimal viewing angles and immersive visuals.
7. Surround Sound System: Install a high-quality surround sound system that delivers immersive audio. Place speakers strategically for optimal sound distribution, and invest in a powerful AV receiver to drive the audio experience.
8. Smart Home Automation: Incorporate smart home automation to simplify and enhance your media room experience. Integrate lighting control, temperature control, and audiovisual equipment into a centralized control system for easy operation.
9. Concealed Wiring: Plan for concealed wiring to maintain a clean and streamlined appearance. Run cables within walls or use cable raceways to ensure cables are hidden and prevent clutter in the room.
10. Décor and Aesthetics: Choose a theme or design that enhances the cinematic feel of your media room. Consider acoustic-friendly wall coverings, theater-themed decorations, and comfortable carpeting or rugs to create a visually appealing and inviting space.
Building a dedicated media room allows you to create the ultimate home theater experience tailored to your preferences. Careful planning, attention to detail, and investment in quality audio and video equipment will ensure countless hours of enjoyment and an immersive cinematic escape right in the comfort of your own home.