
Tools Needed for Splicing Wires
Splicing wires for speakers and home theater systems requires a few essential tools to ensure a clean and secure connection. Before you begin, gather the following tools:
- Wire Strippers: These specialized tools are designed to remove the insulation from the wires without damaging the conductors. Choose wire strippers that are compatible with the gauge of the wires you are working with.
- Wire Cutters: Used to trim and cut the wires to the desired length. It’s important to have sharp wire cutters to achieve clean and precise cuts.
- Needle-Nose Pliers: These long, thin pliers with pointed tips are handy for twisting wires together and holding them securely during the splicing process.
- Wire Connectors: Also known as wire nuts or terminal blocks, these small plastic caps are used to join two or more wires together. Ensure you have connectors that are suitable for the gauge of the wires you are working with.
- Electrical Tape: Used to provide additional insulation and protection to the spliced wires. Make sure to use high-quality electrical tape for a durable and long-lasting connection.
- Wire Strain Relief: This flexible plastic or rubber component is used to relieve strain on the wires, preventing them from being pulled out of the splice. It is particularly important for speaker wires that may experience tension due to frequent movement.
- Multimeter: While not necessary for the actual splicing process, a multimeter is a handy tool for testing the continuity and polarity of the spliced wires to ensure proper functionality.
Having these tools readily available will make the process of splicing wires for your speakers and home theater systems much easier and more efficient. With the right tools in hand, you can proceed to the next step of the splicing process.
Step-by-Step Guide to Splicing Wires for Speakers and Home Theater Systems
Splicing wires for speakers and home theater systems may seem daunting, but with the right approach and a little bit of patience, you can achieve a clean and secure connection. Follow the step-by-step guide below:
- Prepare the wires: Start by cutting the wires to the desired length using wire cutters. Use wire strippers to strip off approximately 1/2 inch of insulation from the ends of each wire.
- Twist the wires: Take the stripped ends of the wires and twist them together tightly. This will ensure a solid electrical connection. If the wires are too thin to twist by hand, use needle-nose pliers to hold the wires and twist them together.
- Apply wire connectors: Choose a wire connector that is appropriate for the gauge of the wires you are working with. Insert the twisted wires into the connector and twist the connector clockwise until it is securely fastened. Avoid over-tightening, as this can damage the wires.
- Insulate the connection: Once the wires are securely connected, use electrical tape to wrap around the base of the wire connector. This will provide additional insulation and protect the connection from moisture and other environmental factors.
- Secure the splice: If the spliced wires will be subject to movement or tension, use a wire strain relief component to ensure that the wires do not get pulled out of the splice. Slip the strain relief over the wires and secure it in place.
- Test the connection: It is crucial to test the spliced connection to ensure proper functionality. Use a multimeter to check for continuity and verify that the polarity is correct. This will help identify any potential issues and allow you to make necessary adjustments if needed.
By following these steps, you can successfully splice wires for your speakers and home theater systems. Remember to take your time, double-check your connections, and prioritize safety during the entire process. With a little practice, you’ll become proficient in splicing wires and achieve professional-quality results for your audio setup.
Safety Precautions to Consider Before Splicing Wires
When working with electrical systems and splicing wires for speakers and home theater systems, it is crucial to prioritize safety. Taking the necessary precautions will help protect yourself and ensure a successful and risk-free project. Before you begin splicing wires, consider the following safety measures:
- Turn off the power: Before starting any work, always ensure that the power is turned off at the source. This will help prevent electrical shocks or short circuits. If you are unsure which circuit controls the area where you’ll be working, turn off the main power supply.
- Use proper insulation: When stripping wires and making connections, ensure that the bare conductors are properly insulated. Use wire connectors and electrical tape to provide an additional layer of protection and prevent any accidental contact with live wires.
- Wear safety gear: Protect yourself by wearing appropriate safety gear, such as safety glasses, gloves, and closed-toe shoes. These will safeguard you against any potential hazards or injuries during the splicing process.
- Avoid water and moisture: Perform the splicing process in a dry and clean environment. Keep all tools and surfaces dry to minimize the risk of electrical shocks. Avoid working on splices exposed to high levels of moisture or in wet areas.
- Inspect the wires: Before splicing, thoroughly inspect the wires for any signs of damage, such as frayed or exposed wires. Do not proceed if you notice any issues, as it may compromise the safety and functionality of the connection. Replace damaged wires before continuing.
- Take breaks when needed: Splicing wires can be a time-consuming process. It’s essential to take regular breaks to prevent fatigue, which can lead to mistakes and accidents. Resting allows you to maintain focus and ensure safety throughout the entire project.
By following these safety precautions, you can minimize the risk of accidents and create a safe working environment when splicing wires for speakers and home theater systems. Remember to always prioritize safety and consult a professional if you encounter any uncertainties or challenges along the way.
Understanding the Different Types of Wire Splices
When it comes to splicing wires for speakers and home theater systems, there are different types of wire splices to choose from, each with its own advantages and recommended applications. Understanding these types will help you make informed decisions and ensure the best possible connection for your wiring needs. Here are some common wire splice types:
- Twist and Tape Splice: This is the simplest type of splice, where the stripped ends of the wires are twisted together and covered with electrical tape. This method is quick and easy but may not provide the most secure and long-lasting connection.
- Wire Nut Splice: Wire nuts, also known as wire connectors, are widely used for splicing wires. They consist of a plastic cap with internal threads that twist onto the twisted wires, creating a secure connection. Wire nuts are available in different sizes, accommodating different wire gauge sizes.
- Soldered Splice: Soldering involves melting a metal alloy onto the joined wires to create a permanent connection. This method provides excellent conductivity and strength but requires skill and appropriate tools for proper soldering. It is commonly used in low-voltage applications.
- Crimp Connector Splice: Crimp connectors are metal cylinders that are crimped onto the wires to create a solid and reliable connection. They are often used in automotive and electrical installations, offering good conductivity and resistance to vibration.
- Heat Shrink Splice: Heat shrink splices involve using heat to shrink a protective tubing over the joined wires. This creates a waterproof and insulated connection, ensuring durability and protection against environmental factors.
Choosing the right type of wire splice depends on factors such as the type of wires, the application, and personal preference. For simple speaker and home theater system installations, wire nut or twist and tape splices can often be sufficient. However, for more complex systems or installations where extra durability is needed, soldered, crimp connector, or heat shrink splices may be preferred.
It’s important to follow manufacturer guidelines and instructions when using specific wire splice types and to ensure that the connectors or tools you use are compatible with the wire gauge you are working with. By understanding these different types of wire splices, you can select the most suitable method for your specific splicing needs.
How to Strip the Insulation from Wires
Before splicing wires for speakers and home theater systems, it is essential to strip off the insulation from the wire ends. Stripping the insulation exposes the conductors, allowing for a proper electrical connection. Follow these steps to strip the insulation from wires:
- Choose the right tools: To strip the insulation, you will need a pair of wire strippers designed for the gauge of the wires you are working with. Ensure that the wire strippers have the appropriate size markings or adjustability to match the wire size.
- Measure the length: Determine how much insulation you need to remove from the wire. Measure and mark the desired length, typically around 1/2 inch, on the wire using a ruler or the wire stripper itself.
- Position the wire stripper: Hold the wire securely with one hand and position the wire stripper over the marked area. Make sure the cutting blades are facing towards the end of the wire that you want to strip.
- Apply pressure and rotate: Squeeze the handles of the wire stripper firmly to apply pressure on the wire. Rotate the wire stripper around the wire a few times to score the insulation.
- Remove the insulation: After scoring the insulation, gently pull the wire stripper away from the wire while maintaining slight pressure. This should remove a section of insulation, exposing the underlying conductors.
- Inspect the strip: Once the insulation is removed, visually inspect the wire to ensure that the conductors are intact and undamaged. Trim any leftover insulation or frayed wires with wire cutters for a clean and smooth end.
It’s important to practice caution and be precise when stripping the insulation. Avoid applying excessive pressure that could damage the wires or cut into the conductors. Always double-check the wire size and adjust the wire stripper accordingly to ensure an accurate and clean strip.
Properly stripped wires will provide a solid foundation for splicing and ensure a secure and reliable connection for your speakers and home theater system. Take your time and pay attention to detail to achieve the best results.
Tips for Properly Twisting Wires Together
When splicing wires for speakers and home theater systems, it is crucial to twist the wires together properly. A secure and tight twist ensures a solid electrical connection and reduces the risk of loose or faulty connections. Here are some tips for properly twisting wires together:
- Align the wires: Before twisting, ensure that the stripped ends of the wires are aligned properly. This means that the conductors are in direct contact with each other.
- Overlap the wires: Create a small overlap between the wires, typically around 1 inch, to increase the contact area between the conductors. This ensures better electrical conductivity.
- Hold the wires firmly: Use needle-nose pliers or your fingers to hold the wires firmly together as you twist them. This prevents the wires from slipping or becoming loose during the twisting process.
- Twist in a clockwise direction: Twist the wires together in a clockwise direction. This ensures a tight and secure connection as most wire connectors are designed to be tightened in a clockwise direction.
- Avoid excessive twisting: Be cautious not to over-twist the wires as it can cause the conductors to break or become damaged. Twist the wires until they are snug and secure, but avoid using excessive force.
- Check for a smooth twist: After twisting the wires, inspect the twist to ensure that it is smooth and even. There should be no gaps or loose sections. If necessary, adjust the twist by holding the wires and re-twisting as needed.
- Trim excess wire: Once the wires are properly twisted together, trim any excess wire or exposed conductors using wire cutters. This will ensure a neat and tidy connection.
Taking the time to properly twist wires together is essential for a reliable and long-lasting splice. A secure twist guarantees good electrical conductivity and minimizes the risk of loose connections or signal loss. Remember to follow these tips and techniques to achieve a professional-quality splice for your speaker and home theater system.
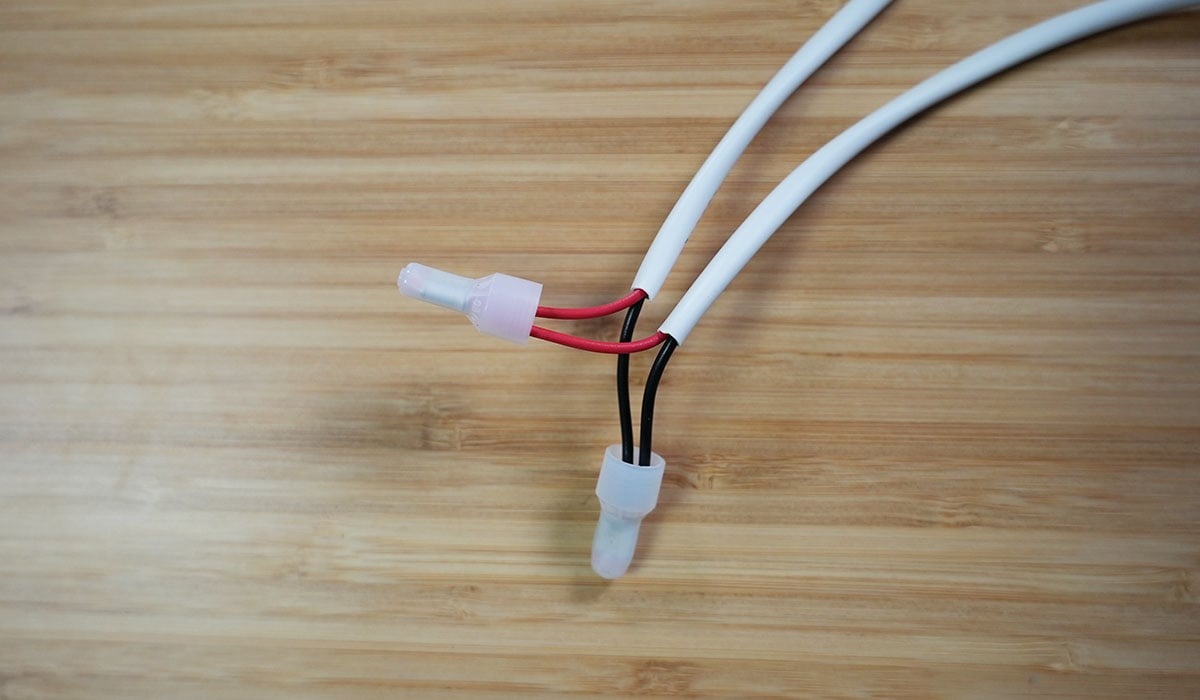
Using Wire Connectors for Splicing Wires
Wire connectors, also known as wire nuts or terminal blocks, are commonly used for splicing wires in speaker and home theater systems. These small plastic caps provide a secure and insulated connection, ensuring reliable electrical conductivity. Here’s how to properly use wire connectors for splicing wires:
- Select the right wire connector: Choose a wire connector that is suitable for the gauge of the wires you are splicing. Wire connectors come in various sizes, color-coded to indicate their compatibility with specific wire sizes. Refer to the packaging or manufacturer specifications for guidance in selecting the appropriate wire connectors.
- Prepare the wires: Strip off the insulation from the ends of the wires, leaving about 1/2 inch of exposed conductor. Ensure that the stripped portion of each wire is clean and free from any frayed or damaged conductors.
- Twist the wires: Align the stripped ends of the wires together, overlapping them slightly. Use your fingers or needle-nose pliers to tightly twist the wires together. The twist should be snug to ensure maximum conductivity.
- Insert the wires into the connector: Hold the twisted wires and insert them into the wire connector until they are fully inserted. Make sure that all the exposed conductors are securely contained within the connector.
- Tighten the wire connector: With one hand holding the connector, use your other hand to twist the connector clockwise. Continue twisting until the connector is securely fastened onto the wires. Avoid over-tightening, as it can damage the wires or the connector itself.
- Inspect the connection: After tightening the wire connector, visually inspect the connection to ensure that all the wires are fully enclosed and there are no exposed conductors. Gently tug on the wires to ensure they are securely held by the connector.
- Cover with electrical tape: For additional insulation and protection, wrap the base of the wire connector with electrical tape. This helps to secure the wires and prevents any accidental contact with the connector or exposed conductors.
Using wire connectors provides a convenient and reliable method for splicing wires in speaker and home theater systems. Proper installation of wire connectors ensures a secure and long-lasting connection, preventing signal loss and potential electrical hazards. By following these steps, you can confidently and effectively use wire connectors for your wire splicing needs.
Properly Securing Spliced Wires
After successfully splicing wires for your speakers and home theater systems, it is essential to properly secure the connection to ensure its longevity and reliability. Properly securing spliced wires not only prevents accidental disconnection but also helps maintain the integrity of the electrical connection. Here are some key steps to follow:
- Check the wire connection: Before securing the spliced wires, double-check the wire connection to ensure that it is properly twisted or connected using wire connectors. Verify that all the conductors are securely in contact and there are no loose or exposed wires.
- Trim excess wire: If there is excess wire left after the splice, use wire cutters to trim it to a manageable length. Leaving excess wire increases the risk of accidental tangling or damage to the connection in the future.
- Use wire strain relief: If the spliced wires are subject to movement or tension, it is important to incorporate a wire strain relief component. This can be in the form of a flexible plastic or rubber component that prevents the wires from being pulled out of the splice. Apply the strain relief over the spliced region and secure it in place.
- Organize the wires: Neatly organize the spliced wires and route them away from potential hazards or sources of interference. Use cable ties or adhesive clips to secure the wires in place and prevent them from becoming tangled or tangled with other cables.
- Protect the connection: To provide additional insulation and protection, wrap the spliced region with electrical tape. Start a few inches before the splice and continue wrapping a few inches beyond the connection. Ensure that the electrical tape completely covers the exposed conductors and overlaps onto the insulation of the wires.
- Perform a tug test: Once the spliced wires are secured and protected, gently tug on the wires to ensure that the connection remains intact. The wires should not easily pull apart or become loose. If there is any movement or signs of weakness, revisit the splice and reinforce it as needed.
By following these steps, you can properly secure your spliced wires and ensure their long-term reliability. Taking the time to perform these additional steps will help maintain a strong and durable electrical connection, giving you peace of mind knowing that your speaker and home theater system wiring is secure.
Testing the Spliced Connection
After splicing wires for your speakers and home theater systems, it is crucial to test the spliced connection to ensure its functionality and reliability. Proper testing helps confirm that the wires are properly connected and that the electrical signal will pass through without any issues. Follow these steps to test the spliced connection:
- Turn off the power: Before testing the spliced connection, make sure that the power to the system is turned off. This prevents any potential electrical shocks or damage to the equipment during the testing process.
- Prepare the testing equipment: Use a multimeter set to the appropriate testing mode, typically the continuity or resistance mode. Ensure that the multimeter is properly calibrated and functioning correctly.
- Connect the testing probes: Touch the multimeter’s testing probes to each end of the spliced wires. The probes should make contact with the exposed conductors or connectors, ensuring a secure connection.
- Check for continuity: In the continuity mode, the multimeter will emit a beep or display a reading close to zero if there is a continuous electrical path between the wires. This indicates that the spliced connection is successful and functional.
- Test for polarity: In some cases, it may be necessary to test the polarity of the spliced wires. This ensures that the positive and negative terminals are correctly aligned. Follow the multimeter’s instructions to test for polarity, if necessary.
- Inspect the readings: After testing, carefully observe the multimeter’s readings. Ensure that the readings match the expected values for a properly connected circuit. Any significant deviations may indicate a problem with the spliced connection.
- Perform additional testing (optional): Depending on the complexity of your setup and personal preferences, you may want to perform additional testing, such as testing for signal quality or signal loss using audio or visual equipment.
By testing the spliced connection, you can verify that the electrical signal can pass through the connection without interruptions or signal loss. This step helps prevent any potential issues with audio quality, distortion, or equipment failure. If any problems arise during the testing process, revisit the spliced connection, ensure correct insulation and connection, and make any necessary adjustments until the desired results are achieved.
Troubleshooting Common Issues with Spliced Wires
While splicing wires for speakers and home theater systems, it is common to encounter issues that may affect the performance and functionality of the connection. However, with proper troubleshooting techniques, you can identify and resolve these issues effectively. Here are some common issues with spliced wires and troubleshooting tips:
- Loose or weak connection: If the spliced wires feel loose or show signs of weakness, the connection may not be secure. Double-check the twist or wire connector and ensure that the wires are firmly twisted or properly connected. Adjust as needed and perform a tug test to verify the strength of the connection.
- Poor or no audio signal: If you experience poor or no audio signal after splicing wires, check the connections and ensure that the wires are properly aligned. Make sure the stripped ends of the wires are tightly twisted or securely connected using wire connectors. Additionally, ensure that the positive and negative terminals are correctly aligned for a proper audio signal.
- Signal interference or noise: If you notice unwanted interference or noise in the audio signal, it may be caused by poor grounding or improper shielding. Check that the spliced wires are properly shielded and that any shielding or grounding wires are correctly connected. Consider using high-quality shielded cables or employing techniques to minimize electromagnetic interference.
- Short circuits or exposed wires: If you detect a short circuit or exposed wires, it is important to address this issue promptly to prevent equipment damage or electrical hazards. Inspect the spliced connection for any exposed conductors or frayed wires. Ensure that the wires are properly insulated using electrical tape or wire connectors. Trim away any excess wire or damaged conductors, and ensure that no bare wires are touching other conductive materials.
- Inconsistent speaker output: If the speaker output is inconsistent or distorted, check the spliced connection and verify that the wires are securely connected to the correct terminals. Ensure that the wires are not crossed or touching each other, causing a short circuit. Test the speakers with other sources to rule out any potential issues with the audio device or amplifier.
By troubleshooting common issues with spliced wires, you can identify and resolve problems that may arise during the installation process. Patience, attention to detail, and thorough inspection can help you pinpoint the source of the issue and take appropriate corrective measures. If troubleshooting does not resolve the problem, it is advisable to consult a professional to ensure proper splicing and optimal performance of your speaker and home theater system.
Frequently Asked Questions about Splicing Wires for Speakers and Home Theater Systems
Here are some frequently asked questions and their answers regarding the process of splicing wires for speakers and home theater systems:
-
Do I need to splice wires for my speakers and home theater system?
Splicing wires is often necessary when setting up speakers and home theater systems. It allows you to connect multiple speakers, subwoofers, or other audio components to the main system or amplifier.
-
What tools do I need to splice wires?
The essential tools for splicing wires include wire strippers, wire cutters, needle-nose pliers, wire connectors, electrical tape, wire strain relief, and a multimeter for testing continuity and polarity.
-
How do I choose the right wire connector size?
Wire connectors are available in different sizes, color-coded to indicate compatibility with specific wire gauges. Refer to the packaging or manufacturer specifications to select the appropriate wire connector size for your wires.
-
Is it necessary to twist the wires before using wire connectors?
While not mandatory, it is recommended to twist the exposed ends of the wires tightly before using wire connectors. This ensures a solid and secure connection.
-
Can I reuse wire connectors?
It is generally not recommended to reuse wire connectors. Over time, the plastic in the connectors can become brittle, compromising the integrity of the connection. It is best to use new connectors for each splice.
-
How do I know if the spliced connection is successful?
Testing the spliced connection with a multimeter in continuity or resistance mode is a reliable way to determine if the connection is successful. The multimeter should indicate continuity or a low resistance reading.
-
What if I encounter a short circuit after splicing the wires?
If you encounter a short circuit after splicing wires, carefully inspect the connection. Look for exposed conductors, crossed wires, or any loose connections. Ensure that all wires are properly insulated using electrical tape or wire connectors.
-
Can I splice different gauge wires together?
It is generally not recommended to splice wires of different gauges together. Different gauge wires have different current-carrying capacities, and mismatched splices can lead to electrical issues or equipment damage. Always use wire connectors and splices that are compatible with the wire gauge you are working with.
These are just a few of the most commonly asked questions regarding splicing wires for speakers and home theater systems. If you have any other specific questions or concerns, it is always recommended to consult the manufacturer’s guidelines or seek advice from a professional to ensure a safe and reliable splice for your audio setup.