
HDMI Connection
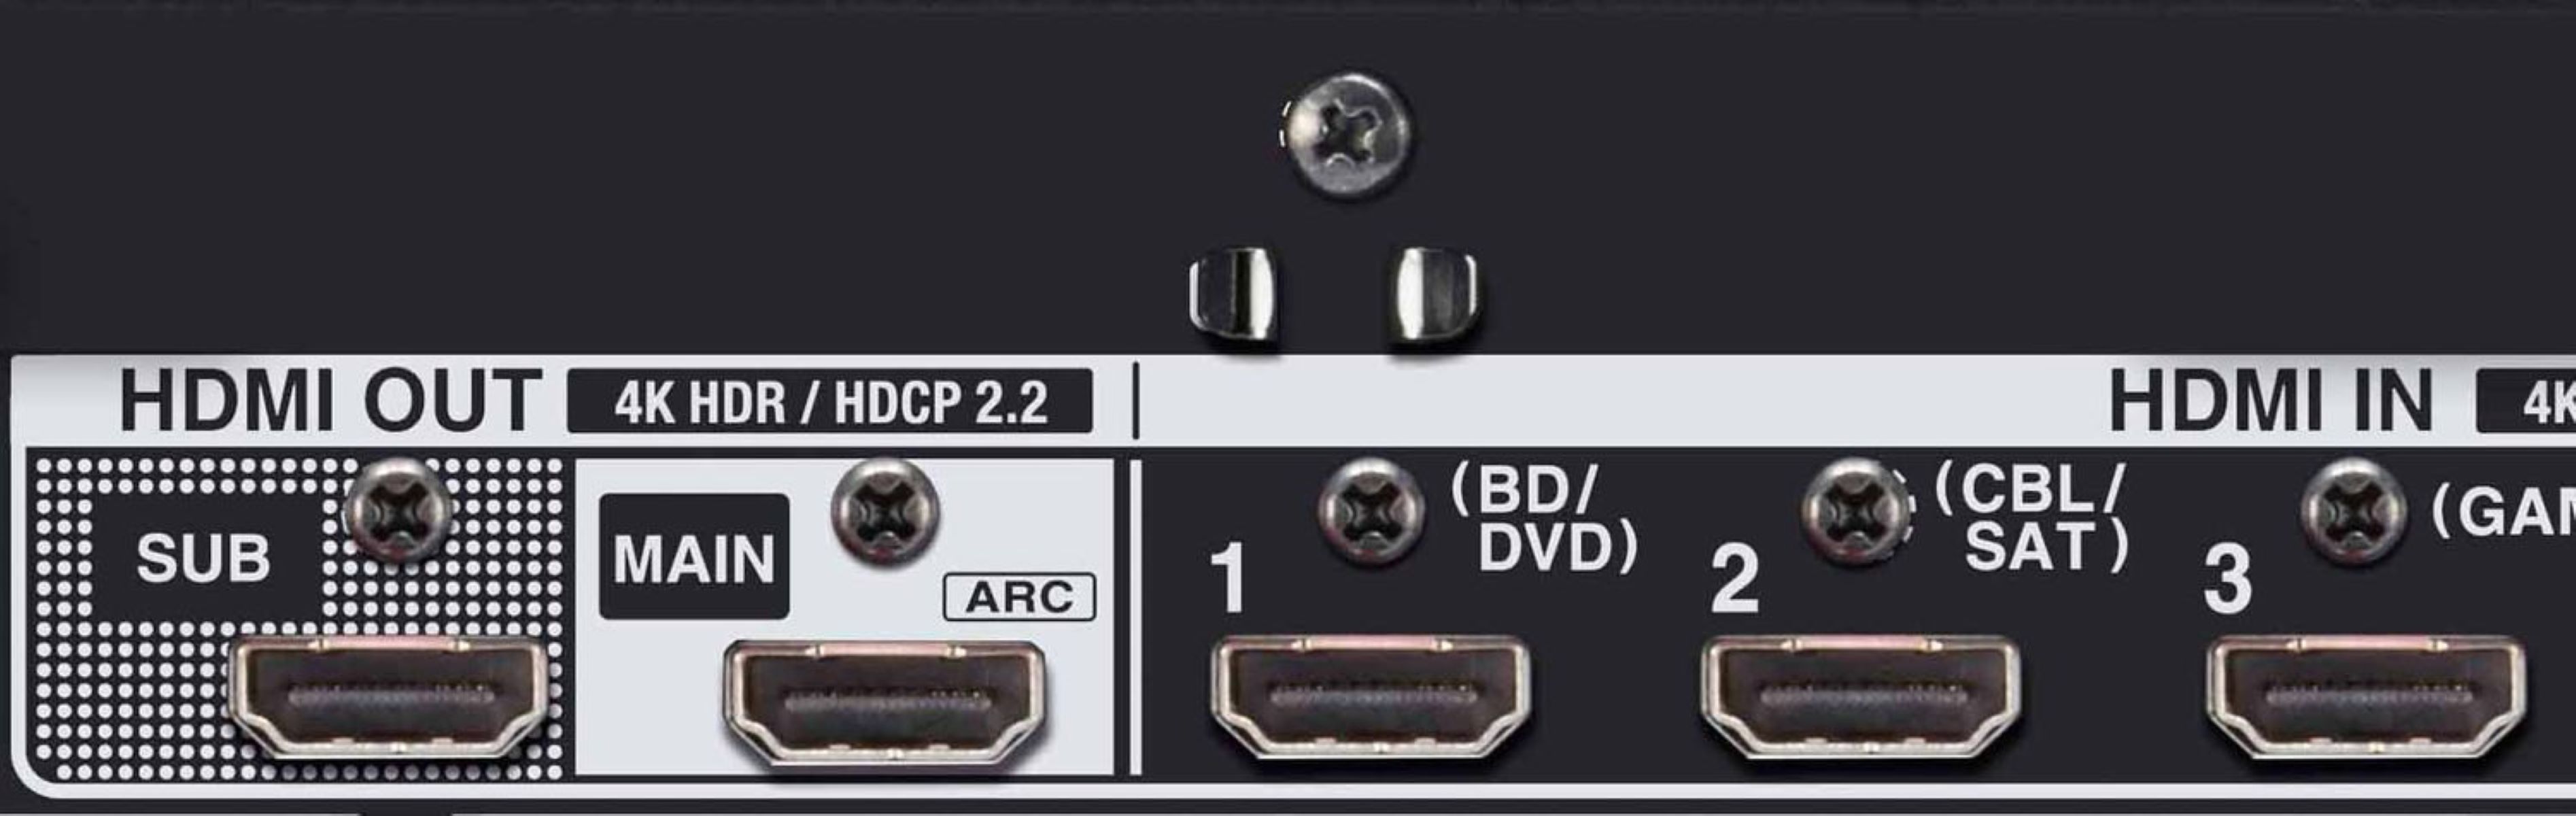
HDMI (High-Definition Multimedia Interface) is the most common and widely used connection for home theater receivers. It allows for both high-definition video and high-quality audio transmission through a single cable. HDMI connections offer a seamless and convenient way to connect your receiver to a variety of devices such as TVs, projectors, Blu-ray players, gaming consoles, and more.
One of the main advantages of HDMI is its ability to support high-resolution video formats, including 4K Ultra HD and HDR (High Dynamic Range), providing you with stunning picture quality. It also supports various audio formats, such as Dolby TrueHD and DTS-HD Master Audio, delivering immersive and cinematic sound to enhance your movie-watching or gaming experience.
To establish an HDMI connection, simply connect one end of the HDMI cable to the HDMI output port on your receiver and the other end to the HDMI input port on your desired device. Make sure to use a high-quality HDMI cable to ensure the best signal transmission and avoid any audio or video quality loss.
In addition to audio and video transmission, HDMI connections also support other features, such as Consumer Electronics Control (CEC) and Audio Return Channel (ARC). CEC allows for synchronized control of multiple devices with a single remote, simplifying the operation of your home theater system. ARC enables audio to be sent back from your TV to the receiver through the same HDMI cable, eliminating the need for a separate audio connection.
It’s worth noting that HDMI versions have evolved over the years, with the latest being HDMI 2.1. This version offers increased bandwidth, allowing for higher frame rates, variable refresh rates, and support for advanced gaming features. If you have a compatible TV and devices, upgrading to HDMI 2.1 can unlock the full potential of your home theater system.
Optical and Coaxial Digital Audio Connections
In addition to HDMI, home theater receivers also offer optical and coaxial digital audio connections to connect various audio sources. These connections allow for the transmission of digital audio signals, providing a high-quality audio experience.
The optical digital audio connection, commonly known as TOSLINK or SPDIF, uses a fiber optic cable to transmit light signals. It supports uncompressed stereo and compressed surround sound formats, such as Dolby Digital and DTS. To establish an optical connection, simply connect one end of the optical cable to the optical output port on your source device and the other end to the optical input port on the receiver. Ensure that the cables are securely plugged in to avoid any audio interruptions or loss of signal.
Coaxial digital audio connections, on the other hand, use a coaxial cable to transmit audio signals. They also support uncompressed stereo and compressed surround sound formats. To connect via coaxial, use a coaxial cable to connect the coaxial output port on your source device to the coaxial input port on the receiver.
The choice between optical and coaxial connections depends on the available ports on your devices and personal preference. Both types of connections are capable of delivering high-quality audio, so it’s important to use cables of good quality to ensure optimal performance.
It’s worth mentioning that optical and coaxial connections do not support video transmission. If you need to transmit both audio and video signals, HDMI is the preferred connection. However, if you have an older device that only supports analog audio connections, optical or coaxial audio connections can be a viable option for upgrading your audio system without the need for HDMI compatibility.
When using optical or coaxial connections, keep in mind that some audio formats, such as Dolby TrueHD and DTS-HD Master Audio, require HDMI connections to be fully supported. In these cases, you may need to use HDMI for the audio transmission to ensure you get the best audio quality available.
Analog Audio Connections
While digital audio connections like HDMI, optical, and coaxial offer superior audio quality, analog audio connections still have their place in home theater setups. Analog connections are typically used for older devices or when you want to connect specific audio components that only have analog outputs.
The most common analog audio connection is the RCA (Radio Corporation of America) connection, which uses red and white cables. These cables carry stereo audio signals and can be connected to the corresponding RCA input or output ports on your home theater receiver and audio source.
Another type of analog audio connection is the 3.5mm headphone jack, commonly found on mobile devices, laptops, and some audio equipment. To connect a device with a 3.5mm headphone jack to your home theater system, you’ll need a cable with a 3.5mm stereo connector on one end and RCA connectors on the other end.
Some higher-end receivers also feature XLR (Cannon X Series Connector) connections, which are commonly used in professional audio setups. XLR cables are typically used for balanced audio transmission and provide better noise rejection and signal integrity over longer cable runs.
When using analog audio connections, it’s important to consider the limitations they have compared to digital connections. Analog connections can be more susceptible to interference and signal degradation, which can result in lower audio quality. Additionally, analog connections do not support advanced audio formats, such as Dolby TrueHD or DTS-HD Master Audio, which are only available through digital connections.
However, analog connections still have their advantages. They can be useful for connecting vintage audio equipment or for extending audio signals over longer distances using specialized audio extenders. Analog connections also allow for easy integration of external audio sources, such as turntables or cassette players, which often have analog outputs.
Overall, while digital audio connections are the preferred choice for optimal audio quality and compatibility, analog audio connections can still be a valuable option when using older devices or specific audio components that rely on analog connectivity.
Video Connections
When setting up a home theater system, video connections are just as important as audio connections. They allow you to enjoy high-quality visuals on your TV or projector and ensure that your video sources seamlessly integrate with your home theater receiver.
The most common video connection used in home theater setups is HDMI (High-Definition Multimedia Interface). HDMI not only carries high-quality audio but also supports high-definition video signals. It is capable of transmitting various video formats, including standard definition, high definition, and even 4K Ultra HD with HDR (High Dynamic Range) for enhanced color and contrast. All you need to do is connect one end of the HDMI cable to the HDMI output port on your video source (such as a Blu-ray player or gaming console) and the other end to the HDMI input port on your receiver or TV.
If you have older video sources or equipment that do not have HDMI output, you can utilize component video connections. Component video cables consist of three separate RCA cables (typically red, green, and blue) for transmitting analog video signals. They are capable of transmitting high-quality analog video up to 1080p resolution. Connect one end of the component video cables to the corresponding component video output ports on your video source and the other end to the component video input ports on your receiver or TV. However, keep in mind that component video connections only carry video signals and do not transmit audio. For audio, you will need to use separate audio connections.
Another option for video connections is composite video. Composite video cables use a single RCA cable (usually yellow) to transmit analog video signals. While composite video is the least desirable option in terms of video quality, it can still be useful for connecting older devices or when other video connection options are limited. Connect one end of the composite video cable to the composite video output port on your video source and the other end to the composite video input port on your receiver or TV. Again, like component video, composite video does not transmit audio.
In recent years, digital video connections such as DisplayPort and DVI (Digital Visual Interface) have become less common in home theater setups due to the prevalence of HDMI. However, if you have a specific device or equipment that uses these connections, you can still connect them to your home theater receiver using the appropriate cables and adapters.
When selecting video connections, it is important to consider the capabilities of your devices and the type of video signals you will be transmitting. HDMI is typically the best choice for its support of high-definition video and audio in a single cable. However, if HDMI is not available, component video or composite video connections can still provide satisfactory video quality for your home theater system.
Speaker Connections
Speaker connections are crucial for creating an immersive and powerful audio experience in your home theater setup. Properly connecting your speakers to your receiver ensures that each speaker delivers the intended sound and contributes to a cohesive audio performance.
The most common speaker connection method is through speaker wire. Speaker wire is typically composed of two conductive strands, often color-coded for convenience. To connect your speakers, start by stripping the ends of the speaker wire to expose the metal strands. Then, match the positive (+) and negative (-) terminals on both the speaker and the receiver, and insert the appropriate wires into each terminal. Ensure a tight and secure connection to avoid any signal interference or loss.
It’s important to note that different speaker wire gauges exist, ranging from thicker to thinner wires. Thicker gauge wires, such as 12 or 14 AWG (American Wire Gauge), are recommended for longer wire runs or higher power output speakers, as they provide better conductivity and minimize signal loss. Thinner gauge wires, such as 16 or 18 AWG, are suitable for shorter wire runs or smaller speakers with lower power requirements. However, the size of the speaker wire gauge also depends on personal preference and the specific needs of your home theater system.
Another type of speaker connection is through binding posts or spring clips on the receiver and speakers. Binding posts provide a secure connection by tightening the caps to clamp down on the speaker wire. Spring clips, on the other hand, use spring-loaded pressure to hold the speaker wire in place. Both types of connections offer a reliable and convenient way to connect your speakers to your receiver.
Some home theater receivers also offer dedicated pre-outs for connecting external amplifiers or subwoofers. These pre-outs ensure better power distribution and allow for additional customization and optimization of the audio performance. To connect external amplifiers or subwoofers, use RCA or XLR cables, depending on the available connections on your receiver and devices.
When connecting your speakers, make sure to follow the correct polarity, matching the positive and negative terminals on the speakers and the receiver. The positive terminal is usually indicated by a “+” symbol or a red color, while the negative terminal is indicated by a “-” symbol or a black color. Incorrectly connecting the speakers can result in phase cancellation and degraded audio quality.
It’s also essential to consider the placement and positioning of your speakers for optimal sound distribution. Experiment with speaker placement, taking into account the size and acoustic properties of your room, to achieve the best audio performance and immersive surround sound experience.
By properly connecting and positioning your speakers, you can enjoy the full potential of your home theater system, immersing yourself in rich, detailed sound that enhances your movie-watching or music-listening experiences.
Subwoofer Connection
A subwoofer is a specialized speaker designed to reproduce low-frequency sounds, adding depth and impact to your home theater audio. To fully enjoy the powerful and rumbling bass that a subwoofer provides, it is essential to properly connect it to your home theater receiver.
The most common method of connecting a subwoofer is through a dedicated subwoofer output on your receiver. This output is usually labeled as “Subwoofer Out” or “LFE” (Low-Frequency Effects). It is a mono (single-channel) output specifically designed to send low-frequency audio signals to your subwoofer.
To connect your subwoofer, you will need an RCA cable with a single male connector on each end. Simply plug one end of the RCA cable into the subwoofer output on your receiver and the other end into the corresponding input on your subwoofer. Make sure the connections are snug and secure to prevent any signal loss or interference.
Sometimes, you may come across subwoofers that offer both RCA and speaker-level connections. Speaker-level connections use speaker wire to connect the subwoofer to your receiver or amplifier’s speaker outputs. This method is useful when your receiver does not have a dedicated subwoofer output. To connect via speaker-level, use speaker wire to connect the speaker-level input terminals on the subwoofer to the corresponding speaker outputs on your receiver or amplifier.
Additionally, some subwoofers have built-in amplifiers, known as powered or active subwoofers. They have their power source and volume controls. Active subwoofers require a power connection to operate, usually through a standard AC power outlet. Be sure to locate an available power outlet near your subwoofer to provide the necessary power supply.
Once your subwoofer is connected, it’s crucial to calibrate its settings to achieve the optimal bass performance. Every subwoofer is different, so consult the user manual for specific instructions on adjusting the crossover frequency, phase, and volume controls. The crossover frequency determines how high or low the subwoofer reproduces sound, while the phase control aligns the subwoofer’s sound with the other speakers in your system. The volume control allows you to adjust the subwoofer’s output level to achieve a balanced and cohesive audio experience.
Properly integrating a subwoofer into your home theater system can greatly enhance the overall audio experience, immersing you in a more dynamic and immersive soundstage. Take the time to set up and fine-tune your subwoofer to achieve the optimal bass performance that complements and enhances the audio from your other speakers.
Network and Wireless Connections
In the era of smart devices and streaming services, network and wireless connections have become integral to modern home theater setups. These connections allow you to access online content, stream music and movies, and take advantage of various smart features offered by your home theater receiver.
One of the key network connections available on home theater receivers is Ethernet. Ethernet connections provide a reliable and stable network connection, ensuring smooth streaming and online access. Simply connect one end of an Ethernet cable to the Ethernet port on your receiver and the other end to your network router or modem. This connection allows your receiver to access the internet and avail streaming services, firmware updates, and networked media playback.
For added convenience and flexibility, many home theater receivers now offer wireless connectivity options. Wi-Fi enables you to connect your receiver to your home network without the need for physical Ethernet cables. This allows you to stream content seamlessly and access online services without the limitations of wired connections. To set up wireless connectivity, access the receiver’s settings and follow the prompts to connect to your Wi-Fi network.
With a network or wireless connection, you can take advantage of streaming services like Netflix, Amazon Prime Video, Spotify, and more. These services provide access to a vast library of movies, TV shows, and music that can be enjoyed directly from your home theater receiver. Additionally, network connections enable firmware updates for your receiver, ensuring that you have the latest features and improvements.
Some receivers also support multi-room audio capabilities, allowing you to wirelessly stream audio to different rooms or zones in your home. This feature lets you enjoy synchronized music playback throughout your house or individualized audio in specific areas.
Bluetooth is another wireless connection option found in many home theater receivers. Bluetooth enables you to wirelessly connect your smartphones, tablets, and other compatible devices directly to your receiver. This allows for convenient streaming of music or audio content from your personal devices, giving you greater control and flexibility over your audio sources.
When setting up network and wireless connections, make sure that your home network has a strong and stable internet connection to ensure smooth streaming performance. If you experience any connectivity issues, rebooting your network router or updating your receiver’s firmware can often resolve the problem. Additionally, consider the placement of your receiver to ensure optimal wireless signal strength, avoiding any physical obstacles or areas with interference.
Network and wireless connections open up a world of possibilities for your home theater system, allowing you to access a wide range of content and enjoy a seamless and connected audiovisual experience.
USB and Bluetooth Connections
USB and Bluetooth connections are popular options for connecting external devices to your home theater receiver, providing versatility and convenience for accessing and playing digital media.
A USB connection allows you to connect a USB storage device, such as a flash drive or an external hard drive, directly to your home theater receiver. This connection enables you to play a variety of digital media files, including music, photos, and videos, directly from the USB device. Simply plug the USB device into the USB port on your receiver, and use the receiver’s interface or remote control to navigate and select the desired content. USB connections provide a straightforward and reliable way to access and enjoy your personal media library without the need for additional devices or network connectivity.
Bluetooth connections offer the convenience of wirelessly streaming audio from your compatible devices, such as smartphones, tablets, or computers, to your home theater receiver. By pairing your Bluetooth-enabled device with the receiver, you can stream music, podcasts, or other audio content directly to your home theater speakers. Bluetooth connections are versatile and allow you to enjoy personalized audio content without the constraints of wires or physical connections.
When using USB or Bluetooth connections, it’s important to consider the capabilities and limitations of your devices and the audio quality they offer. USB connections provide a direct and stable connection, ensuring high-quality audio playback from digital files. USB connections also allow for more extensive file format compatibility, supporting a wide range of audio, photo, and video formats.
Bluetooth connections, on the other hand, rely on wireless transmission and may be subject to interference or limited range. The audio quality on Bluetooth connections can vary depending on the audio codec supported by your devices, with newer Bluetooth versions typically offering better audio fidelity. It’s recommended to use Bluetooth connections for casual listening or background music rather than critical listening scenarios where maximum audio quality is desired.
Some home theater receivers also offer advanced features like Bluetooth input/output, allowing you to connect Bluetooth headphones or speakers directly to the receiver. This feature provides a wireless audio connection for private listening or expanding the audio coverage to other areas in your home.
When using USB or Bluetooth connections, it’s important to keep your devices updated with the latest firmware or software versions to ensure compatibility and optimal performance. Additionally, to maintain the integrity of the audio signal, use high-quality USB cables and position your Bluetooth devices within a reasonable range from the receiver for a stable connection.
USB and Bluetooth connections enhance the flexibility and accessibility of your home theater system, allowing you to enjoy media from a variety of sources and devices with ease and convenience.
Multi-zone and Multi-room Connections
With the rise in popularity of multi-room audio systems, home theater receivers now offer multi-zone capabilities, allowing you to distribute audio to different parts of your home. Multi-zone connections provide the flexibility to enjoy music or other audio content in multiple rooms simultaneously or independently.
In a multi-zone setup, your home theater receiver acts as the central hub for controlling and distributing audio to different zones or rooms in your home. Each zone typically corresponds to a different area, such as the living room, bedroom, or patio, where you want to have separate audio playback.
The simplest way to enable multi-zone capabilities is by connecting additional speakers to your receiver. Depending on the receiver, you may have dedicated speaker connections for each zone, allowing you to connect speakers directly or via speaker selectors. Speaker selectors enable you to switch between different zones and control the volume for each separately.
Another option for multi-zone connections is using a separate amplifier or receiver for each zone. By connecting a dedicated amplifier or receiver to the pre-outs or zone outputs of your main receiver, you can independently control the audio in each zone. This setup provides greater flexibility and allows for different audio sources or settings in each individual area.
Some advanced home theater receivers offer built-in multi-zone features, allowing you to distribute audio to different zones using only the receiver. These receivers often have dedicated pre-outs or zone outputs for connecting external amplifiers or powered speakers to each zone.
In addition to traditional wired connections for each zone, some receivers also support wireless multi-room audio solutions. This means you can wirelessly stream audio to different areas using your home network or dedicated wireless protocols, such as Wi-Fi or Bluetooth. Wireless multi-room audio systems offer greater convenience and allow for easy expansion of your audio setup.
Modern multi-zone capable receivers often come with dedicated apps or interfaces that allow you to control and manage each zone conveniently. These apps provide seamless control over source selection, volume adjustment, and even independent playback for each zone, all from your smartphone or tablet.
It’s important to note that multi-zone setups may have limitations depending on the receiver and the number of zones you want to incorporate. Some receivers may limit the number of zones that can be active simultaneously or may require additional equipment for more extensive multi-room deployments.
Multi-zone and multi-room connections offer the flexibility to customize your audio experience throughout your home, providing the ability to enjoy music or other audio content in different areas simultaneously or independently.
Calibration and Setup
Proper calibration and setup of your home theater receiver is crucial to ensure optimal audio performance and an immersive viewing experience. Taking the time to calibrate your system can make a significant difference in audio clarity, balance, and overall enjoyment. Here are some important steps to follow during the calibration and setup process:
1. Speaker Placement: Start by placing your speakers in the appropriate positions within your room. Follow the guidelines provided by the manufacturer for the optimal placement of your front, center, surround, and height speakers. Proper speaker placement ensures accurate sound staging and imaging.
2. Room Acoustics: Consider the acoustics of your room and make necessary adjustments. Acoustic treatments like absorptive panels, diffusers, or bass traps can help mitigate unwanted reflections, echoes, and resonances, improving overall sound quality.
3. Connection Check: Double-check all your audio and video connections to ensure they are securely and correctly plugged in. Loose or improper connections can result in signal loss or distorted audio.
4. Speaker Level Adjustment: Use the built-in speaker level adjustment feature in your receiver to balance the output of each speaker. This ensures that all speakers produce audio at the same volume level, providing a more cohesive and harmonious soundstage.
5. Crossover Settings: Adjust the crossover settings on your receiver to determine the frequency at which low-frequency sounds are redirected to the subwoofer. This helps avoid overlap with your main speakers and ensures a smoother transition between frequencies.
6. Equalization: Many receivers offer built-in equalization features, such as room correction systems or graphic equalizers. Utilize these features to fine-tune the frequency response and compensate for any acoustic anomalies in your room.
7. Test Tones and Calibration Microphones: Some receivers come with a calibration microphone and automated setup systems. Follow the instructions provided with your receiver to run test tones and allow the receiver to adjust the audio settings automatically based on the measurements from the microphone. This ensures accurate speaker distances, levels, and EQ settings.
8. Firmware Updates: Regularly check for firmware updates for your receiver. Manufacturers often release firmware updates to address any performance issues, add new features, or improve compatibility with new audio and video formats.
9. Input and Output Settings: Configure the input and output settings on your receiver to match the capabilities of your connected devices. Set the appropriate video and audio resolution, format, and output settings for optimal performance and compatibility.
10. User Manual and Settings Exploration: Familiarize yourself with your receiver’s user manual and explore its settings. Understanding the features and capabilities of your receiver will allow you to maximize its performance and customize it to your preferences.
By following these calibration and setup steps, you can ensure that your home theater receiver is optimized to deliver the best possible audio and video experience. Regularly revisit and fine-tune the settings as needed to adapt to changes in your room, system components, or personal preferences.