
Reasons to Pin a Program or Website to the Taskbar
Pinning a program or website to the Windows taskbar can provide numerous benefits and improve your productivity and convenience. Here are some compelling reasons why you should consider pinning your favorite programs or frequently visited websites to the taskbar:
- Quick access: By pinning a program or website to the taskbar, you can easily launch it with just a single click. This eliminates the need to search through menus or shortcuts on your desktop, saving you valuable time.
- Efficient multitasking: The taskbar allows you to switch between different programs and websites efficiently. With a simple click, you can jump between your email client, web browser, and any other essential applications you regularly use.
- Customization: Pinning programs and websites to the taskbar allows you to personalize your desktop and create a customized workflow. You have the flexibility to rearrange the pinned items according to your preference, making it more intuitive and tailored to your specific needs.
- Visual reminders: Pinning important programs, such as productivity tools or project management software, to the taskbar serves as a visual reminder of tasks that need your attention. This can help you stay organized and focused on your work without getting lost in a sea of open windows.
- Streamlined navigation: Pinning frequently visited websites to the taskbar provides convenient shortcuts to access your favorite online destinations. Whether it’s your go-to news site, social media platform, or online shopping website, you can launch them directly from the taskbar, saving you the hassle of opening your web browser first.
- Reduced clutter: By pinning programs or websites to the taskbar, you can declutter your desktop and avoid filling it with numerous shortcuts. This cleaner aesthetic can help improve your focus and create a more organized workspace.
- Consistency across devices: If you use multiple devices running Windows, pinning programs or websites to the taskbar provides consistency in accessing your favorite tools or online resources. You can have the same shortcuts readily available, regardless of whether you’re working on your desktop, laptop, or tablet.
Overall, pinning programs or websites to the Windows taskbar offers convenience, efficiency, and personalization to enhance your computing experience. Now that you understand the benefits, let’s explore how to pin your desired programs or websites to the taskbar.
How to Pin a Program to the Taskbar
Pinning a program to the Windows taskbar is a straightforward process that allows you to easily access your favorite applications. Here is a step-by-step guide on how to pin a program to the taskbar:
- Locate the program you want to pin. This can be done by searching for it in the Start menu or navigating to its location on your computer.
- Right-click on the program’s executable file or shortcut.
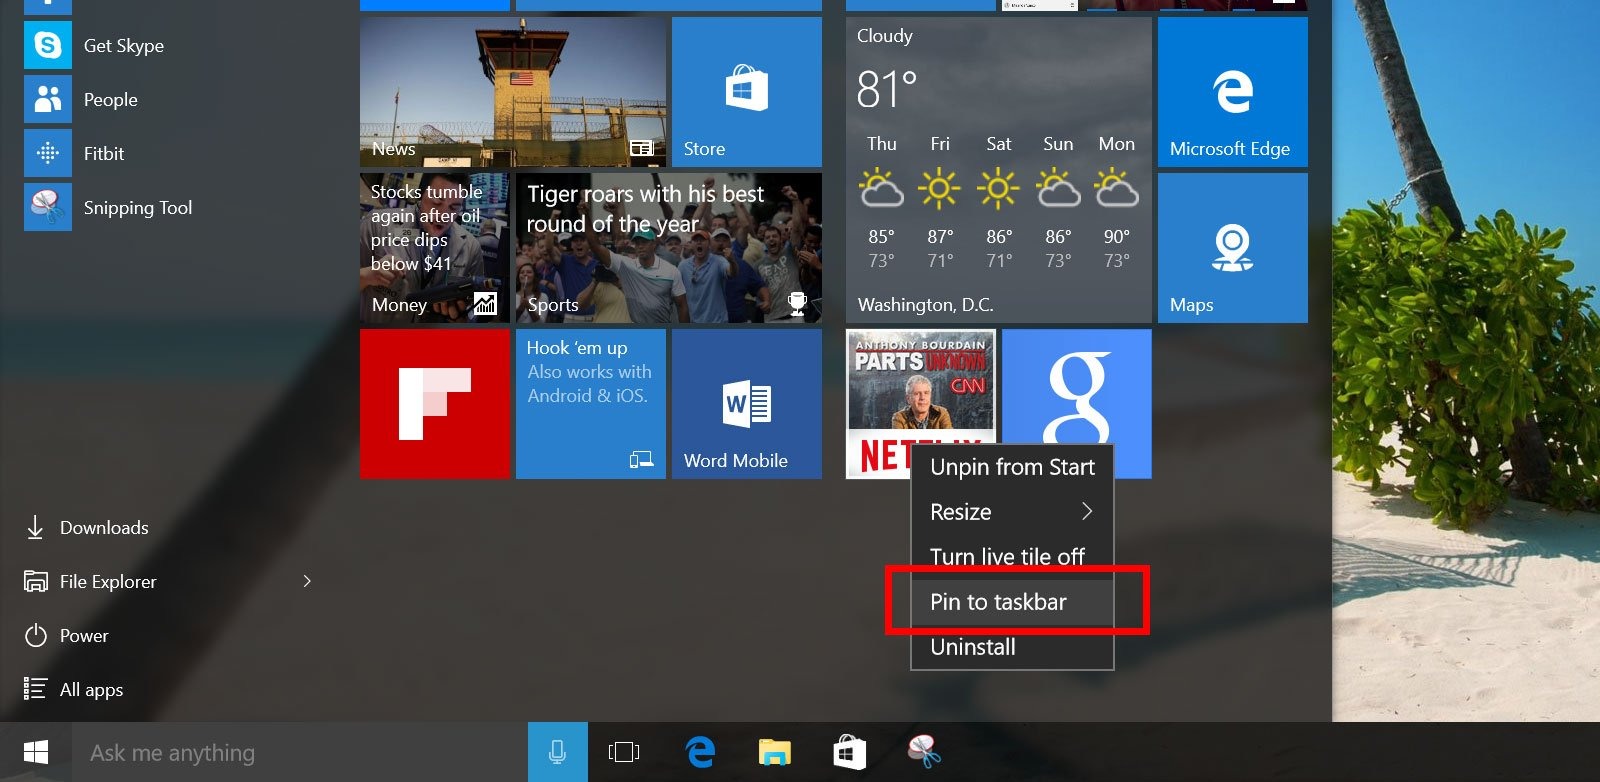
- From the context menu, select “Pin to Taskbar.” The program’s icon will now appear on the taskbar.
- Alternatively, you can also pin a program to the taskbar by dragging and dropping its executable file or shortcut directly onto the taskbar.
Once pinned, the program’s icon will remain on the taskbar, providing quick access whenever you need it. You can launch the program by simply clicking on its icon on the taskbar.
If you want to ensure that the program remains on the taskbar even when it’s closed, right-click on its icon and select “Pin this program to the taskbar” from the context menu. This will make sure the program’s icon is always visible for immediate access.
Now that you know how to pin a program to the taskbar, let’s move on to pinning websites for quick and convenient access.
Step-by-Step Guide: Pinning a Program to the Taskbar
Pinning a program to the Windows taskbar is a simple process that allows you to have quick access to your frequently used applications. Follow these steps to pin a program to the taskbar:
- Open the Start menu by clicking on the Windows icon in the bottom left corner of your screen.
- Search for the program you want to pin by typing its name in the search bar. Alternatively, you can find the program by browsing through the list of installed applications.
- Once you have located the program, right-click on its icon. A context menu will appear.
- From the context menu, select “Pin to Taskbar.” The program’s icon will now be pinned to the taskbar.
- You can also pin a program to the taskbar by dragging its icon from the Start menu or desktop and dropping it onto the taskbar.
- Once the program is pinned, you can rearrange its position on the taskbar by clicking and dragging it to your desired location.
- To ensure that the program remains on the taskbar even after it’s closed, right-click on its icon and select “Pin this program to the taskbar” from the context menu.
Now, whenever you want to launch the program, you can simply click on its icon on the taskbar. This allows for easy and convenient access to your favorite applications without the need to search through menus or desktop shortcuts.
By pinning programs to the taskbar, you can streamline your workflow and optimize your productivity. It’s a handy feature that ensures your most frequently used programs are readily available with just a single click.
Next, we will explore how to pin websites to the taskbar for instant access to your favorite web destinations.
How to Pin a Website to the Taskbar
Pin your favorite websites to the Windows taskbar for quick and easy access. Follow this step-by-step guide to pin a website to the taskbar:
- Open your preferred web browser (e.g., Google Chrome, Mozilla Firefox, Microsoft Edge).
- Navigate to the website you want to pin by typing the website’s URL into the address bar or searching for it using a search engine.
- Once you’re on the desired website, click on the three-dot menu icon in the top-right corner of your browser window. This will open a dropdown menu.
- From the dropdown menu, locate and select the “More Tools” or “More Options” option. This will expand the menu further.
- In the expanded menu, look for the “Create Shortcut” or “Pin to taskbar” option and click on it.
- A pop-up window will appear, asking you to confirm the action. Click on “Add” or “Yes” to proceed.
- The website’s icon will then be pinned to the taskbar, alongside your other pinned programs.
- To access the website, simply click on its icon on the taskbar, and your default web browser will open with the website loaded.
By pinning websites to the taskbar, you can conveniently open your favorite online destinations with just a single click. This eliminates the need to open your web browser first and then manually enter the website’s URL.
It’s worth noting that when you pin a website to the taskbar, it acts as a shortcut. This means that upon clicking the website’s icon, a new instance of your web browser will open with the chosen website loaded, allowing you to have multiple instances of the same browser with different websites open simultaneously.
Now that you know how to pin websites to the taskbar, you can easily access your frequently visited web destinations without going through multiple steps or searching for them in your browser’s bookmarks.
In the next section, we will discuss how to customize and organize your pinned programs and websites on the taskbar according to your preference.
Step-by-Step Guide: Pinning a Website to the Taskbar
Pin your favorite websites to the Windows taskbar for easy and direct access. Here’s a step-by-step guide on how to pin a website to the taskbar:
- Open your web browser (such as Google Chrome, Mozilla Firefox, or Microsoft Edge).
- Type the URL of the website you want to pin into the address bar and press Enter.
- Once the website loads, click on the menu icon (usually represented by three dots) in the top-right corner of your browser window.
- From the dropdown menu, find the option labeled “More Tools” or “More Options” and click on it.
- In the expanded menu, look for the “Create Shortcut” or “Pin to Taskbar” option and select it.
- A confirmation dialog box will appear, asking if you want to create a shortcut or pin the website to the taskbar. Click on “Yes” or “Add” to proceed.
- The website’s icon will now be added to the taskbar, alongside your other pinned programs.
- To access the website, simply click on its icon on the taskbar, and your default web browser will open with the website loaded.
That’s it! You have successfully pinned a website to the taskbar. Now you can easily open your favorite website with just a single click, saving you time and effort.
It’s important to note that pinning a website to the taskbar creates a shortcut. This means that when you click on the website’s icon, a new instance of your web browser will open with the selected website loaded.
You can pin multiple websites to the taskbar, allowing you to quickly switch between them as needed. Additionally, you can customize the position of the pinned website icons on the taskbar by clicking and dragging them to your desired location.
By pinning websites to the taskbar, you can streamline your online experience and access your frequently visited websites without having to search through bookmarks or type in URLs.
In the next section, we will explore how you can customize and manage your pinned programs and websites on the taskbar.
Customizing Pinned Programs and Websites on the Taskbar
Once you have pinned programs and websites to the Windows taskbar, you can further customize and organize them according to your preferences. Here are some ways to customize your pinned items on the taskbar:
- Repositioning: To change the order of your pinned programs or websites on the taskbar, simply click and drag the icon to the desired position. This allows you to prioritize the items you use most frequently.
- Grouping: If you have multiple instances of the same program or several related websites pinned to the taskbar, you can group them together for a more organized appearance. Right-click on the taskbar, go to “Taskbar settings,” and enable the “Combine taskbar buttons” option under the “Taskbar” section.
- Unpinning: If you no longer need a program or website pinned to the taskbar, you can easily remove it. Right-click on the icon and select “Unpin from taskbar” from the context menu. This will remove the item from the taskbar while keeping the program or website available in its regular location.
- Jump Lists: Some programs offer jump lists, which provide quick access to recently opened files or specific tasks within the program. Right-clicking on a pinned program icon may reveal a jump list. You can customize the jump list behavior by right-clicking on the taskbar, going to “Taskbar settings,” and adjusting the options under the “Jump list” section.
- Badge Notifications: Certain apps and websites may display badge notifications on their taskbar icons to alert you of new messages, updates, or other relevant information. You can configure these notifications by right-clicking on the taskbar, going to “Taskbar settings,” and adjusting the options under the “Notifications” section.
Customizing your pinned programs and websites on the taskbar provides a personalized and efficient computing experience. It allows you to declutter the taskbar, access your frequently used items quickly, and stay organized with a layout that suits your workflow.
Experiment with different customization options until you find the configuration that works best for you. Remember, you can always adjust and fine-tune the settings to ensure your taskbar reflects your preferences and enhances your productivity.
In the next section, we will discuss how to remove items from the taskbar if you no longer need them pinned.
Removing Pinned Items from the Taskbar
If you have items pinned to the Windows taskbar that you no longer need or want, you can easily remove them. Here’s how to remove pinned items from the taskbar:
- Locate the item that you want to remove from the taskbar. This can be a program or website icon.
- Right-click on the item’s icon. A context menu will appear.
- From the context menu, select the “Unpin from taskbar” option. This will remove the item from the taskbar.
- The item’s icon will disappear from the taskbar, indicating that it has been successfully unpinned.
By removing unnecessary or unused items from the taskbar, you can declutter the interface and maintain a more organized workspace. This can improve your productivity by providing a cleaner and less distracting environment.
If you accidentally remove an item from the taskbar that you wanted to keep pinned, don’t worry. The program or website will still be accessible from its regular location. You can simply open the program through the Start menu, desktop shortcut, or by searching for it in the appropriate folder or application list.
Regularly reviewing and removing pinned items that you no longer require allows you to have a more streamlined and focused taskbar. It ensures that only the most relevant and frequently used items are present, enhancing your efficiency and productivity.
In the next section, we will address some common issues you may encounter while pinning programs or websites to the taskbar and provide troubleshooting tips to resolve them.
Troubleshooting: Common Issues When Pinning Programs or Websites to the Taskbar
While pinning programs or websites to the Windows taskbar is usually a simple and straightforward process, there are some common issues that you may encounter. Here are a few troubleshooting tips to help you overcome these issues:
1. The “Pin to Taskbar” option is not available:
If you right-click on a program or website but don’t see the “Pin to Taskbar” option in the context menu, it could be because the program or website is already pinned or it is not compatible with pinning. To resolve this, first, check if the program or website is already pinned to the taskbar. If it is, you don’t need to pin it again. If it is not pinned, try restarting your computer and then try pinning it again. If the issue persists, you may need to investigate if the program or website supports pinning.
2. Pinned items disappear from the taskbar:
Sometimes, pinned items may unexpectedly disappear from the taskbar. To fix this issue, right-click on an empty space on the taskbar, go to “Taskbar settings,” and under the “Notification area” section, click on “Select which icons appear on the taskbar.” Make sure that the option to display the specific program or website icon is enabled. If it is disabled, turn it on and check if the pinned item reappears.
3. Pinned websites don’t open in the correct browser:
If you have multiple web browsers installed on your computer, the pinned websites may not open in your preferred browser. To resolve this, unpin the website from the taskbar, open the desired browser, navigate to the website, and pin it again as instructed earlier. This should ensure that the website opens in the correct browser.
4. Taskbar freezes or becomes unresponsive:
In some cases, pinning programs or websites to the taskbar may cause the taskbar to become unresponsive or freeze. This can be resolved by restarting the “Windows Explorer” process. Press “Ctrl + Shift + Esc” to open the Task Manager, locate the “Windows Explorer” process under the “Processes” tab, right-click on it, and select “Restart.” This should refresh the taskbar and resolve any freezing or unresponsiveness issues.
These are some of the common issues you may encounter when pinning programs or websites to the taskbar. By following these troubleshooting steps, you can quickly overcome these problems and enjoy the convenience of easily accessible and organized pinned items on your taskbar.
In the next section, we will wrap up our guide with some final tips and reminders for effectively utilizing the taskbar.