
Setting Up Your New Gmail Account
Setting up a new Gmail account is the first step in moving or copying your mail from one Gmail account to another. Follow these simple steps to create your new account:
- Visit the Gmail website and click on the “Create account” button.
- Fill out the required information, such as your name, desired email address, and password.
- Choose a unique and memorable email address that reflects your identity or business.
- Create a strong and secure password that includes a combination of letters, numbers, and special characters.
- Confirm your password and complete the verification process, which may include providing a phone number or alternative email address.
- Once your account is created, you can customize the appearance and settings according to your preferences.
Remember to use a strong password and enable two-factor authentication for added security. This will help protect your new Gmail account from unauthorized access.
After setting up your new account, you’ll be ready to move on to the next steps of granting access to your old Gmail account and importing your mail and contacts.
Granting Access to Your Old Gmail Account
In order to move or copy your mail from your old Gmail account to your new Gmail account, you will need to grant access to your old account. This will allow your new account to access and import your emails and contacts. Here’s how you can grant access:
- Log in to your old Gmail account using your existing credentials.
- Click on the gear icon in the top right corner and select “Settings” from the dropdown menu.
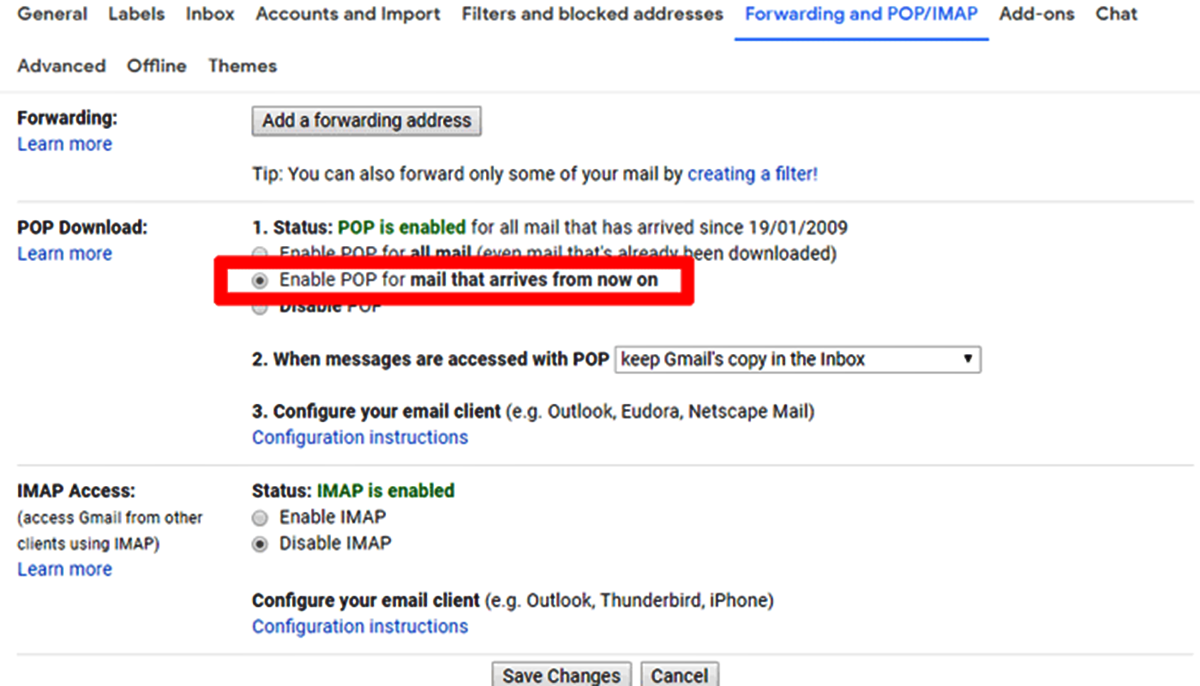
- Go to the “Forwarding and POP/IMAP” tab.
- Under the “POP Download” section, select the option that allows access for all mail or only new mail.
- Save the changes and exit the settings.
- Now, go to your new Gmail account and click on the gear icon.
- Select “Settings” from the menu and go to the “Accounts and Import” tab.
- Under the “Check mail from other accounts” section, click on “Add a mail account”.
- Enter your old Gmail account email address and follow the prompts to grant access.
By following these steps, you are granting permission for your new Gmail account to retrieve emails from your old account. This will make it easier to import your mail and contacts into your new account in the next steps. Keep in mind that granting access does not involve sharing your password or compromising the security of your accounts.
Once access is granted, you’re ready to import your mail and contacts from your old Gmail account to your new account. Read on to find out how to do that in the next section.
Importing Mail and Contacts from Your Old Gmail Account
Now that you have granted access to your old Gmail account, it’s time to import your mail and contacts into your new Gmail account. Follow these steps to seamlessly transfer your data:
- Log in to your new Gmail account using your credentials.
- Click on the gear icon in the top right corner and select “Settings” from the dropdown menu.
- Go to the “Accounts and Import” tab.
- Under the “Import mail and contacts” section, click on “Import mail and contacts”.
- Follow the prompts and enter the email address of your old Gmail account.
- Enter the password for your old Gmail account. Rest assured, this information is securely transferred.
- Select the specific items you want to import, such as mail and contacts.
- Choose the options that suit your needs, like whether to archive or delete the imported mail from your old account.
- Click on “Start import” to initiate the transfer process. Depending on the size of your data, the import may take some time.
During the import process, your new Gmail account will access your old account and retrieve the selected mail and contacts. You can monitor the progress or pause the import if needed. Once the import is complete, you will find your previous emails and contacts in your new account, organized and ready to use.
Note that the imported emails will appear in your inbox with a label indicating their source account. You can also find them in specific folders corresponding to the ones in your old account.
With your mail and contacts imported, you’re now one step closer to having all your information in one place. In the next sections, we’ll cover how to forward new emails to your new Gmail account, transfer your sent emails, and manage labels and filters.
Forwarding New Emails to Your New Gmail Account
Now that you have imported your mail and contacts from your old Gmail account to your new account, you may want to ensure that any new emails received in your old account are automatically forwarded to your new Gmail account. Follow these steps to set up email forwarding:
- Log in to your old Gmail account using your credentials.
- Click on the gear icon in the top right corner and select “Settings” from the dropdown menu.
- Go to the “Forwarding and POP/IMAP” tab.
- Click on the “Add a forwarding address” button under the “Forwarding” section.
- Enter the email address of your new Gmail account and click “Next”.
- Follow the prompts and confirm the forwarding address.
- Choose whether to keep a copy of forwarded emails in your old account or delete them.
- Click on the “Proceed” button to confirm the forwarding settings.
- You may be required to verify your new email address through a confirmation email.
Once email forwarding is set up, any new emails received in your old Gmail account will automatically be forwarded to your new account. This ensures that you don’t miss any important messages during the transition period.
It’s important to note that forwarded emails will appear as if they were sent directly to your new Gmail account. You can manage and respond to them as you would with any other email in your new account.
In the next section, we’ll discuss how to transfer the sent emails from your old Gmail account to your new account. Stay tuned!
Transferring Sent Emails to Your New Gmail Account
In addition to importing your received emails and contacts, you may want to transfer your sent emails from your old Gmail account to your new account. Follow these steps to ensure a seamless transition:
- Log in to your old Gmail account using your credentials.
- Click on the “Sent Mail” label on the left side of the screen.
- Select the emails you want to transfer by checking the boxes next to them.
- Click on the “More” button at the top of the screen and select “Forward as attachment”.
- Enter your new Gmail account email address in the “To” field.
- Add a subject line to the forwarded email and any additional message if desired.
- Click on the “Send” button to forward the selected sent emails to your new account.
By following these steps, you will send the selected sent emails as attachments to your new Gmail account. You can then access and organize them in your new account’s inbox or any desired folders.
Alternatively, you can also manually forward the sent emails one by one from your old account to your new account. Simply open the desired email, click on the “Forward” button, enter your new email address, and click “Send”. Repeat this process for each sent email you want to transfer.
With your sent emails transferred to your new account, you can easily access and reference them alongside your imported received emails. In the next section, we’ll cover how to move or copy emails from specific folders in your old Gmail account to your new account. Keep reading!
Moving or Copying Emails from Specific Folders in Your Old Gmail Account
If you want to organize your emails in your new Gmail account similar to how they were arranged in your old account, you can move or copy emails from specific folders in your old Gmail account to your new account. Here’s how you can do it:
- Log in to your old Gmail account using your credentials.
- Click on the folder that contains the emails you want to move or copy.
- Select the emails by checking the boxes next to them.
- Click on the “Move to” button at the top of the screen.
- Select “New label” from the dropdown menu.
- Type in the name of the label, which will act as the folder name, and click “Create”.
- Repeat the process for each folder you want to move or copy emails from.
By following these steps, you will create new labels in your old Gmail account for the folders you want to move or copy emails from. Once the labels are created, the selected emails will be moved or copied to those labels.
To access the moved or copied emails from your new Gmail account, follow these steps:
- Log in to your new Gmail account using your credentials.
- On the left side of the screen, click on the “Labels” section.
- Scroll down to find the labels that correspond to the folders you created earlier.
- Click on a specific label to view the emails under that folder.
Once you have accessed the moved or copied emails in your new account’s labels, you can further organize them into folders, apply labels, or even create new folders based on your preferences.
In the next section, we will discuss how to manage labels and filters in your new Gmail account. Stay tuned for more!
Managing Labels and Filters in Your New Gmail Account
In your new Gmail account, you have the flexibility to manage labels and filters to further organize and streamline your emails. Here’s how you can effectively manage labels and filters:
Managing Labels:
- To create a new label, go to your new Gmail account and click on the gear icon in the top right corner, then select “Settings” from the dropdown menu.
- Go to the “Labels” tab.
- Scroll down to the “Labels” section and click on the “Create new label” button.
- Enter a name for the label and click “Create” to save it.
- You can then apply the label to specific emails by selecting the emails and clicking on the “Labels” button at the top of the screen.
- Select the desired label from the dropdown menu to apply it.
Creating Filters:
- To create a filter, again go to the gear icon, select “Settings” and go to the “Filters and Blocked Addresses” tab.
- Click on the “Create a new filter” button towards the bottom of the page.
- Specify the criteria for the filter, such as specific sender, subject, or keywords.
- Click on the “Create filter” button.
- Choose the action you want to apply to the filtered emails, such as automatically applying a label or marking them as important.
- Click on the “Create filter” button to save the filter.
By managing labels and filters in your new Gmail account, you can easily categorize and prioritize your emails. You can create separate labels for different types of emails, such as work, personal, or newsletters, and set up filters to automatically sort incoming emails into the appropriate labels. This will help you stay organized and efficiently manage your inbox.
In the next section, we will discuss how to update your email signatures and settings in your new Gmail account. Keep reading to learn more!
Updating Your Email Signatures and Settings in Your New Gmail Account
As you settle into your new Gmail account, it’s important to update your email signatures and customize the account settings to align with your preferences. Here’s how you can do that:
Updating Email Signatures:
- Log in to your new Gmail account using your credentials.
- Click on the gear icon in the top right corner and select “Settings” from the dropdown menu.
- Go to the “General” tab.
- Scroll down to the “Signature” section.
- Choose where you want your signature to appear (e.g. below new emails or below replies/forwards).
- Enter your desired email signature in the text box.
- You can personalize your signature by adding your name, job title, contact information, or any other details you deem important.
- Use the formatting options to customize the font, color, and style of your signature.
- Click “Save Changes” to save your updated email signature.
Customizing Account Settings:
- While still in the “Settings” menu, you can explore different tabs to customize various account settings based on your preferences.
- In the “General” tab, you can modify your display language, time zone, and default reply behavior.
- In the “Inbox” tab, you can choose the inbox type (e.g. default, important first, or unread first) and enable or disable specific inbox categories.
- In the “Labels” tab, you can control the visibility and display of labels in your account.
- Other tabs like “Filters and Blocked Addresses,” “Forwarding and POP/IMAP,” and “Accounts and Import” offer additional options for managing specific aspects of your account.
By updating your email signatures and customizing the account settings, you can project a professional image, streamline your inbox organization, and tailor your Gmail experience to your specific needs.
In the next section, we will discuss the optional step of deleting your old Gmail account. Read on if you’re interested in permanently removing your old account.
Deleting Your Old Gmail Account (optional)
If you no longer need your old Gmail account and want to remove it from your digital presence, you have the option to delete it. Deleting your old Gmail account is an irreversible process, so please proceed with caution. Follow these steps to delete your old Gmail account:
- Log in to your old Gmail account using your credentials.
- Click on the gear icon in the top right corner and select “Settings” from the dropdown menu.
- Go to the “Accounts and Import” tab.
- Under the “Change account settings” section, click on the “Account and Import” link.
- Scroll down to the “Delete your account or services” section.
- Click on the “Delete products” option.
- You will be prompted to sign in to your old account once again for verification.
- Follow the on-screen instructions and select “Delete a Google service” to proceed.
- Select “Delete a Google Account” to continue with the deletion process.
- Review the information regarding the deletion and the consequences of deleting your account.
- Confirm your decision by entering your password and clicking on the “Delete Account” button.
Once you have deleted your old Gmail account, you will no longer have access to any data associated with that account, including emails, contacts, and files saved in Google Drive. Therefore, it is crucial to back up any important data before proceeding with the deletion.
Please note that deleting your old Gmail account will not affect your new Gmail account or any other Google services you use with separate credentials.
Take the time to consider the implications and make sure you have backed up any important information before deciding to delete your old Gmail account. Once the deletion process is complete, it cannot be undone.
Congratulations on successfully moving or copying your mail from one Gmail account to another! Your new Gmail account is now set up and ready to be your primary email address. Enjoy the benefits of a fresh start with all your important emails and contacts conveniently consolidated in one place!