
What is Autofill?
Autofill is a useful feature available in web browsers that automatically fills in information for you, such as your name, address, email, and credit card details, making it easier to complete online forms. This feature saves you time and effort by eliminating the need to manually enter repetitive information every time you encounter a form on the web.
With Autofill, you can conveniently store and manage your personal information within your browser’s settings. When you encounter a form that requires your details, your browser will prompt you to fill in the information with just a few clicks. This feature is particularly helpful when making online purchases, filling out online applications, or subscribing to newsletters.
Autofill securely stores your information by encrypting it to protect your privacy. The data is typically stored locally on your device and is not shared with any external servers unless you explicitly choose to sync it across multiple devices.
This feature is available in most popular web browsers, including Mozilla Firefox. With Firefox Autofill, you can streamline your online form-filling experience and ensure the accuracy of your information.
Why Manage Autofill Settings?
While Autofill can be a convenient feature, there are several reasons why you may want to manage your Autofill settings in Firefox. Here’s why:
- Security: Managing your Autofill settings allows you to ensure that sensitive information, such as credit card details, is not automatically filled in on every form you encounter. By controlling what information is stored and automatically filled, you reduce the risk of accidentally submitting sensitive data on malicious or untrusted websites.
- Accuracy: Autofill may sometimes complete forms with outdated or incorrect information. By managing Autofill settings, you can review and update your personal details to ensure that the most current and accurate information is filled in when needed.
- Privacy: By managing Autofill settings, you have control over what information is stored and used by your browser. You can choose to disable Autofill for certain categories or disable it entirely if you prefer not to have your information automatically filled in on any form.
- Efficiency: Customizing your Autofill settings can improve your browsing experience by ensuring that only relevant information is stored and filled in. This streamlines the form-filling process, saving you time and reducing the frustration of erasing unnecessary or unwanted autofill suggestions.
- Syncing Across Devices: If you use Firefox across multiple devices, managing Autofill settings allows you to control the synchronization of your Autofill data. By selectively syncing your information, you can ensure that only the necessary details are available on each device, maintaining a consistent experience while protecting your privacy.
By managing your Autofill settings in Firefox, you have greater control over your personal information, enhancing your security, privacy, and overall browsing experience. With a few simple adjustments, you can optimize Autofill to meet your specific needs and preferences.
Accessing Autofill Settings in Firefox
Accessing the Autofill settings in Firefox is a straightforward process. Here’s how you can manage your Autofill settings in Firefox:
- Open the Firefox browser on your computer or device.
- Click on the menu button (represented by three horizontal lines) located in the top-right corner of the browser window. Alternatively, you can press the “Alt” key on your keyboard to temporarily show the menu toolbar.
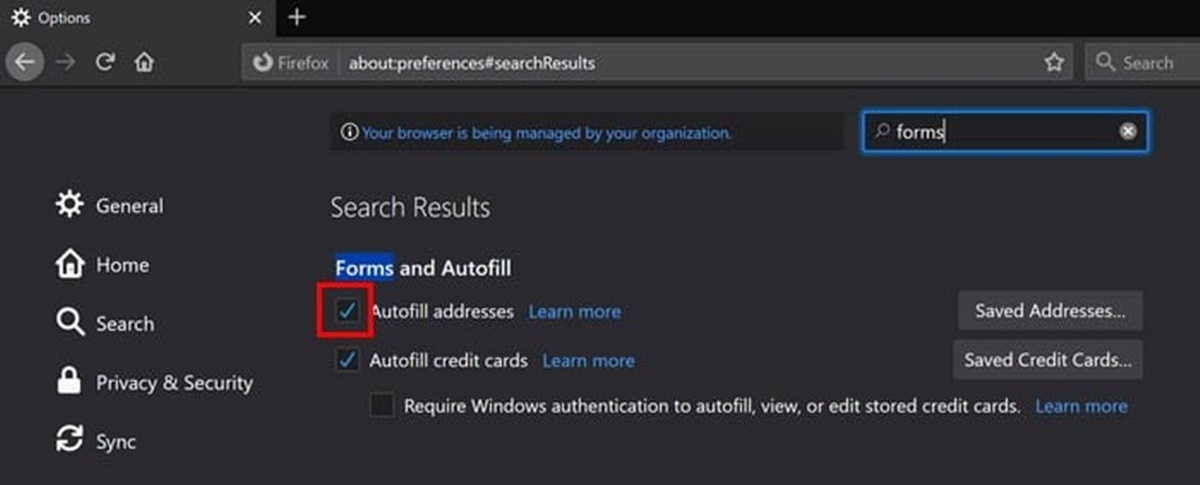
- In the menu, select “Preferences” if you are on a Mac device or “Options” if you are on a Windows device. This will open the settings page.
- In the left sidebar of the settings page, click on “Privacy & Security.”
- Scroll down to the “Forms & Autofill” section.
- Under the “Autofill” section, you will find options to manage various types of Autofill data, such as addresses, credit cards, and logins.
- To access the settings for a specific Autofill category, click on the “Settings” button next to that category.
- Within the Autofill settings for each category, you can enable or disable Autofill, add new entries, edit existing entries, and delete unwanted entries.
- Make the necessary adjustments to your Autofill settings based on your preferences.
- Once you have made changes, close the settings page. Your adjustments will be saved automatically.
By following these steps, you can easily access and customize the Autofill settings in Firefox. Remember to review and adjust these settings periodically to ensure that they align with your preferences and needs.
How to Turn Autofill On or Off
Firefox allows you to easily toggle the Autofill feature on or off based on your preferences. Here’s how you can turn Autofill on or off in Firefox:
- Launch the Firefox browser on your device.
- Click on the menu button (represented by three horizontal lines) located in the top-right corner of the browser window. Alternatively, you can press the “Alt” key on your keyboard to temporarily show the menu toolbar.
- In the menu, select “Preferences” if you are on a Mac device or “Options” if you are on a Windows device. This will open the settings page.
- In the left sidebar of the settings page, click on “Privacy & Security”.
- Scroll down to the “Forms & Autofill” section.
- Under the “Autofill” section, you will find options to manage various types of Autofill data, such as addresses, credit cards, and logins.
- To turn off Autofill completely, toggle the switch next to “Autofill addresses”, “Autofill credit card”, and any other options you wish to disable.
- If you want to enable Autofill, simply toggle the switches next to the desired Autofill categories.
- After making the desired changes, close the settings page. Firefox will save your settings automatically.
By following these steps, you can easily enable or disable the Autofill feature in Firefox based on your preferences. Whether you choose to use Autofill or not, it’s important to regularly review and manage your Autofill settings to ensure they align with your privacy and security needs.
Managing Autofill Data
Managing Autofill data in Firefox allows you to customize the information that is automatically filled in when encountering online forms. Here are some steps to effectively manage your Autofill data in Firefox:
- Open the Firefox browser and access the Autofill settings following the steps mentioned earlier.
- Within the Autofill settings, you will find options for different categories, such as addresses, credit cards, and logins.
- To add new entries, click on the “Add” or “New” button within the relevant category’s settings. Enter the required information, such as name, address, credit card details, or login credentials, and save the entry.
- If you want to edit an existing entry, navigate to the respective category’s settings and locate the entry you wish to modify. Click on the “Edit” or “Update” button, make the necessary changes, and save the updated entry.
- To remove unwanted Autofill entries, go to the respective category’s settings, locate the entry you want to delete, and click on the “Remove” or “Delete” button. Confirm the action to remove the entry from Autofill data.
- If you prefer not to store any Autofill data for a specific category, uncheck the corresponding box in the Autofill settings to disable the feature entirely.
- You can also choose to clear all Autofill data in Firefox by clicking on the “Clear Data” button within the Autofill settings. Be aware that this action will remove all saved Autofill information across all categories.
- If you use Firefox across multiple devices, consider enabling the sync feature to have your Autofill data available on all synced devices. You can toggle the sync options for Autofill data within the Firefox sync settings.
- After making any changes to your Autofill data, close the settings page. The modifications will be saved automatically.
By managing your Autofill data in Firefox, you can ensure that the information being automatically filled in is accurate, up-to-date, and relevant to your needs. Regularly reviewing and maintaining your Autofill data helps you maintain control over your personal information while enhancing your browsing experience.
Removing Autofill Entries
Removing unwanted Autofill entries in Firefox is a simple process that allows you to declutter and manage your saved information. Here’s how you can remove Autofill entries in Firefox:
- Launch the Firefox browser and access the Autofill settings using the steps outlined earlier.
- Within the Autofill settings, you will find options for different categories, such as addresses, credit cards, and logins.
- Identify the category containing the Autofill entry you wish to remove.
- Navigate to the respective category’s settings and locate the unwanted entry you want to delete.
- Click on the “Remove” or “Delete” button next to the entry to initiate its removal.
- Confirm the action when prompted to confirm the deletion of the selected Autofill entry.
- The entry will be permanently removed from your Autofill data, and it will no longer be suggested or automatically filled in on online forms.
- If you have multiple unwanted entries within the same category, repeat the process for each entry to remove them.
- If you want to clear all Autofill data across all categories, you can click on the “Clear Data” button within the Autofill settings. However, be cautious as this action will remove all saved Autofill information in Firefox.
- Close the settings page once you have finished removing the desired Autofill entries. Your changes will be saved automatically.
By regularly reviewing and removing unwanted Autofill entries, you can declutter your saved information in Firefox and ensure that only relevant and accurate data is suggested or automatically filled in on online forms. This helps to maintain the security, privacy, and efficiency of your browsing experience.
Editing Autofill Entries
Editing Autofill entries in Firefox allows you to update and customize the information that is automatically filled in on online forms. Here’s how you can edit Autofill entries in Firefox:
- Open the Firefox browser and access the Autofill settings using the steps mentioned earlier.
- Within the Autofill settings, you will find options for different categories, such as addresses, credit cards, and logins.
- Identify the category containing the Autofill entry you wish to edit.
- Navigate to the respective category’s settings and locate the entry you want to modify.
- Click on the “Edit” or “Update” button next to the entry to access its details.
- Make the desired changes to the information within the entry, such as updating your name, address, credit card details, or login credentials.
- Ensure that the updated information is accurate and up-to-date.
- Save the changes by clicking on the “Save” or “Update” button within the entry’s details.
- The Autofill entry will be updated with the edited information, and it will be automatically filled in on future online forms based on the updated details.
- If you have multiple entries within the same category that require editing, repeat the process for each entry to make the necessary changes.
- Close the settings page once you have finished editing the desired Autofill entries. Your changes will be saved automatically.
By editing your Autofill entries in Firefox, you can ensure that the information being automatically filled in is accurate and reflects your current details. This helps to streamline the form-filling process, saving you time and ensuring the accuracy of your information across different online platforms.
Importing and Exporting Autofill Data
Firefox allows you to import and export your Autofill data, making it easy to transfer your information between devices or backup your data. Here’s how you can import and export Autofill data in Firefox:
- To export your Autofill data, open the Firefox browser and access the Autofill settings using the steps mentioned earlier.
- Within the Autofill settings, you will find options for different categories, such as addresses, credit cards, and logins.
- Click on the category you want to export, and then look for the “Export” or “Save” option.
- Choose a location on your device where you want to save the exported file. Give it a name and click “Save” to generate the export file.
- The export file will contain your Autofill data in a structured format, such as CSV (Comma-Separated Values) or JSON (JavaScript Object Notation), depending on the export option available.
- To import Autofill data, open Firefox on the device where you want to import the data.
- Access the Autofill settings and navigate to the category where you want to import the data.
- Look for the “Import” or “Restore” option and choose the appropriate file from your device that contains the Autofill data.
- Follow the prompts to complete the import process. Firefox will read the imported file and add the Autofill entries accordingly.
- Repeat the above steps for each category you want to import or export Autofill data.
- Once the import or export is complete, close the settings page. Your changes and imported data will be saved automatically.
Importing and exporting Autofill data in Firefox allows you to conveniently transfer your information between devices or create backups of your data. It is a useful feature for those who frequently switch devices or want to ensure they have a copy of their Autofill data in case of data loss or device failure.
Clearing Autofill Data
Clearing Autofill data in Firefox is a simple process that allows you to remove all stored information, ensuring your privacy and keeping your browsing experience clutter-free. Here’s how you can clear Autofill data in Firefox:
- Open the Firefox browser and access the Autofill settings as outlined earlier.
- Within the Autofill settings, you will find options for different categories, such as addresses, credit cards, and logins.
- If you want to clear Autofill data from a specific category, navigate to the respective category’s settings.
- Look for the “Clear Data” or “Remove All” button within the category’s settings and click on it.
- A confirmation prompt will appear, asking if you want to clear the Autofill data for that category. Confirm the action to proceed.
- All the Autofill entries within the selected category will be permanently deleted, and none of the stored information will be suggested or automatically filled in on online forms.
- If you want to clear Autofill data from all categories, look for the “Clear Data” or “Remove All” button within the general Autofill settings.
- Click on the button to initiate the clearing process.
- Confirm the action when prompted to permanently delete all Autofill data in Firefox.
- Once the clearing process is complete, close the settings page. All cleared Autofill data will be permanently removed.
By periodically clearing your Autofill data in Firefox, you can remove outdated or unwanted information, protect your privacy, and ensure that only relevant and accurate data is suggested or automatically filled in on online forms. This also prevents any potential leakage of sensitive information and keeps your browsing experience tidy.