
Change Slide Size in Google Slides
Google Slides is a powerful presentation tool with numerous features that allow you to create visually stunning slides. One important aspect of creating effective presentations is ensuring the correct slide size and orientation. By default, Google Slides is set to landscape orientation, but you can easily change it to portrait orientation to fit your specific needs. Here’s how you can change the slide size in Google Slides:
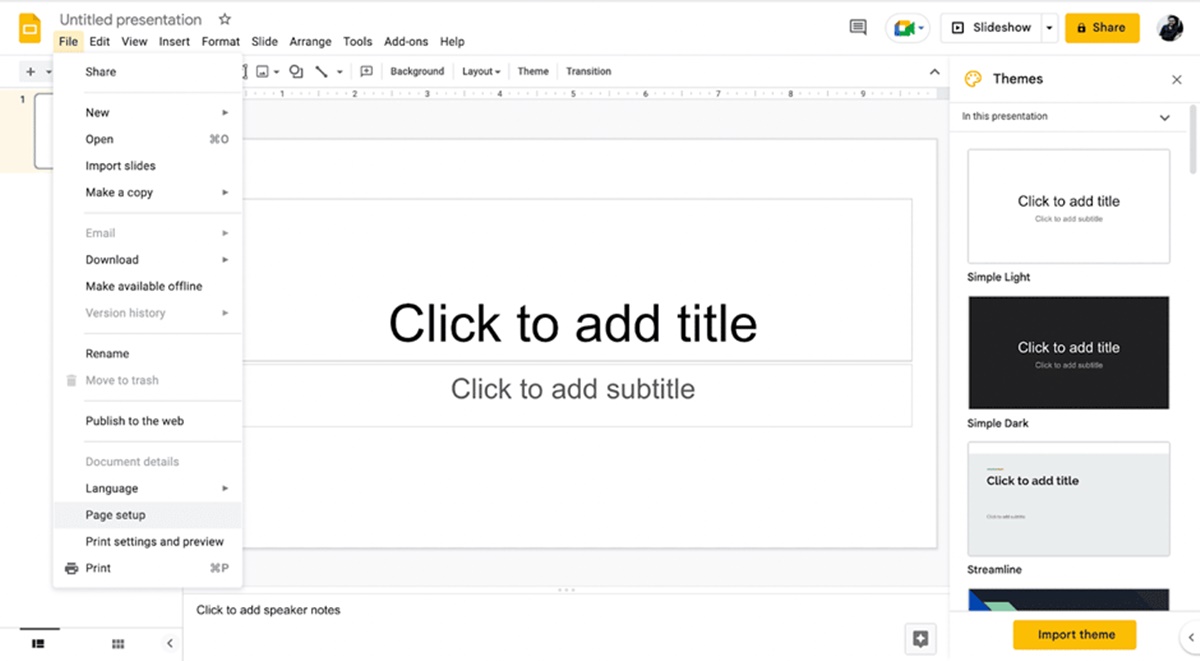
- Open your Google Slides presentation and click on the “File” tab at the top-left corner.
- From the drop-down menu, select “Page setup.”
- A dialog box will appear with various options for page setup. Click on the “Custom” option.
- In the “Width” and “Height” fields, enter the dimensions for your portrait slide. Typically, portrait slides have a width of 8.5 inches and a height of 11 inches.
- Once you’ve entered the dimensions, click on the “Apply” button.
Changing the slide size to portrait orientation allows for a vertical layout, which is ideal for certain types of presentations, such as posters, infographics, or documents that need to be printed in portrait format.
Keep in mind that changing the slide size will affect the layout and formatting of your slides. You may need to adjust the placement and size of text boxes, images, and other elements to ensure they fit within the new dimensions. Additionally, it’s important to consider the visibility of your content when designing portrait slides, as the narrower width may require larger text and more concise information.
Once you have successfully changed the slide size to portrait orientation, you can proceed to customize the layout, reformat text and content, rearrange slide elements, and add images and graphics to create visually appealing portrait slides. Google Slides offers a wide range of tools and options to help you create professional-looking presentations that meet your specific design requirements.
Adjust Slide Orientation to Portrait
When creating a presentation in Google Slides, the default orientation is landscape. However, there may be instances where you want to change the orientation to portrait for a more vertical layout. Adjusting the slide orientation in Google Slides is a simple process. Here’s how you can do it:
- Open your Google Slides presentation.
- Click on the “File” tab at the top-left corner of the screen.
- From the drop-down menu, select “Page setup.”
- A dialog box will appear with different options for page setup. Select the “Custom” option.
- In the “Orientation” section, choose “Portrait.”
- Click the “Apply” button to apply the changes to your presentation.
Once you’ve adjusted the slide orientation to portrait, each slide in your presentation will be displayed vertically instead of horizontally. This can be particularly useful when creating presentations that need to be printed, such as posters or handouts, as the portrait orientation is better suited for these formats.
Keep in mind that changing the slide orientation may affect the layout and arrangement of the content on your slides. It’s important to review your slides after adjusting the orientation to ensure that all elements, such as text boxes, images, and graphics, remain correctly positioned and readable. You may need to make adjustments to ensure the content fits well within the vertical layout.
With the ability to adjust slide orientation in Google Slides, you have the flexibility to create presentations that best suit your specific needs and design preferences. Whether you’re presenting on a screen or printing your slides, changing the orientation to portrait can enhance the visual impact and readability of your presentation.
Customize the Layout for Portrait Orientation
When you change the slide orientation to portrait in Google Slides, it’s important to customize the layout to optimize the visual impact and readability of your presentation. Here are some tips on how to customize the layout for portrait orientation:
- Resize Text and Graphics: With the narrower width in portrait orientation, you may need to resize text boxes and graphics to fit within the new layout. Make sure the text remains readable and the graphics are appropriately sized to maintain clarity and visual appeal.
- Consider Hierarchy: In portrait orientation, you may have limited horizontal space to work with. Prioritize your content and consider the hierarchy of information. Use headings, subheadings, and bullet points to clearly indicate the main points of your presentation.
- Whitespace and Margins: Utilize whitespace and margins effectively to create a balanced and aesthetically pleasing layout. Give your content room to breathe and avoid overcrowding the slide with too much text or graphics.
- Columns and Grids: Divide the slide into columns or grids to better organize your content. This can help create visual structure and make it easier for the audience to follow along with your presentation.
- Consistency: Maintain consistency in your layout across all slides to create a cohesive and professional-looking presentation. Keep fonts, colors, and formatting consistent throughout to ensure a polished and unified visual design.
By customizing the layout for portrait orientation, you can make the most of the vertical space available and create a visually appealing presentation. Remember to regularly review and adjust the layout of your slides as you add or modify content to ensure everything aligns properly and remains visually engaging.
Google Slides provides a user-friendly interface that makes customizing the layout for portrait orientation a breeze. With a few simple adjustments, you can create a presentation that effectively conveys your message and captivates your audience.
Reformat Text and Content for Vertical Display
When working with portrait orientation in Google Slides, it’s essential to reformat your text and content to ensure optimal visibility and readability. Here are some key considerations to keep in mind when reformatting for vertical display:
- Font Size: As the width of the slide decreases in portrait orientation, it’s important to increase the font size to maintain readability. Choose a font size that is clear and legible, even from a distance.
- Text Alignment: Adjust the text alignment to suit the vertical layout. Consider using left alignment for large blocks of text to ensure a smooth reading experience. Center-aligning titles and headings can also create a visually appealing effect.
- Line Length: Be mindful of the line length when reformatting text for a vertical display. Long lines of text can be overwhelming, so aim for shorter line lengths to enhance readability.
- Bullet Points: Use bullet points to break down information and make it easier to digest. This helps to reduce lengthy paragraphs and present information in a concise and organized manner.
- Captions and Labels: If your slides contain images, graphics, or diagrams, ensure that captions and labels are positioned appropriately and are clearly visible. This helps to provide context and allows the audience to understand the visuals more easily.
- Whitespace: Incorporate whitespace strategically to create a clean and uncluttered appearance. Whitespace can enhance readability and draw attention to key content. Be selective about the amount of text and graphics you include on each slide.
By reformatting the text and content for vertical display, you optimize the presentation’s legibility and visual appeal. This ensures that your audience can easily follow along and understand the information you’re presenting.
Google Slides offers a wide range of formatting options to help you achieve the desired vertical layout. Experiment with different font styles, sizes, and text arrangements to find the combination that best suits your presentation and enhances its overall impact.
Rearrange Slide Elements for Portrait Alignment
When working with portrait alignment in Google Slides, it’s important to rearrange slide elements to ensure optimal arrangement and visual coherence. Here are some key steps to consider when rearranging slide elements for portrait alignment:
- Textboxes: Review the placement of textboxes on each slide and adjust them as needed. Since the vertical space is more limited in portrait alignment, relocating textboxes closer to the top or bottom of the slide can help create a more balanced and visually pleasing composition.
- Graphics and Images: Examine the positioning of graphics and images on your slides. Resize them, if necessary, to fit within the narrower width of the slide. Consider placing visuals on one side of the slide to create a visually appealing balance with the text.
- Headers and Footers: Assess the placement of headers and footers to ensure they are appropriately positioned for the portrait alignment. Depending on your design preferences, you may choose to place headers at the top or bottom of the slide, or eliminate them altogether for a cleaner look.
- Charts and Graphs: If your presentation includes charts or graphs, reposition them so they fit within the vertical layout. Consider resizing or adjusting the orientation of the charts and graphs to maintain readability and clarity.
- Callouts and Annotations: Take a closer look at any callouts or annotations you have added to your slides. Make sure they are correctly positioned and do not interfere with the overall visual flow of the slide. Adjust their placement if needed.
- Slide Order: As you rearrange elements, also consider the sequence and order of the slides in your presentation. Ensure that the flow of information makes sense and leads the audience through your content in a logical manner.
By rearranging slide elements for portrait alignment, you create a visually balanced and harmonious presentation. This allows your audience to easily follow the content and enhances the overall impact of your message.
Google Slides provides a variety of tools and options to assist in rearranging slide elements. Take your time to experiment with different placements and alignments to find the arrangement that best suits your presentation goals and design preferences.
Add Images and Graphics for Portrait Slides
Visuals play a crucial role in enhancing the impact and engagement of your presentation. When working with portrait slides in Google Slides, incorporating relevant images and graphics can further elevate your content. Here are some steps to consider when adding images and graphics for portrait slides:
- Select High-Quality Images: Choose high-resolution images that are clear, crisp, and visually appealing. High-quality visuals make a significant difference in the overall look and professionalism of your presentation.
- Resize Images: Adjust the size of your images to fit within the narrower width of portrait slides. Ensure that the images are appropriately sized and do not overpower the slide or compromise its readability.
- Position Images: Experiment with the placement of images within the slide. Consider placing images on one side, leaving space for text on the other side. This creates a visually balanced composition and enhances the visual impact of both the image and the accompanying text.
- Use Icons and Illustrations: Icons and illustrations can be a great way to visually represent concepts or ideas. Google Slides offers a wide range of icons and illustrations that you can easily insert into your slides. Choose icons and illustrations that are relevant to your content and help support your message.
- Create Infographics: Infographics are an effective way to present complex information in a visually compelling manner. Utilize graphs, charts, and diagrams to convey data or statistics. Make sure the infographics are concise, clear, and easy to understand.
- Consider Background Images: Incorporating a background image can add depth and visual interest to your slides. Choose a background image that complements your content and does not distract from the main message.
Adding images and graphics to your portrait slides can enhance the visual appeal of your presentation and make it more memorable. They help to break up text-heavy slides and provide a visual representation of your ideas.
With Google Slides, you have access to a wide array of tools and resources to seamlessly incorporate images and graphics into your presentation. Take advantage of these resources to create visually stunning portrait slides that captivate your audience.
Use Templates and Themes for Portrait Presentations
Google Slides offers a variety of pre-designed templates and themes that can greatly simplify the process of creating portrait presentations. These templates and themes provide a professional and cohesive design, allowing you to focus on the content of your presentation. Here’s how you can make the most of templates and themes for portrait presentations:
- Explore Template Gallery: Open Google Slides and navigate to the Template Gallery. Browse through the available templates and select a design that aligns with your presentation’s tone and purpose. Look for templates specifically designed for portrait presentations.
- Customize Theme Colors: Once you’ve selected a template or theme, you can customize the colors to match your branding or personal preference. This ensures that your presentation maintains a consistent visual identity.
- Modify Fonts and Typography: Fonts play a crucial role in setting the mood and readability of your presentation. Customize the font styles and sizes to ensure optimal legibility and aesthetic appeal. Choose fonts that complement the theme and align with your presentation’s tone.
- Apply Layouts and Placeholder Content: Templates often come with pre-designed layouts and placeholder content. Replace the placeholder content with your own text, images, and graphics. Utilize the different slide layouts provided to enhance the organization and flow of your presentation.
- Add Personal Touches: While templates offer a great starting point, don’t be afraid to add your personal touches. Incorporate your own images, diagrams, and illustrations to make the presentation unique and aligned with your specific message.
- Preview and Fine-tune: After customizing the template and adding your content, preview your presentation to ensure it looks cohesive and visually appealing. Make any necessary adjustments to optimize the overall design and flow of your portrait presentation.
Using templates and themes for your portrait presentations not only saves time but also ensures a polished and professional look. They provide a solid foundation on which to build your presentation, allowing you to focus on the content and delivery.
Google Slides offers a wide range of templates and themes that cater to various presentation needs. Explore the available options, customize them to your specifications, and create stunning portrait presentations that captivate your audience.
Print and Present Your Portrait Google Slides
Once you have finalized your portrait Google Slides presentation, you may want to print it out or present it in a physical format. Here are some important steps to consider when printing and presenting your portrait Google Slides:
- Print Settings: Before printing, review and adjust the print settings to ensure the best results. Set the paper size to match your desired output, typically 8.5 x 11 inches for portrait orientation. Check the print quality, orientation, and other settings to ensure your slides print exactly as intended.
- Proofreading: Before printing, thoroughly proofread your slides for any spelling or grammatical errors. Ensure that all text, images, and graphics are properly aligned and positioned.
- Handouts: If you plan to distribute handouts to your audience, consider adjusting the layout to include multiple slides per page. This reduces paper usage and allows for easier note-taking.
- Printing Options: Depending on your preference, you can print your slides in color or black and white. Consider the cost and impact of color printing when making your decision.
- Slide Order: Check the order of your slides before printing to ensure they align with the flow and structure of your presentation. Confirm that any section breaks or transitions are accurately reflected.
- Formatting Considerations: Keep in mind that the way your slides appear on a screen may slightly differ when printed. Double-check that all content, images, and graphics appear as intended and are properly aligned and formatted.
- Presenting in Person: If you plan to present your portrait Google Slides in person, consider using a digital device or a projector to display your slides on a larger screen. Test the setup beforehand to ensure compatibility and smooth presentation.
- Backup Copies: Always keep backup copies of your digital presentation and printed slides. This ensures that you have a spare set of slides in case of any technical issues or unexpected circumstances.
By following these steps, you can ensure that your portrait Google Slides translate well into a printed format or a live presentation. Remember to thoroughly review your slides before printing or presenting to make sure everything looks and reads as intended.
Whether you choose to print your slides or present them digitally, the goal is to effectively communicate your message and engage your audience. With portrait Google Slides, you have the flexibility to adapt your presentation for a variety of settings.